
Popular categories
Looking for a yarn?


Comments / Questions (55)
![]() Mette Bruun wrote:
Mette Bruun wrote:
Hej..det var er en fejl jeg havde talt forkert 1 gang og strikket forkert beklage
07.02.2026 - 14:29
![]() Mette Bruun wrote:
Mette Bruun wrote:
Hvis man skal starte med at slå 88 måske op til en str. m og så strikke 2 ret 2 vrang på lille rundpind så starter man omgangen med 2 ret og slutter med 2 ret; altså har man 4 ret i samlingen…..eller hvad er det jeg misser
07.02.2026 - 14:19DROPS Design answered:
Hei Mette. Så bra du fant du at det , håper du fikk strikket mye i helga :) mvh DROPS Design
09.02.2026 - 15:14
![]() Susan wrote:
Susan wrote:
Oh ik snap het al, ik heb de extra opgezette steken niet meegeteld, ik dacht dat die bij die mouw hoorde. Maar dan komt het wel uit.
21.11.2025 - 08:52
![]() Susan wrote:
Susan wrote:
Staat er een fout in het aantal steken bij het verdelen van lijf en mouwen? Aan het begin van het patroon bij LIJF staat dat maat M 150 steken moet hebben bij het lijf, maar als je naar het aantal steken kijkt in de alinea ervoor en die optelt is dat voor het lijf 138. Als het lijf 150 steken zou hebben zou je met de 2 mouwen uitkomen op 108 steken (plus 150 is 258 steken, maar voor je gaat verdelen heb je 246 steken bij maat M).
19.11.2025 - 16:22DROPS Design answered:
Dag Susan,
Dat verschil van 12 steken klopt, want je zet ook 6 steken op onder de mouw aan elke kant.
22.11.2025 - 09:14
![]() Bernike Pasveer wrote:
Bernike Pasveer wrote:
Ik heb net een vraag over dit patroon gesteld, maar daar staat een fout in: de lengte van de pas is wél correct. Hij is 6 cm breder dan staat aangegeven, en het lijf (vanaf A2) is veel te smal, maar het aantal steken is wel zoals het patroon aangeeft.
16.03.2025 - 11:25DROPS Design answered:
Dag Bernike,
Heb je gecontroleerd of de stekenverhouding in de breedte klopt? Als dat het geval is en je hebt het juiste aantal steken op de naald staan voor het lijf, dan zou het goed moeten komen.
16.03.2025 - 19:51
![]() Bernike Pasveer wrote:
Bernike Pasveer wrote:
Ik brei maat M. Mijn stekenproef klopt. Maar de breedte van de pas is 50 cm (niet 40), de lengte ervan (dus als ik A1 afheb) is 4 cm te weinig, en nadat ik de steken voor de mouwen op een hulpdraad heb gezet meet het lijf (ondanks te te brede pas) nog maar 37 cm in de breedte; dus de omtrek is dan maar 74. Waar gaat/ging het fout? Na A1 heb ik de mouwsteken op een hulpdraad gezet en ben verder gegaan met A2.
16.03.2025 - 11:17
![]() Clémence wrote:
Clémence wrote:
Bonjour, est-ce normal que le nombre de pelotes pour la taille S n'est que de 5 ? En comparaison la même laine drops air compte 8 pelotes pour un autre pull de cette taille (modèle moonlit moutain). Merci, Clémence
15.09.2024 - 18:07DROPS Design answered:
Bonjour Clémence, le modèle que vous citez est plus large et plus long, il faudra donc davantage de laine; pensez à bien vérifier votre tension et surtout à bien conserver ensuite la même tension tout du long, lors de la réalisation. Bon tricot!
16.09.2024 - 09:28
![]() Anette wrote:
Anette wrote:
Hallo, wo beginnt der Rapport , bzw. der Anfang der Reihe beim Ärmel? LG Anette
31.07.2024 - 16:15DROPS Design answered:
Liebe Anette, die Runden beginnen bei der Passe an der hinteren Mitte. Viel Spaß beim Stricken!
01.08.2024 - 08:34
![]() Anita wrote:
Anita wrote:
Hei. Hva betyr PIL? Står det i mønsteret. Hilsen Anita
16.07.2024 - 22:23
![]() Heather wrote:
Heather wrote:
I am confused about when to mark out the sleeves. I am doing the large size, and I am reading the pattern to start the sleeves after the A.2 chart is completed in height. But looking at the photos, that's the end of colour work. Help please? Thanks!
21.01.2024 - 19:15DROPS Design answered:
Dear Heather, you divide yoke on last round in A.1 then work A.2 on body but work A.3 on sleeves. Then after diagrams have been worked, just continue in stocking stitch. Happy knitting!
22.01.2024 - 10:27
|
|||||||||||||||||||
Bardu#bardusweater |
|||||||||||||||||||
 |
 |
||||||||||||||||||
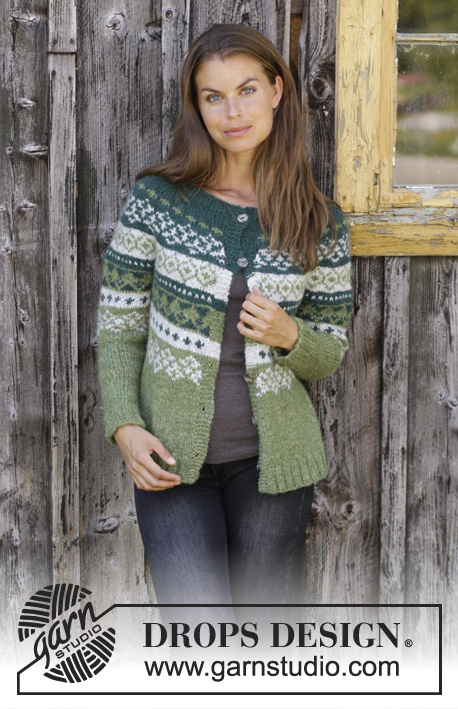
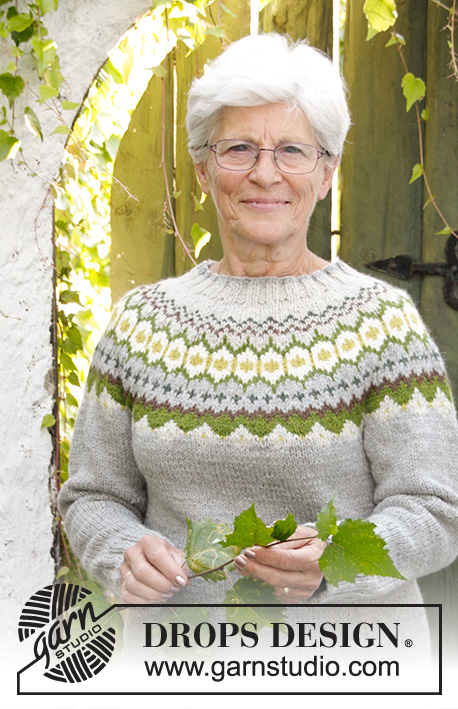
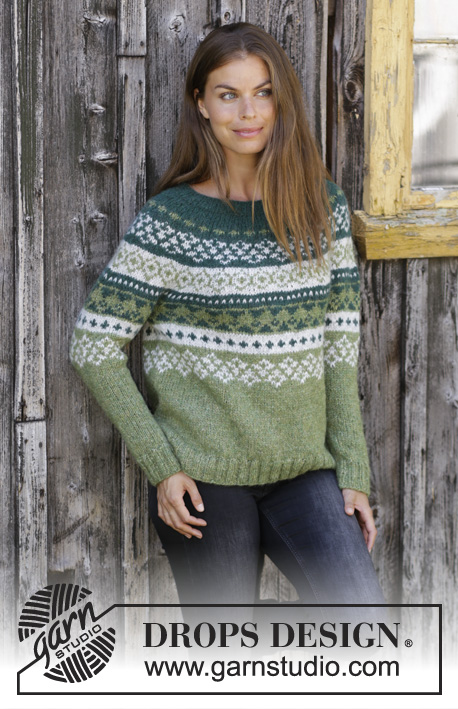
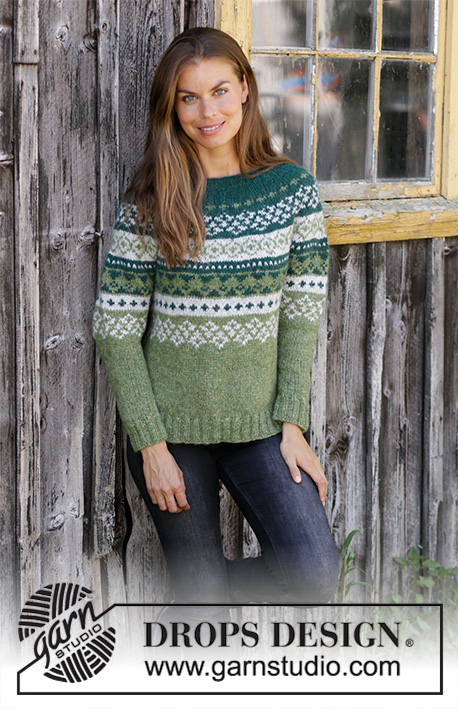
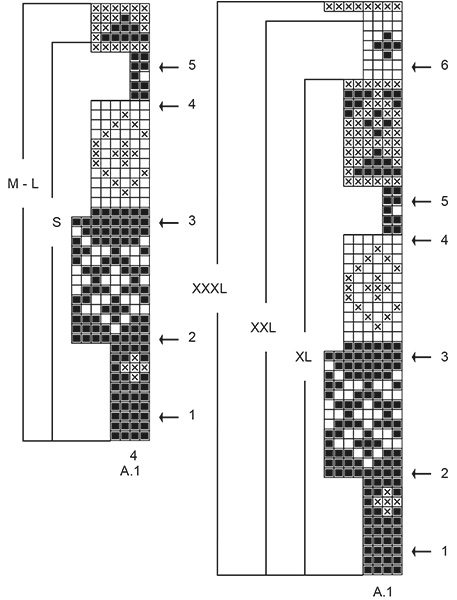
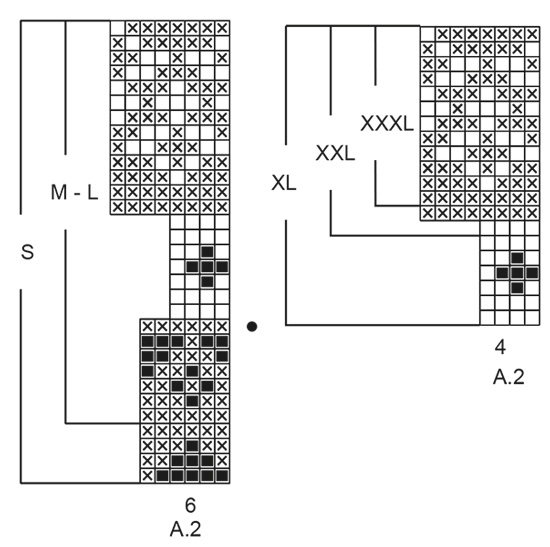
Knitted jumper with round yoke in DROPS Air. The piece is worked top down with Nordic pattern. Sizes S - XXXL.
DROPS 196-9 |
|||||||||||||||||||
|
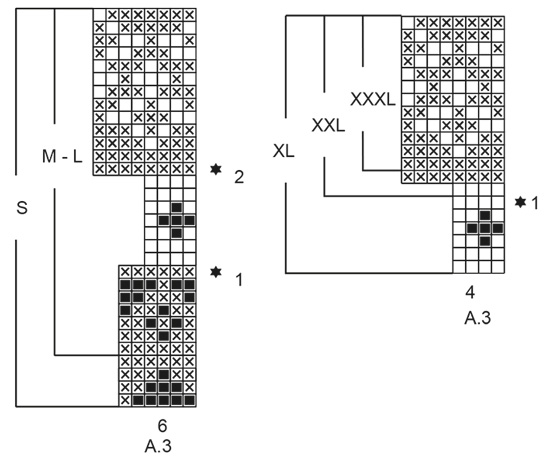
EXPLANATIONS FOR THE PATTERN: ------------------------------------------------------- PATTERN: See diagrams A.1 to A.3. Find your size in the diagrams. The whole pattern is worked in stocking stitch. KNITTING TIP-1: To avoid the knitting tension becoming tighter when working pattern it is important that the strands at the back of the piece are not tight. You can use a larger needle size when working pattern if this is a problem. KNITTING TIP-2: It is important that the knitting tension is maintained also in height, or the yoke will be too short and the armholes too small! Check the tension as you go and if it is right in width but not in length, you can work extra rows with forest green after the 2nd and/or the 3rd rows with increases (row with arrow) to get the right length for your size. INCREASE TIP-1 (evenly spaced): To work out how to increase evenly, count the total number of stitches on the needle (e.g. 84 stitches) and divide by the number of increases to be made (e.g. 20) = 4.2. In this example, increase by making 1 yarn over after approx. each 4th stitch. On the next round knit the yarn overs twisted to avoid holes. INCREASE TIP-2 (for sides of body): Work until there are 2 stitches left before the marker thread, 1 yarn over, knit 4 (marker thread sits in the middle of these 4 stitches), 1 yarn over (= 2 stitches increased). On the next round knit the yarn overs twisted to avoid holes. DECREASE TIP-1 (evenly spaced): To work out how to decrease evenly, count the total number of stitches on the needle (e.g. 54 stitches) and divide by the number of decreases to be made (e.g. 2) = 27. In this example, decrease by knitting each 26th and 27th stitch together. DECREASE TIP-2 (for sleeves): Decrease 1 stitch on each side of the marker thread as follows: Work until there are 3 stitches left before the marker thread, knit 2 together, knit 2 (marker thread sits in the middle of these 2 stitches), slip 1 stitch as if to knit, knit 1 and pass the slipped stitch over the knitted stitch (= 2 stitches decreased). ------------------------------------------------------- START THE PIECE HERE: ------------------------------------------------------- JUMPER - SHORT OVERVIEW OF THE PIECE: The piece is worked in the round with circular needle, from mid back and top down. The sleeves are worked in the round with double pointed needles/short circular needle, top down. JUMPER: NECK: Cast on 84-88-92-100-104-108 stitches with short circular needle size 4.5 mm and forest green. Knit 1 round. Now work rib (knit 2, purl 2) until the rib measures 4 cm. YOKE: Change to short circular needle size 5.5 mm. Now knit 1 round where you increase 20-20-24-24-28-28 stitches evenly on round – read INCREASE TIP-1 = 104-108-116-124-132-136 stitches. Knit 1 round. Now work pattern A.1 (find your size in the diagram) in the round and increase stitches evenly on the rounds marked with an arrow in the diagram. REMEMBER THE KNITTING TENSION! Read KNITTING TIP-1 and KNITTING TIP-2! ARROW-1: Increase 24-28-32-32-32-32 stitches evenly on round = 128-136-148-156-164-168 stitches. ARROW-2: Increase 32-32-36-36-36-40 stitches evenly on round = 160-168-184-192-200-208 stitches. ARROW-3: Increase 32-36-38-36-40-44 stitches evenly on round = 192-204-222-228-240-252 stitches. ARROW-4: Increase 24-30-30-30-30-36 stitches evenly on round = 216-234-252-258-270-288 stitches. ARROW-5: Increase 6-12-24-30-30-36 stitches evenly on round = 222-246-276-288-300-324 stitches. When the increases on the round marked with arrow-5 are finished, continue as follows in the different sizes: Sizes S, M, L and XL: Continue until there is 1 round left in the diagrams. The piece should now measure 25-27-27-30 cm from the cast-on edge down. Sizes XXL and XXXL: Continue with pattern as before and increase as follows: ARROW-6: Increase 28-28 stitches evenly on round = 328-352 stitches. When the increases on the round marked with arrow-6 are finished, continue until there is 1 round left in the diagrams. The piece should now measure 33-34 cm from the cast-on edge down. ALL SIZES: Work the last round in the diagrams as follows: Work the first 31-34-39-42-48-52 stitches (= half back piece), place the next 48-54-60-60-68-72 stitches on a thread for sleeve, cast on 6-6-6-8-8-8 new stitches on the needle (= in side under sleeve), work the next 63-69-78-84-96-104 stitches (= front piece), place the next 48-54-60-60-68-72 stitches on a thread for sleeve, cast on 6-6-6-8-8-8 new stitches on the needle (= in side under sleeve), work the remaining 32-35-39-42-48-52 stitches (= half back piece). THE PIECE IS NOW MEASURED FROM HERE! BODY: = 138-150-168-184-208-224 stitches. Now work pattern as follows: Work A.2 (find your size in diagram) in the round. The pattern on the body should match the pattern on the yoke so that each repeat of A.2 is over each repeat of A.1! In sizes S and M increase 6-2 stitches evenly on the row marked with a black dot in A.2 (do not increase in sizes L, XL, XXL and XXXL) = 144-152-168-184-208-224 stitches. When A.2 has been completed in height continue with moss green and stocking stitch. Now insert 1 marker thread in each side as follows: Insert the first marker thread after the first 36-38-42-46-52-56 stitches, then the second marker thread after the next 72-76-84-92-104-112 stitches. There are 36-38-42-46-52-56 stitches left on the round after the second marker thread. On the next round increase 2 stitches in each side (= 4 stitches increased on the row) - read INCREASE TIP-2. Increase like this every 4-2-3-4-5-6 cm a total of 2-4-4-4-3-3 times = 152-168-184-200-220-236 stitches. When the piece measures 24-24-26-25-24-25 cm increase 24-28-28-32-36-36 stitches evenly on round = 176-196-212-232-256-272 stitches. Change to circular needle size 4.5 mm. Work rib (knit 2, purl 2). When the rib measures 6 cm cast off with knit over knit and purl over purl; but to avoid the cast off edge being tight you can make 1 yarn over after each 4th stitch (yarn overs cast off as normal stitches). The piece measures approx. 58-60-62-64-66-68 cm from the shoulder down. SLEEVE: Place the 48-54-60-60-68-72 stitches from the thread on the one side of the piece on double pointed needles/short circular needle size 5.5 mm and knit up 1 stitch in each of the 6-6-6-8-8-8 new stitches cast on under the sleeve = 54-60-66-68-76-80 stitches. Insert a marker thread mid under sleeve, i.e. in the middle of the 6-6-6-8-8-8 stitches cast on under sleeve. Let marker thread follow in piece, it is used for the decrease under the sleeve. Continue in the round with A.3 (find your size in the diagram). NOTE (applies to sizes S, M and L): Because the yoke was finished in the middle of a pattern repeat, it is important that the pattern on the sleeve matches the pattern on the yoke so that each repeat of A.3 is over each repeat of A.2! Make sure that you start on the right stitch in the diagram so that the pattern fits around the whole sleeve. Now work as follows in the different sizes: Sizes S, M and L: On the first round with a star in A.3 decrease 2-4-2 stitches evenly – read DECREASE TIP-1 and on the second round with a star decrease 4-8-8 stitches evenly = 48-48-56 stitches. Sizes XL, XXL and XXXL: On the round with a star in A.3 decrease 4-4-0 stitches evenly – read DECREASE TIP-1 = 64-72-80 stitches. When A.3 has been completed, continue with stocking stitch and moss green. On the next round start to decrease under the sleeve - read DECREASE TIP-2. Decrease like this approx. every 2-2-1-1-1-1 cm a total of 7-7-10-13-16-19 times = 34-34-36-38-40-42 stitches. When the sleeve measures 34-32-33-30-27-27 cm from the division, knit 1 round where you increase 6-6-8-6-8-10 stitches evenly = 40-40-44-44-48-52 stitches. Change to double pointed needles size 4.5 mm. Work rib (knit 2 /purl 2) for 6 cm. Cast off with knit over knit and purl over purl. The sleeve measures approx. 40-38-39-36-33-33 cm. Work the other sleeve in the same way. |
|||||||||||||||||||
Diagram explanations |
|||||||||||||||||||
|
|||||||||||||||||||
 |
|||||||||||||||||||
 |
|||||||||||||||||||
 |
|||||||||||||||||||
 |
|||||||||||||||||||
Have you finished this pattern?Tag your pictures with #dropspattern #bardusweater or submit them to the #dropsfan gallery. Do you need help with this pattern?You'll find 26 tutorial videos, a Comments/Questions area and more by visiting the pattern on garnstudio.com. © 1982-2026 DROPS Design A/S. We reserve all rights. This document, including all its sub-sections, has copyrights. Read more about what you can do with our patterns at the bottom of each pattern on our site. |
|||||||||||||||||||


With over 40 years in knitting and crochet design, DROPS Design offers one of the most extensive collections of free patterns on the internet - translated to 17 languages. As of today we count 324 catalogues and 12290 patterns translated into English (UK/cm).
We work hard to bring you the best knitting and crochet have to offer, inspiration and advice as well as great quality yarns at incredible prices! Would you like to use our patterns for other than personal use? You can read what you are allowed to do in the Copyright text at the bottom of all our patterns. Happy crafting!
Post a comment to pattern DROPS 196-9
We would love to hear what you have to say about this pattern!
If you want to leave a question, please make sure you select the correct category in the form below, to speed up the answering process. Required fields are marked *.