
Popular categories
Looking for a yarn?


Comments / Questions (84)
![]() Ann-Karin wrote:
Ann-Karin wrote:
Eg Had tenkt å strikke meg ei slik jakke men K andre fargar, kva fargekombinasjoner vil dokke anbefale til brun eller blå jakke ? Kan vel ikkje ha naturfarge som tråd nr 2 då?
19.04.2019 - 11:48DROPS Design answered:
Hei Ann-Karin. Her er det ingen fasitsvar, dette går helt på smak og behag. Hvis fargen du velger er relativtlys kan en naturhvit tråd passe (og da duse ned fargen), men om du har en mørk farge vil det bli en tydligere kontrast mellom trådene. Det finnes flere nyanser av både brun og blå i begge kvalitetene (fra lys til mørk). Så her er det bare å mixe og matche som du selv ønsker. Det beste er nok å gå i en butikk så du får sett garnene ved siden av hverandre, om du har mulighet til det. God fornøyelse
25.04.2019 - 13:41
![]() Kari Mette wrote:
Kari Mette wrote:
Hei. Jeg ønsker å stikke denne jakken i rødt, men er usikker på hvilke farge i alpaca som matcher kid silk best??
17.04.2019 - 09:29DROPS Design answered:
Hei Kari Mette. Om du vil strikke i rød burde du bruke en rød kid-silk også, natur vil nok da bli en for stor kontrast (hvis du ønsker at plagget skal være mest mulig jevn i fargen da). Kid-silk farge 32 feks, passer fint sammen med de fleste mørkere røde, og mer rød-rosa Alpaca-fargene (som feks 3650, 3900, 2922). Om du ønsker en veldig sterk rød kan du vurdere Alpaca 3620 og Kid silk 14. Her er det egentlig ikke noe fasitsvar, det beste er nok å besøke en butikk der du kan se på begge kvalitetene sammen, hvis du har mulighet til det. God fornøyelse
23.04.2019 - 15:01
![]() Marcia wrote:
Marcia wrote:
Hi. Do you have a single thread yarn that I could substitute for the 3 threads the pattern calls for? I'd prefer not alpaca because it makes me itch!
04.04.2019 - 00:47DROPS Design answered:
Hi Marcia! You should try DROPS Melody (1 single thread): 71% Alpaca, 25% Merino Wool, 4% Polyamide. It is very soft and light. Happy knitting!
04.04.2019 - 08:20
![]() Lavedan wrote:
Lavedan wrote:
Bonjour\\r\\nPour le début de l empiècement,il faut répéter le motif A1 au dessus des 15 mailles .Mais nous avons 16 mailles. Si on commence par une maille endroit on finit alors par 2 mailles endroit?\\r\\nJe vous remercie de m’éclairer sur ce point .\\r\\nBonne journée
05.03.2019 - 15:06DROPS Design answered:
Bonjour Mme Lavedan! Il faut répéter A.1 seulement au-dessus des 15 mailles suivantes (en commençant et en terminant par 1 maille endroit): on commence par 1 maille endroit, 1 maille envers, etc, et on termine par 1 maille envers, 1 maille endroit. Ensuite il faut faire 1 jeté, tricoter 2 mailles jersey (le fil marqueur est entre ces 2 mailles), et travailler comme on voit dans les explications. Bon tricot!
05.04.2019 - 22:33
![]() POnchaux Claude wrote:
POnchaux Claude wrote:
Comment dois faire pour mettre un modèle dans mes favoris ? Merci
17.02.2019 - 09:19DROPS Design answered:
Bonjour Mme Ponchaux, juste à côté de l'icône pour imprimer les explications, vous avez un petit bouton "♥ Ajouter à mes favoris", cliquez là et ajoutez votre adresse mail pour conserver ce modèles dans vos favoris. Bon tricot!
18.02.2019 - 10:01
![]() Anaïs wrote:
Anaïs wrote:
Je voudrais faire une remarque, voire signaler une petite erreur. À la fin du dos/devant, il est écrit de "tricoter le rang suivant ainsi sur l'envers: 4 m au point mousse, *1 m end, 2 m env*, répéter de *-* jusqu'à ce qu'il reste 5 mailles, 1 m env et 4 mailles au point mousse. Or il me semble que c'est plutôt *1 m env, 2 m end*. Cependant, mille mercis pour ce ravissant modele que je viens de terminer.
07.02.2019 - 00:34DROPS Design answered:
Bonjour Anaïs et merci, nos stylistes vont probablement corriger les côtes. Bon tricot!
07.02.2019 - 10:36
![]() Sharon wrote:
Sharon wrote:
Oh! I need to do another swatch in that case, perhaps I mis measured or made the water too warm, it was warm, not luke warm. Thanks for your advice.
28.11.2018 - 14:18
![]() Sharon wrote:
Sharon wrote:
Hello there, Id like to a about shrinkage? Is the measurement on the chart before washing? My gauge swatch shrunk from 14sts to 13 after washing using merino and 2 strands kid-silk. I feel very unsure about how to proceed except to just knit a size bigger, (is that the best thing to do?) but then I wont know if it fits untill Ive washed it. As an aside, does the recomended Alpaca yarn shrink? I noticed no mention of how to account for shrinkage in any other pattern of yours that I read.
27.11.2018 - 22:40DROPS Design answered:
Dear Sharon, In our experience neither of the yarns you mention (merino, Kid Silk or the Alpaca) should shrink with proper care. Be careful to follow the directions for washing pinted on the bands / lavels. Do not wash these yarns in the washing machine, use only lukewarm water, and the wash should be more like rinse, without too much moving around the piece. Happy Knitting!
28.11.2018 - 03:49
![]() Maud T wrote:
Maud T wrote:
Bonjour. Je viens de terminer ce gilet en taille XL. Je l'ai réalisé en mélody (brouillard) associée à glitter (argent). Je l'ai tricoté au point de riz, je l'ai rallongé de 5 cm environ et j'ai fait des manches longues. Je n'ai pas mis de boutonnières. Pour les tricoteuses que cela pourrait intéresser, j'ai utilisé 4,5 pelotes de Drops Mélody. Et oui, seulement 4,5 !
18.10.2018 - 08:40
![]() Anais wrote:
Anais wrote:
Bonjour, Je suis en train de faire ce modele, mais j'ai un problème de comprehension pour les diminutions sous les bras : vous indiquez 4 diminutions par rang, mais les explications au-dessus expliquent une diminution d'une maille au niveau d'un marqueur, et je n'ai que 2 marqueurs sur mon gilet ? (Une dans chaque groupe de 5 mailles ajoutées au niveau des manches.)
15.10.2018 - 19:31DROPS Design answered:
Bonjour Anaïs, vous allez effectivement diminuer à chacun de ces 2 marqueurs sous les manches (chacun d'eux est dans la m au milieu des nouvelles mailles montées à la place de celles des manches), et vous diminuez ainsi à chacun de ces marqueurs: glissez les 2 m suivantes à l'end (= la m avant le marqueur + celle avec le marqueur), tricotez la m suivante (comme dans A.1) et passez les 2 m glissées par-dessus la m tricotée = vous avez diminué 2 mailles au marqueur (le marqueur doit être dans cette maille), répétez à l'autre marqueur = vous diminuez 4 m au total sur ce rang. Bon tricot!
16.10.2018 - 09:07
|
|||||||
Le Conquet#leconquetcardigan |
|||||||
 |
 |
||||||
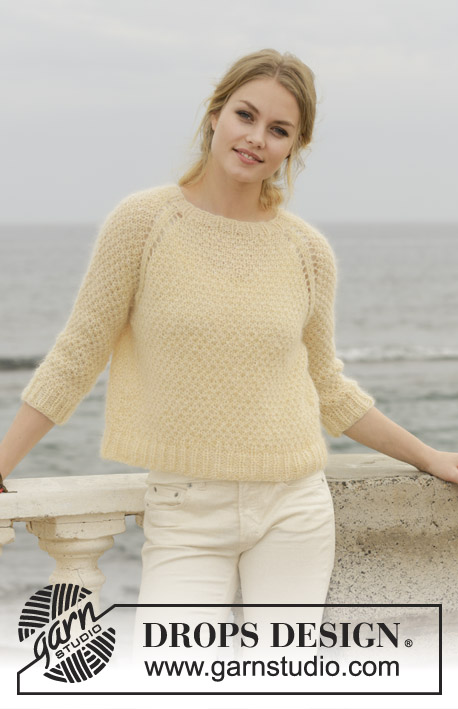
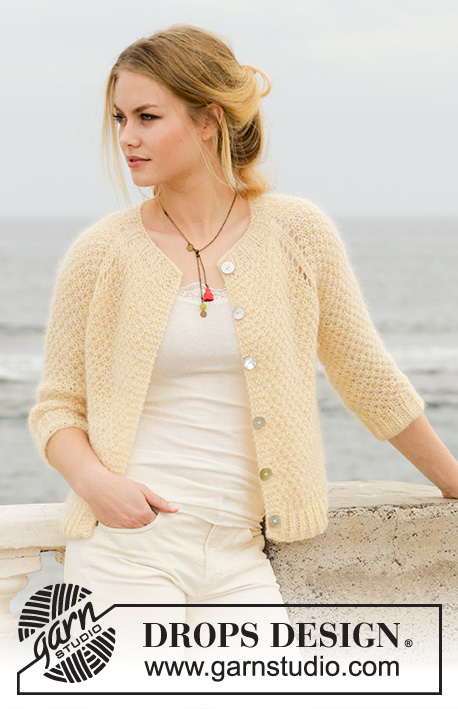
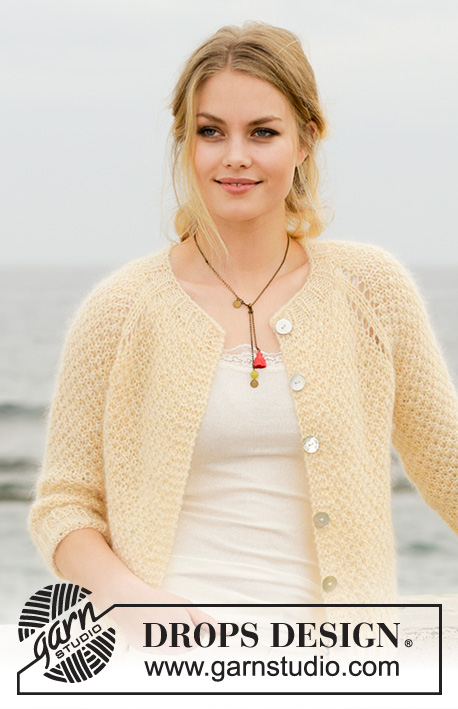
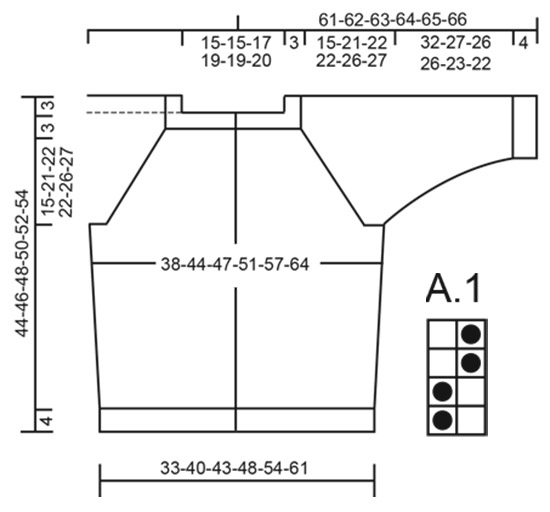
Jacket with raglan, moss stitch and ¾ sleeves, knitted top down. Size: S - XXXL Piece is knitted in 1 strand DROPS Alpaca or DROPS Flora and 2 strands DROPS Kid-Silk.
DROPS 191-8 |
|||||||
|
---------------------------------------------------------- INFORMATION FOR PATTERN: GARTER STITCH (back and forth): 1 ridge = knit 2 rows. INCREASE TIP: To calculate how to increase evenly, use the total number of stitches on row (e.g. 63 stitches), minus bands (e.g. 8 stitches) and divide the remaining stitches by number of increases to be done (e.g. 12) = 4.6. In this example increase after alternately approx. every 4th and 5th stitch. Increase 1 stitch by making 1 yarn over, on next row work yarn over twisted to avoid holes. PATTERN: See diagram A.1 (moss stitch). Diagrams show all rows in pattern seen from the right side. RAGLAN: All increases are done from the right side. Increase on every other row (i.e. every row from right side) as follows: Begin 1 stitch before marker thread, make 1 yarn over, work 2 stitches in stocking stitch (marker thread is in the middle of these two stitches), make 1 yarn over (= 2 stitches increased). Increase on each side of the 4 marker threads. On next row (wrong side) purl yarn overs to make holes, then work the increased stitch in pattern. The 2 stitches along each raglan line are worked in stocking stitch until yoke is done. DECREASE TIP (applies to sides on body and mid under sleeves): Work until 1 stitch remains before stitch with marker thread, slip 2 stitches as if to knit together, work next stitch as shown in A.1 and pass the 2 slipped stitches over. This way A.1 will continue nicely over decrease on next row/round. BUTTONHOLES: Decrease for buttonholes on right band (when garment is worn). Decrease from right side when 3 stitches remain on row as follows: Make 1 yarn over, knit the next 2 stitches together, knit last stitch. On next row knit yarn over to make holes. Decrease first buttonhole when neck edge measures approx. 1½-2 cm. Then decrease the next 5-5-5-6-6-6 buttonholes approx. 7½-8-8-7-7½-8 cm apart. ---------------------------------------------------------- JACKET: Work back and forth on circular needle from mid front, work top down. Sleeves are worked in the round on a short circular needle top down, switch to double pointed needles when needed. NECK EDGE: Cast on 63-63-69-75-78-81 stitches (including 4 band stitches in each side towards mid front) on circular needle size 6 mm with 1 strand Alpaca/Flora + 2 strands Kid-Silk (= 3 strands). Purl 1 row (= wrong side). Work next row as follows from right side: 4 band stitches in GARTER STITCH - see explanation above - * knit 1, purl 2 *, repeat from *-* until 5 stitches remain, knit 1 and finish with 4 band stitches in garter stitch. Continue rib like this for 3 cm – remember BUTTONHOLES on right band – see explanation above. After rib purl 1 row from wrong side while increasing 12-12-14-14-11-10 stitches evenly - read INCREASE TIP = 75-75-83-89-89-91 stitches. Now insert 4 marker threads in the piece as follows (without working the stitches): Insert first marker thread after the first 16-16-18-20-20-20 stitches (= front piece), insert 2nd marker thread after the next 9 stitches (= sleeve), insert 3rd marker thread after the next 25-25-29-31-31-33 stitches (= back piece), and insert 4th marker thread after the next 9 stitches (= sleeve). There are 16-16-18-20-20-20 stitches after last marker thread on front piece. Then work yoke as explained below. YOKE: Switch to circular needle size 7 mm and work first row from right side as follows: 4 band stitches in garter stitch, work A.1 over the next 11-11-13-15-15-15 stitches (begin and end with knit 1), make 1 yarn over, work 2 stitches in stocking stitch (marker thread is in the middle of these two stitches), make 1 yarn over, work A.1 over the next 7 stitches (begin and end with knit 1), make 1 yarn over, work 2 stitches in stocking stitch, make 1 yarn over, work A.1 over the next 23-23-27-29-29-31 stitches (begin and end with knit 1), make 1 yarn over, work 2 stitches in stocking stitch, make 1 yarn over, work A.1 over the next 7 stitches (begin and end with knit 1), make 1 yarn over, work 2 stitches in stocking stitch, make 1 yarn over, work A.1 over the next 11-11-13-15-15-15 stitches (begin and end with knit 1) and finish with 4 band stitches in garter stitch (= 8 stitches increased). Continue A.1 back and forth with 4 band stitches in garter stitch in each side towards mid front and 2 stitches in stocking stitch along each raglan line. AT THE SAME TIME continue increase in RAGLAN on each side of the 4 marker threads – see explanation above, until 11-15-16-16-19-20 increases have been done in total along each raglan line (including increase on first row after neck edge). REMEMBER THE KNITTING TENSION! After last increase there are 163-195-211-217-241-251 stitches on needle. Continue pattern with 2 stitches in stocking stitch along each raglan line until piece measures 18-24-25-25-29-30 cm from cast-on edge mid front. Work next row as follows from wrong side: Work the first 26-30-32-34-38-40 stitches as before, slip the next 33-41-45-45-49-49 stitches on 1 stitch holder for sleeve, cast on 5-5-5-7-7-11 new stitches on needle (= in the side under sleeve), work the next 45-53-57-59-67-73 stitches as before, slip the next 33-41-45-45-49-49 stitches on a stitch holder for sleeve, cast on 5-5-5-7-7-11 new stitches on needle and work the last 26-30-32-34-38-40 stitches as before. Then finish body and sleeves separately. NOW MEASURE THE PIECE FROM HERE! BODY: = 107-123-131-141-157-175 stitches. Insert 1 marker thread in the middle of the 5-5-5-7-7-11 stitches cast on under sleeve in each side and move the marker threads upwards when working. Continue A.1 back and forth with 4 band stitches in garter stitch in each side. When piece measures 4 cm from division, decrease 2 stitches in each side - read DECREASE TIP (= 4 stitches decreased). Decrease like this every 6-4-4-8-8-8 cm a total of 3-3-3-2-2-2 times in each side = 95-111-119-133-149-167 stitches. When piece measures 19-15-16-18-16-17 cm from division, knit 1 row from right side while increasing 13-12-13-17-19-19 stitches evenly = 108-123-132-150-168-186 stitches. Switch to circular needle size 6 mm. Work next row as follows from wrong side: 4 band stitches in garter stitch, * purl 1, knit 2 *, repeat from *-* until 5 stitches remain, purl 1 and 4 band stitches in garter stitch. Continue rib like this for 4 cm. Switch back to circular needle size 7 mm and cast off with knit over knit and purl over purl - make sure to avoid a tight cast-off edge. Jacket measures approx. 44-46-48-50-52-54 cm from shoulder and down. SLEEVE: Slip the 33-41-45-45-49-49 stitches from stitch holder in one side of piece on a short circular needle size 7 mm and pick in addition up 1 stitch in each of the 5-5-5-7-7-11 stitches cast on under sleeve = 38-46-50-52-56-60 stitches. Insert 1 marker thread in the middle stitch of the 5-5-5-7-7-11 stitches under sleeve. Continue A.1 in the round. When piece measures 3 cm from division, decrease 2 stitches mid under sleeve - read DECREASE TIP. Decrease like this every 13-3½-3-3-2-1½cm 3-7-8-8-10-11 times in total = 32-32-34-36-36-38 stitches. Continue until sleeve measures 32-27-26-26-23-22 cm from division (shorter measurements in the larger sizes because of wider neck and longer yoke). Knit 1 round while increasing 4-4-5-3-3-4 stitches evenly = 36-36-39-39-39-42 stitches. Switch to double pointed needles size 6 mm. Work rib in the round = knit 1/purl 2 for 4 cm. Cast off with knit over knit and purl over purl but to avid at tight cast-off edge make 1 yarn over after every 6th stitch at the same time cast off (cast off yarn overs as stitches). Sleeve measures approx. 36-31-30-30-27-26 cm from division. Work the other sleeve the same way. ASSEMBLY: Sew the buttons on to the left band. |
|||||||
Diagram explanations |
|||||||
|
|||||||
 |
|||||||
Have you finished this pattern?Tag your pictures with #dropspattern #leconquetcardigan or submit them to the #dropsfan gallery. Do you need help with this pattern?You'll find 27 tutorial videos, a Comments/Questions area and more by visiting the pattern on garnstudio.com. © 1982-2026 DROPS Design A/S. We reserve all rights. This document, including all its sub-sections, has copyrights. Read more about what you can do with our patterns at the bottom of each pattern on our site. |
|||||||


With over 40 years in knitting and crochet design, DROPS Design offers one of the most extensive collections of free patterns on the internet - translated to 17 languages. As of today we count 324 catalogues and 12290 patterns translated into English (UK/cm).
We work hard to bring you the best knitting and crochet have to offer, inspiration and advice as well as great quality yarns at incredible prices! Would you like to use our patterns for other than personal use? You can read what you are allowed to do in the Copyright text at the bottom of all our patterns. Happy crafting!
Post a comment to pattern DROPS 191-8
We would love to hear what you have to say about this pattern!
If you want to leave a question, please make sure you select the correct category in the form below, to speed up the answering process. Required fields are marked *.