
Popular categories
Looking for a yarn?


Comments / Questions (43)
![]() Wilma wrote:
Wilma wrote:
Meine Maschenprobe ist größer (ergibt 11x11 cm), obwohl ich eigentlich eher fest stricke. Geht die Wolle (ist ja Baumwolle) beim waschen noch ein? Muss ich das berücksichtigen oder ist die Maschenprobe deshalb größer?
07.02.2025 - 18:11DROPS Design answered:
Liebe Wilma, am besten benutzen Sie kleinere Nadeln, damit Sie die richtige Maschenprobe erreichen; gerne können Sie aber Ihre Maschenprobe zuerst waschen (die Pflegehinweise richtig folgen), die sollte aber danach gleich sein. Viel Spaß beim Stricken!
10.02.2025 - 08:54
![]() Reiah N wrote:
Reiah N wrote:
Hi! I’m so sorry to bother you again... \r\nI’ve reached the end of the yoke where it says to ‘cut the yarn’. \r\nDoes that mean I have to cast off, and cast on 184 for size medium when I start the body ? Another question is how much would I have to increase if I wanted to make the dress longer ? Also thank you so so so much for the answer last time ! You’re amazing 😍
23.12.2024 - 03:42DROPS Design answered:
Dear Reiah, we cut the thread because the round will start now at a place different from when we stopped in the previous round. So we cut the thread and rejoin it in one side of the dress. If you want to make the dress longer, you can spread out the increases in the dress, so instead of every 5cm every 6 or whatever you need to reach your desired length. The last 43 cm have to be worked in A.2 and moss stitch, so you will work more rows between the 15cm mark (when you start increasing for the shaping of the dress) and when you start A.2. So you will need to do a rule-of-three to calculate this. Happy knitting!
29.12.2024 - 19:55
![]() Reiah N wrote:
Reiah N wrote:
Hi again! I’m so sorry I think this autocorrected me. I meant for the neck. I don’t think I understood exactly what I have to do.. do I moss stitch it until it’s 2cm then increase in a new knit k round and then knit k one more round with 4 mm needles? Or do I increase in moss stitch and knit one more round in k with 4 mm needles then work A.1. ? I would be extremely thankful for your help !!
18.12.2024 - 02:12DROPS Design answered:
Hi Reiah, After working 2 cm in moss stitch you then knit 1 round where you increase the correct number of stitches for your size. After this knitted round you change to needle size 4 mm and knit 1 more round without increasing. Then you begin the yoke and work A.1 in the round. Hope this helps and Happy Christmas!
18.12.2024 - 06:59
![]() Reiah N wrote:
Reiah N wrote:
Hi! So in total how many rows are in the back ribbing area ? I knit the first then I moss till it’s 2 cm then I knit one more with increases and knit one more? I’m so sorry for the inconvenience!
17.12.2024 - 03:26
![]() Marty wrote:
Marty wrote:
The pattern from A1 to A2 says (for medium) I start with 192 stitches and at the completion of A2, I should have 256 stitches. So how do I increase 64 stitches while maintaining the pattern repeat of 14 stitches from rows 13-32 of A2
23.10.2024 - 22:41DROPS Design answered:
Dear Marty, in the next to last row in A.2 you will increase 2 stitches in each A.2 (= see yarn overs) so that there are 16 sts in each of the 16 repeats in the round = 256 sts on needle. Happy knitting!
24.10.2024 - 09:46
![]() Cheryl Bonner wrote:
Cheryl Bonner wrote:
What is the sized of the dress after it has been knitted on the picture it give you difference number please tell me the measurement of the finish dress in inches thank you for your help
13.05.2024 - 23:30DROPS Design answered:
Dear Mrs Bonner, all measurements in chart are in cm, read more and convert into inches here. Happy knitting!
14.05.2024 - 07:54
![]() Jo Bolt wrote:
Jo Bolt wrote:
What would be the best alternative yarn to the one recommended as I am allergic to wool but would love to knit this dress.
13.09.2023 - 19:44DROPS Design answered:
Hi Jo, Drops yarns are in groups and all yarns within one group can be used for the same pattern. Drops Muskat is from group B, so click på "Yarns and Needles" at the top of the page, then "Yarn groups" bottom right-ish. A list of yarns in group B will include all types and qualities so you can choose freely. We always recommend that you work a swatch before beginning your project, to check your knitting tension. Happy crafting!
14.09.2023 - 06:48
![]() Pernilla wrote:
Pernilla wrote:
Hej, jag undrar hur jag gör när oket delar sig från fram och bakstycket. Om jag förstår det rätt så ska jag klippa av tråden mitt bak och nu räknas början av varvet från mitt under armen. Hur gör jag med de maskor som är på stickan fram till mitt under armen? Lyfter jag bara över dem utan att sticka dem?
02.05.2023 - 12:28DROPS Design answered:
Hej Pernilla, ja det stemmer, det er bare at flytte maskerne over på den anden pind :)
03.05.2023 - 07:54
![]() Pierre Luc wrote:
Pierre Luc wrote:
Bonjour, J'ai une question concernant le passage entre l'Empiècement et le Dos/Devant : ou commence le début du tour pour le Dos/Devant. Pour l'empiècement, il était au milieu du dos, et si j'ai bien compris pour le dos/devant, le début du tour se situe à la moitié des mailles ajoutées (coté de la robe). est bien cela? Merci d'avance pour votre retour, Pierre Luc
18.08.2022 - 10:44DROPS Design answered:
Bonjour Pierre Luc, tout à fait, l'empiècement et le dos/le devant se tricotent en commençant les tours à partir du milieu dos. Lorsque vous tricotez le bas de la robe, placez un marqueur au milieu des mailles montées sous les manches = côtés de la robe. On va diminuer de chaque côté de ces marqueurs. On place ensuite d'autres marqueurs (4) pour augmenter après/avant ces marqueurs pour le bas de la robe. Bon tricot!
18.08.2022 - 15:04
![]() Barbara wrote:
Barbara wrote:
Hallo, könntet Ihr einmal ein Kleid, gestrickt, mit Farbverlaufsgarn als Anleitung vorstellen, das würde mich sehr freuen. Danke für die schönen Modelle.
25.06.2022 - 15:50
|
|||||||||||||||||||||||||
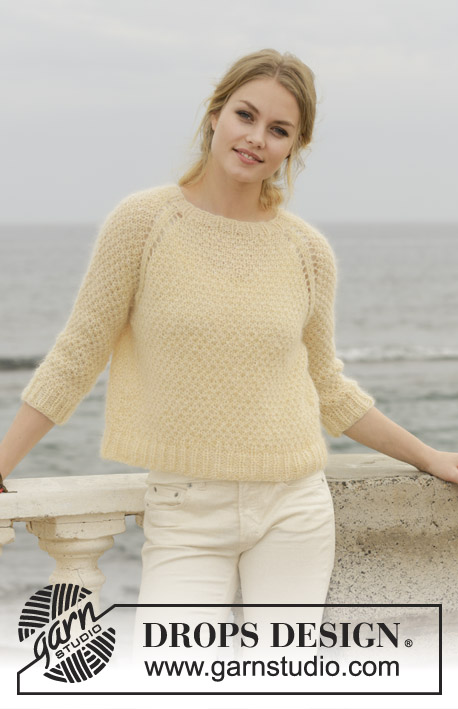
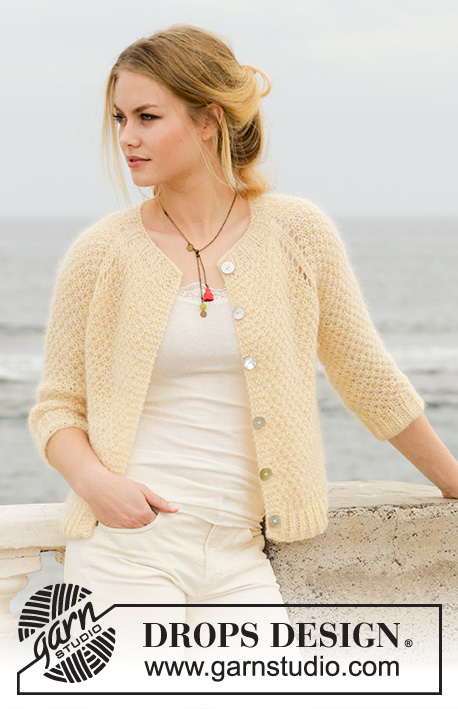
Embrace of the Sun#embraceofthesundress |
|||||||||||||||||||||||||
|
|
|||||||||||||||||||||||||
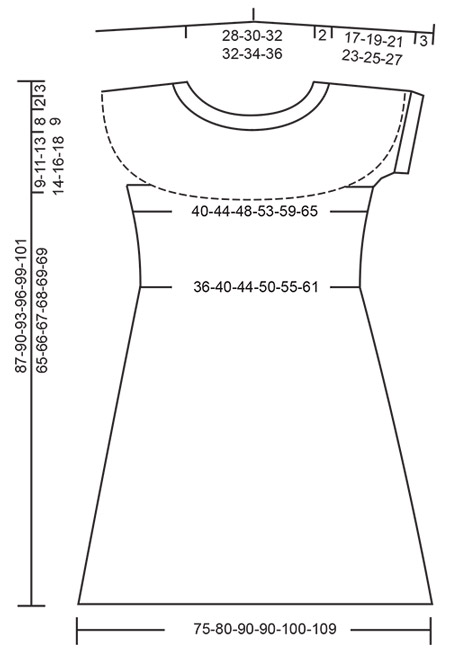
Dress with lace pattern round yoke and short sleeves, worked top down. Sizes S - XXXL. The piece is worked in DROPS Muskat.
DROPS 191-5 |
|||||||||||||||||||||||||
|
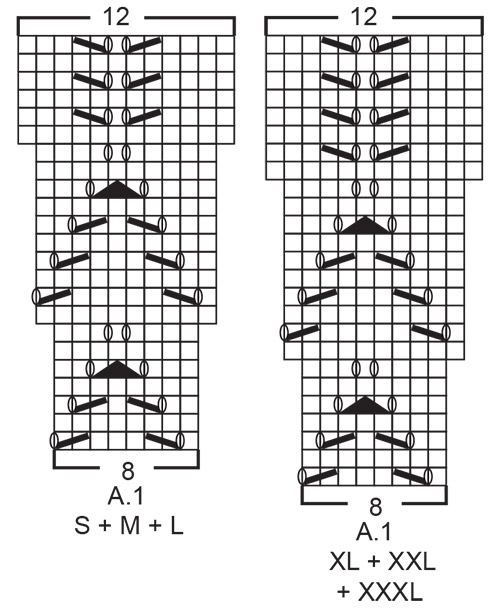
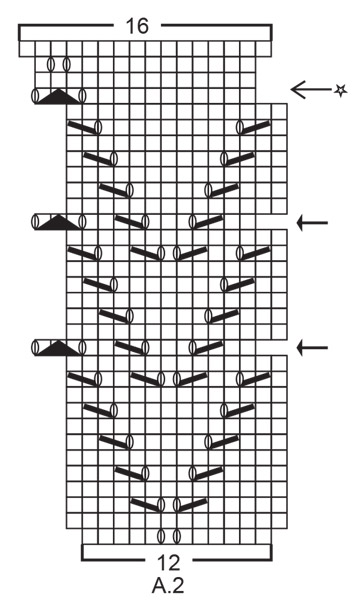
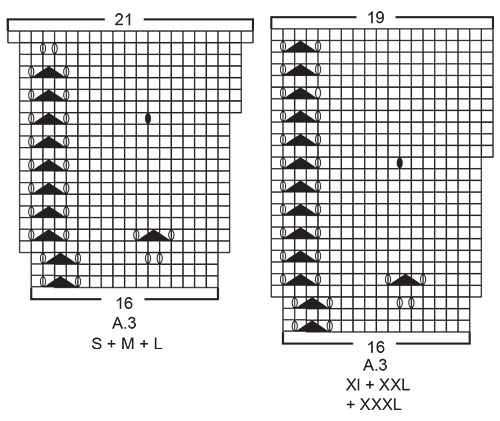
INFORMATION FOR THE PATTERN: MOSS STITCH: Round 1: * Knit 1, purl 1 *, work from *-* to end of round. Round 2: Purl over knit and knit over purl. Repeat round 2. INCREASE TIP-1: To work out how to increase evenly, count the total number of stitches on the needle (e.g. 121 stitches) and divide by the number of increases to be made (e.g. 15) = 8.1. In this example, increase by making 1 yarn over after approx. every 8th stitch; on the next round knit the yarn overs twisted to avoid holes. PATTERN: See diagrams A.1 to A.3. Choose diagram for your size (applies to A.1 and A.3). RAGLAN: Increase to raglan on each side of the 4 marker threads in each transition between body and sleeves as follows: Start 1 stitch before the marker thread, make 1 yarn over, knit 2 (the marker thread sits in the middle of these 2 stitches), make 1 yarn over (= 2 stitches increased). On the next round knit the yarn overs twisted to avoid holes. DECREASE TIP (for the body): Start 4 stitches before the marker thread, knit 2 together, knit 4 (the marker thread sits in the middle of these 4 stitches), slip 1 stitch as if to knit, knit 1, pass the slipped stitch over the knitted stitch (= 2 stitches decreased). INCREASE TIP-2 (for body): Increase 1 stitch by picking up the stitch from the previous round and knitting the new stitch. When you increase after the first and third marker threads, pick up 1 stitch in the first stitch loop after the marker thread. When increasing before the second and fourth marker threads, pick up a stitch in the last loop before the marker thread. ---------------------------------------------------------- DRESS: The yoke and body are worked in the round with circular needle, top down. The sleeve edges are worked in the round with double pointed needles/short circular needle. NECK EDGE: Cast on 121-125-129-135-145-149 stitches with small circular needle size 3.5 mm and Muskat. Knit 1 round. Then work MOSS STITCH – see description above, for 2 cm. Knit 1 round where you increase 15-19-23-17-15-19 stitches evenly on round – read INCREASE TIP-1 = 136-144-152-152-160-168 stitches. Change to circular needle size 4 mm and knit 1 round. Then work the yoke as described below. YOKE: Work A.1 in the round (= 17-18-19-19-20-21 repeats of 8 stitches). REMEMBER THE KNITTING TENSION! When A.1 has been completed, there are 204-216-228-228-240-252 stitches on the needle and the piece measures approx. 10-10-10-11-11-11 cm from the cast on edge. Now insert 4 markers in the piece for raglan as follows (do this without working the stitches): The first marker is inserted after the first 31-32-34-36-39-43 stitches (= ½ back piece), 2nd marker after the next 40-44-46-42-42-40 stitches (= sleeve), 3rd marker after the next 62-64-68-72-78-86 stitches (= front piece) and the 4th marker is inserted after the next 40-44-46-42-42-40 stitches (= sleeve). There are 31-32-34-36-39-43 stitches after the last marker for half the back piece. Work stocking stitch in the round. AT THE SAME TIME on the first round increase to RAGLAN – see description above (= 8 stitches increased). Increase like this every 2nd round a total of 0-3-5-11-11-12 times and then every 4th round a total of 6-6-6-4-5-6 times. After the last increase to raglan there are 252-288-316-348-368-396 stitches on the needle. Knit 1 round where you increase 4-4-0-0-4-0 stitches evenly on round = 256-292-316-348-372-396 stitches. Continue working until the piece measures 19-21-23-25-27-29 cm from the cast on edge mid front. The next round is worked as follows: Work 38-42-45-51-56-61 stitches stocking stitch (= ½ back piece), place the next 52-62-68-72-74-76 stitches on 1 thread for sleeve, cast on 8-8-10-10-12-14 new stitches on the needle (= in side under the sleeve), work 76-84-90-102-112-122 stitches stocking stitch (= front piece), place the next 52-62-68-72-74-76 stitches on 1 thread for sleeve, cast on 8-8-10-10-12-14 new stitches on the needle (=in side under the sleeve) and work the remaining 38-42-45-51-56-61 stitches in stocking stitch (= ½ back piece). Cut the strand. Body and sleeves are finished separately. THE PIECE IS NOW MEASURED FROM HERE! BODY: = 168-184-200-224-248-272 stitches. Insert 1 marker thread at the beginning of the round and 1 marker thread after 84-92-100-112-124-136 stitches (= in the sides of the dress). Work stocking stitch in the round. When the piece measures 2 cm from the separation, decrease 1 stitch on each side of both marker threads – read DECREASE TIP (= 4 stitches decreased). Decrease like this every 2 cm a total of 4 times in each side = 152-168-184-208-232-256 stitches. Remove all markers and marker threads in the piece, except the marker thread at the beginning of piece. When the piece measures 15 cm from the separation, insert 4 new marker threads in the piece as follows: The first marker thread is inserted after the first 15-18-21-26-31-36 stitches, 2nd marker thread after the next 46-48-50-52-54-56 stitches, 3rd marker thread after the next 30-36-42-52-62-72 stitches and the 4th marker thread is inserted after the next 46-48-50-52-54-56 stitches. There are 15-18-21-26-31-36 stitches left on the round after the last marker thread. On the next round, increase after the first and third marker threads and before the second and fourth marker threads – read INCREASE TIP-2 (= 4 stitches increased). Increase like this every 4-5-3½-3½-3½-3½ cm a total of 7-6-8-8-8-8 times = 180-192-216-240-264-288 stitches. When the piece measures 44-45-46-45-46-46 cm work A.2 in the round (= 15-16-18-20-22-24 repeats of 12 stitches). On each round with arrow in A.2 the beginning of the round is displaced 2 stitches towards the left, i.e. lift the 2 first stitches over to the right needle without working them, then work A.2 in the round. The 2 stitches that where lifted over to the right needle will be worked in the last repeat of A.2. On next round knit all stitches. Then start the round as normal. When A.2 is worked there is 240-256-288-320-352-384 stitches on the needle. Now work A.3 in the round (= 15-16-18-20-22-24 repeats of 16 stitches). When A.3 has been completed, there are 315-336-378-380-418-456 stitches on the needle. Knit 1 round where you increase 14-15-17-19-21-23 stitches evenly on round = 329-351-395-399-439-479 stitches. Change to circular needle size 3.5 mm. Work moss stitch in the round for 2 cm. Cast off with knit over purl and purl over knit. The dress measures approx. 87-90-93-96-99-101 cm from the shoulder down. SLEEVE EDGE: Place the 52-62-68-72-74-76 stitches from the thread on the one side of the piece on double pointed needles size 3.5 mm and, in addition, knit up 1 stitch in each of the 8-8-10-10-12-14 stitches cast on under the sleeve = 60-70-78-82-86-90 stitches. Knit 1 round and at the same time decrease 1 stitch on this round = 59-69-77-81-85-89 stitches. Work moss stitch in the round for 3 cm. Cast off with knit over purl and purl over knit. Work the other sleeve edge in the same way. |
|||||||||||||||||||||||||
Diagram explanations |
|||||||||||||||||||||||||
|
|||||||||||||||||||||||||
|
|||||||||||||||||||||||||
|
|||||||||||||||||||||||||
|
|||||||||||||||||||||||||
|
|||||||||||||||||||||||||
Have you finished this pattern?Tag your pictures with #dropspattern #embraceofthesundress or submit them to the #dropsfan gallery. Do you need help with this pattern?You'll find 27 tutorial videos, a Comments/Questions area and more by visiting the pattern on garnstudio.com. © 1982-2025 DROPS Design A/S. We reserve all rights. This document, including all its sub-sections, has copyrights. Read more about what you can do with our patterns at the bottom of each pattern on our site. |
|||||||||||||||||||||||||


With over 40 years in knitting and crochet design, DROPS Design offers one of the most extensive collections of free patterns on the internet - translated to 17 languages. As of today we count 314 catalogues and 11822 patterns translated into English (UK/cm).
We work hard to bring you the best knitting and crochet have to offer, inspiration and advice as well as great quality yarns at incredible prices! Would you like to use our patterns for other than personal use? You can read what you are allowed to do in the Copyright text at the bottom of all our patterns. Happy crafting!
Post a comment to pattern DROPS 191-5
We would love to hear what you have to say about this pattern!
If you want to leave a question, please make sure you select the correct category in the form below, to speed up the answering process. Required fields are marked *.