
Popular categories
Looking for a yarn?


Comments / Questions (16)
![]() Barbetta Maria wrote:
Barbetta Maria wrote:
Sono sempre piacevolmente attratta dai vs modelli . Complimenti
21.09.2022 - 21:02
![]() Andrea Lauxtermann wrote:
Andrea Lauxtermann wrote:
Gibt es die Möglichkeit irgendwo passende Farbkombinationen zusehen?
07.09.2019 - 20:45DROPS Design answered:
Liebe Frau Lauxtermann, wenden Sie sich bitte an Ihren DROPS Laden an (auch telefonisch oder per E-Mail), gerne wird man Ihnen neue passenden Farben vorschlagen. Viel Spaß beim stricken!
09.09.2019 - 08:29
![]() Sanet wrote:
Sanet wrote:
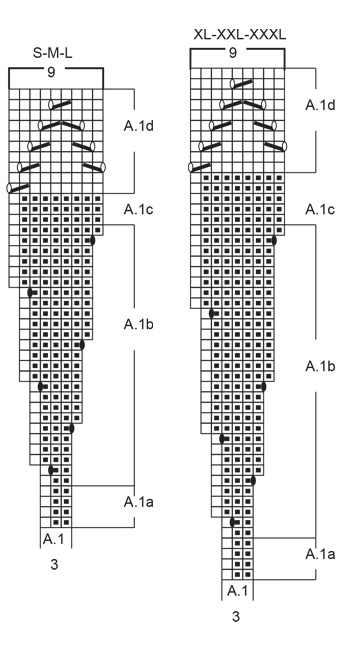
I have never knitted from a diagram and need some help please. 1. There are 4 squares at the bottom, 3 of which are purl, is the last stitch slipped over? 2. Are only right side rows shown and if so, what do I do on the wrong side? 3. Are the diagram stitches just repeated over the amount of stitches cast on? Thank you very much, I am very confused!
18.11.2018 - 10:24DROPS Design answered:
Dear Sanet, start reading diagram from the bottom corner on the right side (= 3 squares = 3 sts at the beginning of A.1 in each size), and repeat these stitches in width over all sts. On row 1 you will work: (P2, K1) and repeat from (to) to the end of the round. Then work row 2 in diagram the same way, always from the right towards the left (since you are working in the round). See diagram key to know how to work the stitches. Happy knitting!
19.11.2018 - 08:51
![]() Marie wrote:
Marie wrote:
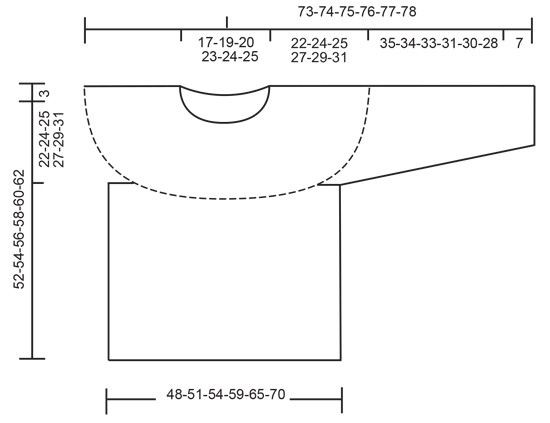
Bonjour, j'ai un problème avec les mesures. Je tricote le pull en taille S qui mesure 52 cm de hauteur d'après le schéma. Or l'empiecement mesure 22 cm puis on tricote 20 cm puis le bord 6 cm : on obtient 48 cm et non 52 cm.
22.10.2018 - 20:45DROPS Design answered:
Bonjour Marie, l'empiècement mesure 22 cm en taille S depuis le rang de montage (au milieu devant), mais quand vous poserez votre pull à plat, vous aurez quelques cm supplémentaires pour les épaules (les 3 cm indiqués en haut du schéma). Bon tricot!
23.10.2018 - 09:22
![]() Agnethe wrote:
Agnethe wrote:
Hei. Er ikke denne oppskriften tilgjengelig lengre? Får ikke opp bilder, diagram eller tegnene i diagramforklaringen. Har forsøkt flere ulike enheter, samme på alle. Samme feil om jeg velger utskrift også.
09.09.2018 - 20:23DROPS Design answered:
Hei Agnethe. Vi har for øyeblikket tekniske problemer med siden vår, dette medfører at diagrammer og bilder dessverre ikke lastes ordentlig. Vi jobber med å løse problemet, og siden vil være tilbake som normalt så snart som mulig. Du kan følge med på vår twitter eller facebookside for oppdateringer. Beklager dette
10.09.2018 - 12:50Dessy wrote:
Beautiful!
20.04.2018 - 10:31
![]() Anne wrote:
Anne wrote:
Går det å strikke denne med kun én tråd med drops Air, uten Brushed Alpaca Silk?
04.04.2018 - 18:46DROPS Design answered:
Hei Anne, Det er mulig å strikke genseren med bare Drops Air, men du må da regne om antall masker og rader som utgjør 10 x 10 cm slik at du får riktige målene. God fornøyelse!
05.04.2018 - 08:17
![]() Tina Gundestrup wrote:
Tina Gundestrup wrote:
Drops gratis strikkeopskrifter, kan ikke uploade selve opskriften billeder mv ? Hvad er der sket? Jeg er interesseret i opskrift fair lily nr. 118 Air og alpacha
23.03.2018 - 08:26
![]() Taputu wrote:
Taputu wrote:
😉 un grand merci à Sylvie! Depuis le temps que j'attendais une réponse, merci mille fois!
10.03.2018 - 23:23
![]() Sylvie wrote:
Sylvie wrote:
Bonjour Je pense qu'il y a une erreur de frappe. Il faut lire a1c puisqu'il y a écrit continuer a2c comme avant (donc a1c). J'espère vous avoir aidé. Bonne continuation ( je vais le tricoter également pour moi) et bonne soirée
09.03.2018 - 22:06
|
|||||||||||||||||||
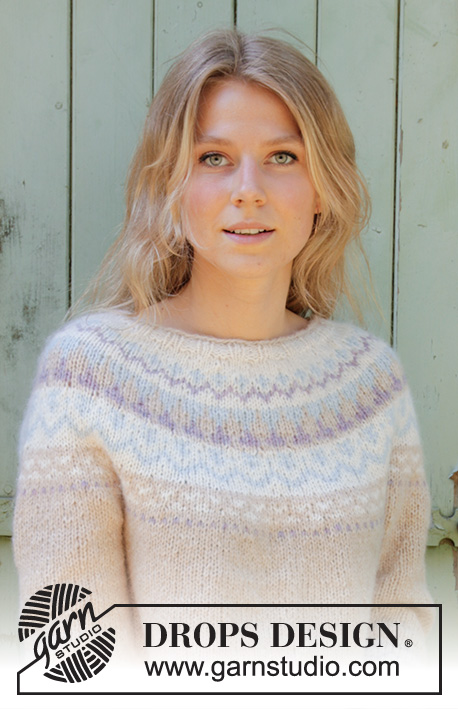
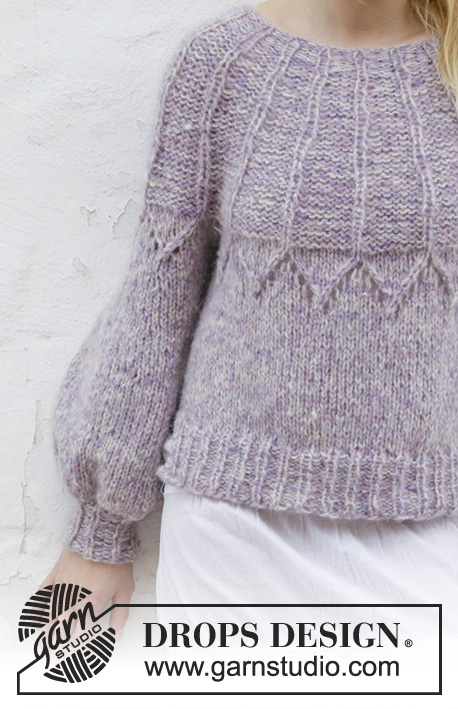
Fair Lily#fairlilysweater |
|||||||||||||||||||
 |
 |
||||||||||||||||||
Knitted jumper with lace pattern and round yoke, worked top down. Sizes S - XXXL. The piece is worked in DROPS Brushed Alpaca Silk and DROPS Air.
DROPS 191-4 |
|||||||||||||||||||
|
INFORMATION FOR THE PATTERN: PATTERN: See diagram A.1. Choose diagram for your size. RIDGE/GARTER STITCH (worked back and forth): 1 ridge = Knit 2 rows. ---------------------------------------------------------- JUMPER: The piece is worked in the round with circular needle, top down. When the yoke is finished, the piece is divided; the body is continued in the round and the sleeves are finished separately in the round with double pointed needles/short circular needle. YOKE: Cast on 51-54-57-63-66-69 stitches with circular needle size 7 mm and 1 strand of each quality (= 2 strands). The beginning of the round is in the side of the back (in the transition between right sleeve and the back piece when the garment is worn). Work A.1 a over all stitches – see diagram for your size. When A.1a has been worked 1 time in height, change to circular needle size 8 mm and work A.1 b over A.1 a. REMEMBER THE KNITTING TENSION! When A.1 b has been worked 1 time in height, there are 153-162-171-189-198-207 stitches on the needle. Now work A.1 c over A.1 b. Continue like this until the piece measures 22-24-25-27-29-31 cm from the cast-on edge. Now the piece is divided as follows: Work A.1 c as before over the first 46-48-49-56-61-64 stitches (= back piece), place the next 30-33-36-38-38-39 stitches on 1 thread for sleeve and cast on 6-6-8-8-10-12 new stitches under the sleeve, work A.1 c as before over the next 47-48-50-57-61-65 stitches (front piece), place the next 30-33-36-38-38-39 stitches on 1 thread for the sleeve and cast on 6-6-8-8-10-12 stitches under the sleeve. BODY: = 105-108-115-129-142-153 stitches. THE PIECE IS NOW MEASURED FROM HERE! Work 1 round in stocking stitch. Continue with A.1 d over the stitches in A.1 c – work stocking stitch over the stitches in the sides where the pattern does not fit; make sure that the repeats of A.1 d are directly over the repeats of A.1 c. When A.1 d has been completed in height, work stocking stitch over all stitches. When the piece measures 24-24-25-25-25-25 cm from where the body was divided from the sleeves, work 1 round where you increase 1-4-3-1-0-1 stitches evenly on round = 106-112-118-130-142-154 stitches on needle. Change to circular needle size 7 mm and work rib back and forth separately over the front and back pieces (= split) as follows: BACK PIECE: = the first 53-56-59-65-71-77 stitches, place the last 53-56-59-65-71-77 stitches on a thread. Work as follows from the right side: Work 2 stitches GARTER STITCH – see description above, rib (= knit 1 /purl 2) until there are 3 stitches left, finish with knit 1 and 2 stitches in garter stitch. Continue like this until the rib measures 6 cm. The piece measures a total of 52-54-56-58-60-62 cm from the shoulder. Cast off with knit, make sure that the cast-off edge is not tight; you can use 1 size larger needle if necessary. FRONT PIECE: Finish the front piece (the remaining stitches on the thread) in the same way as the back piece. SLEEVE: Place the 30-33-36-38-38-39 stitches from the one thread onto double pointed needles size 8 mm and knit up 1 stitch in each of the 6-6-8-8-10-12 stitches cast on under the sleeve = 36-39-44-46-48-51 stitches. THE PIECE IS NOW MEASURED FROM HERE! Work 1 round in stocking stitch. Continue with A.1 d over the stitches in A.1 c – work stocking stitch over the stitches under the sleeve, where the pattern does not fit; make sure that the repeats of A.1d are directly over the repeats of A.1 c. When A.1d has been completed in height, work stocking stitch over all stitches. Work stocking stitch until the piece measures 10 cm. Insert 7 marker threads in the piece with approx. 5-5-6-7-7-7 stitches between each. On the next round make 1 yarn over after each marker thread (= 7 stitches increased). The yarn overs are knitted twisted on the next round to avoid holes = 43-46-51-53-55-58 stitches. Increase like this every 5 cm 2 more times = 57-60-65-67-69-72 stitches. Continue with stocking stitch until the piece measures 35-34-33-31-30-28 cm. On the next round work all the stitches together 2 and 2 = 29-30-33-34-35-36 stitches. Change to double pointed needles size 7 mm and work rib (= knit 1, purl 2) over all stitches AT THE SAME TIME as you decrease 5-3-3-4-2-3 stitches evenly on round = 24-27-30-30-33-33 stitches. Cast off when the rib measures 7 cm, make sure that the cast-off edge is not tight; you can use 1 size larger needle if necessary. The sleeve measures approx. 43-41-40-38-37-35 cm from where the sleeve was separated from the body. Work the other sleeve in the same way. |
|||||||||||||||||||
Diagram explanations |
|||||||||||||||||||
|
|||||||||||||||||||
 |
|||||||||||||||||||
 |
|||||||||||||||||||
Have you finished this pattern?Tag your pictures with #dropspattern #fairlilysweater or submit them to the #dropsfan gallery. Do you need help with this pattern?You'll find 23 tutorial videos, a Comments/Questions area and more by visiting the pattern on garnstudio.com. © 1982-2026 DROPS Design A/S. We reserve all rights. This document, including all its sub-sections, has copyrights. Read more about what you can do with our patterns at the bottom of each pattern on our site. |
|||||||||||||||||||


With over 40 years in knitting and crochet design, DROPS Design offers one of the most extensive collections of free patterns on the internet - translated to 17 languages. As of today we count 325 catalogues and 12298 patterns translated into English (UK/cm).
We work hard to bring you the best knitting and crochet have to offer, inspiration and advice as well as great quality yarns at incredible prices! Would you like to use our patterns for other than personal use? You can read what you are allowed to do in the Copyright text at the bottom of all our patterns. Happy crafting!
Post a comment to pattern DROPS 191-4
We would love to hear what you have to say about this pattern!
If you want to leave a question, please make sure you select the correct category in the form below, to speed up the answering process. Required fields are marked *.