
Popular categories
Looking for a yarn?


Comments / Questions (85)
![]() Uschi A. wrote:
Uschi A. wrote:
Irgendwie komme ich mit der Anleitung nicht klar. Warum muss ich 2mal die 1. Reihen beginnen. Können Sie mir vielleicht weiterhelfen?
03.09.2018 - 13:29DROPS Design answered:
Liebe Uschi, nach dem Anschlag stricken Sie zuerst 1 Reihe rechts (= Rückreihe), und dann stricken Sie REIHE 1 (= Hinreihe). Viel Spaß beim stricken!
06.09.2018 - 09:32
![]() Céline wrote:
Céline wrote:
Comment commencer par faire un rang endroit sur l'envers ??? Merci
29.07.2018 - 15:59DROPS Design answered:
Bonjour Céline, Montez vos mailles et tricotez 1 rang en mailles endroit = ce rang est sur l'envers de l'ouvrage. Tournez et tricotez comme indiqué, le prochain rang sera sur l'endroit de l'ouvrage. Bon tricot!
31.07.2018 - 09:12
![]() Ida M wrote:
Ida M wrote:
Bonjour à toute l'équipe Garnstudio, ai-je bien compris : 12 cm = 48 rangs point mousse (= 24 barres) ; 3 cm = 12 rangs points mousse (= 6 barres, soit 3 rayures de couleurs différentes) ? Mais voilà qu' avec un échantillon conforme, la première pelote col. 522 est terminée après la "1ère section 12 cm + 3 cm rayures". Où me suis-je trompée ? merci pour votre réponse et bravo pour tout ce que vous nous offrez sur votre site, belle philosophie !
30.06.2018 - 06:55DROPS Design answered:
Bonjour Ida, 48 rangs point mousse vont donner 24 côtes mousse (= il faut 2 rangs pour 1 côte mousse), si votre échantillon est conforme, vous devez avoir 40 rangs point mousse = 20 côtes mousse = 10 cm de hauteur. Bon tricot!
02.07.2018 - 09:30
![]() Gigi wrote:
Gigi wrote:
DROPS / 186 / 4 Point the Way I love this scarf and I cannot knit. Is there a similar scarf in a crochet pattern that I could try ?
17.06.2018 - 23:45DROPS Design answered:
Dear Gigi, there is only a knitting pattern to this scarf. Why do not have a try on knitting with the help our videos?
18.06.2018 - 09:29
![]() Ellen Coenen wrote:
Ellen Coenen wrote:
Hallo, wie viel Knäuel brauche ich, wenn ich Safran stricke?
05.06.2018 - 07:14DROPS Design answered:
Liebe Frau Coenen, benutzen Sie unseren Garnumrechner, um die Garnmenge in jeder Alternative zu haben. Viel Spaß beim stricken!
05.06.2018 - 09:05
![]() Ellen Coenen wrote:
Ellen Coenen wrote:
Guten Tag, möchte dieses Tuch gerne stricken. Sind alle 4 Knäuel aufgebraucht worden. Möchte es eventuell größer machen. Ellen
05.06.2018 - 05:58DROPS Design answered:
Liebe Frau Coenen, die vier Knäuel sind fast alle gebraucht, Sie werden praktisch alle 200 g benutzen. Viel Spaß beim stricken!
05.06.2018 - 09:04
![]() D'Andrea wrote:
D'Andrea wrote:
Après avoir rempli toutes les informations demandées, le N du tel portable n'est pas accepté malgré le préfixe qui est exact (Belgique). Pourquoi?
01.06.2018 - 16:59DROPS Design answered:
Bonjour D'Andrea, nous ne demandons pas de numéro de téléphone lorsque vous vous enregistrez à notre newsletter. Vérifiez bien où vous enregistrez vos informations, si c'est pour votre magasin, prenez contact avec lui par mail. Bon tricot!
04.06.2018 - 08:10
![]() Phyllis wrote:
Phyllis wrote:
Bitte das tuch von der Spitze aus beschreiben. Danke!
16.05.2018 - 13:19
![]() Savalle wrote:
Savalle wrote:
Je ne comprends pas le fils marqueurs il faut le monter de rangs à chaque fois ? Et l ouvrage est ce qu il se fait en 2 partie ? Vu qu il y a deux sens mais on ne parle pas de couture d assemblage merci pour votre réponse
28.04.2018 - 11:03DROPS Design answered:
Bonjour Mme Savalle, le châle se tricote en une seule pièce, dans le sens de la longueur. Placez un fil marqueur (ou un marqueur) dans la maille indiquée et faites bien suivre le fil marqueur (ou le marqueur) au fur et à mesure. Les augmentations vont se faire de chaque côté de cette maille avec un marqueur et créer ainsi la forme voulue. Bon tricot!
30.04.2018 - 09:57
![]() Christine Paul wrote:
Christine Paul wrote:
Ich bin richtig begeistert von diesem Teil und habe es inzwischen schon einige male in verschiedenen Farbcombinationen gestrickt
24.04.2018 - 17:52
|
|
Point the Way#pointthewayshawl |
|
 |
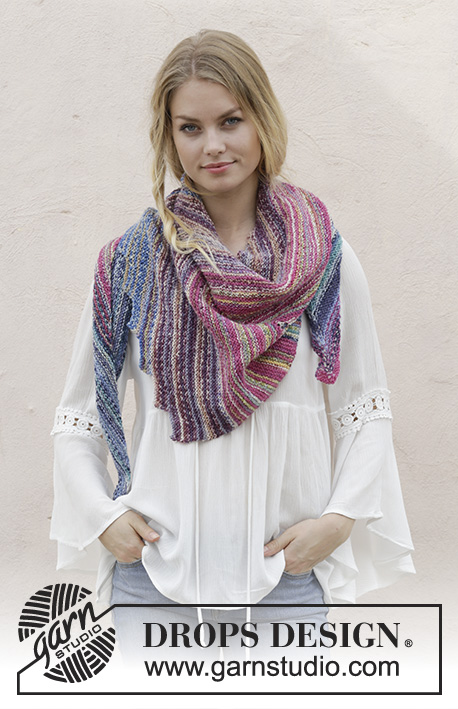 |
Knitted shawl with garter stitch and stripes. The piece is worked in DROPS Fabel.
DROPS 186-4 |
|
|
INFORMATION FOR THE PATTERN: RIDGE/GARTER STITCH (worked back and forth): 1 ridge = Knit 2 rows. STRIPES: Work stripes as follows (NOTE! Change strands at the end of a row from the right side). * Work 12 cm with turquoise/blue Work 3 cm with 1 ridge turquoise/blue, 1 ridge pink dream Work 12 cm with pink dream. Work 3 cm with 1 ridge pink dream, 1 ridge lavender Work 12 cm with lavender. Work 3 cm with 1 ridge lavender, 1 ridge sea mist Work 12 cm with sea mist *, repeat from *-*. ---------------------------------------------------------- SHAWL: The shawl is worked from the one short side and across. Cast on 164 stitches with circular needle size 4.5 mm and turquoise/blue. Knit 1 row from the wrong side. Insert 1 marker thread in the 2nd stitch on the row – seen from the right side. Continue with garter stitch and STRIPES - see description above, and work as follows: ROW 1 (from the right side): Knit 1, 1 yarn over, knit 1 (stitch with marker thread), 1 yarn over, work until there are 2 stitches left, knit 2 stitches together. ROW 2 (from the wrong side): Knit 2 stitches together, knit to end of row, yarn overs are knitted to leave holes. ROW 3 (from the right side): Work as far as the stitch with the marker thread, 1 yarn over, knit 1 (stitch with marker thread), 1 yarn over, work until there are 2 stitches left, knit 2 stitches together. ROW 4 (from the wrong side): Knit 2 stitches together, knit to end of row, yarn overs are knitted to leave holes. Repeat rows 3 and 4 upwards, continue with 1 yarn over on each side of the stitch with the marker thread and decreases at end of rows from the right side and beginning of rows from the wrong side. The number of stitches stays the same upwards. Continue until you have increased 80 times on each side of the marker thread = 164 stitches on needle (worked 160 rows). ROW 1 (= from the right side): Cast off the first 10 stitches on the needle, work to the stitch with the marker thread, 1 yarn over, knit 1 (= stitch with the marker thread), 1 yarn over, work until there are 2 stitches left, knit 2 stitches together. ROW 2 (from the wrong side): Knit 2 stitches together, work to end of row, yarn overs are knitted to leave holes = 154 stitches on needle. ROW 3 (= from the right side): Work to the stitch with the marker thread, 1 yarn over, knit 1 (= stitch with the marker thread), 1 yarn over, work until there are 2 stitches left, knit 2 stitches together. ROW 4 (from the wrong side): Knit 2 stitches together, work to end of row, yarn overs are knitted to leave holes = 154 stitches on needle. ROWS 5-10: Work as for rows 3 and 4 = 154 stitches on needle Repeat rows 1 to 10 upwards, you decrease 10 stitches every 10 rows. Continue until there are 4 stitches left on needle, cast off these stitches. Cut and fasten the strands. |
|
Have you finished this pattern?Tag your pictures with #dropspattern #pointthewayshawl or submit them to the #dropsfan gallery. Do you need help with this pattern?You'll find 11 tutorial videos, a Comments/Questions area and more by visiting the pattern on garnstudio.com. © 1982-2026 DROPS Design A/S. We reserve all rights. This document, including all its sub-sections, has copyrights. Read more about what you can do with our patterns at the bottom of each pattern on our site. |
|


With over 40 years in knitting and crochet design, DROPS Design offers one of the most extensive collections of free patterns on the internet - translated to 17 languages. As of today we count 325 catalogues and 12298 patterns translated into English (UK/cm).
We work hard to bring you the best knitting and crochet have to offer, inspiration and advice as well as great quality yarns at incredible prices! Would you like to use our patterns for other than personal use? You can read what you are allowed to do in the Copyright text at the bottom of all our patterns. Happy crafting!
Post a comment to pattern DROPS 186-4
We would love to hear what you have to say about this pattern!
If you want to leave a question, please make sure you select the correct category in the form below, to speed up the answering process. Required fields are marked *.