
Popular categories
Looking for a yarn?


Comments / Questions (54)
![]() Aileen wrote:
Aileen wrote:
Can this pattern be converted easily into knitting the front/back separately and not in the round?
02.03.2026 - 15:57DROPS Design answered:
Dear Aileen, you can find some tips to adapt a pattern onto straight needles here, this might help. Happy knitting!
03.03.2026 - 09:15
![]() Ghouali Meriem wrote:
Ghouali Meriem wrote:
Bjr pour le motif les 24 mailles suivantes il faut tjrs décaler ou seulement le premier motif j arrive pas à retrouver la grlle malgré vos explications pourtant je ne suis pas novice je coince c est pas clair et j aimerais tant le faire merci comme même
18.01.2026 - 12:52DROPS Design answered:
Bonjour Mme Ghouli, les 24 mailles se tricotent tout le tour comme indiqué dans le diagramme, au tour avec le "décrochage" sur la droite, tricotez jusqu'à ce qu'il reste 6 mailles avant la fin du tour (= les 6 dernières mailles du dernier M.1 du tour), tricotez ces 6 mailles à l'endroit et tricotez le tour suivant comme indiqué, on va ainsi décaler les mailles envers pour que la grande torsade viennent en premier et que la petite vienne en dernier. Quand M.1 est terminé, on a décalé à nouveau les mailles, on peut recommencer le diagramme comme au début. Tricotez un échantillon de ce motif en rond, ce sera plus facile, en rangs, le diagramme ne collera pas. Bon tricot!
19.01.2026 - 10:20
![]() Ghouali Meriem wrote:
Ghouali Meriem wrote:
Bsr mais d où viennent les 6 mailles endroits puisque le rang commence par 4 mailles endroits et 2 mailles envers désolée de vous importuner merci
14.01.2026 - 22:43DROPS Design answered:
Bonjour Mme Ghouali, au 22ème tour, le tour commence quand il reste 6 mailles du tour précédent = ce sont ces 6 mailles que l'on voit "apparaître" à droite du diagramme, ainsi les 6 dernières mailles de chaque diagramme deviennent les 6 premières du motif suivant. Bon tricot!
15.01.2026 - 10:35
![]() Ghouali Meriem wrote:
Ghouali Meriem wrote:
Dans la grille il toujours 2 mailles à l'envers en plus ça coïncide pas pas avec le diagramme merci
12.01.2026 - 14:52DROPS Design answered:
Bonjour Mme Ghouali, au 22ème et au 24ème rang de M;1 vous allez bien tricoter 2 mailles envers, vous allez juste décaler ces 2 mailles envers pour que les 16 m de la grande torsade soient réduites à 4 et que les 4 m de la petite torsade soient augmentées à leur tour à 16 (avec les 4 m du motif précédent); Bon tricot!
14.01.2026 - 07:54
![]() Ghouali Meriem wrote:
Ghouali Meriem wrote:
Bonjour Mme svp j ai beau comprendre les 6 mailles décalées j arrive pas du tout à trouver le nombre de mailles comme sur la grille est ce qu il ya une autre explication plus détaillée merci pour votre compréhension et bonne journée
12.01.2026 - 11:04DROPS Design answered:
Bonjour Mme Ghouali, le diagramme M.1 se tricote sur 24 m, la 1ère partie, au 1er rang, ainsi: 4 m end (petite torsade sur 4 m), 2 m env, 16 m end (2 torsades chacune su 8 m), 2 m env , puis la 2ème partie du diagramme, au 1er rang du décalage: 6 m end, 1 torsade pour décaler les 2 m env (=2 m derrière, 4 m end, 2 m env), puis 4 m end, 1 torsade pour décaler les 2 m env (4 m devant, 2 m env, 4 m end),vous décalez encore 1 fois les 2 m envers et vous avez ensuite: 16 m end, 2 m env, 4 m end, 2 m env. Bon tricot!
14.01.2026 - 07:38
![]() Angela wrote:
Angela wrote:
Hello, at this stage I have just read through the pattern before knitting. I’m a little confused regarding placement of the markers - could you please confirm for me that when I come to placing the markers at the ‘centre’ front and ‘centre’ back (as per the arrows on the chart), that these are in fact the same markers referred to as ‘side’ markers where I will bind off for the armholes?
15.12.2025 - 19:21DROPS Design answered:
Dear Angela, the markers on mid front and mid back mark the middle of front piece and the middle of back piece to center diagram; the markers for the armholes are marking front and back piece, insert the first "side marker" at the beg of the round and the 2nd "side marker" after half of the stitches, you will cast off for armholes at these markers. Happy knitting!
16.12.2025 - 09:12
![]() Glesni wrote:
Glesni wrote:
Is patt2 repeated every row ie one continuous cable up the arm without it being displaced
31.10.2025 - 13:05DROPS Design answered:
Hi, Glesni, yes, M.2 is not displaced and is knittet continuous up the arm. Happy knitting!
31.10.2025 - 15:04
![]() Birgitta wrote:
Birgitta wrote:
Mönster m1 sätt 4m påhj.st framför arbetet,2am.2rm från hj.st vad gör jag med de 2 andra m på hjälpstickan
28.10.2025 - 14:33DROPS Design answered:
Hei, Birgitta, feilen i oppskriften er rettet nå, du skal strikke alle 4 maskene fra hjelpepinnen. Vennlig hilsen, DROPS Design
29.10.2025 - 09:54
![]() Glesni wrote:
Glesni wrote:
The pattern for the sleeve is not clear, on which stitch should you displace 6 sts?
16.10.2025 - 15:43
![]() Andrea wrote:
Andrea wrote:
Hallo, wird M2 bis zum Armloch hinaufgeführt ( also separat von M1) oder werden auch diese 8 Maschen wenn genügend Maschen vorhanden in M1 integriert. Oder die Hälfte von M2 (4) links und rechts in M1 integriert? Ich habe ja auch immer 2 gleiche Muster nebeneinander, soll das so sein? Lg Andrea
19.09.2025 - 10:42DROPS Design answered:
Hi, Andreas, yes, you knit M.2 the lenght of the sleeve. The stitches you increase on each side og M.2 will become a part of M.1 as you go along. Happy knitting!
31.10.2025 - 10:18
|
||||||||||||||||||||||||||||
Cable Magic#cablemagicsweater |
||||||||||||||||||||||||||||
 |
 |
|||||||||||||||||||||||||||
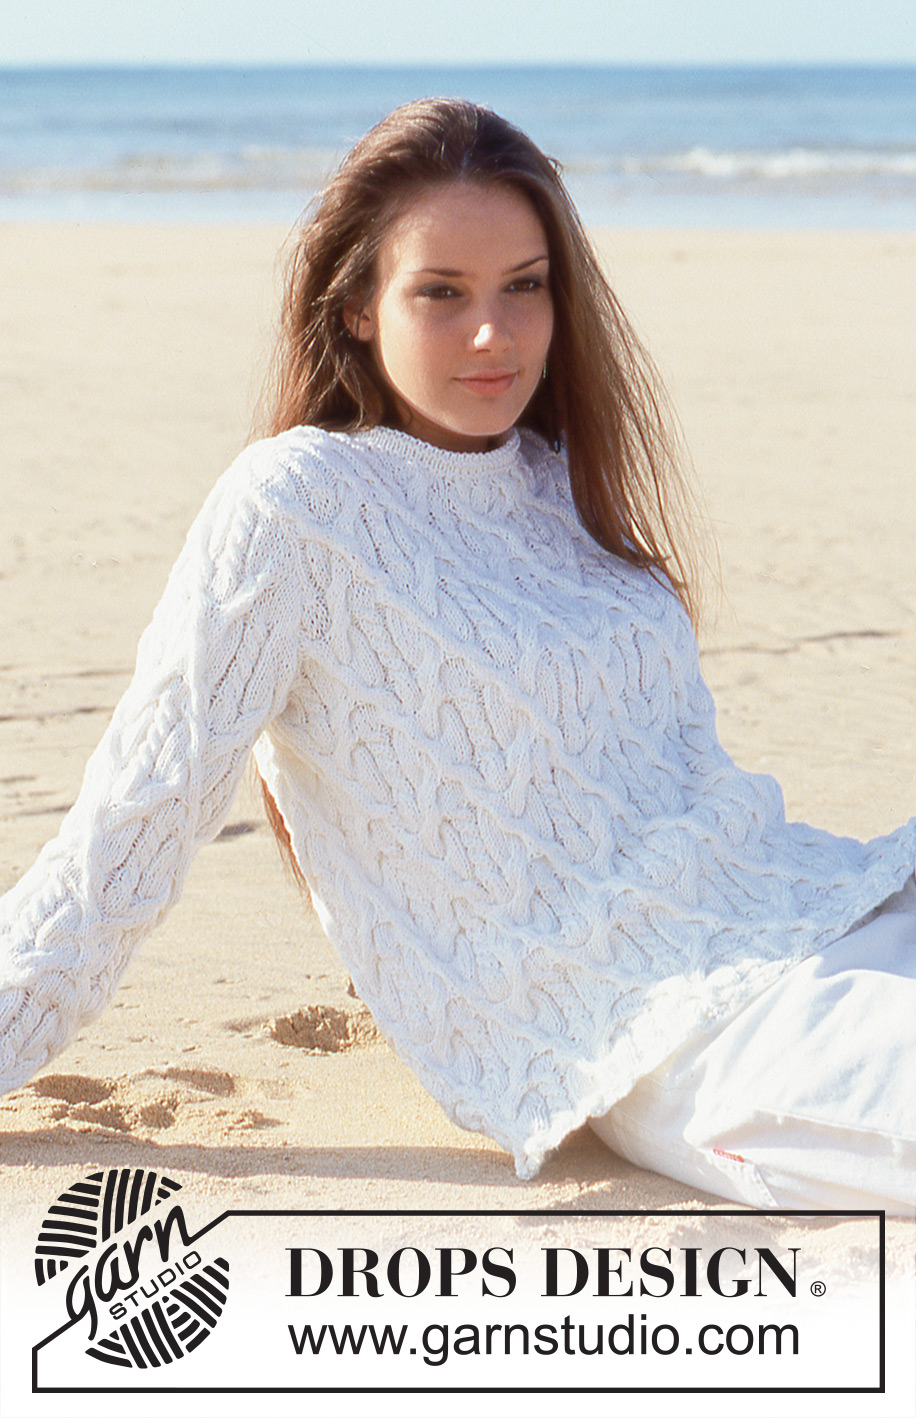
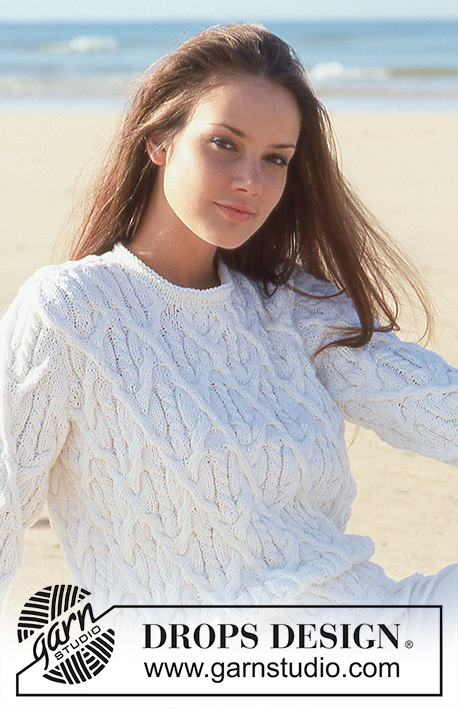
DROPS Cabled Sweater in Bomull-Lin
DROPS 64-11 |
||||||||||||||||||||||||||||
|
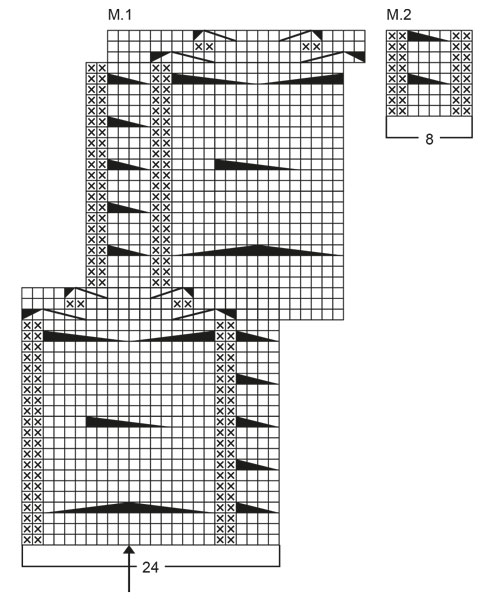
Gauge: 20 sts x 26 rows on larger needles in stockinette st = 10 x 10 cm. Pattern: See charts (1 chart = 1 repeat). The pattern is seen from the right side. An arrow indicates the center st («midt m») of the pattern. Note! In chart M.1 6 sts in right side should be displaced first when the 6 sts gets displaced in the left side. Body: Cast on 180-210-240 sts on smaller circular needles. Join and knit 2 rows garter st; increasing 108-126-144 sts evenly distributed on the last row as follows: * K 1, inc 1 st in the two following sts, K 1, inc 1 st in the next st *, repeat from * - * = 288-336-384 sts. Change to larger circular needles and knit Pattern 1 over all sts. Attach a marker at the center front and center back - see the arrow on the chart. When the work measures 39-41-44 cm, bind off 8 sts at each side (4 sts each side of side markers) for armholes. Front and back each = 136-160-184 sts. Knit the rest of the front and back separately. Front: = 136-160-184 sts. Bind off at each side for armholes every other row: 4 sts 0-1-1 time, 3 sts 0-2-4 times, 2 sts 1-2-4 times, 1 st 3-3-5 times = 126-126-126 sts. Keep 1 st at each side in garter st throughout and continue in pattern. When the work measures 50-53-56 cm, dec 16-16-16 sts evenly distributed over the center 38-38-38 sts. On the next row, bind off the 24-24-24 center sts for the neck. Bind off at each neck edge every other row: 2 sts 4 times, 1 st 3 times = 32-32-32 sts remain on each shoulder. When the work measures 58-61-64 cm, dec 10-10-10 sts evenly distributed on each shoulder = 22-22-22 sts. On the next row, bind off all sts. Back: = 136-160-184 sts. Bind off for armholes as on the front = 126-126-126 sts. Keep 1 st at each armhole edge in garter st throughout and continue in pattern until the work measures 56-59-62 cm. Dec 20-20-20 sts evenly distributed over the center 54-54-54 sts. On the next row, bind off the center 34-34-34 sts. Bind off 2 sts at each neck edge every other row 2 times = 32-32-32 sts remain on each shoulder. When the work measures 58-61-64 cm, dec 10-10-10 sts evenly distributed on each shoulder = 22-22-22 sts. On the next row, bind off all sts. Sleeve: Cast on 50-50-50 sts on smaller double pointed needles; join and place a marker at the join. Knit 2 rows garter st; increasing 30-30-30 sts evenly distributed on the last row = 80-80-80 sts. Change to larger double pointed needles and establish pattern as follows: Pattern 2 over 8 sts (4 sts each side of marker), and Pattern 1 over the remaining 72 sts. Continue in pattern as established. When the work measures 6 cm, inc 1 st at each side of Pattern 2, 12-12-12 times: Size XS: every 9 rows Sizes S/M and L: alternately every 8 and 9 rows = 104-104-104 sts. Knit the increased sts into Pattern 1 as you go along. When the work measures 49-46-45 cm, bind off 4 sts each side of marker (the 8 sts of Pattern 2). Bind off at each side for sleeve cap every other row: 4 sts 2-0-0 times, 3 sts 1-2-1 times, 2 sts 1-8-13 times, 3 sts 1-2-2 times, 4 sts 3-1-0 times. Dec 8 sts evenly distributed over the remaining sts. On the next row bind off all sts. Assembly: Sew shoulder seams. Pick up approx. 90 to 100 sts around the neck on smaller double pointed needles and join. Purl 1 row (right side row), knit 4 rows stockinette st, purl 1 row, and then knit 5 rows stockinette st for facing. Bind off loosely, fold the facing over double against the wrong side and sew. Sew in the sleeves using the edge sts on the body as a seam allowance. |
||||||||||||||||||||||||||||
Diagram explanations |
||||||||||||||||||||||||||||
|
||||||||||||||||||||||||||||
 |
||||||||||||||||||||||||||||
 |
||||||||||||||||||||||||||||
Have you finished this pattern?Tag your pictures with #dropspattern #cablemagicsweater or submit them to the #dropsfan gallery. Do you need help with this pattern?You'll find 20 tutorial videos, a Comments/Questions area and more by visiting the pattern on garnstudio.com. © 1982-2026 DROPS Design A/S. We reserve all rights. This document, including all its sub-sections, has copyrights. Read more about what you can do with our patterns at the bottom of each pattern on our site. |
||||||||||||||||||||||||||||


With over 40 years in knitting and crochet design, DROPS Design offers one of the most extensive collections of free patterns on the internet - translated to 17 languages. As of today we count 324 catalogues and 12290 patterns translated into English (UK/cm).
We work hard to bring you the best knitting and crochet have to offer, inspiration and advice as well as great quality yarns at incredible prices! Would you like to use our patterns for other than personal use? You can read what you are allowed to do in the Copyright text at the bottom of all our patterns. Happy crafting!
Post a comment to pattern DROPS 64-11
We would love to hear what you have to say about this pattern!
If you want to leave a question, please make sure you select the correct category in the form below, to speed up the answering process. Required fields are marked *.