Comments / Questions (43)
![]() Nancy Mulder wrote:
Nancy Mulder wrote:
Bij de schouder staat dat je in de eerste stokjes in A5 moet haken. Voor maat L Maar hoeveel stokjes moet je dan haken?
10.04.2025 - 14:39DROPS Design answered:
Dag Nancy,
Je haakt A.3a, dan A.3B 6 keer in totaal in de breedte.
13.04.2025 - 09:30
![]() Maite wrote:
Maite wrote:
Los patrones son muy difíciles y están mal explicados. Cuesta muchísimo seguirlos.
19.05.2024 - 19:16
![]() Trine wrote:
Trine wrote:
Bindes vesten sammen foran eller hænger den løst?
15.10.2023 - 16:18DROPS Design answered:
Hej Trine, Vi har lavet 2 snore midt foran, så man kan binde sammen hvis man vil :)
17.10.2023 - 15:41
![]() Mesnier wrote:
Mesnier wrote:
Mais pourquoi ne voit on pas ce " coin" sur la photo en bas du gilet ? Merci
07.09.2023 - 13:14DROPS Design answered:
Bonjour Mme Mesnier, ce n'est pas forcément important, le coin va se trouver côté bas du gilet, orientez-vous à l'aide des diagrammes et des indications précédentes pour bien vous repérer; n'hésitez pas à demander de l'aide à votre magasin ou via notre DROPS Workshop, ce sera peut-être ainsi plus facile à d'autres crocheteuses de pouvoir vois aider en voyant votre ouvrage. Bon crochet!
07.09.2023 - 17:00
![]() Mesnier wrote:
Mesnier wrote:
J'aimerais simplement savoir SI LE COIN (2 brides 3 mailles 2 brides) se trouve EN HAUT ou EN BAS du gilet ? MErci
01.09.2023 - 18:15DROPS Design answered:
Bonjour Mme Mesnier, si vous parlez de ce groupe crocheté dans A.4C, c'est alors bien en bas du devant (côté opposé à l'épaule). Bon crochet!
04.09.2023 - 09:23
![]() Mesnier wrote:
Mesnier wrote:
Toujours moi, est-ce que le coin (2 brides 3 mailles en l'air 2 brides) se trouve en bas ou en haut du gilet ? J'ai fait les devants et le dos il y a un certain temps et je ne me souviens pas où j'ai terminé mon dernier rang ? Donc coin vers emmenchures ou en bas du gilet ? Cordialement
01.09.2023 - 12:28DROPS Design answered:
Bonjour Mme Mesnier, parlez-vous de cette partie du diagramme de A.4C? Alors A.4c se trouve à gauche, vu sur l'endroit (pour le devant droit), autrement dit du côté opposé à celui où on va crocheter l'épaule. Bon crochet!
01.09.2023 - 15:34
![]() Mesnier wrote:
Mesnier wrote:
Merci pour votre réponse mais j'aimerais savoir où se trouve le coin (2 brides 3 mailles en l'air 2 brides) par rapport à l'épaule ? Merci pour votre réponse Cordialement
31.08.2023 - 10:01DROPS Design answered:
Bonjour Mme Mesnier, je ne suis pas bien sûre de comprendre votre question, vous avez d'abord crocheté un demi-cercle, en terminant soit par A.4 soit par A.5. Pour crocheter l'épaule, vous aller travailler uniquement les premières mailles de droite, vus sur l'endroit autrement dit, vous crochetez au-dessus du diagramme A.4A (en S/M) ou A.5A/B (en L/XL et XXLXXXL). Ai-je bien compris cette fois?
01.09.2023 - 08:28
![]() Mesnier wrote:
Mesnier wrote:
Je suis perdue. Où faire les épaules ? Où placer le coin par rapport aux épaules ? Cordialement
29.08.2023 - 10:27DROPS Design answered:
Bonjour Mme Mesnier, l'épaule se fait sur les premières brides de A.4/A.5, vu sur l'endroit, autrement dit, sur le côté droit du demi-cercle pour le devant droit. Bon crochet!
30.08.2023 - 07:38
![]() Mesnier wrote:
Mesnier wrote:
Je suis complètement perdue... où et comment faire les épaules ? Où placer le \"coin\" par rapport aux épaules ? Merci pour votre réponse. Cordialement
29.08.2023 - 10:23
![]() Michelle Williamson wrote:
Michelle Williamson wrote:
Why does the stitches on the vest look different to the pattern and i think the pattern is slightly off i am counting the stitches on the pictures and they don't line up and i feel the beginning of A.1 and A.2 is off.
30.09.2022 - 11:32DROPS Design answered:
Dear Mrs Williamson, A.1 is just showing how to start/end each round, then you will work A.2 a total of 4 times in the round - make sure you are reading the appropriate English pattern since UK and US crochet terms are different - maby it can help? Read more about crochet diagrams here. Happy crocheting!
30.09.2022 - 13:19
Bonita#bonitavest |
||||||||||||||||||||||||||||||||||||||||||||||
 |
 |
|||||||||||||||||||||||||||||||||||||||||||||
Crochet vest with crochet square and lace pattern in DROPS Paris. Size: S - XXXL
DROPS 175-24 |
||||||||||||||||||||||||||||||||||||||||||||||
|
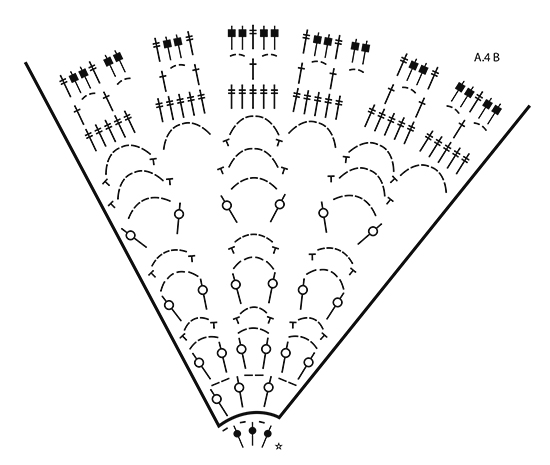
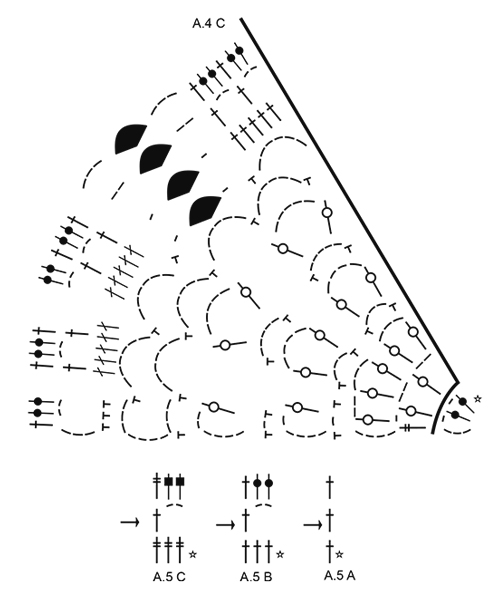
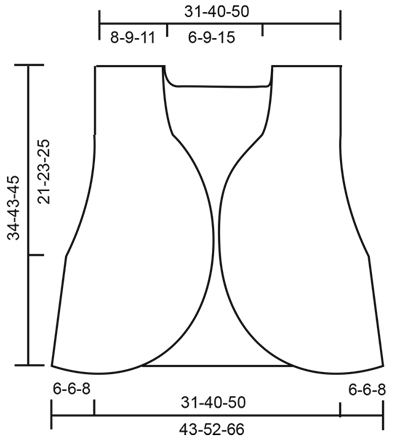
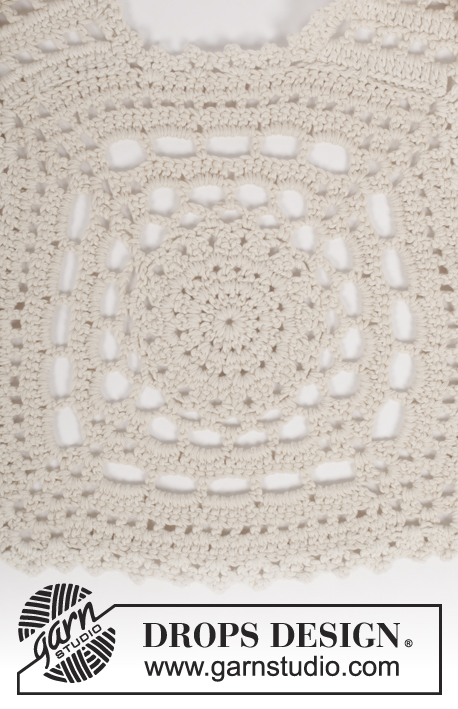
PATTERN: See diagrams A.1 to A.5. CROCHET INFO: At beginning of every round/row with trebles replace first treble on round/row with 3 chain stitches. At beginning of every round/row with double crochet work 1 chain stitch (does not replace first double crochet). INCREASE TIP: Increase 1 treble by working 2 trebles in same stitch. Increase 1 double treble by working 2 double trebles in same stitch. ---------------------------------------------------------- VEST: The vest is worked in 3 parts. Work back piece as a square separately. Work front pieces as a half circle and continue up to shoulder. When front pieces and back piece are sewn together, work 1 round with picots along entire outer edge. BACK PIECE: Begin with crochet hook size 5 mm and Paris and work pattern according to diagram A.2 4 times in total on round (A.1 shows how round begins and ends). REMEMBER THE CROCHET TENSION! When A.2 has been worked, there are 35 trebles along each side and 4 corners that consist of 2 trebles, 3 chain stitches and 2 trebles. The square for back piece is done for size S/M, fasten off. Crochet square measures approx. 28 x 28 cm. Continue in the round in size L/XL and XXL/XXXL as follows: L/XL: Repeat the last 2 rounds. Increase 1 treble before and after each corner. There are now 2 trebles more on each of the 4 sides = 39 trebles along each side. Fasten off. Crochet square measures approx. 37 x 37 cm. XXL/XXXL: Repeat the last 2 rounds. Increase 1 treble before and after each corner. There are now 2 trebles more on each of the 4 sides = 43 trebles along each side. Work slip stitches until chain space with 3 chain stitches in first corner. Then work from 2nd row in diagrams A.3A to A.3C back and forth along one side as follows: Work A.3A around this chain space (shows how row begins and ends) - READ CROCHET INFO. Work A.3B until 1 treble remains before chain space in next corner, work A.3C (= 1 chain stitch, skip 1 treble and work 1 treble around chain space in corner). Turn and work last row in diagrams. Fasten off. Work the same way along the side on opposite side of square. Fasten off. Crochet square measures approx. 47 x 37 cm. RIGHT FRONT PIECE: Work 4 chain stitches on hook size 5 mm with Paris and form a ring with 1 slip stitch in first chain stitch. Then work a half circle as follows: ROW 1: Work 4 chain stitches, * 1 treble around chain stitch ring, 1 chain stitch *, repeat from *-* 7 more times, finish with 1 treble around ring. Turn and work as follows from right side: Work A.4A, A.4B, A.4C. On last row in diagrams increase evenly as follows - READ INCREASE TIP: Increase 0-6-6 trebles over A.4A (= 27-33-33 trebles) and 0-9-9 double trebles over A.4B (= 30-39-39 double trebles). Increase 0-3-3 trebles before corner in A.4C (= 6-9-9 trebles) and increase 0-3-3 trebles after corner (= 13-16-16 trebles). there are 76-97-97 stitches in total + corner (= 2 trebles, 3 chain stitches, 2 trebles) on last row. Size S/M is now done, fasten off. Work back and forth in the 2 next sizes as follows: L/XL- XXL/XXXL: Turn and work from wrong side. Work from row marked with arrow in diagrams as follows: Work A.5B over the first 15 trebles, A.5A, 3 chain stitches, (2 trebles, 3 chain stitches, 2 trebles) around chain space in corner, 3 chain stitches, A.5B over the next 9 trebles, A.5C over the next 39 double trebles, A.5B over the next 32 trebles, finish with A.5A in the last treble on row. Work last row in diagrams the same way. There are now 97 trebles/double trebles + 1 corner (= 2 trebles, 3 chain stitches, 2 trebles) on last row. Fasten off. SHOULDER: Now work back and forth over the first trebles from right side in A.4 (in size S/M) and A.5 (in size L/XL and XXL/XXXL), begin from 2nd row in diagrams as follows: Work A.3A, A.3B 5-6-7 times in total in width. Turn and work last row. Repeat the 2 last rows in diagrams 3-3-4 more times. Fasten off. LEFT FRONT PIECE: Work as right front piece but reversed. ASSEMBLY: S/M and L/XL: Sew shoulder on to each side at the top edge on crochet square/back piece. Sew stitches together one by one. On back piece there are now 17-21 trebles for neck between shoulder pieces. Cut the yarn and fasten off. XXL/XXXL: Sew shoulder on to each side at the top edge on crochet square/back piece. Sew the 6 outermost treble crochets on shoulder to the side of the 2 outermost rows on back piece and sew the other stitches together one by one. On back piece there are now 25 trebles for neck between shoulder pieces. Cut the yarn and fasten off. PICOT EDGE: Begin on top of one shoulder and work a picot edge as follows: Work * 1 treble in treble/around row, 3 chain stitches, 1 slip stitches in first of the 3 chain stitches, 2 trebles in same treble/around row, skip approx. 2.5 cm *, repeat from *-* around the entire vest, i.e. around both armholes, along edge on front pieces, back of neck along bottom edge on back piece. Finish with a slip stitch in first treble on round. Fasten off. TWINED STRING: Cut 2 lengths of 1.5 metres each. Twine the strands tog until they resist, fold the string double so that it twines again. Make a knot at each end. Thread string through picot edge at the front on one front piece and tie a knot. Make another 3 strings the same way. Fasten one to the other front piece. Use the 2 other strands to keep front and back piece together in each side: Start approx. 21-23-25 cm from top of one of the front pieces and the back piece. Thread the string back and forth through holes in the picot edge, between the front and back piece in zig zags (like a shoe lace) and tie them together at the bottom - see picture. Adjust length on string so that distance between front piece and back piece is approx. 6-6-8 cm. Repeat in the other side. |
||||||||||||||||||||||||||||||||||||||||||||||
Diagram explanations |
||||||||||||||||||||||||||||||||||||||||||||||
|
||||||||||||||||||||||||||||||||||||||||||||||
 |
||||||||||||||||||||||||||||||||||||||||||||||
 |
||||||||||||||||||||||||||||||||||||||||||||||
 |
||||||||||||||||||||||||||||||||||||||||||||||
 |
||||||||||||||||||||||||||||||||||||||||||||||
 |
||||||||||||||||||||||||||||||||||||||||||||||
Have you finished this pattern?Tag your pictures with #dropspattern #bonitavest or submit them to the #dropsfan gallery. Do you need help with this pattern?You'll find 14 tutorial videos, a Comments/Questions area and more by visiting the pattern on garnstudio.com. © 1982-2026 DROPS Design A/S. We reserve all rights. This document, including all its sub-sections, has copyrights. Read more about what you can do with our patterns at the bottom of each pattern on our site. |
||||||||||||||||||||||||||||||||||||||||||||||


Post a comment to pattern DROPS 175-24
We would love to hear what you have to say about this pattern!
If you want to leave a question, please make sure you select the correct category in the form below, to speed up the answering process. Required fields are marked *.