
Popular categories
Looking for a yarn?


Comments / Questions (133)
![]() Anna wrote:
Anna wrote:
Lovely dress, but the pattern is terrible and confusing! It's clearly made to save time and effort for whomever wrote it. The joined rounds at the back looks messy. Sloppy work.
18.06.2025 - 09:49
![]() Julia wrote:
Julia wrote:
Hallo, wie häkelt man die Blüte in A3 in einer Reihe?
09.06.2025 - 16:51DROPS Design answered:
Liebe Julia, meinen Sie 3. + 4. Reihe A.3? So häkeln Sie die 3. Reihe: *1 fM in das 1. Stb, 2 Lm, 2 M überspringen, in die nächste M: (1 Stb + 2 Lm + 1 Stb), 2 Lm, 2 M überspringen*, von *bis* wiederholen; bei der 3. Reihe häkeln Sie dann: *1 Luftmasche, dann um den Luftmaschenbogen mit 2 Lm der 3. Reihe häkeln Sie: (2 Stb zusammen (siehe 9. Symbol), 2 Luftmaschen)x3* von*bis*wiederholen. Viel Spaß beim Häkeln!
10.06.2025 - 09:02
![]() Joke Vanzandweghe wrote:
Joke Vanzandweghe wrote:
Hoi, Ik startte elke toer zoals in het patroon vermeld: gedeelte …INFORMATIE VOOR HET HAKEN: Begin elke toer met stokjes met 3 lossen (= 1 stokje), eindig de toer met 1 halve vaste in 3e losse aan begin van de toer … Dit resulteert echter in een steeds verder naar links opschuivende schuine naad op de rugzijde Ik begrijp mijn fout niet … Moet ik misschien een steek overslaan : vb. Na de 3 lossen of op het einde voor de halve vasten sluitsteek ?
05.05.2025 - 17:54DROPS Design answered:
Dag Joke,
Je hebt niks verkeerd gedaan, maar een eigenschap van haken in de rondte, dat je 'scheve' naden of overgangen krijgt en dit is niet erg. De totale afmetingen zouden nog steeds moeten kloppen. De enige manier om deze scheve overgangen te voorkomen is door na elke toer te keren en terug te haken (waarbij je wel telkens de toer sluit), alleen krijg je dan een ander effect van de steken, om dat je ze afwisselen aan de goede en de verkeerde kant hebt.
14.05.2025 - 13:26
![]() Annette wrote:
Annette wrote:
Jeg har lidt svært ved at forstå diagram a.3. Jeg skal tage ud i 2. omgang, men den består af stangmasker og luftmasker, så der kan jeg vel ikke tage ud. Skal jeg så tage ud på første eller tredje række? Eller hvad skal jeg gøre?
13.04.2025 - 22:03DROPS Design answered:
Hei Annette. 2. omgang i A.3 består av staver (staver om luftmaske og staver i maske). Husk at 1. rad du ser i diagrammet har en stjerne foran seg (= første omgang skal ikke hekles, den er allerede heklet, men viser hvordan neste omgang skal hekles i stavene). Så 1. rad i A.3 består av staver + luftmasker). mvh DROPS Design
28.04.2025 - 08:15
![]() Sam wrote:
Sam wrote:
I’ve done the lace at the top and it’s great but i’m stuck on the last round of A1. I’m increasing 6 stitches in total to give me 222. 222 is not divisible by 4 so do I put 6 stitches in some holes of the previous round, when increasing by 2? and 5 in the areas i need to increase by 1? Thanks so much
24.01.2025 - 23:27DROPS Design answered:
Dear Sam, the charts don't include the increases so you have the initial 216 stitches with 4 stitches in each chain space and then increase in some of the spaces to have 5 stitches in them. So spread the 6 stitches evenly . Since you should have 54 chain spaces you can spread them to work 5 stitches instead of 4 in every 9th chain space. Happy crochetting!
25.01.2025 - 23:18
![]() Sam wrote:
Sam wrote:
Hi all, I don’t suppose any one has the A1-3 diagrams written down as words? i’m struggling so much with them 😫. I’ve done a lot of crocheting but never using diagrams! Thank you!
23.01.2025 - 09:51DROPS Design answered:
Dear Sam, you have these videos, where you can see how A.1 and A.2 are worked: https://www.garnstudio.com/video.php?id=1154&lang=en and how to turn the chain stitch ring in the charts: https://www.garnstudio.com/video.php?id=1149&lang=en. You can also check the following lesson on how to interpret our crochet charts: https://www.garnstudio.com/lesson.php?id=69&cid=19. Finally, you can ask us any specific questions that may arise when reading or working the charts. Happy crochetting!
25.01.2025 - 20:07
![]() Sam wrote:
Sam wrote:
Hi everyone, just wondering what the sizing is like please im an 8 so not sure which to go with! Thanks
14.01.2025 - 09:08DROPS Design answered:
Dear Sam, measure a similar garment you have and like the shape and compare these measurements to the chart, this is the best way to find the appropriate size. Read more here. Happy knitting!
14.01.2025 - 10:39
![]() Berta wrote:
Berta wrote:
Lehetne egy részletesebb leírást, videót kapni a ruha elkészítéséről? Főleg az első sorok okoznak problémát. S méretben készíteném . K
26.11.2024 - 02:31DROPS Design answered:
Kedves Berta, sajnos nem áll módunkban a mintát átírni. Minden vonatkozó videót megtalál a "videók" fül alatt. Ha konkrét kérdése van tegye fel itt, vagy a Facebookon a Magyar DROPS csoportban magyar kötőstársaival együtt szívesen segítünk. Sikeres kézimunkázást!
16.01.2025 - 01:14
![]() Jana Staňková wrote:
Jana Staňková wrote:
Omlouvám se, ale nerozumím začátku 2.-3. řadě pak asi pokračuje návod schématem. Ráda bych si šaty uháčkovala ve velikosti L. A druhá otázka jaký je rozdíl mezi vzorem a schématem? Děkuji moc
06.08.2024 - 16:04
![]() Cécile wrote:
Cécile wrote:
Bonjour, pour A3 j'ai bien placé les fils marqueurs mais je ne sais pas comment les faire suivre sur les tours suivants vu que le nombre de mailles change à chaque tour, pouvez-vous m'aider ? Merci
16.07.2024 - 20:58DROPS Design answered:
Bonjour Cécile, faites simplement suivre les marqueurs comme avant - augmentez à intervalles réguliers sans vous préoccuper des marqueurs, lors de la 1ère augmentation, par la suite, vous augmenterez à chaque marqueur, mais au début, tant que les augmentations sont faites à intervalles réguliers, vos marqueurs peuvent rester en place. Bon crochet!
29.07.2024 - 10:22
|
||||||||||||||||||||||||||||||||||||||||
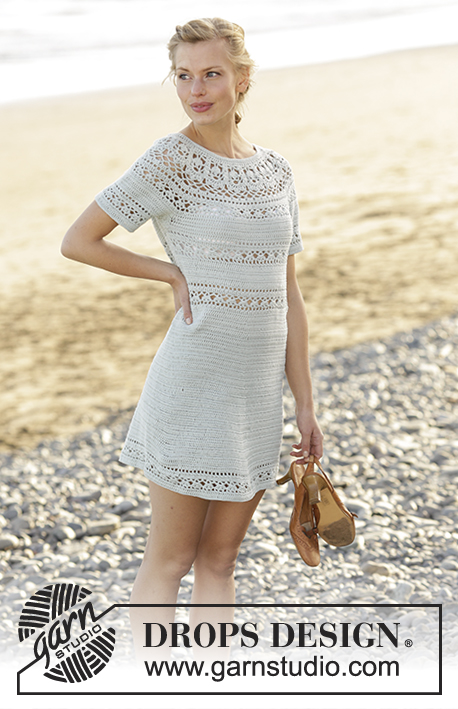
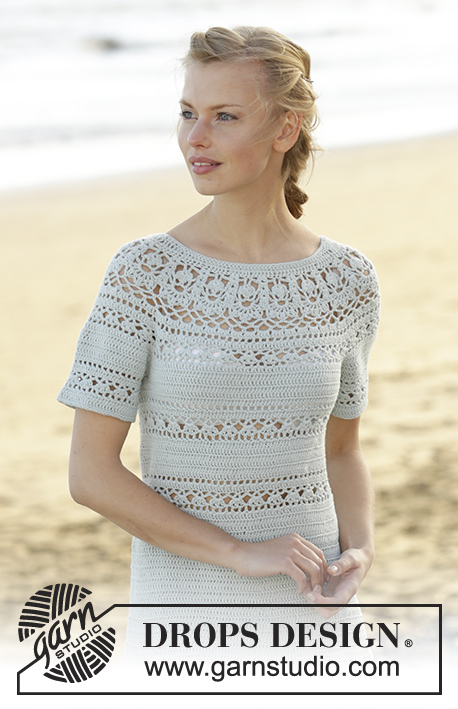
Grace in Lace#graceinlacedress |
||||||||||||||||||||||||||||||||||||||||
 |
 |
|||||||||||||||||||||||||||||||||||||||
Dress crochet from the top down with round yoke, lace pattern and short sleeves in DROPS Safran. Size: S - XXXL
DROPS 175-30 |
||||||||||||||||||||||||||||||||||||||||
|
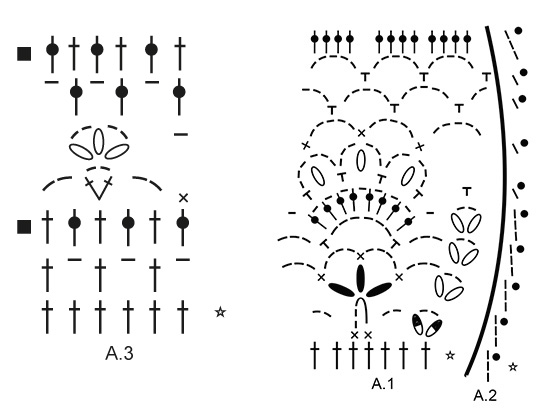
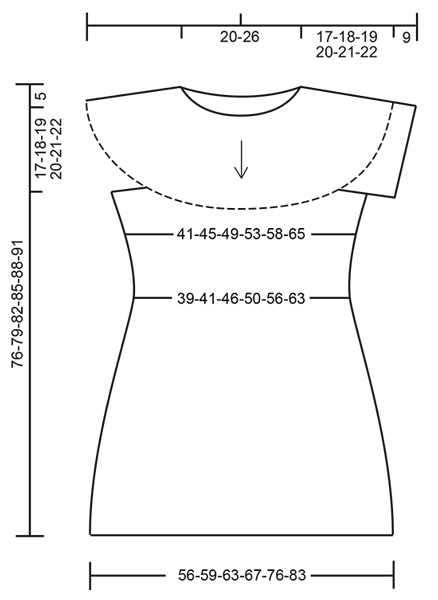
LACE PATTERN: See diagrams A.1 to A.3. A.2 shows how round begins and ends when working A.1 (A.2 is an addition to A.1, i.e A.2 replaces 1st stitch). CROCHET INFO: Begin every round with trebles with 3 chain stitches ,finish round with 1 slip stitch in 3rd chain stitch at beginning of round. Begin every round with double crochet with 1 chain stitch, finish round with 1 slip stitch in 1st chain stitch at beginning of round. 2nd and 5th round in A.3 begins with 3 chain stitches, finish round with 1 slip stitch in 3rd chain stitch at beginning of round. PATTERN-1 (applies to body): Work A.3. When A.3 has been worked 1 time vertically, work 5-6-8-9-10-11 rounds with 1 treble in every treble, then work A.3 one more time. INCREASE/DECREASE TIP: To calculate how to increase/decrease evenly, use the total number of stitches on row (e.g. 258 stitches) and divide stitches by number of increases/decreases to be done (e.g. 15) = 17.2. In this example increase after approx. every 17th stitch. If decrease, crochet approx. every 16th and 17th stitch together. INCREASE TIP-1: Increase 1 treble by working 2 trebles in same stitch. INCREASE TIP-2: Work until 2 trebles/chain stitches remain before marker thread, work 2 trebles in/around next treble/chain stitch (= 1 treble increased), work 1 treble in/around each of the next 2 treble/chain stitches, marker thread is in the middle of these trebles/chain stitches, work 2 trebles in/around next treble/chain stitch (= 1 treble increased). Repeat increase at every marker thread. DECREASE TIP: Decrease 1 treble by working the next 2 trebles together as follows: Work 1 treble but wait with last pull through (= 2 loops on hook), then work next treble but on last pull through, pull yarn through all 3 loops on hook. ---------------------------------------------------------- DRESS: Worked in the round from mid back, top down. YOKE: Work 146-146-155-155-163-163 chain stitches on hook size 3.5 mm with Safran and form a ring with 1 slip stitch in first chain stitch. Work first round as follows: Work 3 chain stitches - READ CROCHET INFO, 1 treble in each of the next 5-5-0-0-1-1 chain stitch, * skip 1 chain stitch, 1 treble in each of the next 6 chain stitches *, repeat from *-* the entire round = 126-126-133-133-140-140 trebles (including 3 chain stitches from the beginning of round). Then work A.1 in the round (= 18-18-19-19-20-20 repetitions of 7 stitches - A.2 shows how every round in A.1 begins and ends and comes in addition to A.1). REMEMBER THE CROCHET TENSION! On last round in A.1 insert 8 marker threads and crochet as follows: Work as shown in diagram and increase as explained below – READ INCREASE-TIP 1: Work 29-29-31-31-33-33 trebles and increase 0-0-0-1-0-0 trebles evenly, insert 1 marker thread in piece, work 4 trebles and increase 2-4-4-4-4-4 trebles evenly (= right back piece), insert 1 marker thread, work 42-42-44-44-46-46 trebles and increase 0-1-1-2-1-1 trebles evenly, insert 1 marker thread, work 4 trebles and increase 2-4-4-4-4-4 trebles evenly, insert 1 marker thread (= sleeve), work 58-58-62-62-66-66 trebles and increase 0-0-0-2-0-0 trebles evenly, insert 1 marker thread, work 4 trebles and increase 1-4-4-4-4-4 trebles evenly, insert 1 marker thread (= front piece), work 42-42-44-44-46-46 trebles and increase 0-1-1-2-1-1 trebles evenly, insert 1 marker thread, work 4 trebles and increase 1-4-4-4-4-4 trebles evenly, insert 1 marker thread (= sleeve), work 29-29-31-31-33-33 trebles and increase 0-0-0-1-0-0 trebles evenly(= left back piece) = 222-234-246-252-258-258 trebles on round. Piece measures approx. 9 cm. Work 0-0-0-0-2-2 rounds with 1 treble in every treble and increase 0-0-0-0-12-15 trebles evenly on each of the rounds – READ INCREASE/DECREASE TIP (= 0-0-0-0-24-30 trebles in total) = 222-234-246-252-282-288 trebles. Move marker threads upwards when working. Repeat A.3 37-39-41-42-47-48 times in total in width. On 2nd round (i.e. round with trebles) increase at every marker thread – READ INCREASE TIP-2 and increase 2-8-8-8-8-8 trebles evenly on round (= 2 trebles increased at every marker thread and 2-8-8-8-8-8 trebles increase evenly = 18-24-24-24-24-24 trebles increased on round) = 240-258-270-276-306-312 trebles. Now repeat A.3 40-43-45-46-51-52 times in width. Repeat increase on last round in A.3 (i.e. 2 trebles increased at every marker thread and 2-8-8-8-8-8 trebles increased evenly = 18-24-24-24-24-24 trebles increased in total on round) = 258-282-294-300-330-336 trebles. * Work 1 round trebles with 1 treble in every treble. Work 1 round trebles and increase 18-18-16-17-24-26 trebles evenly *, repeat from *-* 1-1-2-3-2-3 times in total = 276-300-326-351-378-414 trebles. Work 0-1-1-0-1-0 rounds trebles with 1 treble in every treble. Piece measures approx. 17-18-19-20-21-22 cm. On next round work as follows: Work 1 treble in each of the first 39-43-47-51-57-64 trebles (= half back piece), work 8 chain stitches, skip 60-64-69-73-75-79 trebles from previous round (= sleeve), 1 treble in each of the next 78-86-94-103-114-128 trebles (= front piece), 8 chain stitches, skip 60-64-69-73-75-79 trebles from previous round (= sleeve), 1 treble in each of the last 39-43-47-51-57-64 trebles (= half back piece) = 172-188-204-221-244-272 trebles/chain stitches on round. Finish body and sleeves separately. BODY: Insert 1 marker on round – NOW MEASURE PIECE FROM HERE. Work 1 round trebles with 1 treble in every treble/chain stitch. Work 1 round more with 1 treble in every treble and decrease AT THE SAME TIME 4-2-0-5-4-2 trebles evenly – READ INCREASE/DECREASE TIP and DECREASE TIP = 168-186-204-216-240-270 trebles. Now work PATTERN-1 - see explanation above. AT THE SAME TIME when piece measures 9-10-11-12-13-14 cm, adjust so that next round is a round with trebles, decrease 6-12-12-6-6-6 trebles evenly = 162-174-192-210-234-264 trebles. Continue pattern-1. When piece measures 19-20-21-22-23-24 cm, increase 6 trebles evenly - READ INCREASE/DECREASE TIP AND INCREASE TIP-1. Increase like this every 3rd round 12-12-12-12-14-14 times in total = 234-246-264-282-318-348 trebles. When piece measures 49-51-53-55-57-59 cm from marker (entire dress measures approx. 71-74-77-80-83-86 cm), work A.3 in the round. When A.3 has been worked, work 1 round trebles with 1 treble in every treble. Then work 1 round double crochet with 1 double crochet in every treble. Fasten off. Dress measures approx. 76-79-82-85-88-91 cm from shoulder and down. SLEEVE: Sleeve is worked in the round, top down. Beg by working mid under sleeve as follows: Work 1 double crochet in the 5th chain stitch of the 8 chain stitches worked in armhole on body, work 3 chain stitches, work 1 treble in each of the next 3 chain stitches, work 1 treble in every treble over sleeve, work 1 treble in each of the remaining chain stitches under sleeve = 68-72-77-81-83-87 trebles on round. Insert 1 marker mid under sleeve – NOW MEASURE PIECE FROM HERE. SIZE S + M: Work 1 round trebles with 1 treble in every treble and decrease AT THE SAME TIME 2-0 trebles evenly = 66-72 trebles. SIZE L + XL + XXL + XXXL: Work 1 round trebles with 1 treble in every treble and increase AT THE SAME TIME 1-3-1-3 trebles evenly = 78-84-84-90 trebles. ALL SIZES: = 66-72-78-84-84-90 trebles. Work trebles in the round with 1 treble in every treble until piece measures approx. 3 cm from marker in all sizes. Now work A.3 in the round. When A.3 has been worked, work 1 round trebles with 1 treble in every treble. Then work 1 round double crochet with 1 double crochet in every treble. Fasten off. Work the other sleeve the same way. NECK EDGE: Worked back and forth from mid back - NOTE: Work in the chain stitches where trebles were worked, but do not work in the chain stitches skipped = 126-126-133-133-140-140 trebles). Work 1 double crochet in each of the first 16-16-18-18-20-20 stitches, * 1 half treble in each of the next 3 stitches, 1 treble in each of the next 3 stitches, 1 double treble in each of the next 19 stitches, 1 treble in each of the next 3 stitches, 1 half treble in each of the next 3 stitches *, 1 double crochet in each of the next 32-32-35-35-38-38 stitches, repeat from *-* 1 time and then work 1 double crochet in each of the last 16-16-18-18-20-20 stitches. Work next round as follows: Work 1 double crochet in each of the first 20-20-22-22-24-24 stitches, ** 1 half treble in each of the next 3 stitches, 1 treble in each of the next 3 stitches, * work the next 2 double trebles together *, repeat from *-* 5 more times, 1 treble in each of the next 3 stitches, 1 half treble in each of the next 3 stitches **, 1 double crochet in each of the next 38-38-41-41-44-44 stitches, repeat from **-** 1 more times and finish with 1 double crochet in each of the last 20-20-22-22-24-24 stitches = 114-114-121-121-128-128 stitches. Work 1 round with 1 double crochet in every stitch. Fasten off. |
||||||||||||||||||||||||||||||||||||||||
Diagram explanations |
||||||||||||||||||||||||||||||||||||||||
|
||||||||||||||||||||||||||||||||||||||||
|
||||||||||||||||||||||||||||||||||||||||
|
||||||||||||||||||||||||||||||||||||||||
Have you finished this pattern?Tag your pictures with #dropspattern #graceinlacedress or submit them to the #dropsfan gallery. Do you need help with this pattern?You'll find 13 tutorial videos, a Comments/Questions area and more by visiting the pattern on garnstudio.com. © 1982-2025 DROPS Design A/S. We reserve all rights. This document, including all its sub-sections, has copyrights. Read more about what you can do with our patterns at the bottom of each pattern on our site. |
||||||||||||||||||||||||||||||||||||||||


With over 40 years in knitting and crochet design, DROPS Design offers one of the most extensive collections of free patterns on the internet - translated to 17 languages. As of today we count 314 catalogues and 11822 patterns translated into English (UK/cm).
We work hard to bring you the best knitting and crochet have to offer, inspiration and advice as well as great quality yarns at incredible prices! Would you like to use our patterns for other than personal use? You can read what you are allowed to do in the Copyright text at the bottom of all our patterns. Happy crafting!
Post a comment to pattern DROPS 175-30
We would love to hear what you have to say about this pattern!
If you want to leave a question, please make sure you select the correct category in the form below, to speed up the answering process. Required fields are marked *.