
Popular categories
Looking for a yarn?


Comments / Questions (38)
![]() Marie Turpaud wrote:
Marie Turpaud wrote:
Bonjour .Les diminutions pour les rangs raccourcis se font sur le diagramme A2et A 1 ou apret Merci
16.04.2024 - 08:22DROPS Design answered:
Bonjour Mme Turpaud, quand on commence les rangs raccourcis, les diminutions doivent être terminées et l'ouvrage mesure environ 71 -83 cm (cf taille). Vous tricotez ensuite d'abord 2 rangs sur les 10 premières mailles, puis 2 rangs comme avant en continuant le diagramme comme avant pour que le motif continue à chaque fois que l'on tricote ces mailles. Bon tricot!
16.04.2024 - 13:26
![]() Nicole wrote:
Nicole wrote:
Bonjour madame, au début de l'ouvrage les 5 mailles montées sur la bordure et tricotées au point mousse sont montées une fois les augmentations du bord terminées ou en même temps ?
10.11.2023 - 10:24DROPS Design answered:
Bonjour Nicole, tout à fait, ces 5 nouvelles mailles sont montées à la fin du rang suivant sur l'envers, quand les augmentations sont terminées. Bon tricot!
10.11.2023 - 11:29
![]() Isabella Zaina wrote:
Isabella Zaina wrote:
Buonasera, non ho capito cosa devo fare alla fine del davanti/dietro sinistro quando si dice di lavorare a ferri accorciati la descrizione dei FERRO 1, FERRO 2, FERRO 3, FERRO 4 e nemmeno le fasi successive. Vi ringrazio anticipatamente.
12.09.2023 - 23:41DROPS Design answered:
Buonasera Isabella, in quel punto deve lavorare solo su una parte delle maglie e non su tutte le maglie sui ferri. Deve seguire le indicazioni, e lavorare solo sul numero di maglie indicato. Buon lavoro!
14.09.2023 - 20:12
![]() Christina Pernholt wrote:
Christina Pernholt wrote:
Sista stycket innan avmaskning, man stickar 17, vänder, stickar tillbaka, stick 15 vänder, tillbaka sen 2 räta varv, inkl 2 omslag. men på bild verkar det vara fler än 2 räta varv innan avmaskning? eller fattar jag fel? mvh christina
02.12.2021 - 20:40DROPS Design answered:
Hej Christina. Du ska sticka förkortade varv tills du har 3 maskor kvar ytterst ("sticka över 2 m mindre för varje gång det vänds") och när du har 3 maskor kvar ytterst så ökar du med omslag för att avmaskningskanten inte ska strama. Mvh DROPS Design
03.12.2021 - 10:49
![]() Truaud wrote:
Truaud wrote:
Merci pour votre réponse rapide et si je peut abuser combien environ doit mesurer l ouvrage terminé cordialement
15.10.2021 - 09:06DROPS Design answered:
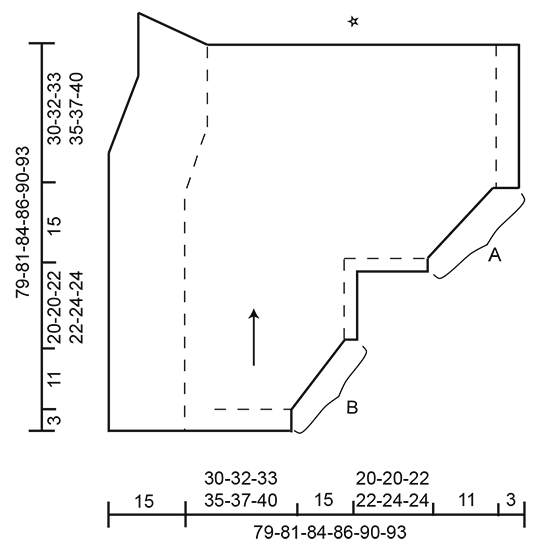
Bonjour Mme Truaud, retrouvez toutes les mesures dans le schéma, y compris la hauteur totale de la pièce: 79 à 93 cm selon la taille + les rangs raccourcis du haut. Bon tricot!
15.10.2021 - 13:40
![]() Truaud wrote:
Truaud wrote:
Bonjour lorsque vous dites le cote le plus court est ce celui de la manche je ne comprends pas bien cordialement
15.10.2021 - 07:10DROPS Design answered:
Bonjour Mme Truaud, vous devez mesurer du côté où vous avez tricoté moins de rangs, si vous regardez le schéma, ce sera du côté droit, vu sur l'endroit, à partir du rang de montage jusqu'aux mailles sur l'aiguille (cf flèche), mais avant les pointillés du schéma = avant les rangs raccourcis. Bon tricot!
15.10.2021 - 08:13
![]() Haas Gabriele wrote:
Haas Gabriele wrote:
Hallo, ab den verkürzten Reihen verstehe ich die Anleitung nicht mehr. Können Sie mir bitte helfen? LG
10.03.2021 - 23:02DROPS Design answered:
Liebe Frau Haas, beim linken Vorderteil/Rückenteil beginnen Sie diese verkürzten Reihen mit einer Rückreihe - die 4 Reihen (= 2 Reihe über die 10 ersten M, 2 Reihe über alle Maschen) wiederholen, dann stricken Sie verkürzten Reihen über nur die Krausrechte Maschen (= die 17 M), dh 2 Reihe über 17 M, 2 Reihe über 15 M, 2 Reihe über 13 M, usw bis Sie 2 Reihe über die ersten 3 M gestrickt haben (Schalkragen), dann stricken Sie 2 Reihen über alle Maschen und ketten Sie dann alle Maschen ab. Viel Spaß beim stricken!
11.03.2021 - 08:20
![]() Haas, Gabriele wrote:
Haas, Gabriele wrote:
Was bedeutet bei verkürzten Reihen das A. 1(=1-1-1-1-2-2x in der Breite)?? Danke schonmal im voraus für die Hilfe
10.03.2021 - 20:51DROPS Design answered:
Liebe frau Haas, wenn Sie die 3. Reihe bei den verkürzten Reihen stricken, stricken Sie alle Maschen, dh: 17 M re, A.1 (1 oder 2 x in der Breite je nach der Größe), glatt rechts und kraus rechts wie zuvor bis zur Ende der Reihe. Dann stricken Sie die nächste Hinreihe auch wie zuvor (kraus rechts, glatt rechts, A.1 und kraus rechts). Viel Spaß beim stricken!
11.03.2021 - 08:09
![]() Leila wrote:
Leila wrote:
Bonsoir, peut t'on réaliser ce modèle avec des aiguilles simple merci
31.01.2021 - 16:14DROPS Design answered:
Bonjour Leila, cela peut etre diffcile parce que tu as beaucoup de mailles. Comment tricoter en allers et retours sur aiguille circulaire tu peux voir ICI. Bon tricot!
31.01.2021 - 19:14
![]() Gail wrote:
Gail wrote:
I just finished this and love wearing it, however, I made a couple alterations. I found there was more fabric in front than back, and the placement of the armholes was almost too far back, therefore restrictive. To remedy this, I added a short-row expansions to both the left and right halves, at the end of the pattern, thereby increasing the hem width, without increasing the whole pattern size. I also joined with a crocheted flat braided join for some elasticity. Love the drape now.
12.01.2021 - 01:45
|
|||||||||||||||||||||||||
Swing Along#swingalongjacket |
|||||||||||||||||||||||||
 |
 |
||||||||||||||||||||||||
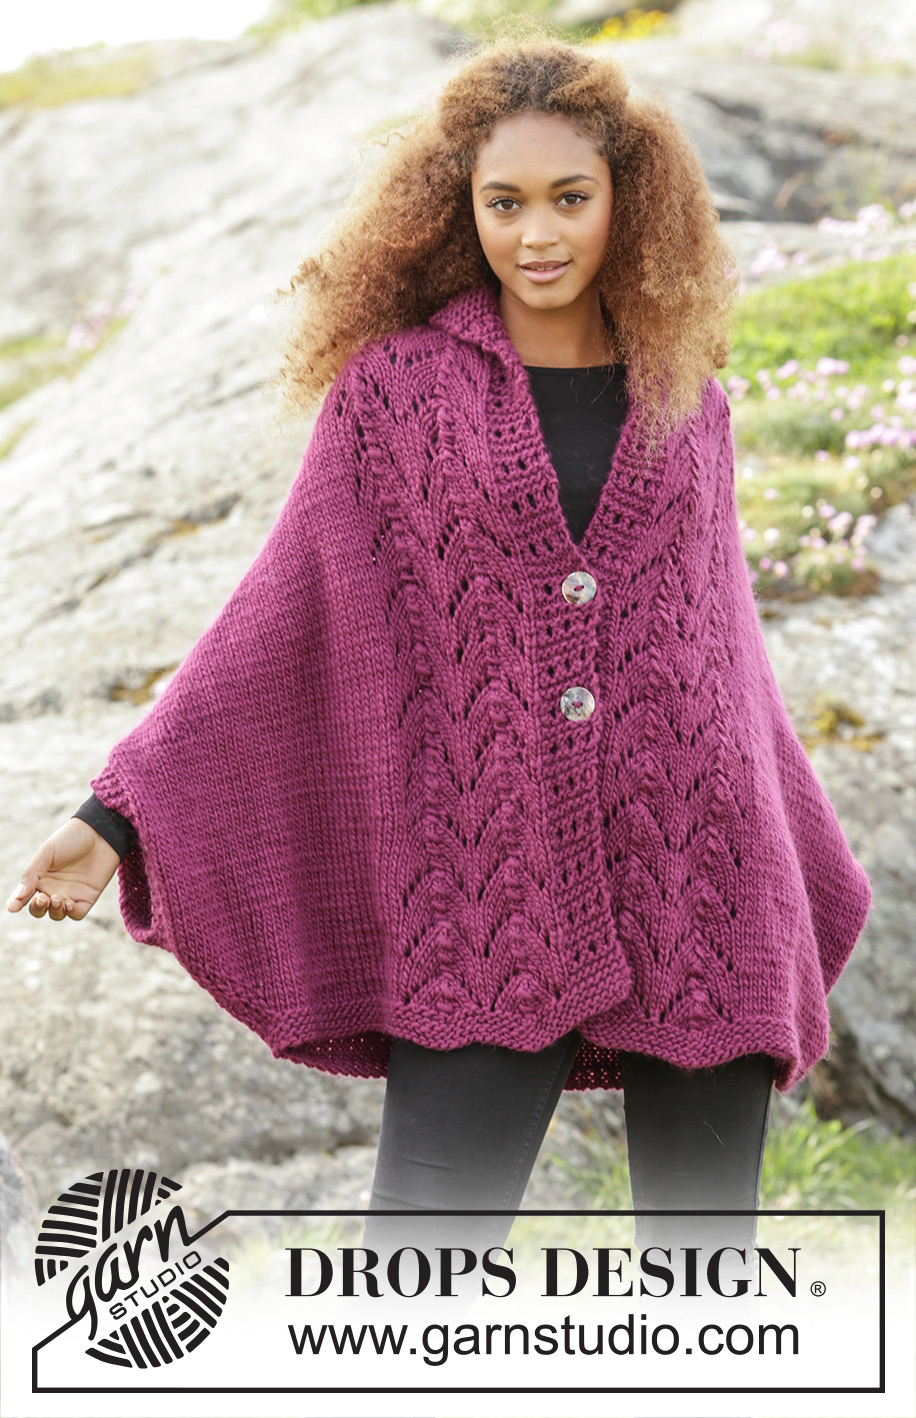
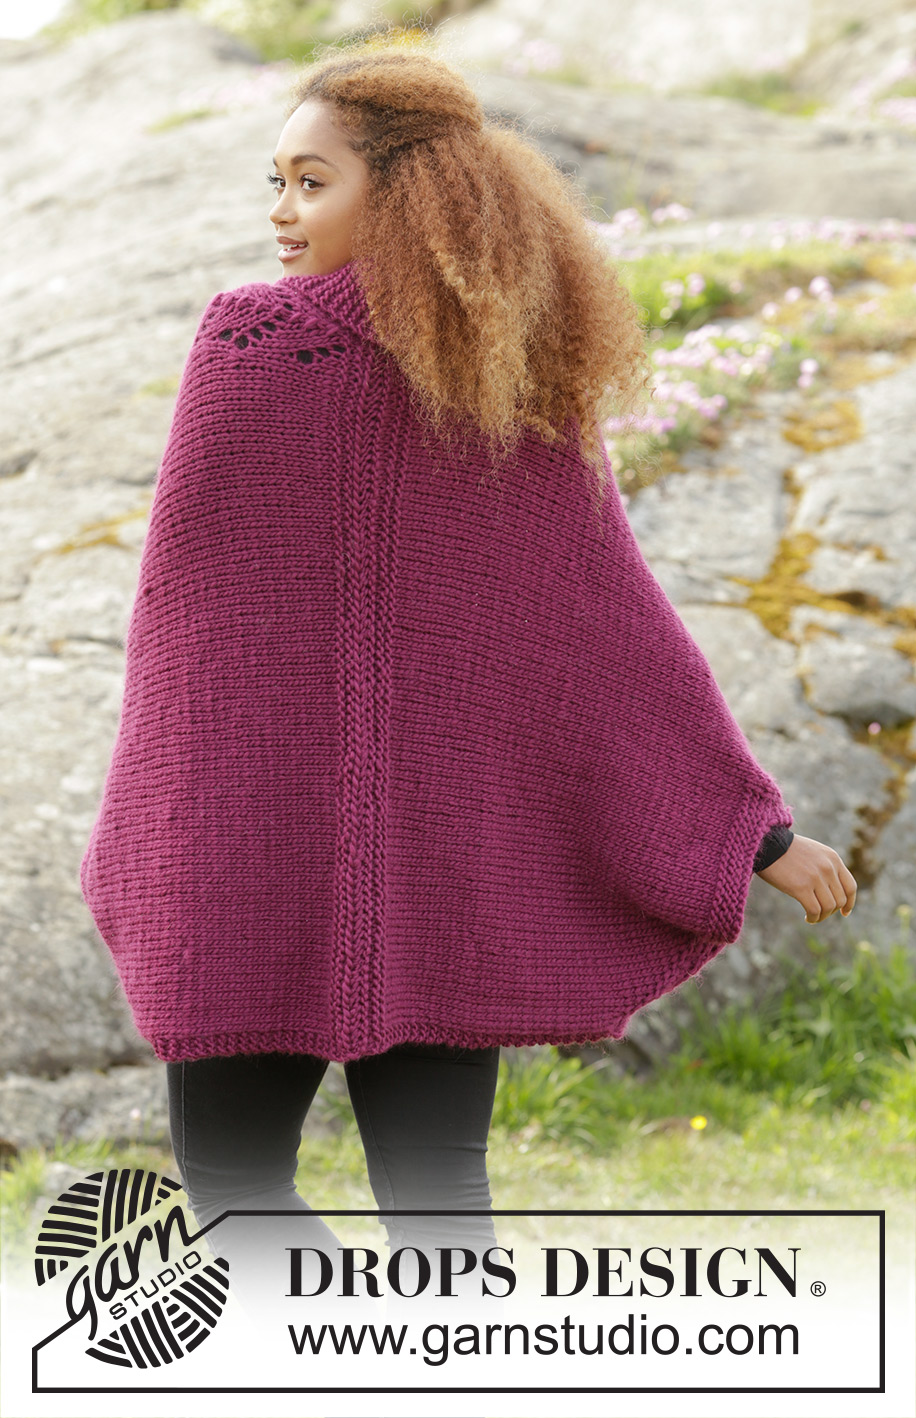
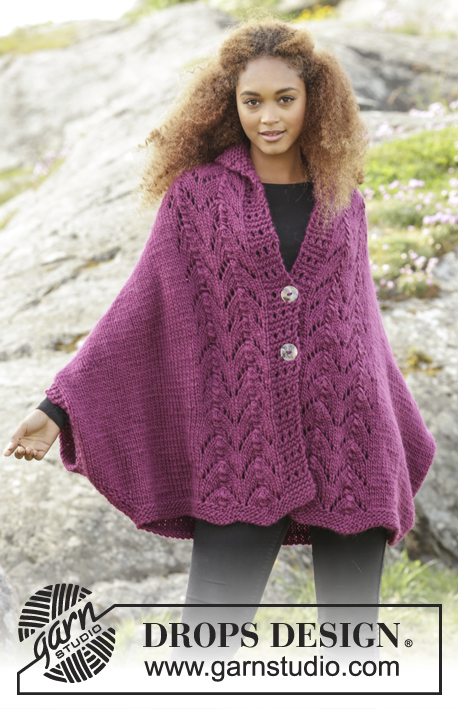
Knitted DROPS jacket with lace pattern and shawl collar in ”Snow”. Size: S - XXXL.
DROPS 172-21 |
|||||||||||||||||||||||||
|
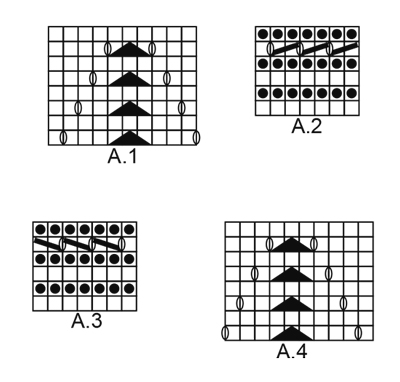
GARTER ST (back and forth): K all rows. 1 ridge = 2 rows K. PATTERN: See diagrams A.1 to A.4. The diagrams show all rows in pattern seen from RS. ---------------------------------------------------------- JACKET: Work back and forth in 2 parts from bottom edge on front piece to mid back. Sew the 2 parts tog mid back. LEFT FRONT PIECE/BACK PIECE: Worked back and forth on circular needle to make room for all the sts. Cast on 50-52-53-56-58-61 sts on circular needle size 8 mm with Snow. Work 3 ridges in GARTER ST - see explanation above. Work as follows from RS (i.e. from the side and towards mid front): Work 23-25-26-29-21-24 sts in stocking st, A.1 (= 10 sts) over the next 20-20-20-20-30-30 sts (= 2-2-2-2-3-3 times in width in total) and A.2 over the last 7 sts. Work pattern like this until finished measurements. On next row from WS beg inc towards the side and cast on new sts at end of every row from WS as follows: Cast on 1 st 2 times in total and 2 sts 5 times in total, work the inc sts in stocking st. On next row from WS, cast on 5 sts at the end of row (work these 5 sts in garter st for sleeve edge) = 67-69-70-73-75-78 sts. REMEMBER THE KNITTING TENSION Piece now measures approx. 14 cm. Work as before until piece measures 34-34-36-36-38-38 cm. LOOSELY cast on 22-22-24-24-26-26 new sts for sleeve at the end of next row from WS = 89-91-94-97-101-104 sts. The 22-22-24-24-26-26 new sts are worked in garter st = 27-27-29-29-31-31 sts in garter st in right side seen from RS. Work 6 rows as before. Then work stocking st over the 27-27-29-29-31-31 sts in garter st (= 62-64-67-70-64-67 sts in stocking st in total), 20-20-20-20-30-30 sts pattern A.1 and 7 sts pattern A.2. On next row from WS beg inc towards the side and cast on new sts at end of every row from WS as follows: Cast on 2 sts 2 times in total and 1 st 8 times in total. Work inc sts in stocking st. On next row from WS, cast on 3 sts at the end of row (work these 3 sts in garter st until finished measurements) = 104-106-109-112-116-119 sts. When piece measures 58-60-59-61-61-64 cm, dec 1 st for neck towards mid front from RS by K 2 sts in stocking st tog before A.1. Dec like this every 4th row 6-6-7-7-8-8 times in total = 98-100-102-105-108-111 sts. Piece measures approx. 71-73-75-77-80-83 cm. Now work short rows over sts, beg from the neck (= WS) as follows: ROW 1 (= WS): K 10. ROW 2 (= RS): K 10 back. ROW 3 (= WS): K 17, work A.1 (= 1-1-1-1-2-2 times in width), stocking st and garter st as before the rest of row. ROW 4 (= RS): Work in garter st, stocking st and A.1 as before until 17 sts on needle, finish with K 17. Repeat 1st to 4th row until piece measures 78-80-83-85-89-92 cm at the shortest, adjust so that the next row is worked from WS. Row 1 (= WS): K the first 17 sts, turn piece. Row 2 (= RS): K back. Row 3 (= WS): K the first 15 sts, turn piece. Row 4 (= RS): K back. Work 2 sts less on every turn. When 1 ridge have been worked over the outermost 3 sts, work 1 ridge over all sts (= mid back) AT THE SAME TIME on row from WS inc with 1 YO between 5th and 6th st and between 13th and 14th st (= 2 sts inc, this is done to avoid a tight cast-off). Cast off while working K. RIGHT FRONT PIECE/BACK PIECE: Work as left front piece/back piece but reversed. Work A.3 instead of A.2 and A.4 instead of A.1. Dec and cast on sts in left side of piece (i.e. at the end of row from RS). NOTE: Dec for neck after A.4 (from RS). Dec by slipping 1 st as if to K, K 1, psso. ASSEMBLY: Sew the two parts tog mid back in front loop of outermost sts. Sew tog A against B - see chart – sew in outer loops of edge sts. Sew on buttons on left band. Button through holes in A.3 on right band. |
|||||||||||||||||||||||||
Diagram explanations |
|||||||||||||||||||||||||
|
|||||||||||||||||||||||||
 |
|||||||||||||||||||||||||
 |
|||||||||||||||||||||||||
Have you finished this pattern?Tag your pictures with #dropspattern #swingalongjacket or submit them to the #dropsfan gallery. Do you need help with this pattern?You'll find 23 tutorial videos, a Comments/Questions area and more by visiting the pattern on garnstudio.com. © 1982-2026 DROPS Design A/S. We reserve all rights. This document, including all its sub-sections, has copyrights. Read more about what you can do with our patterns at the bottom of each pattern on our site. |
|||||||||||||||||||||||||


With over 40 years in knitting and crochet design, DROPS Design offers one of the most extensive collections of free patterns on the internet - translated to 17 languages. As of today we count 324 catalogues and 12290 patterns translated into English (UK/cm).
We work hard to bring you the best knitting and crochet have to offer, inspiration and advice as well as great quality yarns at incredible prices! Would you like to use our patterns for other than personal use? You can read what you are allowed to do in the Copyright text at the bottom of all our patterns. Happy crafting!
Post a comment to pattern DROPS 172-21
We would love to hear what you have to say about this pattern!
If you want to leave a question, please make sure you select the correct category in the form below, to speed up the answering process. Required fields are marked *.