
Popular categories
Looking for a yarn?


Comments / Questions (149)
![]() Ute Ortland wrote:
Ute Ortland wrote:
Hallo, jetzt komme ich gar nicht mehr weiter. Habe den unteren Rand linkes Rückenteil gestrickt und das Seitenteil damit verbunden. Jetzt gerade aus weiter Stricken bis eine Masche vor der Vorderteil-Spitze? Ich bin dann aber auf der Rückreihe in grau. Das Video hilft mir da leider auch nicht weiter, weil ich den wichtigen Teil nicht erkennen kann. Wird die Arbeit nochmal gedreht? Ich habe mit der 8. Reihe aufgehört und stricke in Größe M. Vielen Dank für Ihre Hilfe
04.08.2020 - 20:36DROPS Design answered:
Liebe Frau Ortland, stricken Sie jetzt die Rückreihe und dann stricken Sie die 1. Reihe = Hinreihe für das linke Vorderteil = bis zur Spitze vom Quadrat, dann bis die Seite, dh Sie wiederholen jetzt (von der Seite durch das Vorderteil bis die andere Seite) die 8 Reihen (1. Reihe =Hinreihe) wie unter linkes Vorderteil beschrieben werden. Viel Spaß beim stricken!
05.08.2020 - 07:55
![]() Vivien Ohnemus wrote:
Vivien Ohnemus wrote:
Habe Dominos und unterer Rand endlich gemeistert und will jetzt die Passe anfangen. Rechtes Rückenteil Gr M. Es heißt: 70 M auf der einen Seite des Domimoquadrats aufnehmen, 2 M an der Spitze und 70 M auf der anderen Seite. Für mich ist die Spitze dort wo man angefangen hat das Quadrat zu Stricken, oder? Also fange ich mit Maschenaufnehmen unten in der Taille an. Aber wenn ich mit verkürzten Reihe in der Taille anfange ist dort die Breite. Da stimmt was nicht! Wo fange ich an?
16.04.2020 - 10:32DROPS Design answered:
Liebe Frau Ohnemus, stimmt, Sie fassen insgesamt 142 M (= 70 M + 2 + 70) und stricken eine Rückreihe mit Zunahmen = 84 M beidseitig (= 160 M insgesamt), dann stricken Sie nur die eine Seite von dem Quadart, die die ersten 84 M mit verkürzten Reihen und Zunahme an der Seite. Viel Spaß beim stricken!
16.04.2020 - 11:11
![]() Josefine wrote:
Josefine wrote:
Jeg er i tvivl omkring aflukning til ærmegab. Når der står man skal lukke 4 masker af i hver side, 2 gange, betyder det så 8 masker i alt (4 i hver side), eller 16 masker i alt (4 i hver side to gange)?
29.02.2020 - 21:25DROPS Design answered:
Hei Josefine. Du skal felle 4 masker 2 ganger på begynnelsen av hver pinne (= 16 masker), deretter 2 masker 3 ganger (=12 masker), så 1 maske 2 ganger ( = 4 masker). God Fornøyelse!
02.03.2020 - 14:29
![]() ANA EMILIA GARCIA ALVAREZ wrote:
ANA EMILIA GARCIA ALVAREZ wrote:
TENGO DOS PREGUNTAS SIN CONTESTAR IGUAL NO LAS HICE CORRECTAMENTE
26.11.2019 - 11:19
![]() ANA EMILIA GARCIA ALVAREZ wrote:
ANA EMILIA GARCIA ALVAREZ wrote:
TADAVIA NO RECIVI LA RESPUESTA A LA PRIMERA PREGUNTA YA NO ME HACE FALTA YA ENCONTRE EL VIDEO PERO AHORA NO SE EMPEZAR LA PARTE DE ARRIBA NO SE AQUE PUNTA DE DOMINO SE REFIERE A LA DE ARRIBA DEL CENTRO DE LA ESPALDA O LA DE DEBAJO DE LA SISA
25.11.2019 - 10:45DROPS Design answered:
Hola Ana. En primer lugar, para que recibamos correctamente la pregunta tienes que marcar el botón "questions" al enviar la pregunta. Para la parte de arriba, se recogen los puntos comenzando en la punta del cuadrado en un lateral hacia arriba hasta la punta superior en el centro de la espalda y hacia abajo por el otro lado.
30.11.2019 - 23:07
![]() ANA EMILIA GARCIA ALVAREZ wrote:
ANA EMILIA GARCIA ALVAREZ wrote:
NO ENTIENDO COMO HAY QUE EMPEZAR LA PARTE DE ABAJO APARTIR DEL PUNTO DOMINO SE HACE TODO A LA VEZ NO HAY UN VIDEO QUE NO EXPLIQUE
11.11.2019 - 10:19
![]() Barbara wrote:
Barbara wrote:
Für große Damen wunderschönes Modell, habe Weste und Pullover gestrickt. Leider für kleine Damen wie mich nicht tragbar, sieht unmöglich aus, trage Gr. XL bei einer Körpergröße von 153 cm.
07.11.2019 - 12:45
![]() Barbara wrote:
Barbara wrote:
Für kleine Körpergrößen ist die Anleitung leider NICHT geeignet. Wie kann ich das Dominoquadrat und die Seiten umrechnen, bin 153 cm groß und trage Größe XL. Danke.
07.11.2019 - 12:43DROPS Design answered:
Liebe Barbara, leider können wir jeder Anleitung nach jedem individuellen Frage anpassen und einzelne Modelle auf individuellen Wunsch hin umrechnen. Wenn sie Hilfe damit brauchen, wenden Sie sich bitte an dem Laden wo Sie die Wolle gekauft haben, dort hilft man Ihnen gerne weiter. Viel Spaß beim stricken!
07.11.2019 - 12:48
![]() Yvonne wrote:
Yvonne wrote:
I have just finished LEFT BACK PIECE BOTTOM EDGE in M size, I started with 75 stitches and now have 54 stitches at the end before starting LEFT FRONT PIECE BOTTOM EDGE. Is this the correct amount of stitches I should have left??
30.04.2019 - 16:37DROPS Design answered:
Dear Yvonne, in size m the left back piece bottom edge starts with 16 sts, you then repeat row 1 to 8 until all sts from domino until the marker have been worked togheter with the sts from the edge, increasing every time you work row 1 and working 2 sts from domino every time you work row 2 and 8. Happy knitting!
02.05.2019 - 08:50
![]() Yvonne wrote:
Yvonne wrote:
When doing bottom edge of jumper and finish Left front piece bottom edge, should I have 16 stitches left on needle before starting Right front piece bottom edge? I seem to run out of stitches?
29.04.2019 - 00:37DROPS Design answered:
Dear Yvonne, when starting bottom edge with 16 sts on mid back piece, do not forget to increase with a YO when working row 1 - you will then increase the number of sts of the bottom edge. Then, when working the bottom edge left front piece, you will decrease (row 1) so that when you reach mid front you should have again 16 sts (as on mid back). Happy knitting!
29.04.2019 - 10:59
|
||||||||||||||||
Tauriel#taurielsweater |
||||||||||||||||
|
|
||||||||||||||||
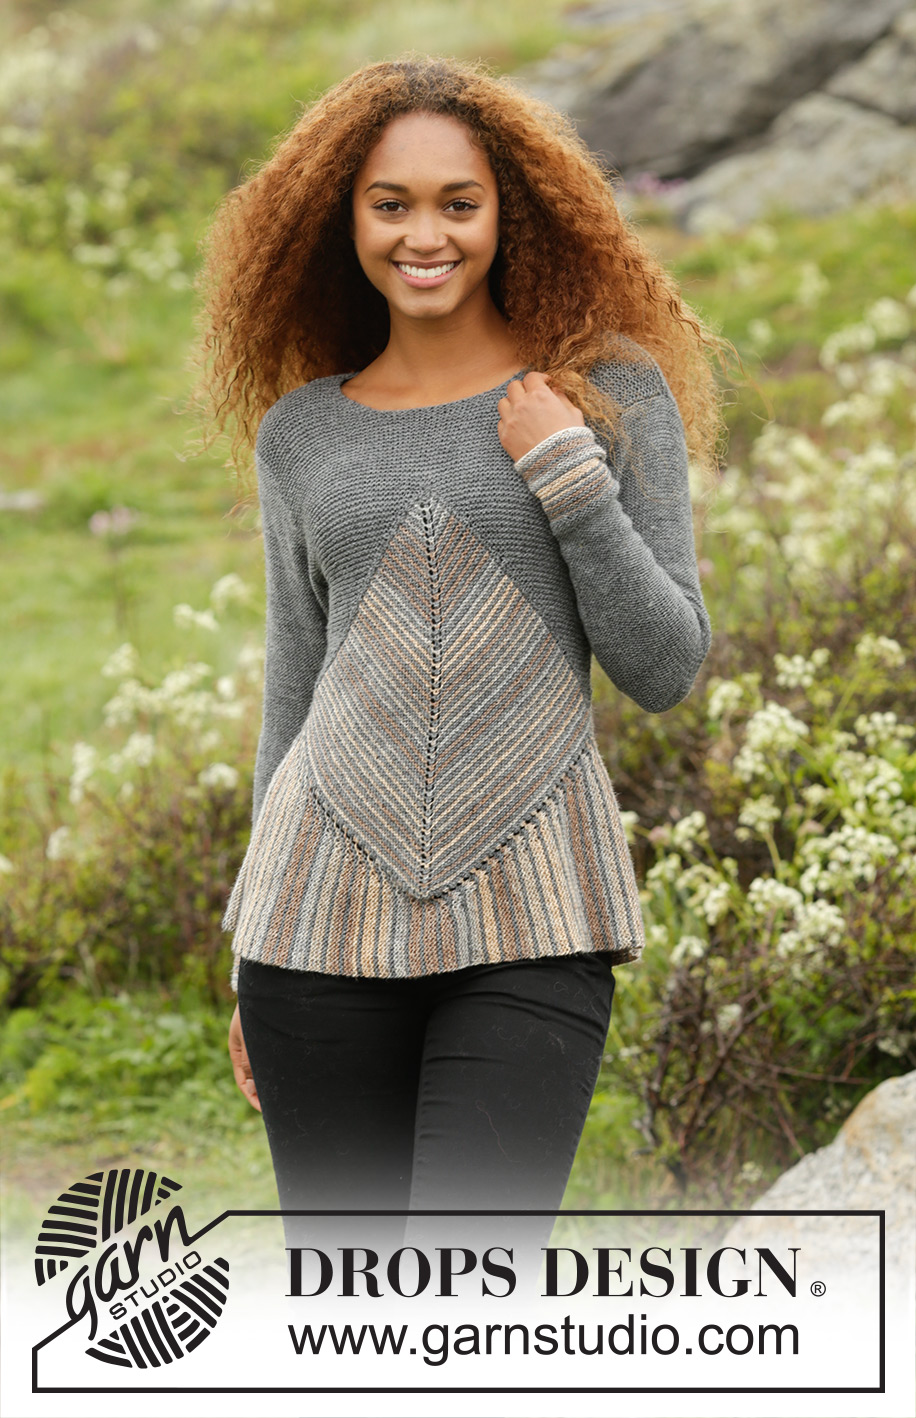
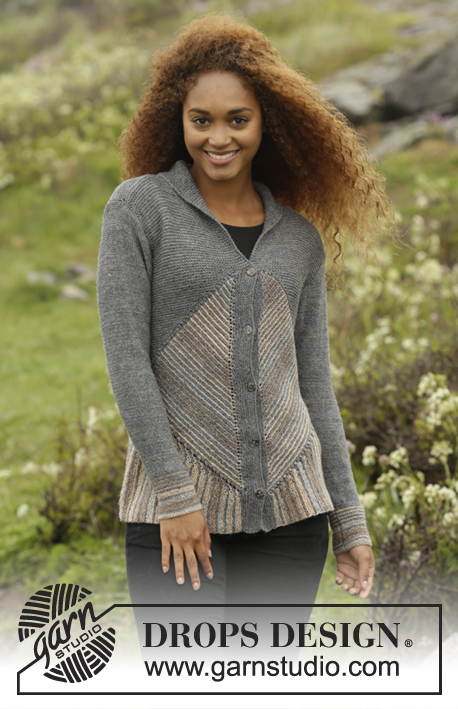
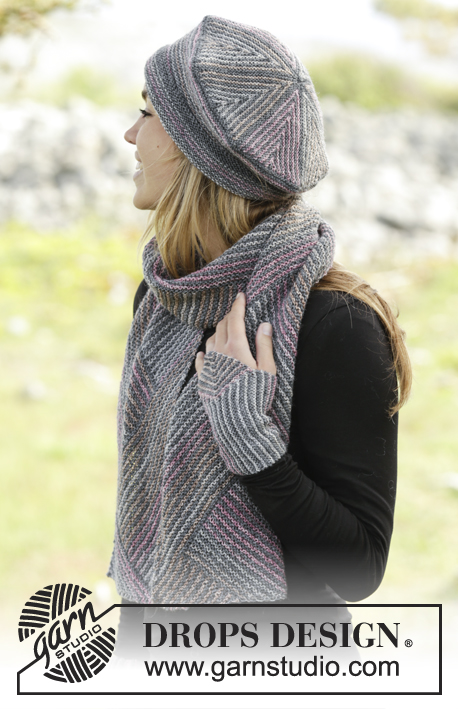
Knitted DROPS jumper in garter st with domino squares and stripes in ”Fabel”. Size: S - XXXL.
DROPS 173-4 |
||||||||||||||||
|
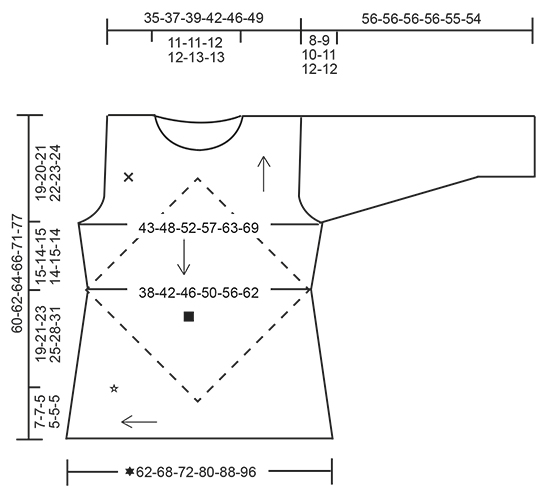
GARTER ST (back and forth): K all rows. 1 ridge = 2 rows K. STRIPES: * Work 1 ridge in GARTER ST - see explanation above, with sand. Work 1 ridge with grey. *, repeat from *-* until finished measurements. First row with new colour is always from RS. DOMINO SQUARE: Insert 1 marker in the middle st. ROW 1 (= RS): K until st with marker, 1 YO, K 1 (st with marker), 1 YO, K the rest of row (= 2 sts inc). ROW 2 (= WS): K all sts. Repeat 1st and 2nd row, i.e. inc 2 sts in the middle of the square on every row from RS. INCREASE TIP (applies to sleeve): Work until 2 sts remain before marker, 1 YO (= 1 st inc), K 4 (marker is in the middle of these sts), 1 YO (= 1 sts inc). Work YO twisted on next round. PATTERN (applies to sleeve): Work * 3 ridges with sand, work 1 ridge with grey *, repeat from *-* 4 times in total, then work stripes as follows: Work * 1 ridge with sand, work 1 ridge with grey *, repeat from *-* 4 times in total. Now work piece in grey until finished measurements. Turn piece inside out to that WS is outwards and continue in stocking st. ---------------------------------------------------------- JUMPER: Work first 2 domino squares – see square on chart, then work 1 edge to sts on domino square (i.e. bottom edge of jumper) with short rows - see star on chart. Edge is worked from mid back to mid front and mid back again. Finally work a yoke on jumper over domino square - se cross on chart. BACK PIECE: DOMINO SQUARE: Cast on 5 sts on circular needle size 3.5 mm with grey. K 1 row from WS. Switch colour to sand and work DOMINO SQUARE - see explanation above, back and forth and STRIPES – see explanation above. REMEMBER THE KNITTING TENSION Work Domino square and stripes until piece measures 38-42-46-50-56-62 cm at the widest = approx. 62-68-74-82-90-100 ridges, adjust so that last ridge is with sand, and approx. 64-70-76-84-92-102 sts on each side of st with marker (= approx. 129-141-153-169-185-205 sts in total on needle). Work 1 ridge with grey and inc as before (i.e. 1 st on each side of st with marker) and inc 4 sts evenly on each side of mid st on row from RS (= 10 sts inc in total on row from RS) = approx. 69-75-81-89-97-107 sts on each side of st with marker (= approx. 139-151-163-179-195-215 sts in total on needle). Slip sts on a stitch holder and work front piece domino square. FRONT PIECE: DOMINO SQUARE: Cast on and work as back piece domino square. Slip sts from domino on back piece back on needle tog with sts from front piece domino square. Insert 1 marker between transition between them (= 2 markers) = approx. 278-302-326-358-390-430 sts in total. BOTTOM EDGE: Work piece tog with sts from mid back (i.e. tip of domino) and to the side, down to tip mid front, up to the side and down to mid back. Cast on 16-16-12-12-12-12 sts on circular needle size 3.5 mm with grey. Work short rows and stripes as follows: LEFT BACK PIECE BOTTOM EDGE: Work tog with sts from tip mid back and out to marker in the side as follows: ROW 1 (= RS): K 1, 1 YO and K rest of row (= 1 st inc). ROW 2 (= WS): K until 1 st remains on row, work next st tog with the first 2 sts from domino (= K 3 tog = 2 sts dec from domino) Switch to sand. ROW 3 (= RS): As 1st row. ROW 4 (= WS): K until 5 sts remain on row, turn piece. ROW 5 (= RS): K all sts. ROW 6 (= WS): K until 3 sts remain on row, turn piece. ROW 7 (= RS): K all sts. ROW 8 (= WS): K until 1 st remains on row, work next st tog with the first 2 sts from domino (= K 3 tog = 2 sts dec from domino). Switch colour to grey. Repeat 1st to 8th row until all sts from tip of domino out to the side until marker has been worked tog with the edge. LEFT FRONT PIECE BOTTOM EDGE: Worked tog with sts from the side and down to tip of domino square on front piece as follows: ROW 1 (= RS): K 1, 1 YO, K 2 twisted tog, K 2 twisted tog, K the rest of row (= 1 st dec). ROW 2 (= WS): K until 1 st remains on row, work next st tog with the first 2 sts from domino (= K 3 tog = 2 sts dec from domino). Switch to sand. ROW 3 (= RS): As 1st row. ROW 4 (= WS): K until 5 sts remain on row, turn piece. ROW 5 (= RS): K all sts. ROW 6 (= WS): K until 3 sts remain on row, turn piece. ROW 7 (= RS): K all sts. ROW 8 (= WS): K until 1 st remains on row, work next st tog with the first 2 sts from domino (= K 3 tog = 2 sts dec from domino) Switch colour to grey. Repeat 1st to 8th row down to tip mid front. NOTE: On last repetition of 8th or 2nd row slip the first 3 sts from stitch holder back on needle. RIGHT FRONT PIECE BOTTOM EDGE: Work tog with sts from tip of domino square on front piece and out to marker in the side as left back piece bottom edge. RIGHT BACK PIECE BOTTOM EDGE: Worked tog with sts from the side and down to tip of domino square on front piece as left front piece bottom edge. Adjust so that last stripe is with sand. Cast off. BACK PIECE: Now work yoke on back piece with grey as follows: RIGHT BACK PIECE: Pick up 64-70-76-84-92-102 sts with grey from RS on needle size 3.5 mm on one side of domino, pick up 2 sts on tip of domino, pick up 64-70-76-84-92-102 sts down the other side of domino = 130-142-154-170-186-206 sts. K 1 row from WS and inc 15-13-13-11-13-9 sts evenly on each side of tip (= 30-26-26-22-26-18 sts inc in total) = 80-84-90-96-106-112 sts on each side (= 160-168-180-192-212-224 sts in total). Then work over the first 80-84-90-96-106-112 sts (i.e. in right side of piece seen from RS) as follows: READ ALL OF THE FOLLOWING SECTION BEFORE CONTINUING! WORK SHORT ROWS, SHORT RIDGES AND INC IN THE SIDE AT THE SAME TIME AS FOLLOWS: Row 1 (= RS): K the first 2 sts tog, turn piece (= 1 st). Row 2 (= WS): K back. Row 3 (= RS): K 1, insert 1 marker, K the next 2 sts from domino tog, turn piece (= 2 sts). Move the marker upwards when working. Row 4 (= WS): K back. Row 5 (= RS): K 2, K the next 2 sts tog, turn piece (= 3 sts). Row 6 (= WS): K back. Row 7 (= RS): K 3, K the next 2 sts tog, turn piece (= 4 sts). Row 8 (= WS): K back. Continue the short rows like this, i.e. work over 2 sts more on every row from RS but work them 2 K tog, i.e. 2 sts become 1 st. Continue like this until all sts up to tip of domino have been worked. SHORT RIDGES: Applies only to size L-XL-XXL-XXXL: When piece measures 0-0-2-2-2-2 cm, work 0-0-1-1-1-1 short ridge (i.e. work from RS until where the last turn was, turn piece and work back = 2 rows = 1 short ridge) over the sts already worked, work short ridge every 0-0-5-4-3-2 cm 0-0-4-6-8-11 times in total. INC IN THE SIDE: When yoke measures 1 cm, inc 1 st inside 1 edge st at beg of next row from RS. Inc like this every 1½-1-1- ½-½-½ cm 9-12-14-17-19-22 times in total = 10-13-15-18-20-23 sts before marker. When yoke measures 15-14-15-14-15-17 cm (measured along the side), cast off for armhole at beg of every row from RS as follows: Cast off 3 sts a total of 1-1-2-2-2-3 times, 2 sts a total of 1-2-2-3-4-4 times and 1 st a total of 4-5-4-5-5-5 times (i.e. 1 st remains before marker). Piece measures approx. 19-21-23-25-28-31 cm measured in the side from domino and up. When the short rows have been worked, there are 40-42-45-48-53-56 sts in total on needle. Slip sts on 1 stitch holder and work left back piece. LEFT BACK PIECE: = 80-84-90-96-106-112 sts. READ ALL OF THE FOLLOWING SECTION BEFORE CONTINUING! WORK SHORT ROWS, SHORT RIDGES AND INC IN THE SIDE AT THE SAME TIME AS FOLLOWS: SHORT ROWS: Row 1 (= WS): Work the first 2 sts from domino, turn piece. Row 2 (= RS): Work the 2 sts K tog (= 1 st). Row 3 (= WS): K 1, insert 1 marker, work the next 2 sts from domino, turn piece (= 3 sts). Move the marker upwards when working. Row 4 (= RS): K 2 tog, K 1 (= 2 sts). Row 5 (= WS): K 2, work the next 2 sts from domino, turn piece (= 4 sts). Row 6 (= RS): K 2 tog, K the rest of row. Row 7 (= WS): K, work the next 2 sts from domino, turn piece (= 4 sts). Row 8 (= RS): K 2 tog, K the rest of row. Continue the short rows like this, i.e. work over 2 sts more from domino on every row from WS and dec 1 st at beg of the every row from RS, i.e. 2 sts become 1 st. Continue like this until all sts up to tip of domino have been worked. SHORT RIDGES: Applies only to size L-XL-XXL-XXXL: When piece measures 0-0-2-2-2-2 cm, work 0-0-1-1-1-1 short ridge (i.e. work from WS until where the last turn was, turn piece and work back = 2 rows = 1 short ridge) over the sts already worked, work short ridge every 0-0-5-4-3-2 cm 0-0-4-6-8-11 times in total. INC IN THE SIDE: When yoke measures 1 cm, inc 1 st inside 1 edge st at end of next row from RS. Inc like this every 1½-1-1- ½-½-½ cm 9-12-14-17-19-22 times in total = 10-13-15-18-20-23 sts before marker. When yoke measures 15-14-15-14-15-17 cm (measured along the side), cast off for armhole at beg of every row from WS as follows: Cast off 3 sts a total of 1-1-2-2-2-3 times, 2 sts a total of 1-2-2-3-4-4 times and 1 st a total of 4-5-4-5-5-5 times (i.e. 1 st remains after marker). Piece measures approx. 19-21-23-25-28-31 cm measured in the side from domino and up. When the short rows have been worked, there are 40-42-45-48-53-56 sts in total on needle. BACK PIECE: Slip sts from right and left back piece on to same needle = 80-84-90-96-106-112 sts. Work in garter st. When piece measures 13-11-11-9-8-8 cm from tip of domino (approx. 2 cm remain), cast off the middle 34-34-38-38-40-40 sts for neck and finish each shoulder separately = 23-25-26-29-33-36 sts remain on shoulder. On next row from the neck dec 1 st = 22-24-25-28-32-35 sts. Work in garter st until piece measures 15-13-13-11-10-10 cm from tip of domino. Cast off. The whole piece measures approx. 60-62-64-66-71-77 cm. Work the other shoulder the same way. FRONT PIECE: RIGHT FRONT PIECE: Work as left back piece. LEFT FRONT PIECE: Work as right back piece. FRONT PIECE: Slip sts from right and left front piece on to same needle = 80-84-90-96-106-112 sts. Work in garter st. When piece measures 8-6-4-2-1-1 cm from tip of domino, loosely cast off the middle 20 sts for neck and finish each shoulder separately = 30-32-35-38-43-46 sts remain on shoulder. Then dec on every row from neck by dec 1 st inside 3 edge sts on every row from RS 8-8-10-10-11-11 times in total = 22-24-25-28-32-35 sts remain on shoulder. Work in garter st until piece measures 7-7-8-8-9-9 cm in total from the 20 sts cast off for neck, cast off. The whole piece measures approx. 60-62-64-66-71-77 cm. Work the other shoulder the same way. SLEEVE: Worked in the round on double pointed needles. Cast on 46-48-50-54-56-58 sts on double pointed needles size 3.5 mm with sand. Work PATTERN - see explanation above. When piece measures 14-12-10-8-3 cm, insert 1 marker at beg of round, inc 1 st on each side of marker – see INCREASE TIP. Inc like this every 1½ cm 21-22-23-24-25-26 times in total = 88-92-96-102-106-110 sts. When piece measures 48-47-46-45-43-42 cm (shorter measurements in the larger sizes because of longer sleeve cap and wider shoulders). Continue to work back and forth and cast off for sleeve cap at beg of every row in each side of piece as follows: Cast off 4 sts 2 times, 2 sts 3 times and 1 st 2 times, then cast off 2 sts in each side until piece measures 56-56-56-56-55-54 cm, then cast off 3 sts 1 time in each side of piece. Cast off the remaining sts. Knit another sleeve the same way. ASSEMBLY: Assemble with grey. Sew bottom edge tog mid back in outer loop of outermost st. Sew the shoulder seams. Sew in sleeves with WS outwards, i.e. stocking st is turned inwards. Sew side seams down to bottom edge in outer loop of edge sts. |
||||||||||||||||
Diagram explanations |
||||||||||||||||
|
||||||||||||||||
 |
||||||||||||||||
Have you finished this pattern?Tag your pictures with #dropspattern #taurielsweater or submit them to the #dropsfan gallery. Do you need help with this pattern?You'll find 27 tutorial videos, a Comments/Questions area and more by visiting the pattern on garnstudio.com. © 1982-2026 DROPS Design A/S. We reserve all rights. This document, including all its sub-sections, has copyrights. Read more about what you can do with our patterns at the bottom of each pattern on our site. |
||||||||||||||||


With over 40 years in knitting and crochet design, DROPS Design offers one of the most extensive collections of free patterns on the internet - translated to 17 languages. As of today we count 324 catalogues and 12290 patterns translated into English (UK/cm).
We work hard to bring you the best knitting and crochet have to offer, inspiration and advice as well as great quality yarns at incredible prices! Would you like to use our patterns for other than personal use? You can read what you are allowed to do in the Copyright text at the bottom of all our patterns. Happy crafting!
Post a comment to pattern DROPS 173-4
We would love to hear what you have to say about this pattern!
If you want to leave a question, please make sure you select the correct category in the form below, to speed up the answering process. Required fields are marked *.