
Popular categories
Looking for a yarn?


Comments / Questions (20)
![]() AGATA wrote:
AGATA wrote:
W instrukcji nie widzę załączonego schematu A1. Czy mogę poprosić o jego przesłąnie?
04.05.2026 - 12:21DROPS Design answered:
Witaj Agato, schemat A.1 znajduje się na dole strony, po lewej stronie schematycznego rysunku miar. Pozdrawiamy!
04.05.2026 - 17:22
![]() Cuennet Josiane wrote:
Cuennet Josiane wrote:
Bonjour, J'ai remarqué que dans la version française (et non ds la version anglaise) pour tricoter le dos il n'est pas noté de commencer A1 au bon moment mais seulement à 12cm de hauteur totale. Bonne journée !
30.07.2025 - 10:18DROPS Design answered:
Bonjour Mme Cuennet et merci pour votre retour, la correction a été faite. Bon tricot!
30.07.2025 - 16:08
![]() Cristina wrote:
Cristina wrote:
Le striscia sembrano, dalla foto, che cambino dimensione, ad esempio la prima striscia inizia con 3cm ma quando viene successivamente rifatta sembra di circa 6cm. In foto. Mi sbaglio?
17.04.2024 - 22:10DROPS Design answered:
Buonasera Cristina, l'altezza delle strisce è riportata nel paragrafo "strisce". Buon lavoro!
21.04.2024 - 23:15
![]() Cristina wrote:
Cristina wrote:
Buonasera, ma la quarta striscia di quanti cm è in larghezza?
17.04.2024 - 22:02DROPS Design answered:
Buonasera Cristina, deve ricominciare la serie delle strisce. Buon lavoro!
21.04.2024 - 23:19
![]() Heike wrote:
Heike wrote:
Mein Strickteil wird schief. Wann stricke ich die 1 M rechts aus dem leeren Diagramm-Kästchen? Ich habe doch nur linke Rückreihen und keine rechten Hinreihen. In den Hinreihen wird doch immer das Muster gestrickt.
29.05.2023 - 12:52DROPS Design answered:
Liebe Heike, in diesem Video zeigen wir ab ca 06:26, wie dieses Lochmuster gestrickt wird (diagram A.4 im Video). Viel Spaß beim stricken!
30.05.2023 - 11:09
![]() Mona Evensen wrote:
Mona Evensen wrote:
Hei. Jeg greier ikke å finne diagrammet til denne oppskriften, kun beskrivelsen. Jeg søker fra telefon, iPhone 12 pro
23.05.2023 - 23:41DROPS Design answered:
Hei Mona, Diagrammet er ikke stort og er til venstre for målskissen i bunnen av oppskriften. Håper du finner det og god fornøyelse!
24.05.2023 - 06:51
![]() Sarah Hämmerle wrote:
Sarah Hämmerle wrote:
Hallo! Ich bin gerade dabei, das schöne Top zu stricken und jetzt ist eine Frage bei mir aufgetaucht: Wenn ich die Krausrippen stricke, wenn ich die neuen Ärmelmaschen aufgenommen habe, stricke ich dann die bestehenden Maschen mit A1 weiter? Logischerweise schon oder? Also die Krausrippen nur über die neuen Maschen? Danke schonmal für Ihre Antwort! Liebe Grüße
16.05.2023 - 19:03DROPS Design answered:
Liebe Frau Hämmerle, zuerst stricken Sie 1 Krausrippe über alle die neuen Maschen beidseitig und bei der 2. Reihe der Krausrippe nehmen Sie regelmäßig verteilt 3 Maschen über die neuen Maschen auf beide Seite (6 Abnahmen insgesamt) ab; und dann stricken Sie A.1 über alle Maschen, mit 5 Maschen krausrechts auf beiden Seite. Viel Spaß beim stricken!
17.05.2023 - 08:04
![]() Heike Berners wrote:
Heike Berners wrote:
Hallo. 54 cm Breite für Größe M scheint mir viel zu groß zu sein.
23.04.2023 - 23:27DROPS Design answered:
Liebe Frau Berners, um Ihre Größe zu wählen, messen Sie eine ähnliche Kleidung, die Sie gerne tragen und vergleichen Sie diese Maßnahmen mit den in der Skizze. Hier lesen Sie noch mehr. Viel Spaß beim stricken!
24.04.2023 - 10:20
![]() Monique Hoyet wrote:
Monique Hoyet wrote:
Bonjour j'arrive en haut du dos, pour former l'épaule, je ne comprends pas pourquoi on augmente 14 mailles; je pensais qu'il suffisait de rabattre les mailles de l'épaule. Merci
11.09.2021 - 19:15DROPS Design answered:
Bonjour Mme Hoyet, pour bien conserver la largeur requise pour l'épaule lorsque l'on tricote cette côte mousse, on doit augmenter au 1er rang de cette côte mousse, après ces 2 rangs sur l'endroit, rabattez toutes les mailles à l'endroit sur l'endroit. Bon tricot!
13.09.2021 - 08:43
![]() Jo-Ann wrote:
Jo-Ann wrote:
Hi! Got back to this project. I have tried 3 browsers and only get the schematic and not the A1 diagram. Starting out on the back, you complete the 2 ridges (4 knit rows), then the instruction is to purl 1 row on the wrong side. But after the ridges are complete you would be on the right side. What do you do on the first right side row before the wrong side row? Sorry about all the questions but without A1 I’m working blind. Thank you!
21.07.2021 - 21:43DROPS Design answered:
Hi Jo-Ann, A.1 is a small diagram at the top left of the measurements chart at the bottom of the page. It consists of Row 1: 1 yarn over, slip 1 stitch, knit 1 and pass the slipped stitch over, then repeat. Row 2: Knit from right side, purl from wrong side. Row 3: Knit 2 together, 1 yarn over, then repeat. Row 4: Knit from the right side, purl from the wrong side. I hope this helps and happy knitting!
22.07.2021 - 09:54
|
|||||||||||||
Einkorn |
|||||||||||||
|
|
|||||||||||||
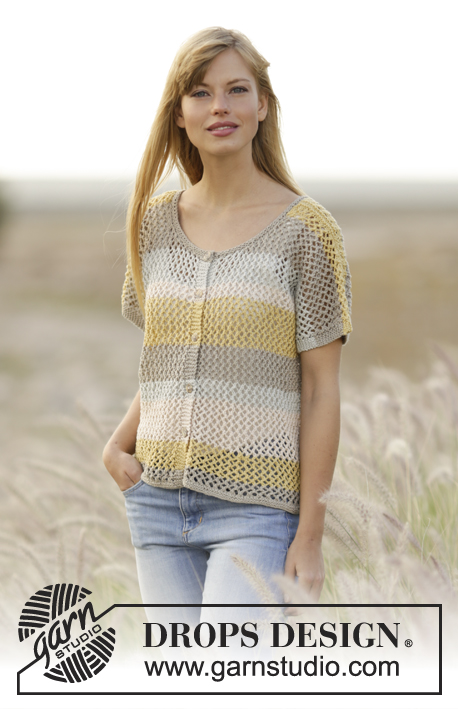
Knitted DROPS top with lace pattern, vent and stripes in ”Belle”. Size: S - XXXL.
DROPS Extra 0-1290 |
|||||||||||||
|
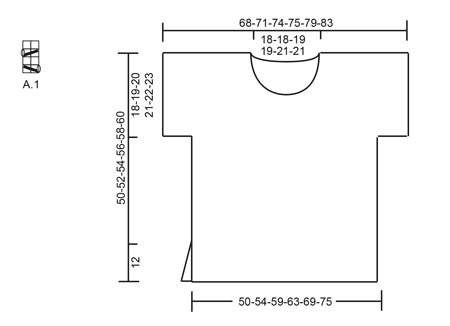
GARTER ST (back and forth): K all rows. 1 ridge = 2 rows K. PATTERN: See diagram A.1. The diagrams show all rows in pattern seen from RS. STRIPES: Work stripes in 4 colour in sequence as follows: Beige, dandelion, light beige and silver grey. Work stripes in cm as follows: STRIPE 1: Work 3 cm, adjust so that next row is from RS. STRIPE 2: Work 5 cm, adjust so that next row is from RS. STRIPE 3: Work 7 cm, adjust so that next row is from RS. Work first row in all stripes from RS. Repeat stripes and colours upwards until finished measurements. ---------------------------------------------------------- BACK PIECE: Worked back and forth on needle. Cast on 105-113-124-132-145-160 sts on circular needle size 3.5 mm with beige. Work 2 ridges in GARTER ST - see explanation above. Switch to circular needle size 4 mm. P 1 row from WS with 4 sts in garter st in each side of piece while AT THE SAME TIME dec 25-27-30-32-35-40 sts evenly = 80-86-94-100-110-120 sts. Then work as follows from RS: 4 sts in garter st, repeat A.1 (= 2 sts) until 4 sts remains, finish with 4 sts in garter st. Work in STRIPES - see explanation above. REMEMBER THE KNITTING TENSION When piece measures 12 cm, cast on 1 edge st in each side of piece at the end of the next 2 rows = 82-88-96-102-112-122 sts. Work next row from RS as follows: 1 edge st in garter st, A.1 until 1 st remains, finish with 1 edge st in garter st. Work edge sts in garter st until finished measurements. Continue A.1 and stripes. When piece measures 32-33-34-35-36-37 cm, cast on 17-17-15-13-11-9 new sts for sleeve at the end of the next 2 rows = 116-122-126-128-134-140 sts. Work 1 ridge in garter st over the new sts AT THE SAME TIME on last row dec 3 sts evenly over the new sts in each side of piece (= 6 sts dec in total), work the remaining sts as before = 110-116-120-122-128-134 sts. Work next row as follows from RS: 5 sts in garter st, repeat A.1 until 5 sts remains, finish with 5 sts in garter st. Continue with 5 edge sts in garter st in each side of piece until finished measurements. When piece measures 48-50-52-54-56-58 cm, slip the middle 26-26-28-28-32-32 sts on a stitch holder for neck and finish each shoulder separately = 42-45-46-47-48-51 sts remain for shoulder. Work sts that do not fit the pattern in stocking st. On next row from the neck dec 1 st = 41-44-45-46-47-50 sts. When piece measures 50-52-54-56-58-60 cm, work 1 ridge over all sts while AT THE SAME TIME inc 13-14-15-14-15-16 sts evenly on first row = 54-58-60-60-62-66 sts. Loosely cast off. Work the other shoulder the same way. FRONT PIECE: Cast on and work as back piece. When piece measures 40-42-44-44-46-48 cm, dec for neck as follows: Slip the middle 12-12-14-14-18-18 sts on a stitch holder for neck and finish each shoulder separately (= 49-52-53-54-55-58 sts remain on shoulder). Work sts that do not fit the pattern in stocking st. On every row from neck cast off as follows: Cast off 2 sts 3 times, then 1 st 2 times = 41-44-45-46-47-50 sts. When piece measures 50-52-54-56-58-60 cm, work 1 ridge over all sts while AT THE SAME TIME inc 13-14-15-14-15-16 sts evenly on first row = 54-58-60-60-62-66 sts. Loosely cast off. Work the other shoulder the same way. ASSEMBLY: Sew left shoulder seam. NECK EDGE: Worked back and forth on needle. Pick up 95-120 sts on circular needle size 3.5 mm with beige. Work 2 ridges. Loosely cast off. ASSEMBLY: Sew right shoulder seam. Sew underarm and side seam in one inside 1 edge st in garter, down to where 1 edge st were cast on (i.e. approx. 12 cm vent). |
|||||||||||||
Diagram explanations |
|||||||||||||
|
|||||||||||||
 |
|||||||||||||
Have you finished this pattern?Tag your pictures with #dropspattern or submit them to the #dropsfan gallery. Do you need help with this pattern?You'll find 24 tutorial videos, a Comments/Questions area and more by visiting the pattern on garnstudio.com. © 1982-2026 DROPS Design A/S. We reserve all rights. This document, including all its sub-sections, has copyrights. Read more about what you can do with our patterns at the bottom of each pattern on our site. |
|||||||||||||


With over 40 years in knitting and crochet design, DROPS Design offers one of the most extensive collections of free patterns on the internet - translated to 17 languages. As of today we count 325 catalogues and 12298 patterns translated into English (UK/cm).
We work hard to bring you the best knitting and crochet have to offer, inspiration and advice as well as great quality yarns at incredible prices! Would you like to use our patterns for other than personal use? You can read what you are allowed to do in the Copyright text at the bottom of all our patterns. Happy crafting!
Post a comment to pattern DROPS Extra 0-1290
We would love to hear what you have to say about this pattern!
If you want to leave a question, please make sure you select the correct category in the form below, to speed up the answering process. Required fields are marked *.