
Popular categories
Looking for a yarn?


Comments / Questions (91)
![]() Margaret wrote:
Margaret wrote:
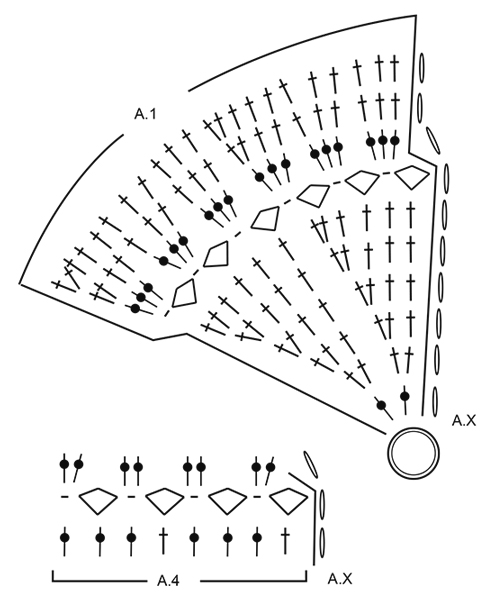
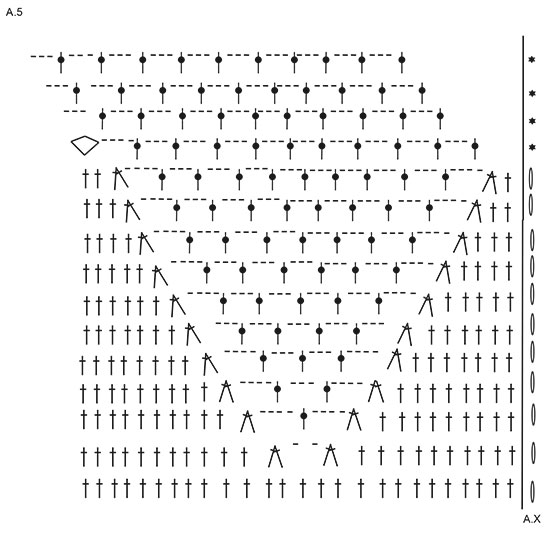
Row 6 on pattern A5 starts chain 3 all other rows on A5 are chain 4 is that a print error.
19.11.2016 - 11:47DROPS Design answered:
Dear Margaret, start each of the first 11 rows in A.5 with 3 ch, and finish each row with 1 sl st in 3rd ch from beg of round. Happy crocheting!
21.11.2016 - 09:18
![]() Hanne wrote:
Hanne wrote:
Hallo, ja, genauso steht es in der Anleitung und genau diese finde ich unverständlich:-(
19.10.2016 - 19:53DROPS Design answered:
Liebe Hanne, so müssen Sie diese Reihe häkeln und wiederholen, dh über immer weniger Maschen (verkürzten Reihen) und gleichzeitig in jeder R. zunehmen.
20.10.2016 - 11:47
![]() Hanne wrote:
Hanne wrote:
Ich verstehe nicht die Anleitung für das Vorderteil. Soll tatsächlich mit 3 Luftmaschen begonnen werden? Wie funktioniert das? Und was ist mit verkürzten Reihen gemeint? Können Sie das etwas besser beschreiben, es wäre ärgerlich so kurz vor Ende aufgeben zu müssen:-(
17.10.2016 - 21:06DROPS Design answered:
Liebe Hanne, das Vorderteil wird über die 49 Stb gehäkelt, jede Reihe so anfangen: 3 Lm, 1 Lm-Bogen überspringen, 1 fM um den nächsten Lm-Bogen, 3 Lm, 1 Stb um den nächsten Lm-Bogen, dann weiter wie zuvor mit Zunahmen häkeln bis 2 Lm-Bögen (von den 49) übrig sind. Arbeit drehen und immer so hin- und zurück häkeln, bis die Arbeit 15 cm ab dem Markierer misst.
18.10.2016 - 09:10
![]() Bernie Sullivan wrote:
Bernie Sullivan wrote:
Would it be possible to have a written pattern instead of a diagram for"Endless Love" pattern?
03.10.2016 - 16:14DROPS Design answered:
Dear Mrs Sullivan, this pattern is only available with diagrams. You will find just above diagrams each symbol and the st/the group of sts it refers to. Repeat each row in the diagrams around, starting at the bottom corner on the right side towards the left. Remember you will get further individual assistance from your DROPS store. Happy crocheting!
03.10.2016 - 16:42
![]() Elma Swier wrote:
Elma Swier wrote:
Ik begin eigenlijk net met haken van patroon lezen maar de delen van A1 tot A6 worden die later aan elkaar vast gemaakt? En hebben jullie niet een filmpje waar je zo een beetje kan mee haken ? Anders ben ik eigenlijk te enthousiast geweest om zo'n mooi vest te willen gaan haken.
09.08.2016 - 14:47DROPS Design answered:
Beste mevrouw Swier, A.1 tot en met A.6 zijn geen losse delen. Als u het patroon stap voor stap volgt, haakt u steeds een aantal van deze patronen mee, dat gaat vanzelf. Er is geen video voor het hele vest, dat is niet mogelijk, maar als u boven aan het patroon het tabblad 'video's' aanklikt, vindt u 7 handige video's voor technieken die in het patroon gebruikt worden. Als u het lastig vindt een heel patroon te doorgronden (dat is even wennen) dan kunt u wellicht een brei/haakgroep in de buurt zoeken waarbij mensen elkaar helpen.
09.08.2016 - 16:05
![]() Tineke wrote:
Tineke wrote:
Zijn de 3 lossen waar oa patroon A3 mee begint ipv een stokje of begin je met 3 lossen en doe je dan 6x patroon herhalen?
15.07.2016 - 22:20DROPS Design answered:
Hoi Tineke. A.X zijn de 3 lossen waarmee je begint en eindigt. Je haakt dus eerst de 3 lossen en daarna herhaal je de twee patronen 6 keer.
19.07.2016 - 13:54
![]() Susan Hall wrote:
Susan Hall wrote:
I need help in starting the Front Piece. Where exactly do you begin. Directions say to skip first 16 dc, do you skip from where you ended on last rnd of rw 15? Thank you
10.07.2016 - 00:15DROPS Design answered:
Dear Mrs Hall, that's right, skip the first 16 dc counting from the beg of rounds worked before. Happy crocheting!
11.07.2016 - 09:16Ana wrote:
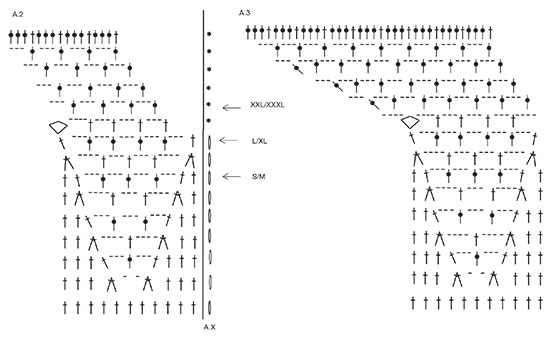
I need help with the sceme A2 and A3 in pattern 168-12. I don't understand how should I increase from 228 sts to 312 sts on the end of A2 and A3. I crochet 9 rounds and then don't understand how to continue after * in round 10. In first repetition I do sl sts then crochet A2 and A3 and then I should repeat them 5 more times, but I don't know how to continue!!! There are 4 ch at the end of A3 that shift to the left. How should I crochet them?
24.06.2016 - 15:53DROPS Design answered:
Dear Ana, when you have 228 sts in A.2/A.3, work next round with armhole, then continue diagram as before in the round. When both diagrams have been worked 1 time in height, there are 318 sts. From round 10 incl. you start round crocheting sl sts to first ch-space then replace 1st tr on this round with 3 ch (see also star in diagram). Happy crocheting!
24.06.2016 - 17:16
![]() Susan Carpenter wrote:
Susan Carpenter wrote:
The armholes are a little a bit tight, even in the larger sizes. Any suggestions to accommodate a larger arms?
19.06.2016 - 20:17DROPS Design answered:
Dear Mrs Carpenter, check that the chain worked over armholes when skipping sts is not too tight (use a crochet hook a size larger if requested) so that armholes won't be too tight. You can also check measurements for each size (in cm) in chart at bottom of the pattern. Happy crocheting!
20.06.2016 - 09:05
![]() Truus Meerstra wrote:
Truus Meerstra wrote:
Bij patroon A4 staat het teken voor het samen haken van 3 stokjes, maar als je telt worden telkens 2 stokjes samen gehaakt. Wat is nu precies de bedoeling?
19.05.2016 - 19:08DROPS Design answered:
Hoi Truus. Je haakt 3 stk samen zoals beschreven bij het symbool. Dit maakt een soort nopje, je moet niet tellen hoeveel stokjes er later zijn in het patroon.
20.05.2016 - 10:59
|
||||||||||||||||||||||||||||
Endless Love#endlesslovecardigan |
||||||||||||||||||||||||||||
 |
 |
|||||||||||||||||||||||||||
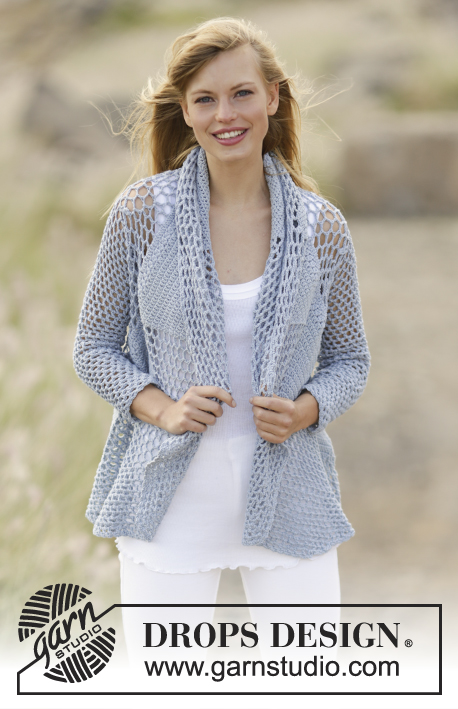
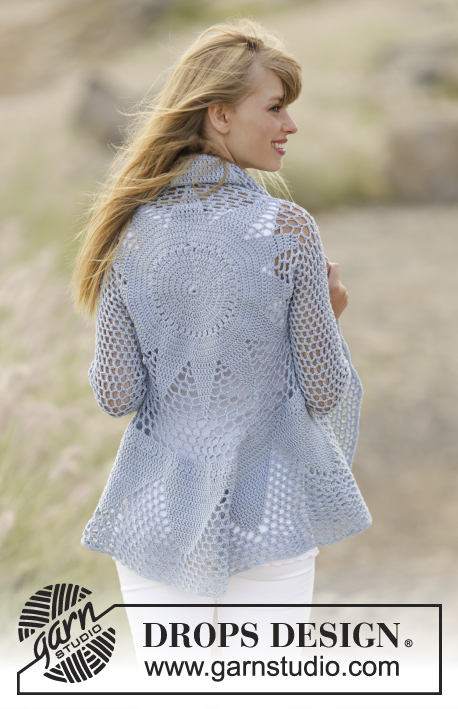
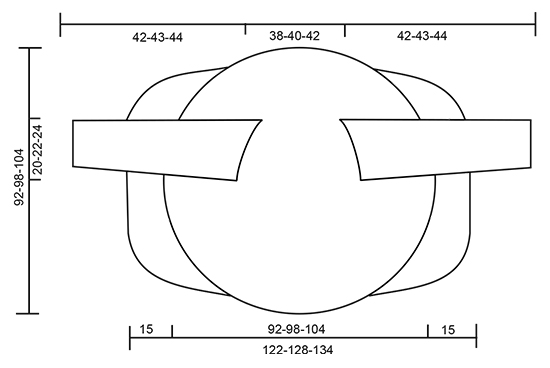
Crochet DROPS jacket worked in a circle with trebles and lace pattern in ”Cotton Merino”. Size S - XXXL.
DROPS 168-12 |
||||||||||||||||||||||||||||
|
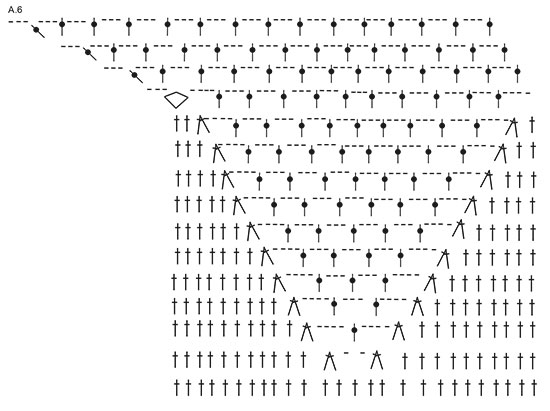
PATTERN: See diagrams A.1 to A.6. DECREASE TIP: Work 1 tr around next ch-space but wait with last pull through, work next tr around next ch-space (do not work 3 ch between tr), on last pull through, pull yarn through all 3 loops on hook. CROCHET TIP (applies to sleeve): After last tr on the round, continue to next round with 1 tr in next ch-space (= first ch-space on next round). NOTE: Insert 1 marker at the beg of round between last ch and first tr on the next round, move the marker upwards. NOTE: MAKE SURE NOT TO DISPLACE THE MARKER. ---------------------------------------------------------- JACKET WORKED IN A CIRCLE: Worked in the round from the centre and outwards. Work 4 ch with Cotton Merino on hook size 4 mm and form a ring with 1 sl st. Then work pattern according to diagram A.1 (= 6 repetitions in width) NOTE: A.x shows how every round beg and end, and is in addition to pattern. REMEMBER THE CROCHET TENSION! When entire A.1 has been worked vertically (= 132 tr), continue as follows: Work * A.2 (= 11 tr), A.3 (= 11 tr) *, repeat from *-* 6 times in total. Work up to and with arrow in diagram - see arrow for your size, there are now 228-252-264 sts on round. Work next round as follows: Continue to work over the first 34-36-38 sts, work 36-40-44 ch, and skip the next 36-40-44 sts (= armhole), work until 70-76-82 sts remain, work 36-40-44 ch and skip the next 36-40-44 sts (= armhole), continue to work over the last 34-36-38 sts. On next round continue according to pattern, work pattern as in diagram around ch-spaces in each side. When A.2 and A.3 have been worked, there are 312 tr on round. Continue with A.4 (= 39 repetitions on round). First round in A.4 shows last round in A.2/A.3, do not work this round. Continue to work as follows: Work * A.5 (= 26 tr), A.6 (= 26 tr) *, repeat from *-* 6 times in total. When A.5/A.6 have been worked, there are 600 sts on round (150 tr with 3 ch between each). Finish size S/M here. Size M/L -XXL/XXXL: Work 2-4 more rounds as last round in A.5/A.6 = 162-174 tr with 3 ch between. ALL SIZES: Piece measures approx. 46-49-52 cm from centre (92-98-104 cm in total). FRONT PIECES: Work back and forth in the one side with short rows. Cut the yarn, skip the first 13-16-19 tr on round, then work over the next 49 tr + ch-spaces as follows (insert a marker here): Work 3 ch, skip 1 ch-space, 1 dc around next ch-space, 3 ch (these 2 ch-spaces are no longer worked), 1 tr around next ch-space, work pattern as before until 2 ch-spaces remain (i.e. ch-spaces between tr, do not work around these 2 ch-spaces anymore), turn piece. Continue the short rows like this, AT THE SAME TIME inc 1 tr + 3 sts in the middle ch-space on every row (work 1 tr + 3 ch + 1 tr in this space). Continue with inc and dec on every row until piece measures 15 cm from marker. Skip 26-32-38 tr, then work short rows over the next 49 tr (13-16-19 tr remain on round). Work the same way as in the other side. CROCHET EDGE: Work an edge around the entire circle as follows: 1 dc around first ch-space, * 3 ch, 1 dc around next ch-space *, repeat from *-* and finish with 1 sl st in first dc. Fasten off. SLEEVES: Worked in the round, top down. Beg mid under one armhole, work 1 dc around first ch-space, 6 ch (= 1 tr + 3 ch), skip first tr and work 1 tr around next ch-space, * 3 ch, 1 tr around next ch-space *, repeat from *-* the entire round (work 1 tr + 3 ch around tr in corners), finish round with 1 tr around first 6 ch, then continue to work in the round without finishing it – READ CROCHET TIP = 21-23-25 tr + 21-23-25 ch-spaces. Continue with 1 tr + 3 ch around every space. When piece measures 4 cm, dec 1 ch-space before marker - READ DECREASE TIP! Repeat dec every 4½ cm 7 more times, dec alternately before and after marker = 13-15-17 tr + 13-15-17 ch-spaces. Continue until piece measures 42-43-44 cm. CROCHET EDGE SLEEVES: Crochet an edge around the sleeves as follows: 1 dc around first ch-space, * 3 ch, 1 dc around next ch-space *, repeat from *-* and finish with 1 sl st in first dc. Fasten off. Work the other sleeve the same way. |
||||||||||||||||||||||||||||
Diagram explanations |
||||||||||||||||||||||||||||
|
||||||||||||||||||||||||||||
 |
||||||||||||||||||||||||||||
 |
||||||||||||||||||||||||||||
 |
||||||||||||||||||||||||||||
 |
||||||||||||||||||||||||||||
 |
||||||||||||||||||||||||||||
Have you finished this pattern?Tag your pictures with #dropspattern #endlesslovecardigan or submit them to the #dropsfan gallery. Do you need help with this pattern?You'll find 7 tutorial videos, a Comments/Questions area and more by visiting the pattern on garnstudio.com. © 1982-2026 DROPS Design A/S. We reserve all rights. This document, including all its sub-sections, has copyrights. Read more about what you can do with our patterns at the bottom of each pattern on our site. |
||||||||||||||||||||||||||||


With over 40 years in knitting and crochet design, DROPS Design offers one of the most extensive collections of free patterns on the internet - translated to 17 languages. As of today we count 324 catalogues and 12290 patterns translated into English (UK/cm).
We work hard to bring you the best knitting and crochet have to offer, inspiration and advice as well as great quality yarns at incredible prices! Would you like to use our patterns for other than personal use? You can read what you are allowed to do in the Copyright text at the bottom of all our patterns. Happy crafting!
Post a comment to pattern DROPS 168-12
We would love to hear what you have to say about this pattern!
If you want to leave a question, please make sure you select the correct category in the form below, to speed up the answering process. Required fields are marked *.