
Popular categories
Looking for a yarn?


Comments / Questions (91)
![]() Sonia wrote:
Sonia wrote:
Cuando se trabaja hasta la talla deseada dice después que se trabaje la siguiente vuelta: trabaja los siguientes 34-36-38 puntos, pero cómo, con qué punto?
07.08.2017 - 21:50DROPS Design answered:
Hola Sonia. Sobre los 34-36-38 puntos continuar trabajando según el patrón como antes.
10.08.2017 - 11:38
![]() Malena Repits wrote:
Malena Repits wrote:
Hej. Jag har nu kommit så långt i mönstret (endles Love) så jag ska göra ärmhålen men jag förstår inte vad ni menar när ni skriver att man ska virka över de första 34 maskorna. Vilken sorts maskor ska jag använda då? Mvh Malena
20.04.2017 - 21:18DROPS Design answered:
Hej Malena, du fortsätter med samma mönster som tidigare. Lycka till!
08.05.2017 - 16:42
![]() Roni wrote:
Roni wrote:
Hi. I've read the pattern over and over and studied the charts, but I can't get the correct number of sts on my armhole round. And I don't see how the number of sts will increase on remaining A2 / A3 the rounds after the armholes.
15.04.2017 - 13:55DROPS Design answered:
Dear Roni, to create armholes, skip the number of sts stated for your size and crochet the relevant number of chains on both places for armholes. On next round, work next round in diagram as for your size as before, ie in the sts from previous row as well as around the both ch-spaces for armholes. Happy crocheting!
18.04.2017 - 10:29
![]() Jennider wrote:
Jennider wrote:
Hallo Drops disign . Ik kom niet uit met de patroon van de voorpand. Als ik aan weer zijde 2 losse lussen niet haken, kom mijn voorpand niet tot 15 cm. En het wordt niet zo vorm als de tekening. ik denk dat ik het patroon niet begrijp. Er staat vermeld tegelijk meerderen, waar moet het meerderen ? Kunt u het patroon uitleggen ? Dank u wel
21.03.2017 - 22:50DROPS Design answered:
Hoi Jennider. Je plaatst een markeerder in het werk als je begint met haken van het voorpand. Door het haken van de verkorte toeren (2 l-lussen minder aan het begin en eind van elke toer) minder je in het werk. Tegelijkertijd moet je meerderen in de middelste lus (tel en markeer eventueel eerst deze middelste lus voordat je begint). Je gaat zo door tot het werk 15 cm meet vanaf de geplaatste markeerder. Klopt je afmeting niet (heb je niet genoeg steken over bijvoorbeeld), dan controleer ook even je stekenverhouding.
22.03.2017 - 11:34
![]() Jennifer wrote:
Jennifer wrote:
Hallo Drops Design Dank u wel voor uw uitleg. Alleen nog 1 vraag over het begin van de het overslaan van 2 losse lussen. Is dat daarna elke toer weer 2 losse lussen overslaan ? Dus ook aan beide zijde ?
21.03.2017 - 16:34DROPS Design answered:
Dat klopt. Er staat tussen haakjes: over deze 2 l-lussen wordt niet meer gehaakt.
21.03.2017 - 16:50
![]() Jennifer wrote:
Jennifer wrote:
Ik begrijp de voorpand niet. Kunt u nog een keer Uitleggen ? Dank u
21.03.2017 - 10:15DROPS Design answered:
Hoi Jennifer, Als het goed is heb je, wanneer je aan het voorpand begint, een cirkel gemaakt met 2 openingen voor de armsgaten. Nu moet je aan de beide zijkanten van deze cirkel de voorpanden haken (zie ook schema / plattegrond van het werkstuk onderaan de beschrijving. Je slaat 13-16-19 stokjes over, ofwel je begint 13-16-19 stokjes verderop t.o.v. waar je de cirkel had afgehecht. Daar begin je dus heen en weer te haken volgens de beschrijving in het patroon. Hopelijk is het nu duidelijker voor je. Als dat nog niet zo is, dan graag even aangeven waar je precies tegenaan loopt.
21.03.2017 - 16:20
![]() Annie wrote:
Annie wrote:
Bonjour, Je suis bloquée à la fin du travail en cercle. je ne comprends pas la suite et ce qui est expliqué ne semble pas donner le résultat de la photo. Merci pour vos explications complémentaires.
27.02.2017 - 17:55DROPS Design answered:
Bonjour Annie, vous pouvez poser votre question ici, ou bien contacter votre magasin DROPS pour toute assistance personnalisée. Bon crochet!
28.02.2017 - 08:37
![]() Martina wrote:
Martina wrote:
Ich versuche mich schon zum xten Mal an dieser tollen Jacke aber es will einfach nichts werden. Gleich zu Beginn in der 3ten Reihe beginnt sich die Arbeit zu wölben. Was mache ich falsch? ○4LM zum Kreis ○12 Stäbchen in den Kreis ○verdoppeln... Ist doch richtig oder nicht?
20.02.2017 - 19:27DROPS Design answered:
Liebe Martine, an der 1. Runde häkeln Sie 2 Stäbchen im Luftmschenring x 6 = 12 Stäbchen, an der 2. Runde häkeln Sie 2 Stäbchen in jedem Stäbchen = 24 Stäbchen. Beachten Sie, daß Ihre Maschenprobe stimmt. Viel Spaß beim häkeln!
21.02.2017 - 09:28
![]() Arlette Van Den Abbeele wrote:
Arlette Van Den Abbeele wrote:
Hallo, ik heb de ster gehaakt en wil nu aan de mouwen beginnen. Ik begrijp niet dat jullie beginnen te tellen in st, steken denk ik. Als je dan die st optelt, klopt het totaal niet.(2x36+ 2x40 + 76 =228 i.p.v. 252 voor L/XL. Tellen jullie lussen en stokjes als steken? De lussen haken om de mouwen te maken begrijp ik wel. Het is de verdeling die ik moeilijk vind. Reeds bedankt Arlette
27.12.2016 - 00:19
![]() Jane wrote:
Jane wrote:
Do you recommend blocking the finished garment?
22.11.2016 - 16:27DROPS Design answered:
Dear Jane, some crocheters always block their work, have a talk with your DROPS store, they will then have tips & advices for you. Happy crocheting!
23.11.2016 - 09:13
|
||||||||||||||||||||||||||||
Endless Love#endlesslovecardigan |
||||||||||||||||||||||||||||
 |
 |
|||||||||||||||||||||||||||
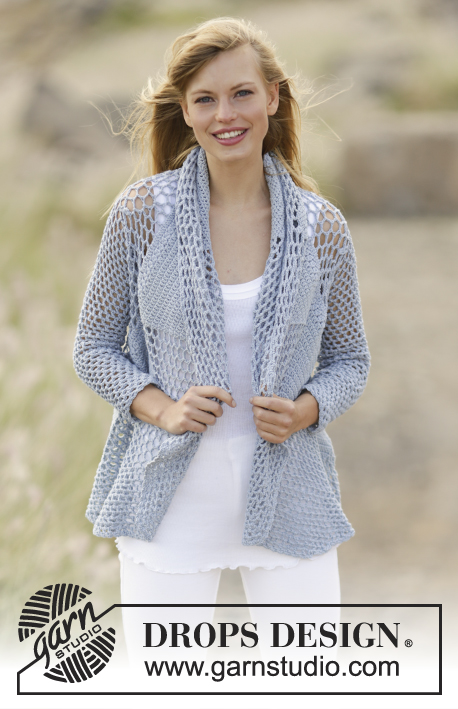
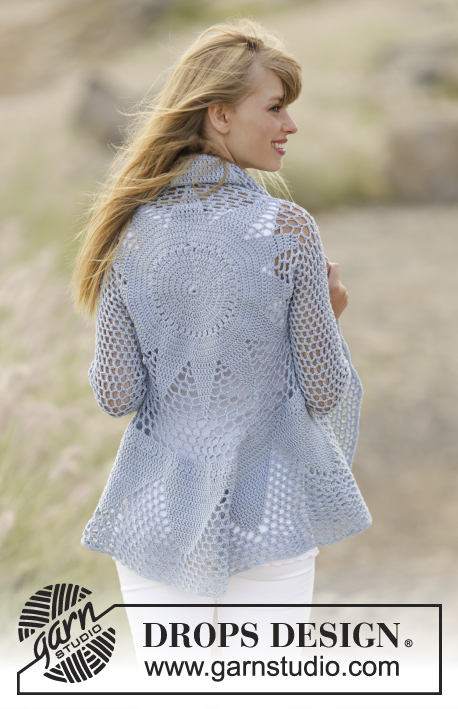
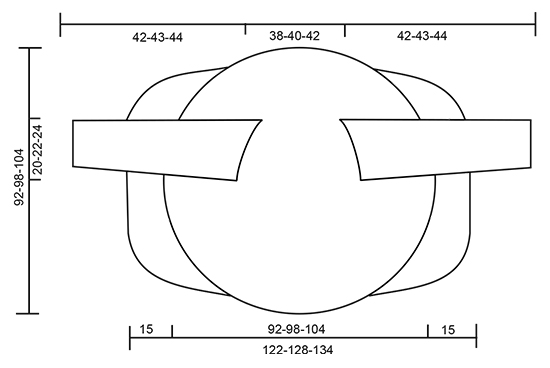
Crochet DROPS jacket worked in a circle with trebles and lace pattern in ”Cotton Merino”. Size S - XXXL.
DROPS 168-12 |
||||||||||||||||||||||||||||
|
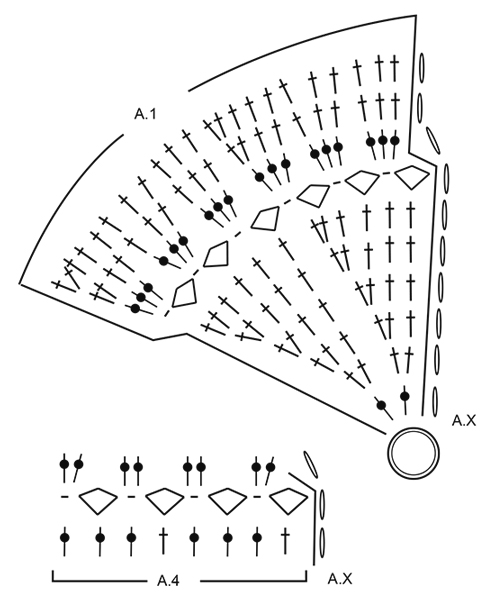
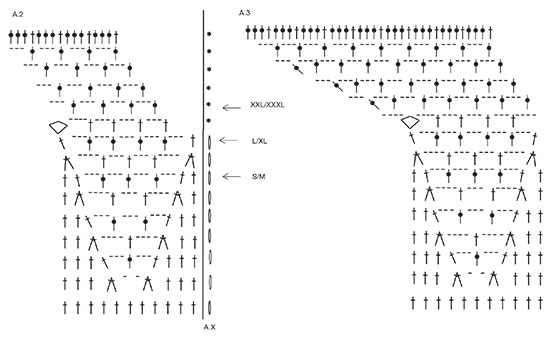
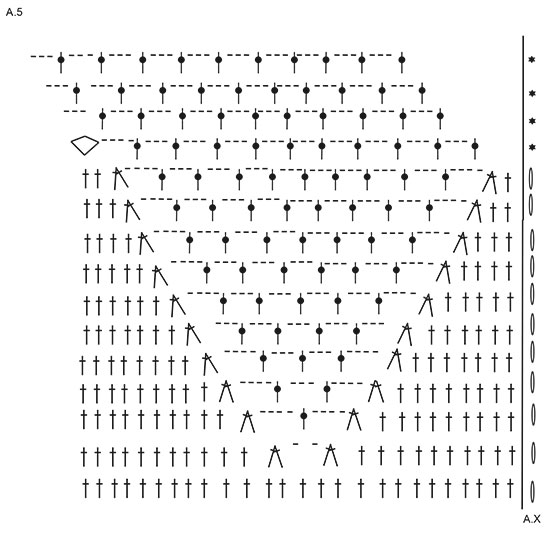
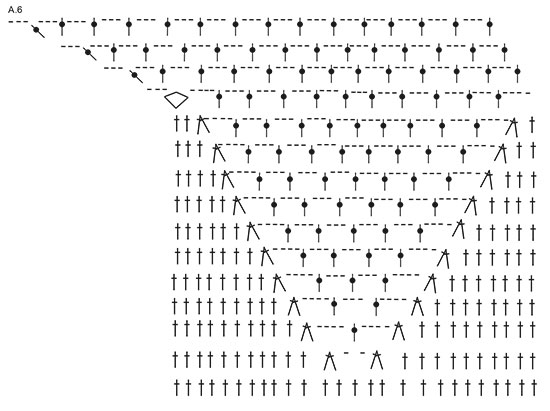
PATTERN: See diagrams A.1 to A.6. DECREASE TIP: Work 1 tr around next ch-space but wait with last pull through, work next tr around next ch-space (do not work 3 ch between tr), on last pull through, pull yarn through all 3 loops on hook. CROCHET TIP (applies to sleeve): After last tr on the round, continue to next round with 1 tr in next ch-space (= first ch-space on next round). NOTE: Insert 1 marker at the beg of round between last ch and first tr on the next round, move the marker upwards. NOTE: MAKE SURE NOT TO DISPLACE THE MARKER. ---------------------------------------------------------- JACKET WORKED IN A CIRCLE: Worked in the round from the centre and outwards. Work 4 ch with Cotton Merino on hook size 4 mm and form a ring with 1 sl st. Then work pattern according to diagram A.1 (= 6 repetitions in width) NOTE: A.x shows how every round beg and end, and is in addition to pattern. REMEMBER THE CROCHET TENSION! When entire A.1 has been worked vertically (= 132 tr), continue as follows: Work * A.2 (= 11 tr), A.3 (= 11 tr) *, repeat from *-* 6 times in total. Work up to and with arrow in diagram - see arrow for your size, there are now 228-252-264 sts on round. Work next round as follows: Continue to work over the first 34-36-38 sts, work 36-40-44 ch, and skip the next 36-40-44 sts (= armhole), work until 70-76-82 sts remain, work 36-40-44 ch and skip the next 36-40-44 sts (= armhole), continue to work over the last 34-36-38 sts. On next round continue according to pattern, work pattern as in diagram around ch-spaces in each side. When A.2 and A.3 have been worked, there are 312 tr on round. Continue with A.4 (= 39 repetitions on round). First round in A.4 shows last round in A.2/A.3, do not work this round. Continue to work as follows: Work * A.5 (= 26 tr), A.6 (= 26 tr) *, repeat from *-* 6 times in total. When A.5/A.6 have been worked, there are 600 sts on round (150 tr with 3 ch between each). Finish size S/M here. Size M/L -XXL/XXXL: Work 2-4 more rounds as last round in A.5/A.6 = 162-174 tr with 3 ch between. ALL SIZES: Piece measures approx. 46-49-52 cm from centre (92-98-104 cm in total). FRONT PIECES: Work back and forth in the one side with short rows. Cut the yarn, skip the first 13-16-19 tr on round, then work over the next 49 tr + ch-spaces as follows (insert a marker here): Work 3 ch, skip 1 ch-space, 1 dc around next ch-space, 3 ch (these 2 ch-spaces are no longer worked), 1 tr around next ch-space, work pattern as before until 2 ch-spaces remain (i.e. ch-spaces between tr, do not work around these 2 ch-spaces anymore), turn piece. Continue the short rows like this, AT THE SAME TIME inc 1 tr + 3 sts in the middle ch-space on every row (work 1 tr + 3 ch + 1 tr in this space). Continue with inc and dec on every row until piece measures 15 cm from marker. Skip 26-32-38 tr, then work short rows over the next 49 tr (13-16-19 tr remain on round). Work the same way as in the other side. CROCHET EDGE: Work an edge around the entire circle as follows: 1 dc around first ch-space, * 3 ch, 1 dc around next ch-space *, repeat from *-* and finish with 1 sl st in first dc. Fasten off. SLEEVES: Worked in the round, top down. Beg mid under one armhole, work 1 dc around first ch-space, 6 ch (= 1 tr + 3 ch), skip first tr and work 1 tr around next ch-space, * 3 ch, 1 tr around next ch-space *, repeat from *-* the entire round (work 1 tr + 3 ch around tr in corners), finish round with 1 tr around first 6 ch, then continue to work in the round without finishing it – READ CROCHET TIP = 21-23-25 tr + 21-23-25 ch-spaces. Continue with 1 tr + 3 ch around every space. When piece measures 4 cm, dec 1 ch-space before marker - READ DECREASE TIP! Repeat dec every 4½ cm 7 more times, dec alternately before and after marker = 13-15-17 tr + 13-15-17 ch-spaces. Continue until piece measures 42-43-44 cm. CROCHET EDGE SLEEVES: Crochet an edge around the sleeves as follows: 1 dc around first ch-space, * 3 ch, 1 dc around next ch-space *, repeat from *-* and finish with 1 sl st in first dc. Fasten off. Work the other sleeve the same way. |
||||||||||||||||||||||||||||
Diagram explanations |
||||||||||||||||||||||||||||
|
||||||||||||||||||||||||||||
 |
||||||||||||||||||||||||||||
 |
||||||||||||||||||||||||||||
 |
||||||||||||||||||||||||||||
 |
||||||||||||||||||||||||||||
 |
||||||||||||||||||||||||||||
Have you finished this pattern?Tag your pictures with #dropspattern #endlesslovecardigan or submit them to the #dropsfan gallery. Do you need help with this pattern?You'll find 7 tutorial videos, a Comments/Questions area and more by visiting the pattern on garnstudio.com. © 1982-2026 DROPS Design A/S. We reserve all rights. This document, including all its sub-sections, has copyrights. Read more about what you can do with our patterns at the bottom of each pattern on our site. |
||||||||||||||||||||||||||||


With over 40 years in knitting and crochet design, DROPS Design offers one of the most extensive collections of free patterns on the internet - translated to 17 languages. As of today we count 324 catalogues and 12290 patterns translated into English (UK/cm).
We work hard to bring you the best knitting and crochet have to offer, inspiration and advice as well as great quality yarns at incredible prices! Would you like to use our patterns for other than personal use? You can read what you are allowed to do in the Copyright text at the bottom of all our patterns. Happy crafting!
Post a comment to pattern DROPS 168-12
We would love to hear what you have to say about this pattern!
If you want to leave a question, please make sure you select the correct category in the form below, to speed up the answering process. Required fields are marked *.