
Popular categories
Looking for a yarn?


Comments / Questions (14)
![]() Anja wrote:
Anja wrote:
Montering: jeg forstår ikke hvad jeg skal efter at have hæklet de midterste trekanter i hver remse sammen - skal de manglende trekanter i remsen blot hæftes/ries på indtil der hækles på skrå? Og hvornår skal remserne hækles sammen? Iøvrigt et smukt tæppe.
04.04.2026 - 16:27DROPS Design answered:
Hej Anja, ja dem rier du på sålænge :)
09.04.2026 - 14:01
![]() Nellie wrote:
Nellie wrote:
Ik begrijp niet helemaal hoe ik de driehoeken aan elkaar moet maken. Ben begonnen met kleur 5. Dan 4 lossen naar de volgende kleur. Dan kom ik weer onderaan of aan de zijkant. Hoe kan ik dan de instructie 4 keer herhalen? En hoe worden de vier secties uiteindelijk aan elkaar gezet? Het lijjt erg ingewikkeld, maar misschien doe ik iets fout. Graag uw hulp en instructies. Dank u
09.11.2018 - 15:45DROPS Design answered:
Dag Nellie,
Je begint links bovenaan in het schema en haakt eerst de 2 driehoeken met kleurcombinatie 5 aan elkaar, dan haak je 4 lossen en ga je verder met het aan elkaar haken van de 2 driehoeken met kleurcombinatie 4, dan weer 4 lossen en dan driehoek 3 plus 3, enzovoort.
11.11.2018 - 12:59
![]() Crystal wrote:
Crystal wrote:
Hi could you help explain the assembly instructions? Do I start with the two color 5 triangles at the very top of column A, or go down the left side of column A and then back up? How do the ch 4’s connect across? Should it be one long seam somehow for all of column A or do you finish and pick up somewhere? I’m having a hard time visualizing the instructions. Thank you for your help!
25.09.2018 - 07:03DROPS Design answered:
Dear Crystal, you first assembly the triangles together top down starting with the 2 triangles colour-5 at the top of each section A then the next 2 triangles colour-4, then the next 2 triangles colour-3 etc. Repeat in each colum B C and D the same way. Then crochet the triangles tog diagonally following the arrows - and then crochet them tog along the last diagonal (from the left twoards the top right). Happy assembly!
25.09.2018 - 10:16
![]() Liz wrote:
Liz wrote:
I think there is a mistake in the chart key (Diagram explanations). The explanation shows a symbol with two bars and translates it as "1 triple treble in st" (UK). However, that symbol does not appear in the chart. Instead, in Rnd 3, there is a symbol with 3 bars. This is shown to be "1 triple treble in st" (UK) in the video. The symbol in the key should have three bars, so that it matches the chart. I checked and this inconsistency is also present in the original Norwegian version.
09.06.2018 - 13:10DROPS Design answered:
Dear Liz, thanks for your feedback, diagram key will be edited as soon as possible. Happy crocheting!
11.06.2018 - 08:46
![]() Claudia wrote:
Claudia wrote:
Fortsetzung: Ich habe jetzt mit 4,5 gehäkelt und mein Dreieck hat natürlich nicht die angegebenen Außenkanten von ca 17 cm, sondern von ca 22cm. Dabei reicht die Wolle nicht und ich müsste nachbestellen, was ich sehr ärgerlich finde. Ich bitte doch sehr, das mal zu überprüfen. Vielen Dank.
27.08.2016 - 19:29
![]() Claudia wrote:
Claudia wrote:
Die angaben stimmen tatsächlichg nicht. In Ihrr anleitung bei Maschenprobe steht 10x 10 cm = 16 Stb und 9 Reihen, bei Nadel4,5. wenn man das gehäkelt hat, weiß man, dass das nicht stimmt. Auf der Wolle steht 10x10 cm= 17 stiches( nicht Stäbchen!) und 22 Reihen, bei Nadel 5. erstens sind das sehr unterschiedliche Angaben und zweitens haut auch die Angabe auf der Wolle nicht hin.
27.08.2016 - 19:26
![]() Claudia wrote:
Claudia wrote:
Liebes Team, ich bin ratlos. Bei Stärke 4,5 häkel ich 16 Stb. plus Wendemaschen: das ergibt in der Breite nie und nimmer 10 cm. Es sind 14 cm. Ich häkel normal - nicht extrem locker, probiert es doch bitte aus oder sagt mir, was ich falsch verstanden habe. Ich häkel nicht zum ersten Mal. Vielen Dank für die Antwort im Voraus!
26.08.2016 - 11:05
![]() Claudia wrote:
Claudia wrote:
An meine Frage schjließt sich dann noch die Frage an, ob beim Zusammenhäkeln die gleiche Nadelstärke benutzt (2,5) wird oder die in der Anleitung angegebene. Und nochmal, ist bei der Maschenprobe die Nadelstärke falsch angegeben, die Maschenzahl oder die cm Zahl? Und reicht bei anderer Nadelstärke denn dann die Wollmenge aus? Hab jetzt schon bestellt und es wäre ärgerlich, wenn ich nachbestellen müsste. Gruß und Danke für Antwort
24.08.2016 - 08:20DROPS Design answered:
Hallo Claudia, es ist weder die Nadelstärke noch die Maschenprobe falsch angegeben, für Paris ist Nadelstärke 4,5 mit 16 Maschen au 10 cm das übliche Mass. Beim Zusammenhäkeln wird die gleiche Nadelstärke benutzt.
25.08.2016 - 18:10
![]() Claudia wrote:
Claudia wrote:
Liebes Team, in der Anleitung ist Nadelstärke 4,5 angegeben. wenn ich die angegebene Maschenprobe mit 4,5 mache ist das Stück viel zu groß. Bei Nadelstärke 2,5 bekomme ich das 10x10 cm Stück. Wie soll ich mir den eklatanten Unterschied erklären und was ist nun flasch in Euer anleitung, die Nadelstärke oder die Maschenzahl(16 Stb)?
23.08.2016 - 23:46DROPS Design answered:
Antwort siehe oben.
25.08.2016 - 18:10
![]() Natalie wrote:
Natalie wrote:
I'd like to make this in just two colours, with off-white for the background and joining rows (ie the vanilla lines) and pink for the flowers and borders (mustard in the pattern). How much yarn would I need in each of off-white and pink?
02.02.2016 - 13:49DROPS Design answered:
Dear Natalie, we are not able to adjust all our patterns to each individual request, but your DROPS store may then help you to calculate amount of yarn with the colours you'd like to use. Happy crocheting!
03.02.2016 - 09:01
|
||||||||||||||||||||||||||||||||||||||||
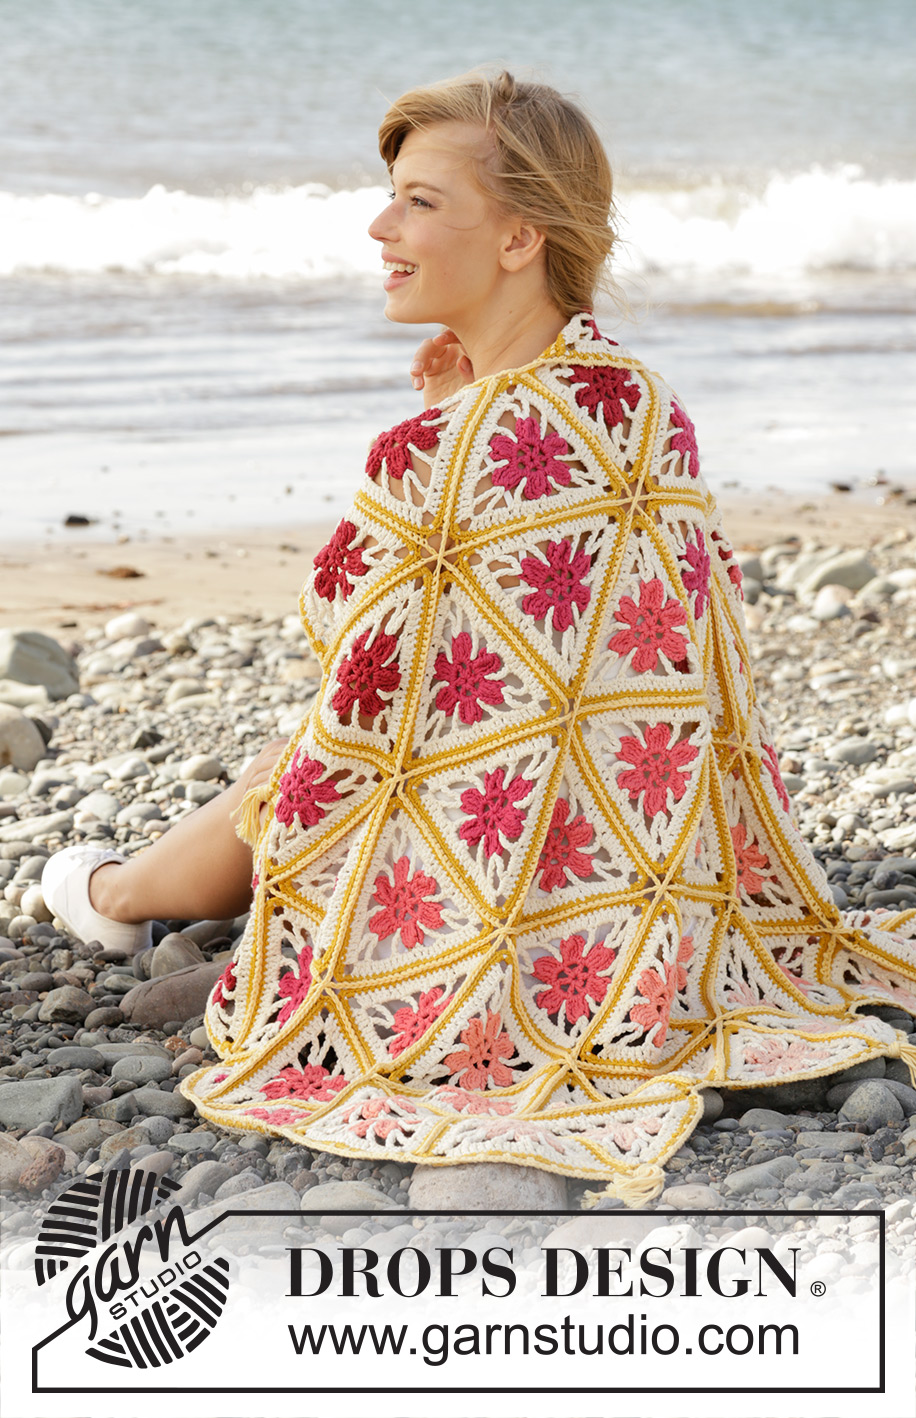
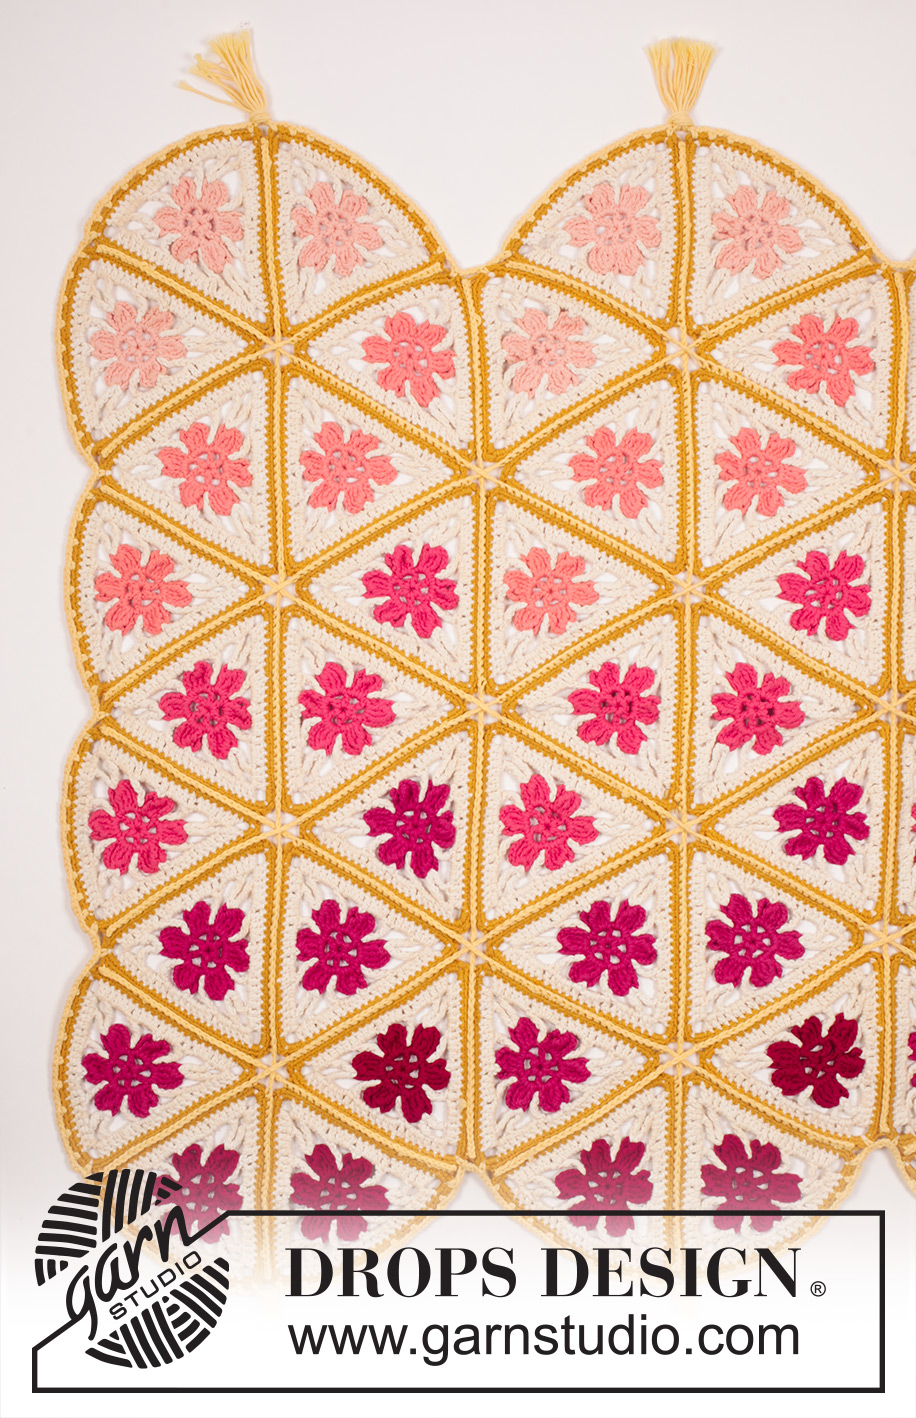
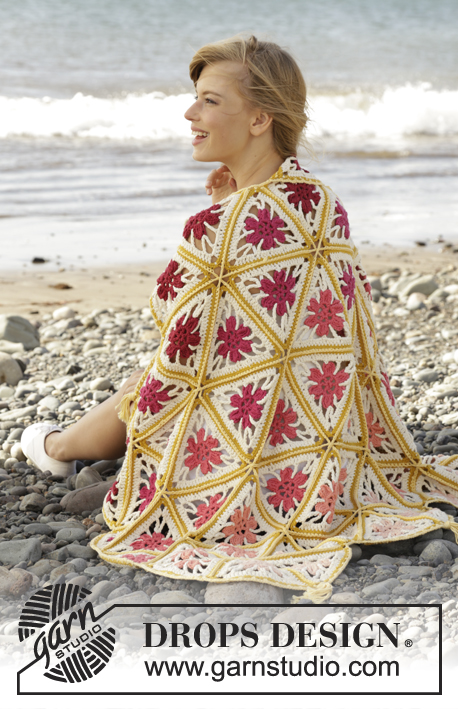
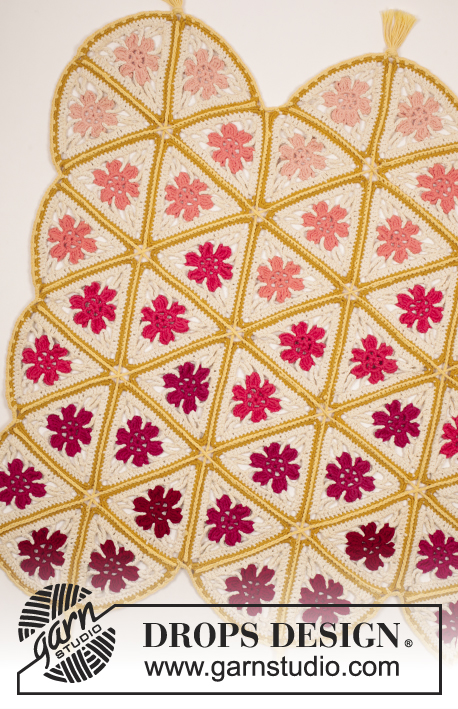
Spring Daze#springdazeblanket |
||||||||||||||||||||||||||||||||||||||||
 |
 |
|||||||||||||||||||||||||||||||||||||||
Crochet DROPS blanket with triangles and fringes in ”Paris”.
DROPS 170-17 |
||||||||||||||||||||||||||||||||||||||||
|
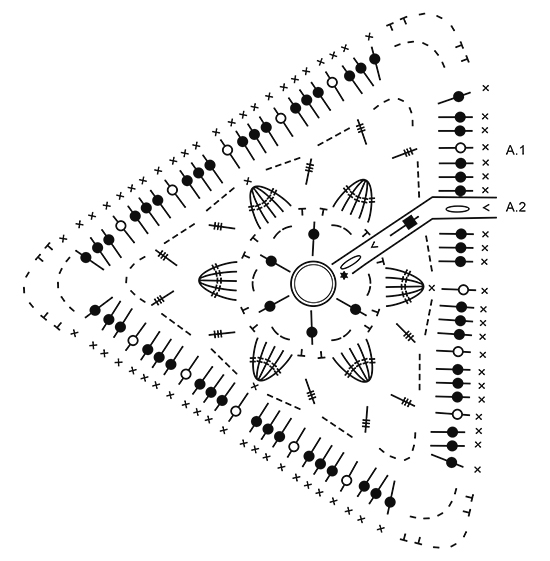
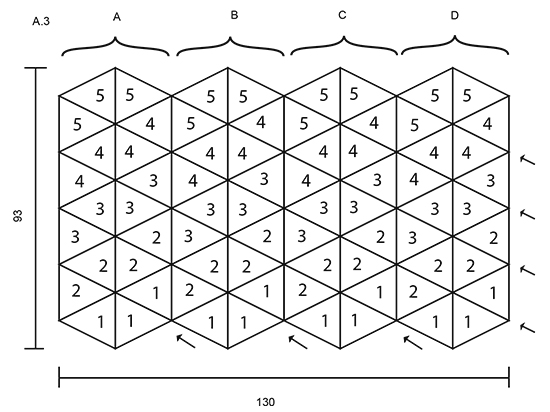
PATTERN: Diagrams A.1 and A.2 (A.2 shows how A.1 beg and ends). A.3 shows how crochet triangles are placed when assembled. ---------------------------------------------------------- CROCHET TRIANGLES: Work pattern according to diagram A.1. A.2 shows how diagram beg and ends. Work crochet triangles on each of the 5 colours explained below. REMEMBER THE CROCHET TENSION! COLOUR 1: Work 12 triangles. Cast on + round 1 and 2: peach. Round 3 and 4: off white Round 5: mustard. COLOUR 2: Work 16 triangles. Cast on + round 1 and 2: apricot. Round 3 and 4: off white Round 5: mustard. COLOUR 3: Work 16 triangles. Cast on + round 1 and 2: raspberry. Round 3 and 4: off white Round 5: mustard. COLOUR 4: Work 16 triangles. Cast on + round 1 and 2: heather. Round 3 and 4: off white Round 5: mustard. COLOUR 5: Work 12 triangles. Cast on + round 1 and 2: rusty red. Round 3 and 4: off white Round 5: mustard. ASSEMBLY: Place triangles as shown in diagram A.3. No 1-5 shows where the different colours should be. First work triangles tog into 4 strips (see brackets A, B, C and D) as follows: NOTE: It might be wise to fasten the triangles temporarily by tying them tog with a strand a yarn, so that they do not move too much when assembling. Place the 2 triangles with colour 5 with wrong sides tog and work them tog with vanilla on hook size 4.5 mm. * Work 1 dc through outermost dc in both triangles (i.e. in both layers) in each of the 27 dc on one side of crochet triangle, work 4 ch in transition for the next 2 triangles that are worked tog (i.e. colour 4) *, repeat from *-* 4 more times (now work over triangles with colour 3, 2 and 1 - see diagram) but finish last time before the 4 ch, fasten off. Repeat the same way on the remaining strips (brackets B, C and D). Then place the 4 strips next to each other as shown in A.3 (fasten triangles temporarily tog as explained above). Then work triangles tog diagonally the same way by working 1 dc through both triangles in each of the outermost 27 dc on one side of every triangle. Work 4 ch in transition between every triangle. Arrows show how blanket are worked tog from one side. Then work diagonally the same way from the other side. Fasten off. EDGE: Work 1 edge with vanilla on hook size 4.5 mm around the blanket as follows: Beg in top between 2 triangles and work (1 dc, 3 ch, skip approx. 1½ cm). NOTE: Work 1 dc around ch-space at the edge in each corner and work 3 ch in transition between the 2 triangles in each tip. In transition between each of brackets A, B, C and D (= where the tip on 4 triangles meet) and in transition between triangles on short side of blanket, work 3 ch and 1 dc around each of the ch-spaces in corners. Finish with round 3 ch, 1 sl st in first dc on round. Fasten off. FRINGE: Insert a large fringe in each of the 4 tips in each long side on blanket. 1 large fringe = 8 strands vanilla of approx. 20 cm. Fold the strands double, thread the loop through ch-space in outer edge worked and pull the strand ends through the loop (so that 16 strands hang down in every fringe). |
||||||||||||||||||||||||||||||||||||||||
Diagram explanations |
||||||||||||||||||||||||||||||||||||||||
|
||||||||||||||||||||||||||||||||||||||||
 |
||||||||||||||||||||||||||||||||||||||||
 |
||||||||||||||||||||||||||||||||||||||||
Have you finished this pattern?Tag your pictures with #dropspattern #springdazeblanket or submit them to the #dropsfan gallery. Do you need help with this pattern?You'll find 11 tutorial videos, a Comments/Questions area and more by visiting the pattern on garnstudio.com. © 1982-2026 DROPS Design A/S. We reserve all rights. This document, including all its sub-sections, has copyrights. Read more about what you can do with our patterns at the bottom of each pattern on our site. |
||||||||||||||||||||||||||||||||||||||||


With over 40 years in knitting and crochet design, DROPS Design offers one of the most extensive collections of free patterns on the internet - translated to 17 languages. As of today we count 324 catalogues and 12290 patterns translated into English (UK/cm).
We work hard to bring you the best knitting and crochet have to offer, inspiration and advice as well as great quality yarns at incredible prices! Would you like to use our patterns for other than personal use? You can read what you are allowed to do in the Copyright text at the bottom of all our patterns. Happy crafting!
Post a comment to pattern DROPS 170-17
We would love to hear what you have to say about this pattern!
If you want to leave a question, please make sure you select the correct category in the form below, to speed up the answering process. Required fields are marked *.