
Popular categories
Looking for a yarn?


|
||||||||||||||||||||||||||||||||||
Starstruck |
||||||||||||||||||||||||||||||||||
 |
 |
|||||||||||||||||||||||||||||||||
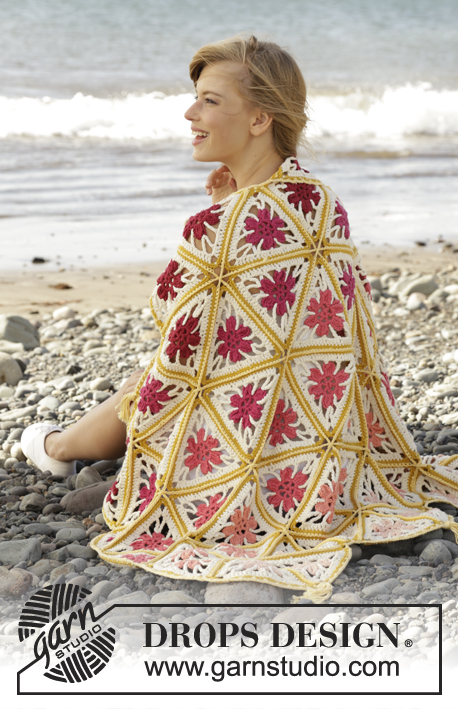
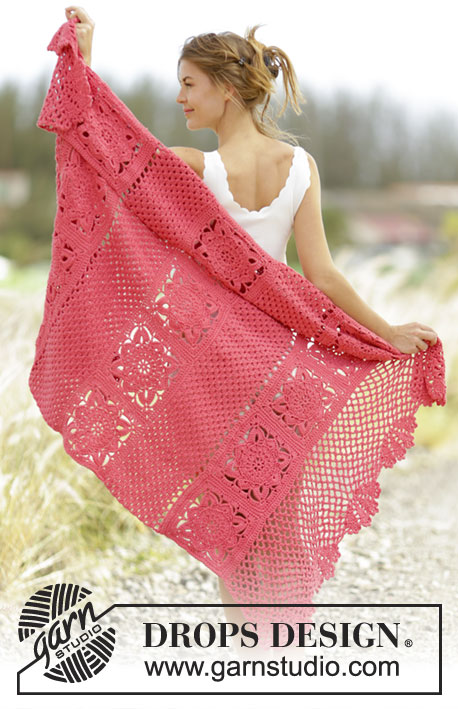
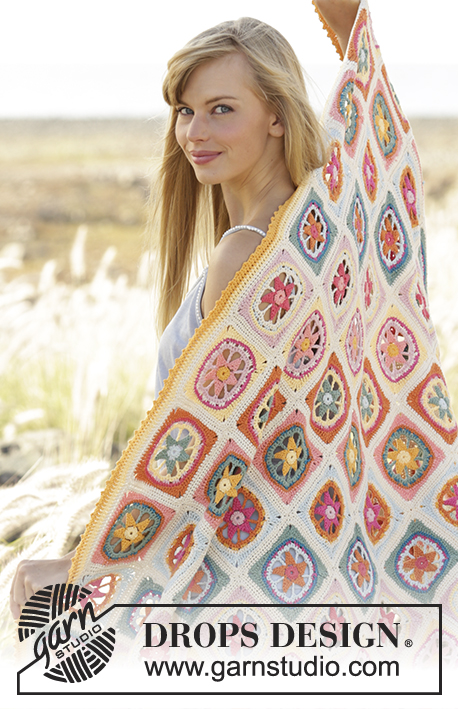
Crochet DROPS blanket with colourful sea star squares ”Safran”.
DROPS 169-37 |
||||||||||||||||||||||||||||||||||
|
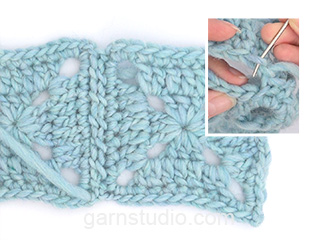
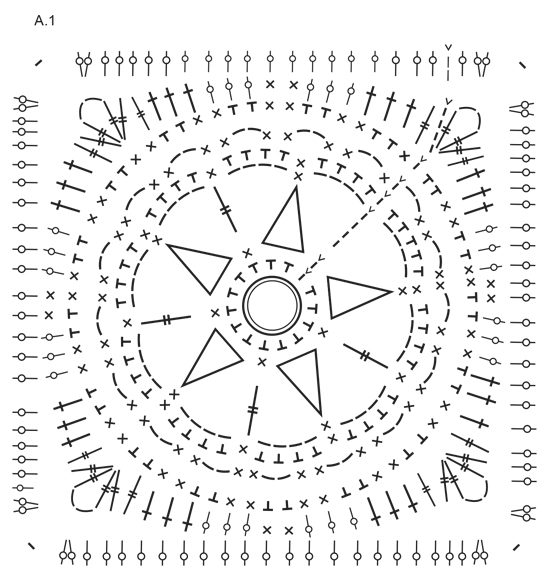
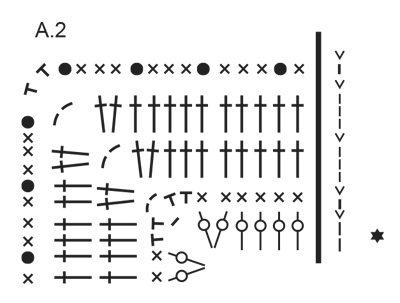
PATTERN: See diagrams A.1 and A.2. COLOUR COMBINATION: Work 6 different squares and 16 squares in each colour combination (96 squares in total). SQUARE 1: Cast on + round 1: strong yellow. Round 2: peach Round 3-4: light pink Round 5: off white. Round 6: cerise Round 7: yellow. Round 8: off white. SQUARE 2: Cast on + round 1: light ice blue. Round 2: green Round 3-4: yellow. Round 5: light pink Round 6: raspberry Round 7: orange Round 8: off white. SQUARE 3: Cast on + round 1: yellow Round 2: strong yellow. Round 3-4: green Round 5: petrol Round 6: orange Round 7: peach Round 8: off white. SQUARE 4: Cast on + 1 round: light pink Round 2: cerise Round 3-4: orange Round 5: strong yellow. Round 6: off white. Round 7: light ice blue. Round 8: off white. SQUARE 5: Cast on + round 1: raspberry Round 2: orange Round 3-4: light ice blue. Round 5: cerise Round 6: petrol Round 7: green Round 8: off white. SQUARE 6: Cast on + round 1: peach Round 2: raspberry Round 3-4: off white. Round 5: light ice blue. Round 6: yellow. Round 7: light pink Round 8: off white. COLOUR CHANGE TIP: To get a nice transition between the colour changes, work last sl st on round with the new colour as follows: Insert hook in first ch from beg of round, make a YO with the new colour and pull YO through the loop on the hook. ---------------------------------------------------------- SQUARE: REMEMBER THE CROCHET TENSION! Work 5 ch on hook size 3 mm with cast-on colour and form a ring with 1 sl st in first ch. Then work pattern in the round according to diagram A.1, i.e. work as follows: ROUND 1: 1 ch (= 1 dc), work 14 dc in ch-ring, switch colour - READ COLOUR CHANGE TIP and finish with 1 sl st in ch from beg of round = 15 sts. ROUND 2: 1 ch (= 1 dc), * work 6 ch, 1 dc in 3rd ch from hook, 1 htr in next ch, 1 tr in next ch and 1 dtr in next ch, skip 2 dc in ring, 1 dc in next st *, repeat from *-* 5 times in total but switch colour before last st on round and finish last repetition with 1 sl st in ch at beg of round (instead of 1 dc in next st) = 5 sea star leaves. ROUND 3: 8 ch (= 1 dtr + 4 ch), * 1 dc at the top of first/next sea star leaf, 4 ch, 1 dtr in dc between 2 sea star leaves, 4 ch *, repeat from *-* 4 times in total, 1 dc at the top of last sea star leaf, 4 ch and finish with 1 sl st in 4th ch at beg of round. ROUND 4: 1 ch (= 1 dc), then work 4 dc around every ch-space and 1 dc in every st between ch-spaces but around last ch-space work 5 dc (instead of 4) = 51 dc on round. Switch colour and finish round with 1 sl st in first ch at beg of round. ROUND 5: 1 ch (= 1 dc), 1 dc in next st, * 2 ch, skip 1 dc, 1 dc in each of the next 2 dc *, repeat from *-* 16 times in total, 2 ch, switch colour and finish with 1 sl st in ch at beg of round = 68 sts (34 dc + 34 ch). ROUND 6: 1 ch (= 1 dc), 1 dc in next st, * 2 dc around ch-space, 1 dc in each of the next 2 dc *, repeat from *-* 16 times in total, work 2 dc around last ch-space, switch colour and finish with 1 sl st in ch at beg of round = 68 sts on round. ROUND 7: 4 ch (= 1 dtr), 1 dtr in next st, * 1 tr in each of the next 3 dc, 1 htr in each of the next 3 dc, 1 dc in each of the next 2 dc, 1 htr in each of the next 3 dc, 1 tr in each of the next 3 dc, 1 dtr in next dc **, 2 dtr + 2 ch + 2 dtr in next dc (= corner), 1 dtr in next dc *, repeat from *-* 4 times in total but finish last repetition after **, work 2 dtr + 2 ch + 1 dtr in last st, switch colour and finish with 1 sl st in 4th ch at beg of round. ROUND 8: 2 ch, (= 1 htr), then work 1 htr in every st the entire round but around ch-space in every corner on work 2 htr + 1 ch + 2 htr, finish round with 1 sl st in ch at beg of round. Fasten off. ASSEMBLY: Sew blanket tog with 8 squares in width and 12 squares in length -see diagram A.3. Sew one and one length tog with off white - sew in outer loop of edge sts, first along then across. CROCHET BORDER: Work a final border around the entire blanket on hook size 3 mm - work diagram A.2 - start in a corner and work from RS with off white as follows: ROUND 1: 1 ch (= 1 dc), then work 1 dc in every st the entire round (i.e. 1 dc in every htr, 1 dc in every corner on the squares themselves, 1 dc in every transition between every square and 2 dc + 2 ch + 2 dc in every corner on the blanket itself), switch to yellow and finish with 1 sl st in ch at beg of round. ROUND 2: 3 ch, (= 1 tr), then work 1 tr in every dc the entire round but around ch-space in every corner on blanket work 2 tr + 2 ch + 2 tr, at the end of round switch to strong yellow and finish round with 1 sl st in 3rd ch at beg of round. ROUND 3: 3 ch (= 1 tr), then work 1 tr in every tr but around ch-space in every corner on blanket work 2 tr + 2 ch + 2 tr, finish with 1 sl st in 3rd ch at beg of round. ROUND 4: 1 ch, 1 dc in next st, * 2 ch, 1 sl st in first ch worked, skip 1 st, 1 dc in each of the next 3 sts on blanket *, repeat from *-* the entire round and finish with 1 sl st in ch at beg of round. Fasten off. |
||||||||||||||||||||||||||||||||||
Diagram explanations |
||||||||||||||||||||||||||||||||||
|
||||||||||||||||||||||||||||||||||
|
||||||||||||||||||||||||||||||||||
|
||||||||||||||||||||||||||||||||||

|
||||||||||||||||||||||||||||||||||
|
Have you made this or any other of our designs? Tag your pictures in social media with #dropsdesign so we can see them! Do you need help with this pattern?You'll find tutorial videos, a Comments/Questions area and more by visiting the pattern on garnstudio.com. © 1982-2024 DROPS Design A/S. We reserve all rights. This document, including all its sub-sections, has copyrights. Read more about what you can do with our patterns at the bottom of each pattern on our site. |
||||||||||||||||||||||||||||||||||


With over 40 years in knitting and crochet design, DROPS Design offers one of the most extensive collections of free patterns on the internet - translated to 17 languages. As of today we count 304 catalogues and 11422 patterns - 11422 of which are translated into English (UK/cm).
We work hard to bring you the best knitting and crochet have to offer, inspiration and advice as well as great quality yarns at incredible prices! Would you like to use our patterns for other than personal use? You can read what you are allowed to do in the Copyright text at the bottom of all our patterns. Happy crafting!
Comments / Questions (9)
Bonjour, il me semble que les instructions du texte pour le tour 7 ne correspondent ni au diagramme ni à la video. Est-ce que je me trompe?
18.12.2018 - 08:47DROPS Design answered:
Bonjour Mme Belette, le texte correspond tout à fait au diagramme, on crochète de *à* 4 fois au total, mais la dernière fois, on termine au niveau de ** (= après 1 DB dans la m suivante avant le coin, et on termine par 2 DB, 2 ml, 1DB dans la dernière m, puis 1 mc dans la 4ème ml du début du tour. Bon crochet!
18.12.2018 - 09:05Pivot 2 som visas i videoklippet görs inte på anna sätt som i beskrivningen i mönstret.\r\n\r\nSka det vara 2 eller 3 luftmassor och ska det vara en luftmassa eller fast maska i första luftmassan. \r\n\r\nMed vänlig hälsning, Radha
09.08.2018 - 20:04DROPS Design answered:
Hej, du ska virka som det står i mönstret, dvs. 2 luftmaskor och 1 smygmaska i den första luftmaskan.
13.08.2018 - 14:19Tidigare kunde man beställa garn till ett specifikt mönster direkt från sidan. Går det inte längre eller är det bara jag som inte hittar var?
11.07.2017 - 15:15DROPS Design answered:
Hej Maria, jo det kan du, det är bara att kicka på "beställ" till höger på sidan under bilden. Lycka till!
12.07.2017 - 14:09Bonjour,j'ai terminé cette magnifique couverture ,j'en arrive l’assemblage ,cependant je ne comprends pas à quoi correspondent les chiffres de 1 à 6 sur le diagramme A3 . En vous remerciant par avance , V Lion .
06.11.2016 - 11:50DROPS Design answered:
Bonjour Mme Lion, les chiffres 1 à 6 dans A.3 représentent chaque type de carré en fonction de l'ordre des couleurs (carrés 1 à 6). Bon assemblage!
07.11.2016 - 09:35Maria Alice Cardoso wrote:
Muito bonito a combinações de cores. Gostaria de ver uma receita com motivos infantil
30.01.2016 - 02:09Liebes DROPS-Team, wieviel Garn wùrde man brauchen wenn man die Decke mit nur 4 Farben häkeln möchte? Hauptfarbe bleibt weiss, und noch 3 Farben für die Sterne... Danke für Ihr Feedback! LG, Claudia
22.01.2016 - 19:02DROPS Design answered:
Leider können wir Ihnen keine Angaben zum ganz genauen Garnverbrauch der Einzelfarben machen und somit auch nicht zum Garnverbrauch mit weniger Farben.
30.01.2016 - 11:06Tolle Granny Squres in hübschen Farben.
20.01.2016 - 12:14Tolle Granny Squares und delikate Farben
20.01.2016 - 11:34A funny feeling of fruits
27.12.2015 - 23:23