
Popular categories
Looking for a yarn?


Comments / Questions (222)
Cathy Morrison wrote:
I have down loaded the pattern called Lights embrace. I have purchased the cotton also. I have recently downloaded the pattern and wondered if this included the updates and corrections that have been made to the pattern. I wont always have access to the internet while crocheting. I cant wait to start my poncho. You have beautiful designs on this site. Thank you.
05.05.2018 - 12:36DROPS Design answered:
Dear Mrs Morrison, if you printed the pattern after the dates shown for the corrections, it means your pattern is fully updated, and includes previous corrections. Happy crocheting!
07.05.2018 - 08:49
![]() Ginger Peterson wrote:
Ginger Peterson wrote:
I am having trouble understanding this pattern with so many diagrams and would be happier if you had better written instructions to follow... I am trying to make this poncho for a friend who asked me to make it... Help
29.04.2018 - 13:36DROPS Design answered:
Dear Mrs Peterson, there are only diagrams to this pattern. You are welcome to contact your DROPS Store for any assistance reading diagrams (even per mail or telephone). Happy crocheting!
30.04.2018 - 11:39Margaret wrote:
Hi, I've seen loads if lovely Poncho crochet patterns, unfortunately I can't work from a chart, are there any patterns that are written out fully!
20.04.2018 - 12:36DROPS Design answered:
Dear Margaret, some of our patterns are fully written, some other do have diagrams. Each symbol reprensents 1 st or group of st. Start reading diagrams from the bottom corner on the right side towards the left on every round. You are welcome to request assistance from your DROPS store (even per mail or telephone) to understand how to read diagrams. Happy crocheting!
20.04.2018 - 13:20
![]() So3147 wrote:
So3147 wrote:
Bonjour, je ne comprends pas comment faire A5 sur le premier tour de point filet! Les explications et le diagramme ne correspondent pas pourriez vous m'aider?
08.04.2018 - 22:40DROPS Design answered:
Bonjour So3147, au 1er rang, crochetez A.5 comme indiqué sous POINT DE FILET, c'est-à-dire crochetez les 4 B (= 2B, 2 ml, 2B) dans la première B la 1ère fois et dans la B suivante la fois suivante, après A.5, crochetez: 1 ml, sautez 1 B, 1 B dans la B suivante jusqu'à ce qu'il reste 1 B avant le marqueur suivant et crochetez A.5 dans le marqueur suivant (faites encore 1 ml et sautez 1 B avant de faire A.5). Bon crochet!
09.04.2018 - 10:49
![]() Dacquin wrote:
Dacquin wrote:
Bonjour Je viens de commencer ce magnifique poncho. Je ne comprends pas comment commencer a2a et a3a.
30.03.2018 - 22:48DROPS Design answered:
Bonjour Mme Dacquin, crochetez le 1er rang (= celui avec l'étoile) comme indiqué dans les explications soit après A.1a: 13-14-15 fois (cf taille) A.2a (= 8 B) en largeur, A.3a (= augmentation milieu devant), 14-15-16 fois A.2a en largeur, A.3a (= augmentation milieu dos) et 1 fois A.2a pour toutes les tailles. Au rang suivant, continuez comme le montre les diagrammes (= rang 2 de A2.a = sauter 1 b, ( 2b, 1 picot, 1 b) dans la b suivante, 1 ml, sauter 3b, (2b,1 picot, 1b) dans la b suivante, 1 ml. Bon crochet!
03.04.2018 - 08:04
![]() Carmen Artesana wrote:
Carmen Artesana wrote:
Ya hice el poncho siguiendo el gráfico, aunque lo hice un poco más pequeño. Me gustaría enviarle la foto de como me quedó. Gracias
24.03.2018 - 00:25DROPS Design answered:
Hola Carmen, puedes colgar las fotos de tus trabajos en la página de Facebook de DROPS Design. https://www.facebook.com/Garnstudio.DROPS.design/
29.03.2018 - 19:12
![]() Pia wrote:
Pia wrote:
Jag undrar liksom tidigare förvirrade virkare varför det bara är en rad stolpar efter det första nätmönstret på bilden men beskrivs två i mönstret? Först ska 234 stolpar virkas totalt, och sedan börjar mönster a2 vars första rad också består av stolpar?
21.03.2018 - 20:15DROPS Design answered:
Hej Pia, * betyder att varvet redan är förklarat i mönstret, men varvet är med i diagrammet för att du skall se var du virkar m på nästa varv. Lycka till!
22.03.2018 - 09:32
![]() Elena wrote:
Elena wrote:
Hola por favor me podeis explicar que es MP? No viene reflejado en ningun sitio y no se que tengo que hacer
07.03.2018 - 20:07DROPS Design answered:
Hola Elena. MP = marcapuntos. En el glosario puedes encontrar todos las abreviaturas que usamos en los patrones, bajo este link : https://www.garnstudio.com/glossary.php?langf=es&langt=en
11.03.2018 - 15:49
![]() Maida wrote:
Maida wrote:
Wenn ich in die 10 Masche eine KM mache und mit 4 Lm beginne (diese ersetzen nicht das erste Stäbchen), in der gleichen Masche mit meinen Stb beginne und 104 Stb mache habe ich am Ende noch 4 Maschen vor dem LM-Bogen und nicht 2. 104+4= 108 + die 9 Maschen vor dem Rundenbeginn sind genau 117 (zwischen den 2 Bögen). Was also passt hier nicht?
12.02.2018 - 12:21DROPS Design answered:
Liebe Maida, hatten Sie vor diesem Muster die 117 M + die 3 Lftmaschen am Anfang der Runde? Es sollte damit so klappen - siehe vorrige Antwort. Viel Spaß beim häkeln!
12.02.2018 - 14:32
![]() Maida wrote:
Maida wrote:
Ich habe wirklich Probleme mit A.2a und A.3a. Ich habe in das 10. Stb der Vorrunde eine KM gemacht und dann 4LM +1Lm, 1 Stb übersprungen dann 2 Stb, 1 Picot,1 Stb in eine Masche, 3 Maschen übersprungen und wieder einen Diamanten. Vor dem nächsten LM-Bogen gingen sich aber mehr als die angegebenen 13x aus. Sprich ich hatte noch 6 Stb übrig bis zum LM-Bogen. Und die Stb in der Vorrunde sind richtig (117). Habe oft genug nachgezählt. Bitte was ist los mit dieser Anleitung?
11.02.2018 - 22:58DROPS Design answered:
Liebe Maida, Sie häkeln 13 x A.2 (= 8 Stb in jedem A.2a = 1 Stb in jeder der nächsten 104 Stb), dann die 2 nächsten Stb vor der Spitze gehören zur A.3 - bei der 2. Spitze haben sie die 3 ersten Stb = A.3 und am Ende der Runde häkeln Sie noch die 8 Stb in A.2a = 13x8 (A.2) + 2 (Anfang A.3 1. Spitze) + 3 (Ende A.3 2. Spitze) + 1x8 (letzte A.2 am Ende der Runde) = 117 Stb zwischen den 2 LfmBögen. Viel Spaß beim häkeln!
12.02.2018 - 09:25
|
|||||||||||||||||||||||||||||||||||||||||||||||||
Light's Embrace#lightsembraceponcho |
|||||||||||||||||||||||||||||||||||||||||||||||||
 |
 |
||||||||||||||||||||||||||||||||||||||||||||||||
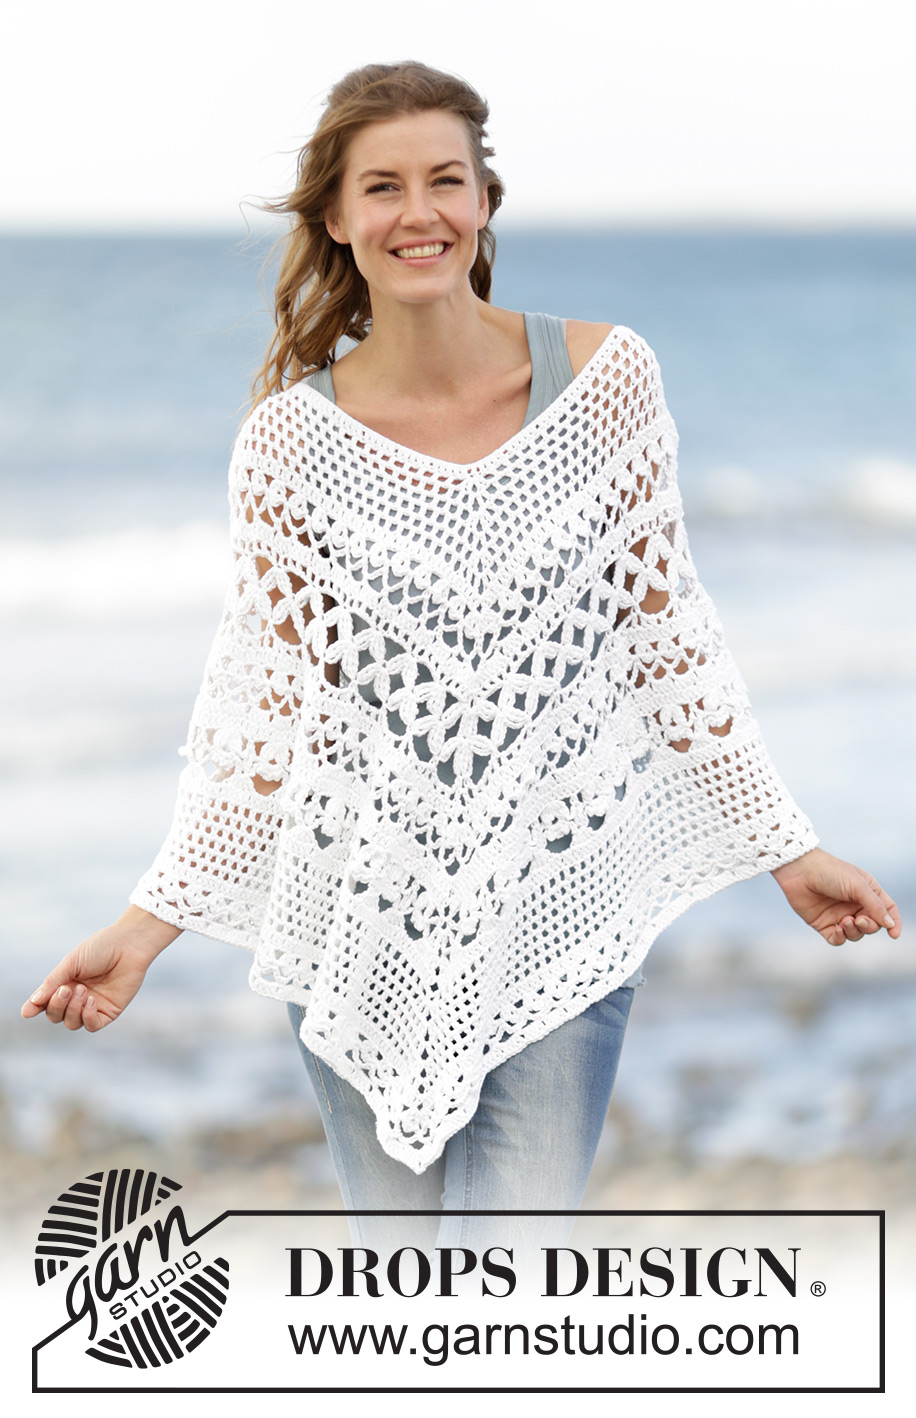
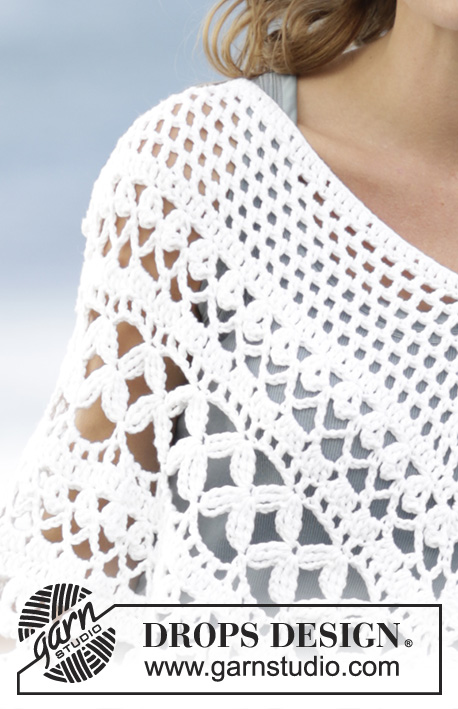
Crochet DROPS poncho with lace pattern, worked top down in ”Paris”. Size S-XXXL.
DROPS 169-4 |
|||||||||||||||||||||||||||||||||||||||||||||||||
|
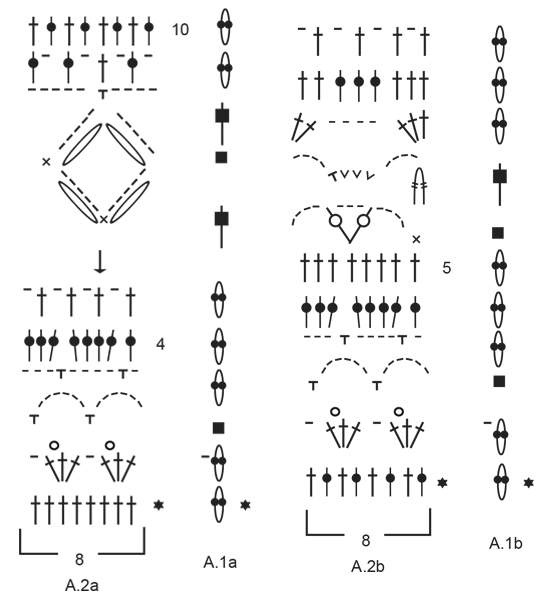
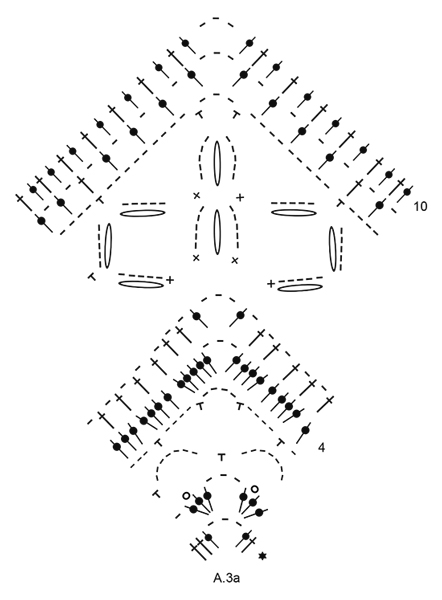
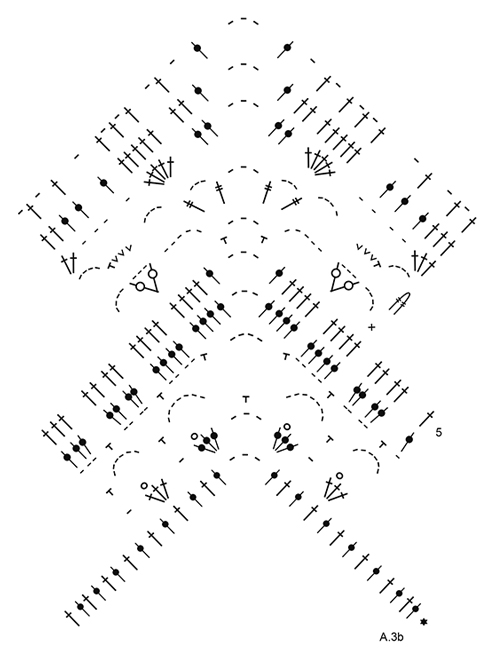
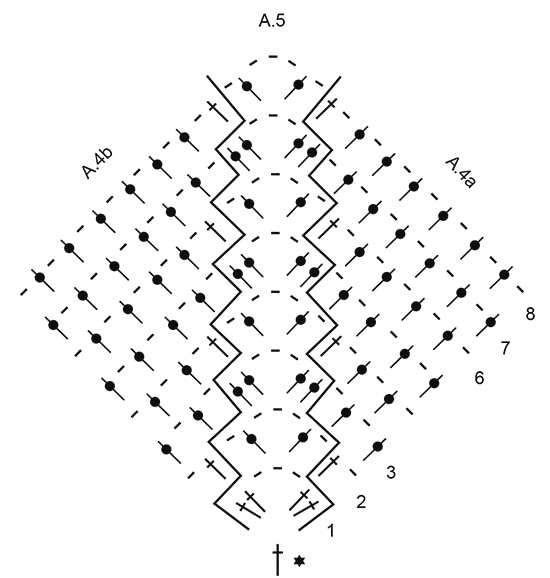
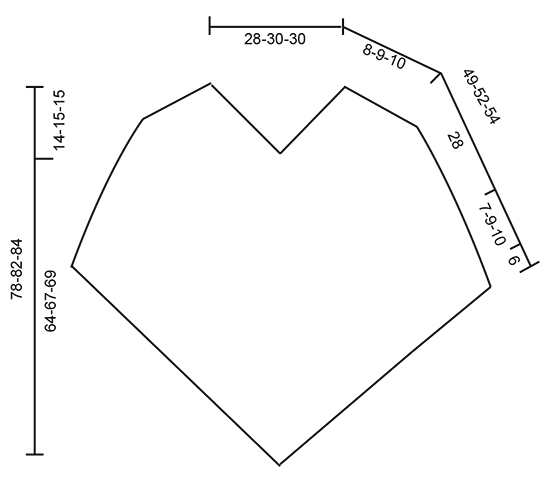
PATTERN: See diagrams A.1 to A.5. Diagrams A.1a and A.1b show how round beg and ends. CROCHET INFO: Beg every tr round with 3 ch (these ch do not replaces first tr). At the end of round work 1 sl st in 3rd ch at beg of round. NOTE: When working A.5 beg round with 3 ch. At the end of round work 1 tr in first st worked on round (i.e. st with the 3 ch in), then 1 sl st in 3rd ch at beg of round. WORK 2 DTR TOG: Work 1 dtr around ch-space below but wait with last pull through (= 2 loops on hook), skip 1 dc and work 1 dtr around next ch-space but on last pull through, pull yarn through all loops on hook. WORK 3 DTR TOG: Work 1 dtr but wait with last pull through (= 2 sts on hook), work 1 more dtr but wait with last pull through (= 3 loops on hook), work 1 more dtr but on last pull through, pull yarn through all loops on hook. MESH PATTERN: ROUND 1: * Start with 1st row of A.5, work the 4 tr in first/next tr with marker, work (1 ch, ship 1 tr, 1 tr in next tr) until 1 tr remains before next marker, work 1 ch, skip next tr *, repeat from *-* 3 times more. There is now 4 repeats of A.5 on round. ROUND 2: * Work A.5 around first/next ch-space with marker, then work 1 tr in next tr, 1 ch, 1 tr around first ch-space, (1 ch, skip 1 tr, 1 tr in next ch-space) until 1 ch-space remains before next repeat of A.5, work 1 ch, 1 tr in next tr *, repeat from *-* 3 times more. ROUND 3: * Work A.5 around first/next ch-space with marker, then work (1 ch, skip 1 tr, 1 tr around next ch-space) until next repeat of A.5, 1 ch *, repeat from *-* 3 times more. ---------------------------------------------------------- PONCHO: Worked in the round, top down. First inc mid front, mid back and on each shoulder, then inc only mid front and mid back. Work 153-163-163 ch on hook size 4.5 mm with Paris and form a ring with 1 sl st. Work 3 ch – see CROCHET INFO! Then work 1 tr in each of the next 3-1-1 ch, * skip 1 ch, 1 tr in each of the next 5 ch *, repeat from *-* 24-26-26 more times on round = 128-136-136 tr + 3 ch on round. Now insert 4 markers from beg of round without working: Insert 1 marker in 1st tr on round (= mid back), skip 31-33-33 tr, insert 1 marker in next tr (= shoulder), skip 31-33-33 tr, insert 1 marker in next tr (= mid front), skip 31-33-33 tr, insert 1 marker in next tr (= shoulder), there are now 31-33-33 tr between last marker and beg of round. Now work MESH PATTERN - see explanation above. When 1st-3rd round have been worked, repeat 2nd and 3rd round until 6-7-8 rounds with mesh pattern have been worked - see diagram A.4a and A.4b to see how to work the whole inc in each side of A.5. REMEMBER THE CROCHET TENSION! Piece measures approx. 8-9-10 cm. Work next round as follows AT THE SAME TIME dec 0-8-8 tr evenly (= 0-4-4 tr dec on each side of mid back and mid front): *Work (2 tr, 3 ch, 2 tr) around ch-space (= mid back on 1st repetition and mid front on 2nd repetition), then work 1 tr in every tr and 1 tr around every ch until next inc tr-group, work 3 tr around ch-space (= shoulder), work 1 tr in every tr and 1 tr around every ch until inc tr-group (mid front on 1st repetition and mid back on 2nd repetition)*, repeat from *-* 1 more time. There are now 117-125-133 tr between ch-space mid front and mid back (= 234-250-266 tr in total on round + 2 ch-space). Cut the yarn. NOTE: Then do not inc on each shoulder but only mid front and mid back on poncho. Work 1 sl st in the 10th st from ch-space mid back and work pattern as follows: Work A.1a (shows how round beg and end, does not replace first st), A.2a (= 8 tr) 13-14-15 times in width, A.3a (= inc mid front), continue with A.2a 14-15-16 times in width, A.3a (= inc mid back) and A.2a 1 time in all sizes. On 4th round in A.3a there are 133-141-149 tr between ch-space mid front and mid back. Continue with pattern as before (there is now room for 16-17-18 repetitions A.2a on each side of A.3a). On 10th round inc 8 tr evenly on each side of A.3a (= 16 tr in total on round) = 163-171-179 tr on each side of ch-space mid front and mid back. Continue with pattern as before, but now work A.1b over A.1a, A.2b over A.2a and A.3b over A.3a (there is now room for 19-20-21 repetitions A.2 on each side of A.3). On 4th round inc 3 tr evenly between every repetitions of A.3 (i.e. 6 tr in total on round) = 169-177-185 tr between each ch-space mid front and mid back. Continue pattern (there is now room for 21-22-23 repetitions A.2 on each side of A.3). When entire diagram has been worked vertically, piece measures 36-37-38 cm. Cut the yarn. Now work mesh pattern as at beg of piece. Beg in ch-space mid back, and work mesh pattern from 3rd round in mesh pattern. Repeat 2nd and 3rd round until 6-8-10 rounds in total have been worked (incl last round in A.2 and A.3). Work next round as follows: * Work (2 tr, 3 ch, 2 tr) around ch-space (= mid back), then work 1 tr in every tr and 1 tr around every ch until next repeat of A.5 *, repeat from *-* 1 more time = 193-209-225 tr between ch-space mid front and mid back. Cut the yarn. Now work pattern A.1a, A.2a and A.3a as follows: Work 1 sl st in 12th tr from ch-space mid back and work pattern as follows: Work A.1a (shows how round beg and end, does not replace first st), A.2a until 2 tr remain before ch-space mid front, A.3a (= inc mid front), continue with A.2a until 2 tr remain before ch-space mid back, A.3a (= inc mid back) and A.2a 1 time in all sizes. When 4th row has been worked vertically, poncho measures 49-52-54 cm. Fasten off. |
|||||||||||||||||||||||||||||||||||||||||||||||||
Diagram explanations |
|||||||||||||||||||||||||||||||||||||||||||||||||
|
|||||||||||||||||||||||||||||||||||||||||||||||||
 |
|||||||||||||||||||||||||||||||||||||||||||||||||
 |
|||||||||||||||||||||||||||||||||||||||||||||||||
 |
|||||||||||||||||||||||||||||||||||||||||||||||||
 |
|||||||||||||||||||||||||||||||||||||||||||||||||
 |
|||||||||||||||||||||||||||||||||||||||||||||||||
Have you finished this pattern?Tag your pictures with #dropspattern #lightsembraceponcho or submit them to the #dropsfan gallery. Do you need help with this pattern?You'll find 13 tutorial videos, a Comments/Questions area and more by visiting the pattern on garnstudio.com. © 1982-2026 DROPS Design A/S. We reserve all rights. This document, including all its sub-sections, has copyrights. Read more about what you can do with our patterns at the bottom of each pattern on our site. |
|||||||||||||||||||||||||||||||||||||||||||||||||


With over 40 years in knitting and crochet design, DROPS Design offers one of the most extensive collections of free patterns on the internet - translated to 17 languages. As of today we count 324 catalogues and 12290 patterns translated into English (UK/cm).
We work hard to bring you the best knitting and crochet have to offer, inspiration and advice as well as great quality yarns at incredible prices! Would you like to use our patterns for other than personal use? You can read what you are allowed to do in the Copyright text at the bottom of all our patterns. Happy crafting!
Post a comment to pattern DROPS 169-4
We would love to hear what you have to say about this pattern!
If you want to leave a question, please make sure you select the correct category in the form below, to speed up the answering process. Required fields are marked *.