
Popular categories
Looking for a yarn?


Comments / Questions (22)
![]() Noemí wrote:
Noemí wrote:
Buenas tardes: En las instrucciones para los aumentos el patrón dice que las hebras se tejan retorcidas de derecho para evitar agujeros; sin embargo, esta prenda tiene un patrón de calados. He probado a tejer las hebras de la manera habitual y así sí se ve el agujero. No sé si estoy equivocada o es un fallo de transcripción del patrón (por si quieren revisarlo 😉). Un saludo y gracias por todos los patrones que comparten.
21.08.2018 - 18:47DROPS Design answered:
Hola Noemí, no hay ningún fallo, el patrón es correcto. Las hebras se trabajan sólo con punto retorcido en los aumentos (para dar forma a la prenda). Las hebras del patrón de calados se trabajan de la manera habitual.
26.08.2018 - 16:35
![]() Noemí wrote:
Noemí wrote:
Buenas tardes: Estoy tejiendo este maravilloso bolero para un regalo y me surge una duda. Comparando mi tejido con la imagen mis calados se ven más pequeños a pesar de haber comprobado con la muestra que mi tensión de tejido es la adecuada. ¿Es necesario bloquear la prenda para que el tejido se vea igual? Mucha gracias por la atención y por todos los patrones gratuitos.
21.08.2018 - 18:43
![]() Nanna Mathiasen wrote:
Nanna Mathiasen wrote:
Hej jeg er lidt i tvivl om hvordan jeg skal strikke A1B når vi når til linjen med 2 trekanter da trekanterne overlapper både A1A og A1C?
14.04.2018 - 10:54DROPS Design answered:
Hei Nanna. På den 7 omgangen strikker du slik: det første kastet i overgangen A.1a/A.1b inngår i A.1a, mens fellingen og kastet på slutten av fellingen inngår i A.1b. Det samme prinsippet gjelder for overgangen mellom rapportene av A.1b, og overgangen mellom A.1b/A.1c. Maskeantallet i de forskellige delene (a,b og c) forblir det samme gjennom hele omgangen. God fornøyelse
24.04.2018 - 13:40
![]() Petra Stammkötter wrote:
Petra Stammkötter wrote:
Hallo, nachdem ich 7 Maschen auf jeder Seite zugenommen habe geht die erste Musterreihe (Reihe 3) sehr gut auf. In Reihe 5 des Musters habe ich jedoch auf der linken Seite 4 Maschen als Randmaschen übrig statt 3. Auch nach 5 mal wieder anfangen. Können Sie mir weiter helfen? Vielen Dank
15.06.2017 - 21:13DROPS Design answered:
Liebe Frau Stammkötter, Sie sollen die Maschen so stricken: 3 M kraus rechts, A.1A x 1, A.1B wiederholen bis 7 M übrig sind, und die letzte M so stricken: A.1C (= 4 M), 3 M Kraus rechts. Fadenmarkierer können Sie zwischen jedem Rapport einsetzen, so kann es einfacher das Muster weiterzustricken. Viel Spaß beim stricken!
16.06.2017 - 08:56
![]() Yuliya wrote:
Yuliya wrote:
VII. Reihe kann ich gar nicht zusammen bringen. Wo fängt hier Rapport an? Ps: ging nur so mit Fragen, keine lange Kommentare zugelassen)
21.05.2016 - 23:22DROPS Design answered:
Stricken Sie fortlaufend das im Diagramm dargestellte Muster, ohne sich um den genauen Anfang und Ende des Mustersatzes zu sorgen - das ist nicht nötig und es wird aufgehen. Sie sehen wie das Zusammenstricken im Muster die Spitze des Motivs bildet.
23.05.2016 - 10:39
![]() Yuliya wrote:
Yuliya wrote:
Ist das richtig so? III. Reihe: 3 Maschen ( 2 m. zus., Umschlag, 1 m. re.) Rapport ( 2 m. re., Umschlag, 3 m.zus. Überzug, Umschlag, 1 m. re.) Ende der Reihe 4 Maschen ( 2 m. re., Umschlag, 2 m. zus. Überzug) V. Reihe: 3 Maschen ( 1 m. re., Umschlag, 2 m. zus. Überzug) Rapport ( 1m. re., 2 m. zus, Umschlag, 1m.re., Umschlag, 2 m. zus. Überzug) Ende der Reihe ( 1 m. re., 2 m. zus., Umschlag, 1 m. re.)
21.05.2016 - 23:21DROPS Design answered:
Hallo Yulia, auch hier müssen Sie daran denken, beidseitig je 2 M kraus re zu stricken, ansonsten folgen Sie bitte dem Diagramm.
23.05.2016 - 10:35
![]() Yuliya wrote:
Yuliya wrote:
Guten Tag. Ich verstehe nicht so ganz, wo Rapport anfängt und wo endet. I. Reihe: 3 Maschen (1 m. re, 2 m. zus., Umschlag), dann Rapport ( 1 m.re., Umschlag, 2 m. zus. Überschlag, 1m.re, 2 m. zus., Umschlag) Ende der Reihe 4 Maschen ( 1 m. re., Umschlag, 2 m. zus. Überschlag, 1 m.re)
21.05.2016 - 23:19DROPS Design answered:
Hallo Yulia, im Diagramm haben wir eingezichnet, wo die einzelnen Rapporte beginnen und enden. Denken Sie daran, vor A.1A 2 M kraus rechts zu stricken, dann geht das Muster auf.
23.05.2016 - 10:34
![]() Franca wrote:
Franca wrote:
Buongiorno ,mi piace molto questo coprispalle ma non so lavorare con i ferri circolari........posso utilizzare i ferri normali dritti???? grazie
16.05.2016 - 09:55DROPS Design answered:
Buongiorno Franca. Il capo è lavorato avanti e indietro sui ferri, quindi può usare i ferri dritti e seguire le spiegazioni come riportate. Vengono consigliati i ferri circolari per avere più spazio per le m. Buon lavoro!
16.05.2016 - 10:15Sia wrote:
It's seems to be a problem on the last line of the pattern as A.1A ends after starting 'slip 1 st as if to K, K 2 tog, psso' and it's hards to know from which stitch to repeat A. 1B. I'm looking forward to your reply as I have just started knitting it. Thank you in advance.
27.03.2016 - 20:59DROPS Design answered:
Dear Sia, on row 7 in A.1A work the last st in A.1 A tog with the 2 first sts in A.1B, then work the last st in A.1B with the first 2 sts in next A.1B in width, and on last repeat, work the last sts in A.1B tog with the first 2 sts in A.1C. Happy knitting!
29.03.2016 - 10:07
![]() Christel Johnsson wrote:
Christel Johnsson wrote:
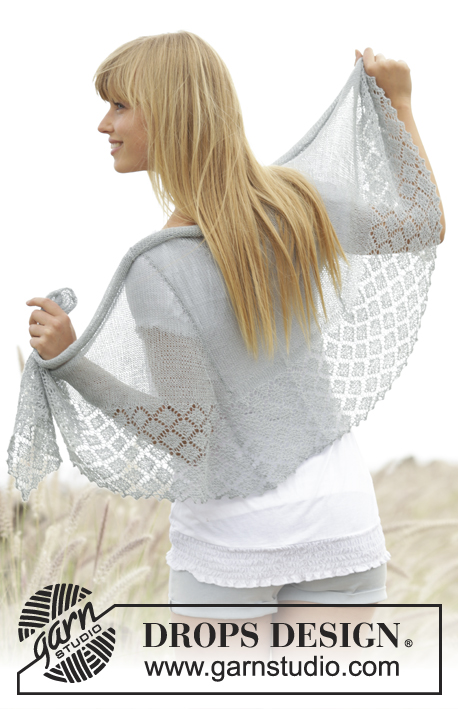
Lace Bolero
24.01.2016 - 19:26
|
||||||||||||||||
Always Cute#alwayscuteshoulderpiece |
||||||||||||||||
 |
 |
|||||||||||||||
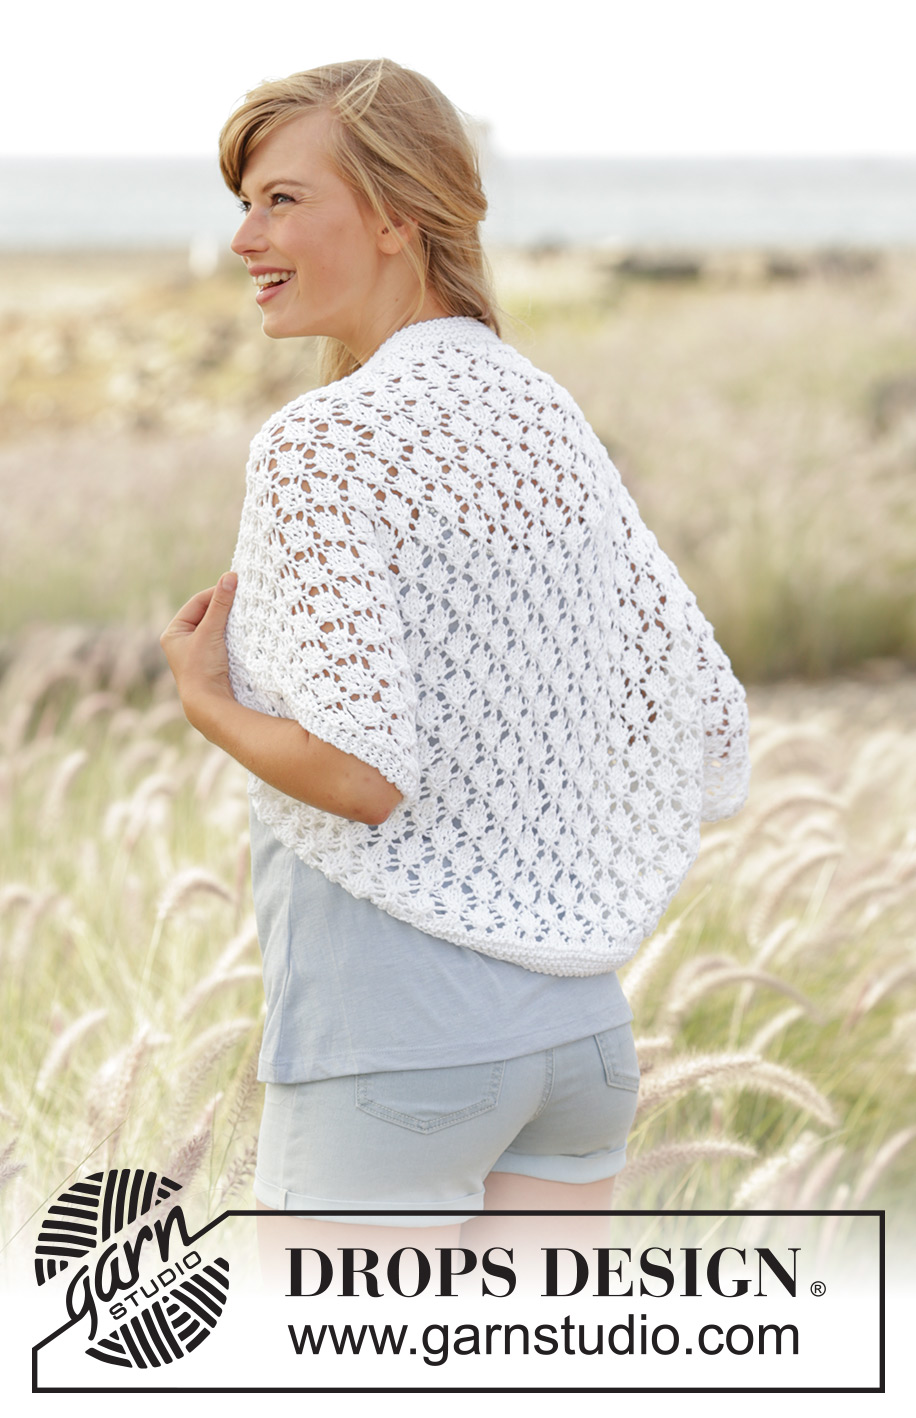
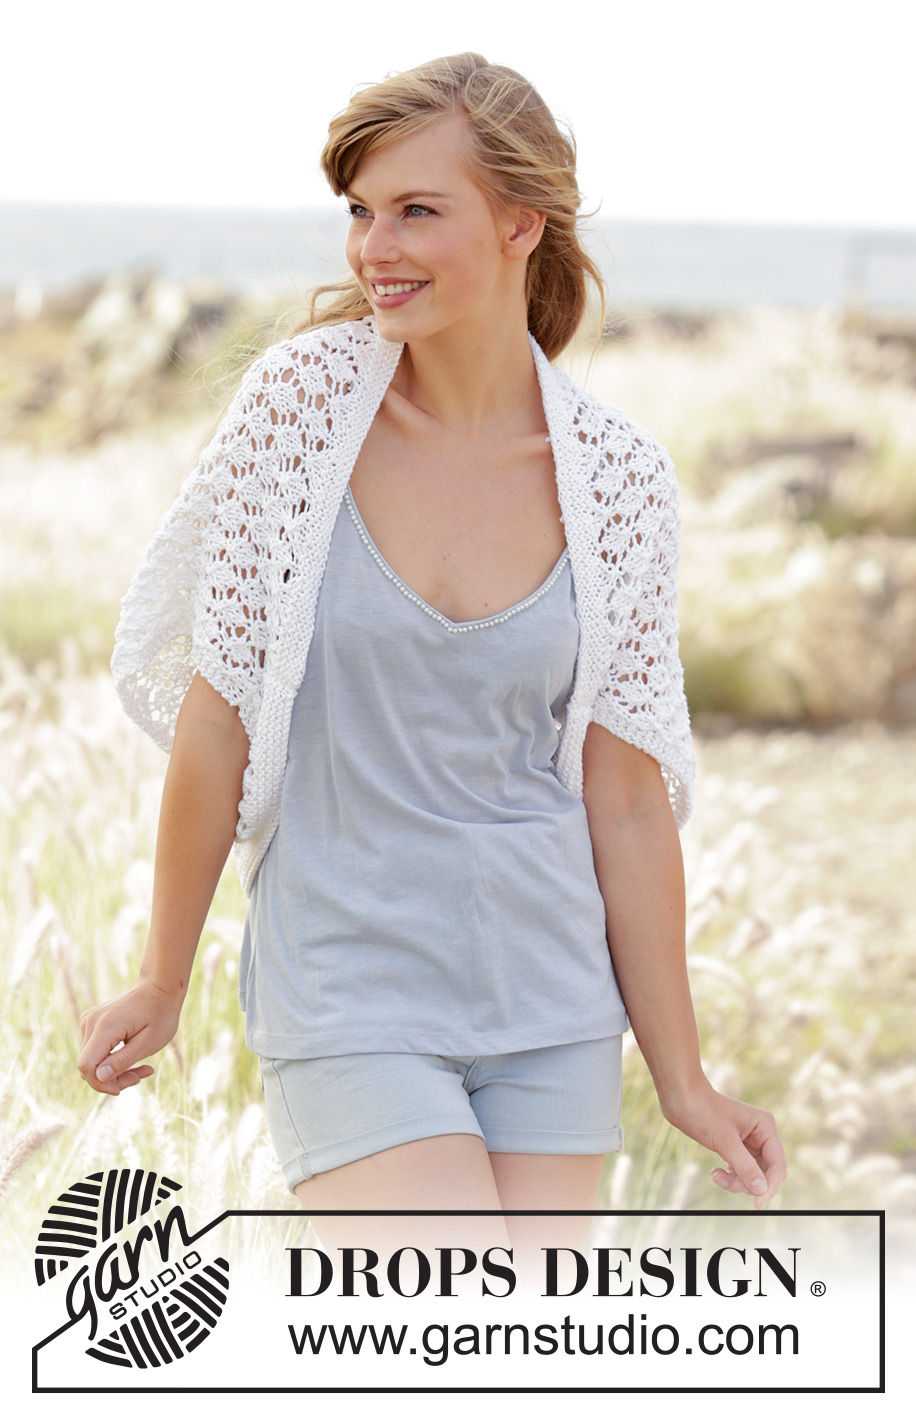
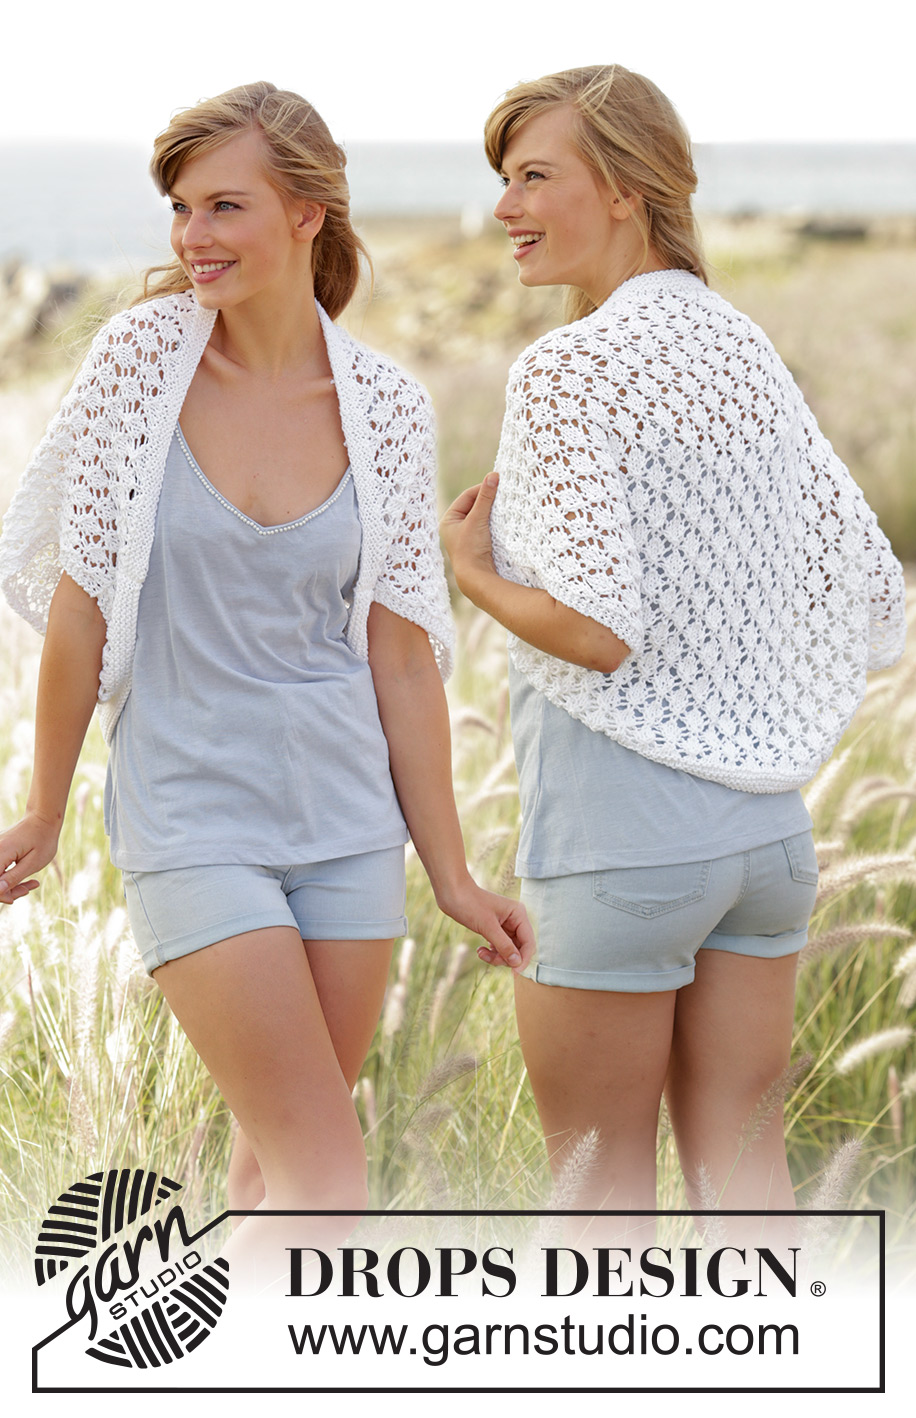
Knitted DROPS shoulder piece with lace pattern in ”Paris”. Size: S - XXXL.
DROPS 169-14 |
||||||||||||||||
|
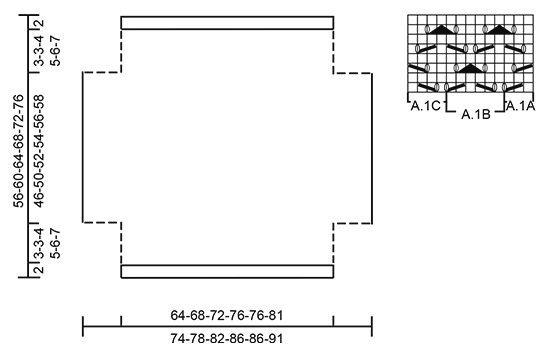
GARTER ST (back and forth): K all rows. 1 ridge = 2 rows K. PATTERN: See diagram A.1. The diagram show all rows in pattern seen from RS. DECREASE/INCREASE TIP: To calculate how often dec/inc should be done, use the total no of sts on row (e.g. 108 sts) and divide by no of dec/inc to be done (e.g. 19) = 5.68. I.e. in this example work alternately every 4th and 5th st K tog and every 5th and 6th K st tog (if dec). Or inc after alternately every 5th and 6th st. NOTE: Inc 1 st by making 1 YO. On next row K YO twisted to avoid holes. ---------------------------------------------------------- SHOULDER PIECE: Cast on 108-116-122-130-130-138 sts on circular needle size 4 mm with Paris. Work 4 ridges in GARTER ST - see explanation above. AT THE SAME TIME when 1 ridge remains, dec 19-21-21-23-23-25 sts evenly from RS - READ DECREASE/INCREASE TIP = 89-95-101-107-107-113 sts. K last row from WS. Switch to circular needle size 5 mm and work 2 rows in stocking st with 2 edge sts in garter st in each side. Work next row as follows from RS: 2 edge sts in garter st, work A.1A (= 3 sts), work pattern according to diagram A.1B until 6 sts remain (= 13-14-15-16-16-17 repetitions of 6 sts), work A.1C (= 4 sts) and finish with 2 edge sts in garter st. Continue pattern like this. REMEMBER THE KNITTING TENSION When piece measures 5-5-6-7-8-9 cm, cast on 7 new sts for sleeve at the end of the next 2 rows = 103-109-115-121-121-127 sts on needle. Continue A.1 with 3 edge sts in garter st in each side - NOTE: Make sure that the pattern comes above each other onwards - after casting on new sts in each side there is room for 2 repetitions more of A.1B. When piece measures 51-55-58-61-64-67 cm, cast off 7 sts at the beg of the next 2 rows = 89-95-101-107-107-113 sts remain on needle. Continue A.1 with 2 edge sts in garter st in each side until piece measures 53-57-61-65-69-73 cm, adjust to have worked the same length as on beg of piece and that next row is worked from RS. Work 2 rows in stocking st with 2 edge sts in garter st in each side. Switch to circular needle size 4 mm and work 4 ridges back and forth while AT THE SAME TIME inc 19-21-21-23-23-25 sts evenly on 1st row – READ DECREASE/INCREASE TIP = 108-116-122-130-130-138 sts. After ridges LOOSELY cast off with K from RS. ASSEMBLY: Place cast-on edge towards cast-off edge, WS against WS. Sew side and underarm seams in one - see dotted line on chart – NOTE: side seams are sewn edge to edge in outer loops of edge sts to get a flat seam, underarm seams are sewn inside cast-off and cast-on edge. |
||||||||||||||||
Diagram explanations |
||||||||||||||||
|
||||||||||||||||
 |
||||||||||||||||
Have you finished this pattern?Tag your pictures with #dropspattern #alwayscuteshoulderpiece or submit them to the #dropsfan gallery. Do you need help with this pattern?You'll find 19 tutorial videos, a Comments/Questions area and more by visiting the pattern on garnstudio.com. © 1982-2026 DROPS Design A/S. We reserve all rights. This document, including all its sub-sections, has copyrights. Read more about what you can do with our patterns at the bottom of each pattern on our site. |
||||||||||||||||


With over 40 years in knitting and crochet design, DROPS Design offers one of the most extensive collections of free patterns on the internet - translated to 17 languages. As of today we count 324 catalogues and 12290 patterns translated into English (UK/cm).
We work hard to bring you the best knitting and crochet have to offer, inspiration and advice as well as great quality yarns at incredible prices! Would you like to use our patterns for other than personal use? You can read what you are allowed to do in the Copyright text at the bottom of all our patterns. Happy crafting!
Post a comment to pattern DROPS 169-14
We would love to hear what you have to say about this pattern!
If you want to leave a question, please make sure you select the correct category in the form below, to speed up the answering process. Required fields are marked *.