
Popular categories
Looking for a yarn?


Comments / Questions (173)
![]() Gwen wrote:
Gwen wrote:
How much ease is there in pattern 168/1 Sea Nymph?
14.04.2021 - 20:48DROPS Design answered:
Dear Gwen, our model wears the sweater with a slight positive ease. You can find teh exact measurements of the finished piece on the schematic drawing at the bottom of the pattern. Happy Knitting!
15.04.2021 - 02:51
![]() Manon wrote:
Manon wrote:
Bonjour, Est-ce que le patron en taille XXXL sera corrigé bientôt ? Voir mon message plus bas. Merci
02.04.2021 - 00:34DROPS Design answered:
Bonjour Manon, fort probablement mais la correction interviendra plus tard, suivez les indications de la réponse précédente, et n'hésitez pas si vous avez une autre question. Bon tricot!
06.04.2021 - 11:29
![]() Maika wrote:
Maika wrote:
El aumento para el ranglan pone cada 2 vueltas, cómo se cuentan ? una de l derecho de la labor y otra del revés de la labor o serían dos vueltas del derecho de labor.
29.03.2021 - 21:08DROPS Design answered:
Hola Maika, cuando trabajas en redondo, toda las vueltas son al derecho de labor. Como aumentar cada 2 vueltas: tejes 1 vuelta, aumentas en la 2ᵃ vuelta, tejes 1 vuelta, aumentas en la vuelta siguiente, etc. Buen trabajo!
30.03.2021 - 13:02
![]() Anabela wrote:
Anabela wrote:
Boa tarde , no reglan fazem -se dois aumentos da cada lado ?! ou seja em cada volta de aumentos são 4 malhas !
29.03.2021 - 15:39DROPS Design answered:
Bom dia, Depende de onde está. No princípio aumentam-se 12 malhas ao todo. RAGLAN: Aumentar a cada 2 carreiras da seguinte maneira: Aumentar 4 ms/pts para as costas, 4 ms/pts para a frente e 2 ms/pts para cada manga (= 12 aumentos – os aumentos das mangas figuram no diagrama) Aqui, aumenta-se de cada lado da frente, de cada lado das costas e de cada lado de cada uma das mangas. Depois, os aumentos do raglan mudam. Está explicado na secção RAGLAN do modelo. Bons tricôs!
26.04.2021 - 10:28
![]() Manon wrote:
Manon wrote:
Bonjour, Je tricote la taille XXL. Jai 59 m en attente. Après avoir relevé 8 mailles sous la manche, j'ai 67 mailles. On me demande de: Tricoter ensuite ainsi: 6 m jersey, A.3 sur les 56 m suivantes (commencer A.3 où A.2 s'est arrêté en fonction de la taille), 7 m jersey. Ce qui fait 69 mailles. Il y aurait il une erreur ?
18.03.2021 - 00:30DROPS Design answered:
Bonjour Manon, effectivement, il semble qu'il y ait une erreur en XXXL (en XL, le compte est bon), tricotez les 56 mailles de A.3 comme indiqué, et tricotez les autres mailles sous la manche en jersey (probablement 5 m jersey avant et 6 m jersey à la fin), une correction sera faite prochainement, merci. Bon tricot!
18.03.2021 - 09:55
![]() Gwen Clark wrote:
Gwen Clark wrote:
Can you give me the sleeve diameter measurements at the armhole, and cuff? Thank you, Gwen
15.03.2021 - 18:00DROPS Design answered:
Dear Mrs Clark, the 53-55-59-61-65-67 stitches at the beg of sleeve will measure approx. 25-26-27-29-31-32 cm and the 47-49-51-53-55-57 sts at the end of sleeve approx. 22-23-24-25-26-27 cm. We currently have issues with the loading of pictures and are working to solve this problem, so that y ou will be able to see soon all measurements from the chart. Thanks for your patience and comprehension. Happy knitting!
16.03.2021 - 08:32
![]() Theresa Spruyt wrote:
Theresa Spruyt wrote:
I am doing the second size where it says to cast on 91 sts. Is this correct as it doesn't seem big enough to go over the head?
10.02.2021 - 10:47DROPS Design answered:
Dear Theresa, yes, the number of stitches is correct. According to Ravelry a number of sweaters were done with the stitchcount. Please do check your gauge and compare the numbers given in the pattern. Happy Knitting!
10.02.2021 - 11:47
![]() Caroline wrote:
Caroline wrote:
I don't understand if i should be knitting any of the y/overs without being twisted after the first round of A2 and the first knit row. I've done as pattern k not twisted nearest markers and k twisted the rest. Does this mean i k all future YO's twisted as well, or just this row? Thank you size m
09.07.2020 - 18:31DROPS Design answered:
Dear Caroline, when you first increase 12 sts per round, you will increase 4 sts on back piece and 4 sts on front piece, 2 of these 2 sts (the 1 towards the K2 for raglan line) are worked to make holes but the 2 yarn overs towards mid front/back piece are worked twisted, ie at the beg of front/back piece work K2 (raglan), K yarn over, K1, K next yarn over twisted, knit to next yarn over, K yarn over twisted, K1, K yarn over, K2 (raglan line). When you increase 2 sts only then knit all yarn overs. Happy knitting!
10.07.2020 - 07:50
![]() Solange wrote:
Solange wrote:
Pour ma part je tricote les manches en aller et retour aussitôt après l'empiècement, c'est plus facile qu'avec 4 aiguilles lorsqu'il s'agit de points dentelle, je reprends en circulaire pour le corps.
20.06.2020 - 12:21
![]() Calley wrote:
Calley wrote:
Is there a recommended style of INC for the last row of A.1 in the yoke? I can't decide if KFB or M1 would look better. If M1 is recommended, would M1R or M1L look better?
11.06.2020 - 20:11DROPS Design answered:
Dear Calley, all increases for raglan are worked with a yarn over and on last row in A.1 you also work yarn overs - feel free to knit a small swatch and check which method you would rather knit instead. Happy knitting!
12.06.2020 - 07:49
|
|||||||||||||||||||
Sea Nymph#seanymphsweater |
|||||||||||||||||||
 |
 |
||||||||||||||||||
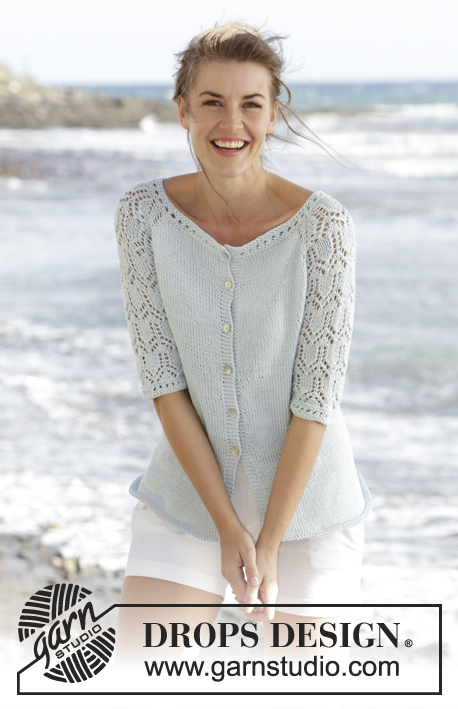
Knitted DROPS jumper with raglan, lace pattern and ¾ sleeves in "Muskat". Worked top down. Size: S - XXXL.
DROPS 168-1 |
|||||||||||||||||||
|
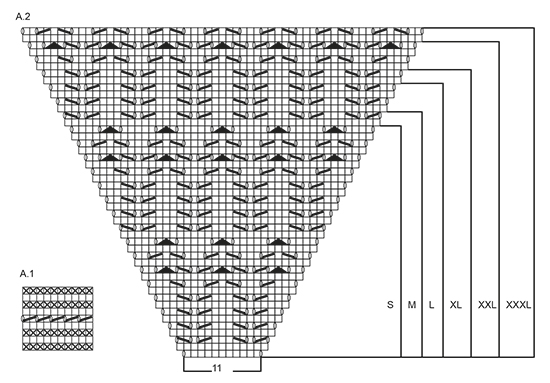
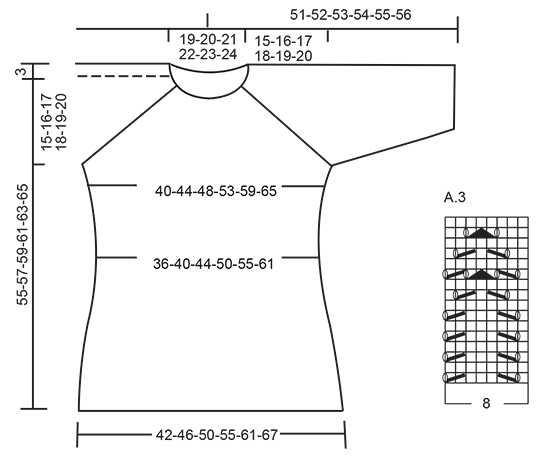
GARTER ST (worked in the round): 1 ridge = 2 rounds. * K 1 round and P 1 round *, repeat from *-*. PATTERN: See diagrams A.1 to A.3. See diagram for size! RAGLAN: Inc every other round as follows: Inc 4 sts on back piece, 4 sts on front piece and 2 sts on each sleeve (= 12 sts inc, inc on sleeve are drawn in pattern) – beg 3 sts before each A.2 and work as follows: 1 YO, K 1, 1 YO, K 2 (marker is in the middle of these sts), A.2, K 2 (marker is in the middle of these sts), 1 YO, K 1, 1 YO. K the YOs closest to markers on next row to make holes, K YOs towards back/front piece twisted to avoid holes. Inc 12 sts this way 0-2-3-7-10-14 times more (= 1-3-4-8-11-15 times in total, first inc is explained in the text). Then inc every other round as follows: Inc 2 sts on back piece, 2 sts on front piece and 2 sts on each sleeve (= 8 sts inc, inc on sleeve are drawn in pattern) – beg 2 sts before each A.2 and work as follows: 1 YO, K 2 (marker is in the middle of these sts), A.2, K 2 (marker is in the middle of these sts), 1 YO. K YOs on next round to make a hole. Inc 8 sts this way 16-15-16-13-12-9 times in total. ---------------------------------------------------------- JUMPER: Worked in the round on circular needle, top down. YOKE: Cast on 87-91-95-99-103-107 sts on circular needle size 4 mm with Muskat. K 1 round, them work A.1, on last round in A.1 inc 15 sts evenly = 102-106-110-114-118-122 sts. Then work as follows from mid back: K 17-18-19-20-21-22, 1 YO, K 1, 1 YO, K 2 (insert a marker between these sts), A.2 (= 11 sts), K 2 (insert a marker between these sts), 1 YO, K 1, 1 YO, K 34-36-38-40-42-44, 1 YO, K 1, 1 YO, K 2 (insert a marker between these sts), A.2, K 2 (insert a marker between these sts), 1 YO, K 1, 1 YO, K 17-18-19-20-21-22. Continue this pattern, and inc for RAGLAN as explained above, first inc is now done. REMEMBER THE KNITTING TENSION When A.2 has been worked vertically - see marking for your size, there are 242-262-286-314-346-374 sts on round, inc are now done. Work next round as follows: Work 38-42-46-52-58-64 sts (= half back piece), slip the next 45-47-51-53-57-59 sts on a stitch holder (= sleeve), cast on 8 sts under sleeve, work the next 76-84-92-104-116-128 sts (= front piece), slip the next 45-47-51-53-57-59 sts on a stitch holder (= sleeve), cast on 8 new sts under sleeve, work the last 38-42-46-52-58-64 sts (= half back piece). BODY: There are now 168-184-200-224-248-272 sts on body. Continue in stocking st. Insert a marker in each side, in the middle of the 8 new sts that were cast on. NOW MEASURE PIECE FROM HERE. When piece measures 4 cm, dec 1 st on each side of marker (= 4 sts dec), repeat dec every 4-4-4-5-5-5 cm 3 more times = 152-168-184-208-232-256 sts. When piece measures 22-23-24-25-26-27 cm, inc 1 st on each side of each marker (= 4 sts inc), repeat inc every 2 cm 5 more times = 176-192-208-232-256-280 sts. When piece measures 36-37-38-39-40-41 cm, work 2 ridges in GARTER ST - see explanation above, over all sts. Cast off K 1/P 1 (to avoid a wavy cast-off edge), piece measures approx. 55-57-59-61-63-65 cm from cast-on edge. SLEEVE: Worked in the round. Slip sts from sleeve back on double pointed needles size 4 mm, pick up 1 st in each of the 8 sts under sleeve = 53-55-59-61-65-67 sts. Insert 1 marker mid under sleeve = beg of round. NOW MEASURE PIECE FROM HERE! Then work as follows: 6-7-1-2-4-5 sts in stocking st, A.3 over the next 40-40-56-56-56-56 sts (beg A.3 where A.2 ends for your size), 7-8-2-3-5-6 sts in stocking st. When piece measures 4 cm, dec 1 st on each side of marker. Work the sts that do not fit the pattern in stocking st, make sure that no of dec and inc in pattern is correct. Repeat dec every 7-7-5-5-3-3 cm 2-2-3-3-4-4 more times = 47-49-51-53-55-57 sts. When piece measures 24-23-23-22-22-21 cm, work A.1 over all sts, then cast off. Work the other sleeve the same way. |
|||||||||||||||||||
Diagram explanations |
|||||||||||||||||||
|
|||||||||||||||||||
 |
|||||||||||||||||||
 |
|||||||||||||||||||
Have you finished this pattern?Tag your pictures with #dropspattern #seanymphsweater or submit them to the #dropsfan gallery. Do you need help with this pattern?You'll find 25 tutorial videos, a Comments/Questions area and more by visiting the pattern on garnstudio.com. © 1982-2026 DROPS Design A/S. We reserve all rights. This document, including all its sub-sections, has copyrights. Read more about what you can do with our patterns at the bottom of each pattern on our site. |
|||||||||||||||||||


With over 40 years in knitting and crochet design, DROPS Design offers one of the most extensive collections of free patterns on the internet - translated to 17 languages. As of today we count 324 catalogues and 12290 patterns translated into English (UK/cm).
We work hard to bring you the best knitting and crochet have to offer, inspiration and advice as well as great quality yarns at incredible prices! Would you like to use our patterns for other than personal use? You can read what you are allowed to do in the Copyright text at the bottom of all our patterns. Happy crafting!
Post a comment to pattern DROPS 168-1
We would love to hear what you have to say about this pattern!
If you want to leave a question, please make sure you select the correct category in the form below, to speed up the answering process. Required fields are marked *.