
Popular categories
Looking for a yarn?


Comments / Questions (165)
![]() Jennifer Thurber wrote:
Jennifer Thurber wrote:
When I am completing the round with the arm holes, I have only 9 rounds, but it matches the 9-inch direction. I'm not sure I have enough triple crochets to suit the directions for the next round. Could you clarify? I'm using a 5.5mm hook, so I don't think that's the problem? Thank you!
13.10.2015 - 01:30DROPS Design answered:
Dear Mrs Thurber, have you checked and keep your gauge? You should get 12 tr in width x 4.5 tr vertically alternately with 1 round Big Delight and 1 round Karisma = 4'' x 4'' (10 x 10 cm). Happy crocheting!
13.10.2015 - 09:40
![]() Au3 wrote:
Au3 wrote:
I've made this onze with big delight 05 (chocolate/ banana) and karisma 52 (mustardyellow). Very Nice pattern and a Nice result. Because of the combination of colours it turned out very 70's, but i like that. I didn't Replace first dtr on round with 4 ch , because it wasn't necessary when working in spirals. It turned out really ok.
12.10.2015 - 15:26
![]() Barbara Sturm wrote:
Barbara Sturm wrote:
Ich habe eine Frage zu der Runde mit den Arm ausschnitten. Da komme ich nciht ganz hin entweder ich verstehe es nicht oder es geht nicht auf so wie es beschrieben ist. Vllt kann man mir da ein wenig weiter helfen wäre schön. lg Barbara
26.09.2015 - 14:38DROPS Design answered:
Es sollte eigentlich genau so aufgehen, wie es beschrieben ist. Für den 2. Armausschnitt häkeln Sie ja so lange, bis noch 32-32-36-36-40-40 D-Stb in der Rd übrig sind, dann häkeln Sie den 2. Armausschnitt wie den ersten.
03.10.2015 - 10:28
![]() Lidia wrote:
Lidia wrote:
Ik ben voor de 4de keer opnieuw begonnen met het vest. Als ik nu naar m'n haakwerk kijk werk ik in een spiraal. Als ik een nieuwe toer begin met 4 losse ipv een dstk dan krijg ik een gat in m'n haakwerk. Ik heb die 4l niet gedaan en m'n werk trekt (nog) niet. Doe ik iets fout?
24.09.2015 - 16:00DROPS Design answered:
Hoi Lidia. Wij raden aan om met 4 l te beginnen ter vervanging van het eerste dstk. Maar heb je een andere manier, die een mooi resultaat oplevert, dan mag je dat natuurlijk gebruiken
14.10.2015 - 13:21
![]() Linda wrote:
Linda wrote:
Ik ben van plan om het cirkel vest Gypsy Blue (model db-053), gehaakt met Big Delight en Karisma, te haken. Mijn vraag is: hoeveel van elk heb ik nodig voor maat L? E
18.09.2015 - 10:17DROPS Design answered:
Hoi Linda. Dat staat bovenaan het patroon: Maat: S - M - L - XL - XXL - XXXL Materiaal: DROPS BIG DELIGHT van Garnstudio 300-400-400-500-500-500 gr. kleur nr. 09, atlantis DROPS KARISMA van Garnstudio 250-300-300-350-350-400 gr. kleur nr. 60, petroleum. Maat L is de derde, dus 400 gr Big Delight en 300 gr Karisma
18.09.2015 - 10:23
![]() Grace wrote:
Grace wrote:
I am having problems - when I make up the pattern I seem have too many stitches, and the work becomes " frilly " and I don't know what I'm doing wrong! Can you help?
17.09.2015 - 17:33DROPS Design answered:
Dear Grace, when working the spiral, you work each round alternately with each quality, so that you work the sts in the sts worked on previous round with the other colour (1 round = half sts with Karisma + half sts with Big Delight). Happy knitting!
17.09.2015 - 18:26
![]() Micheline Baetens wrote:
Micheline Baetens wrote:
"Herhaal 4e en 5e toer maar haak elke toer 1 dstk en 1 l meer tussen elke meerdering = 14 dstk en 14 l gemeerderd elke toer." Wat wordt hiermee bedoelt aub? Welke meerdering? Bedankt, Micheline
06.09.2015 - 18:57DROPS Design answered:
Hoi Micheline. Bij het haken van de toer 4 en 5 heb je 1 steeds 1 dstk meer bij (TOER : * Haak 1 dstk en 1 l in elke van de volgende 2 dstk, haak 1 dstk en 1 l en 1 dstk en 1 l in volgende dstk *). Dus toer 6 heb je dan * Haak 1 dstk en 1 l in elke van de volgende 3 dstk, haak 1 dstk en 1 l en 1 dstk en 1 l in volgende dstk *
07.09.2015 - 16:32Rose wrote:
Wish the comments were in English
05.09.2015 - 08:53
![]() Marian De Meijer wrote:
Marian De Meijer wrote:
Bij het vest in cirkelvorm, moet dan iedere toer niet beginnen met 1 losse in plaats van dubbel stokje gaat het anders niet trekken en rond staan ?
19.08.2015 - 09:52DROPS Design answered:
Hoi Marian. Nee, je haakt in de ronde met dstk, dus dat betekent dat je elke toer moet beginnen met 4 l (ter vervanging voor het eerste dstk). Haak je maar 1 l, dan ga je werk trekken
24.08.2015 - 14:48
![]() EM wrote:
EM wrote:
Undrar bara om det går lika bra att använda ett garnnystan istället för, som i mönstret, två olika. Fungerar beskrivningen då?
24.07.2015 - 11:01DROPS Design answered:
Hej EM, Karisma är lite tunnare än Big Delight, så väljer du enbart Karisma blir arbetet lite mindre och väljer du enbart Big Delight blir arbetet lite större än virkfastheten i beskrivningen. Men välj garn och gör ett virkprov så du får virkfastheten enligt beskrivningen, så går det bra. Lycka till!
28.07.2015 - 12:23
|
|
Gypsy Blue#gypsybluejacket |
|
 |
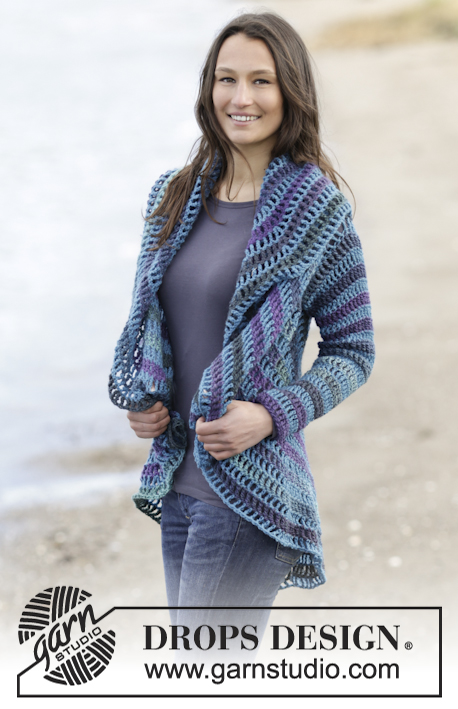 |
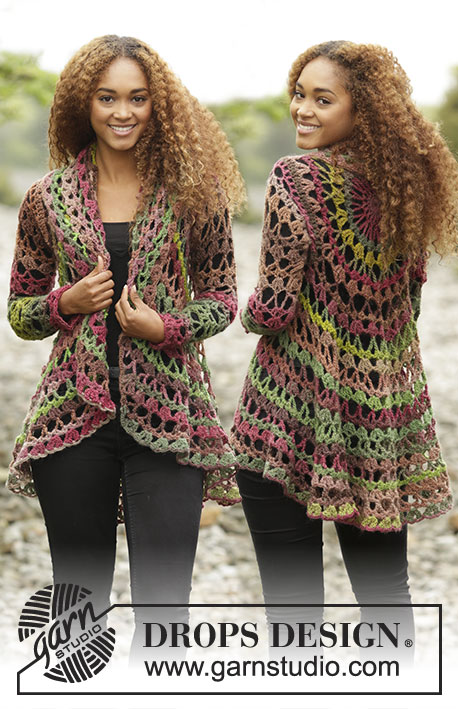
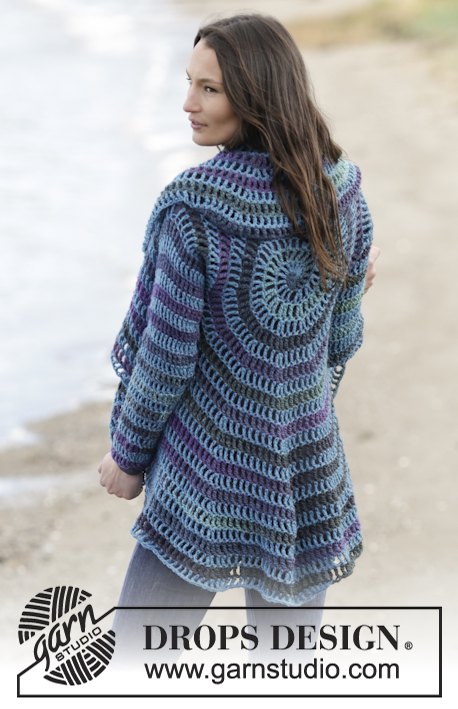
Crochet DROPS jacket worked in a circle in "Big Delight" and "Karisma". Size: S - XXXL.
DROPS 165-40 |
|
|
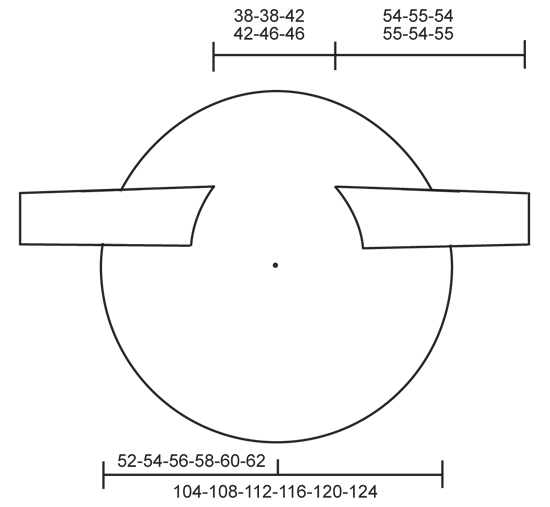
DECREASE TIP: 2 dtr tog into 1 dtr as follows: Work 1 dtr but wait with last YO and pull through, work 1 dtr in next st but pull last YO through all 3 sts on hook. CROCHET TIP: Replace first dtr on round with 4 ch. Finish with 1 sl st in fourth ch from beg of round. ---------------------------------------------------------- CIRCLE: When piece is worked in the round, start with this technique to avoid hole in the middle (instead of ch-ring) use Big Delight: Hold the yarn end and wind the yarn one time around the index finger to make a loop. Hold the loop with left thumb and middle finger, place the yarn over left index finger. Insert hook through the loop, make a YO and pull yarn through loop, work 1 ch, then work around the loop as follows: ROUND 1: 1 ch, 1 dc, 2 htr, 2 tr, 2 dtr. Insert 1 stitch marker in loop on last dtr so that it does not unravel and place yarn aside. Switch to Karisma and work as follows in loop: 1 dc, 2 htr, 2 tr, 2 dtr. Pull the yarn end to tighten loop. Fasten the yarn end on the back side. ROUND 2: (Continue with Karisma). Work 1 dtr + 1 ch in each of the first 7 sts (= 1 dc, 2 htr, 2 tr and 2 dtr worked with Big Delight). Insert 1 stitch marker in loop on last dtr so that it does not unravel and place yarn aside. Continue with Big Delight. Work 1 dtr + 1 ch in each of the next 7 sts (= 1 dc, 2 htr, 2 tr and 2 dtr worked with Karisma) = 14 dtr + 14 ch. ROUND 3: (Continue with Big Delight.) Work 1 dtr + 1 ch + 1 dtr + 1 ch in each of the first 7 dtr, insert 1 stitch marker in loop on last dtr so that it does not unravel and put yarn aside. Continue with Karisma, work 1 dtr + 1 ch + 1 dtr + 1 ch in each of the next 7 dtr = 28 dtr + 28 ch. ROUND 4: (Continue with Karisma). * Work 1 dtr + 1 ch in the next dtr, work 1 dtr + 1 ch + 1 dtr + 1 ch in the next dtr *, repeat from *-* 7 times. Insert 1 stitch marker in loop on last dtr so that it does not unravel and place yarn aside. Continue with Big Delight. * Work 1 dtr + 1 ch in the next dtr, work 1 dtr + 1 ch + 1 dtr + 1 ch in the next dtr *, repeat from *-* 7 times = 42 dtr + 42 ch. ROUND 5: (Continue with Big Delight.) * Work 1 dtr + 1 ch in each of the next 2 dtr, work 1 dtr + 1 ch + 1 dtr + 1 ch in the next dtr *, repeat from *-* 7 times. Insert 1 stitch marker in loop on last dtr so that it does not unravel and place yarn aside. Continue with Karisma. * Work 1 dtr + 1 ch in each of the next 2 dtr, work 1 dtr + 1 ch + 1 dtr + 1 ch in the next dtr *, repeat from *-* 7 times = 56 dtr + 56 ch. Repeat 4th and 5th round but on every round work 1 dtr + 1 ch more between every inc = 14 dtr + 14 ch inc on every round. Continue until there are 112-112-126-126-140-140 dtr + 112-112-126-126-140-140 ch on round, circle measures approx. 20-20-23-23-25-25 cm from centre (= 40-40-46-46-50-50 cm in diameter). Work next round as follows: (Continue with spiral and colour change but without inc.) Work 1 dtr + 1 ch in each of the first 16-16-18-18-20-20 dtr, work 24-24-28-28-32-32 loose ch for armhole, skip the next 16-16-18-18-20-20 dtr, work 1 dtr + 1 ch in every dtr until 32-32-36-36-40-40 dtr remain on round, work 24-24-28-28-32-32 loose ch for armhole, skip the next 16-16-18-18-20-20 dtr, work 1 dtr + 1 ch in each of the last 16-16-18-18-20-20 dtr. Work next round as follows: * Work 1 dtr + 1 ch in each of the next 7-7-8-8-9-9 dtr, work 1 dtr + 1 ch + 1 dtr + 1 ch in next dtr *, repeat from *-* 2 times, work 18-18-20-20-22-22 dtr with 1 ch between each around ch-space, * work 1 dtr + 1 ch in each of the next 7-7-8-8-9-9 dtr, work 1 dtr + 1 ch + 1 dtr + 1 ch in next dtr *, repeat from *-* 3 times. Insert 1 stitch marker in loop on last dtr so that it does not unravel and place yarn aside. Switch yarn. * Work 1 dtr + 1 ch in each of the next 7-7-8-8-9-9 dtr, work 1 dtr + 1 ch + 1 dtr + 1 ch in next dtr *, repeat from *-* 3 times, work 18-18-20-20-22-22 dtr with 1 ch between each around ch-space, * work 1 dtr + 1 ch in each of the next 7-7-8-8-9-9 dtr, work 1 dtr + 1 ch + 1 dtr + 1 ch in next dtr *, repeat from *-* 2 times = 126-126-140-140-154-154 dtr + ch on round. Work as 4th and 5th round but on every round work 1 dtr + 1 ch more between every inc = 14 dtr + 14 ch inc on every round. Continue until circle measures 52-54-56-58-60-62 cm from centre (= 104-108-112-116-120-124 cm in diameter, or desired measurements). Finish circle as follows: Continue with the same yarn as last round. Work 1 dtr in each of the next 2 dtr, 1 tr in each of the next 2 dtr, 1 htr in each of the next 2 dtr, 1 dc in next dtr, 1 sl st in next dtr, fasten off. SLEEVES: Work in the round from armhole and down. Use hook size 6 mm and beg with opposite colour of the one the last dtr around armholes was worked with. Work stripes, i.e. work 1 round with Karisma and 1 round with Big Delight - READ CROCHET TIP. Work 36-38-40-42-44-46 dtr around the opening for sleeve, beg of round should be under sleeve. Then work 3 rounds with 1 dtr in every dtr. Continue with 1 dtr in every dtr - AT THE SAME TIME dec 2 dtr mid under sleeve - READ DECREASE TIP. Repeat dec every 8 cm 6 more times = 22-24-26-28-30-32 dtr. Continue to work until sleeve measures 54-55-54-55-54-55 cm. Fasten off. Work the other sleeve the same way. |
|
 |
|
Have you finished this pattern?Tag your pictures with #dropspattern #gypsybluejacket or submit them to the #dropsfan gallery. Do you need help with this pattern?You'll find 8 tutorial videos, a Comments/Questions area and more by visiting the pattern on garnstudio.com. © 1982-2026 DROPS Design A/S. We reserve all rights. This document, including all its sub-sections, has copyrights. Read more about what you can do with our patterns at the bottom of each pattern on our site. |
|


With over 40 years in knitting and crochet design, DROPS Design offers one of the most extensive collections of free patterns on the internet - translated to 17 languages. As of today we count 324 catalogues and 12290 patterns translated into English (UK/cm).
We work hard to bring you the best knitting and crochet have to offer, inspiration and advice as well as great quality yarns at incredible prices! Would you like to use our patterns for other than personal use? You can read what you are allowed to do in the Copyright text at the bottom of all our patterns. Happy crafting!
Post a comment to pattern DROPS 165-40
We would love to hear what you have to say about this pattern!
If you want to leave a question, please make sure you select the correct category in the form below, to speed up the answering process. Required fields are marked *.