
Popular categories
Looking for a yarn?


Comments / Questions (65)
![]() Barbara Goldstein wrote:
Barbara Goldstein wrote:
I am having trouble with the front piece. I can’t understand how to do the 2 front shoulders. After you put the left shoulder on the stitch holder, do you cut the yarn to do the right shoulder? I didn’t do this and did the right shoulder but they are twisted and will not work in this way. Can you provide more information on how to get the shoulders started? Thanks
28.08.2018 - 04:28DROPS Design answered:
Hi Barbara, After completing the left shoulder, you cut the strand and work the right shoulder. When you have worked the right shoulder, you cast on stitches for the neck and continue working over the stitches on the stitch holder (left shoulder). I hope this helps and happy knitting!
28.08.2018 - 07:52
![]() Ingela Sandström wrote:
Ingela Sandström wrote:
När jag stickat framstycket enligt mönstrets intagningar (17 vart 4:e och 2:e varv) så mäter det endast 41 cm. Skall jag sen sticka 4 varv rätstickning lär det inte bli 51 cm långt. Frågan är var mäter jag ifrån när arbetet skall mäta 18 cm, från axel eller hals? Skall nämnas att jag stickar i garnet Air som det ska vara.
26.01.2018 - 07:31DROPS Design answered:
Måttet på 18 cm ska tas från axeln. Har du kontrollerat så att stickfastheten stämmer?
05.02.2018 - 18:00
![]() Veronika Shafit wrote:
Veronika Shafit wrote:
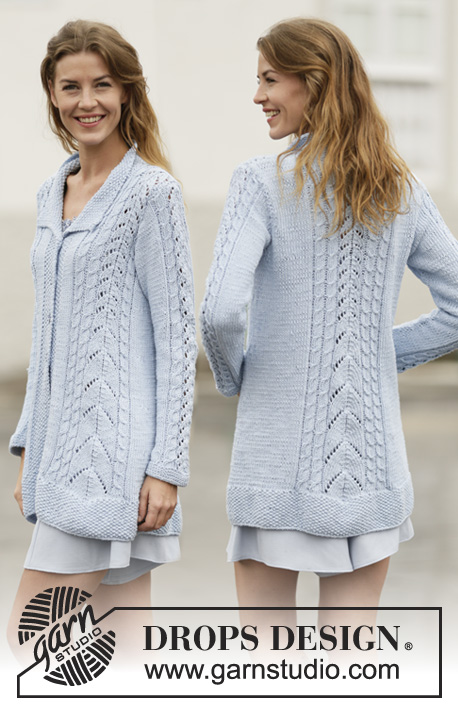
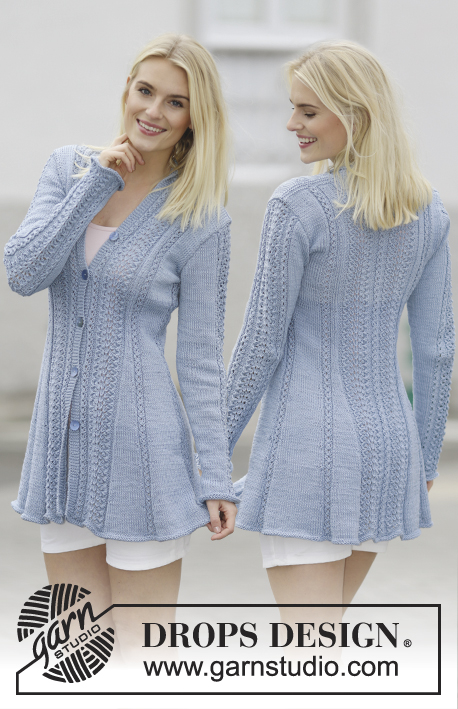
Guten Abend, ich wollte fragen ob es vielleicht beim Rückenteil ab und nicht zugenommen werden soll? Das Strickstück sieht sehr dreieckig aus und weniger wie die Zeichnung.
18.11.2017 - 16:58DROPS Design answered:
Liebe Frau Shafit, es wird für den Vorderteil abgenommen und für den Rückenteil zugenommen, die Seite vom Rückenteil werden dann zusammengenäht wie im Video gezeigt. Viel Spaß beim stricken!
20.11.2017 - 09:09
![]() Emilie wrote:
Emilie wrote:
Efter ærmegabet havde jeg tænkt mig at sætte for-og bagstykke på samme rundp og strikke rundt. Jeg forstår bare ikke at man skal tage ind på forstykket og ud på bagstykket - udligner det ikke hinanden sådan så antallet af masker i slut er det samme som i starten?
29.07.2017 - 20:02DROPS Design answered:
Hej, jo se måleskitsen nederst i opskriften, så kan du se hvordan det er tænkt. God fornøjelse!
17.08.2017 - 15:54
![]() Erika wrote:
Erika wrote:
I think I must be being silly, but I've decreased only 11 times, and I've ended up with 46 stitches (I'm doing size M, so should have 51 stitches after 17 decreases, I'm right in thinking the I need to decrease on both side every row? Thank you
18.05.2017 - 14:52DROPS Design answered:
Dear Erika, you had 90 sts, dec 2 sts a total of 18 times (= 36 sts dec) => 90-36= 54 sts remain. When you work a dec row, you dec 1 st at the beg of row + 1 st at the end of row (= 2 sts per dec row). Happy knitting!
18.05.2017 - 15:15
![]() Erika Procter wrote:
Erika Procter wrote:
Hello again, where it says decrease every other 4th and 2nd row, does that mean every other row? Thanks for your help
17.05.2017 - 10:32DROPS Design answered:
Dear Mrs Procter, dec as follows: *work 3 rows, dec on the 4th row, work 1 row, dec on next row* repat from *-* the number of times given for your size. Happy knitting!
17.05.2017 - 12:19
![]() Erika Procter wrote:
Erika Procter wrote:
Please would you be able to tell me how to work the right shoulder, I'm not sure if I am meant to slip all of the stitches onto a stitch holder or the ones that I have just created. Thanks
16.05.2017 - 15:15DROPS Design answered:
Dear Mrs Procter, work the right shoulder as for the left shoulder, but inc at the beg of each row from WS, then work 1 row over all sts on right shoulder, cast on new sts for neck then work the sts from left shoulder = 80-120 sts (see your size). Happy knitting!
16.05.2017 - 15:52
![]() Mary26 wrote:
Mary26 wrote:
Bonjour, Ce modèle est indiqué comme tricoté en top down. Or il est expliqué pièce par pièce avec un assemblage à la fin. Comment faire pour l'adapter en rond et ne pas avoir de coutures à la fin ?
16.01.2017 - 15:30DROPS Design answered:
Bonjour Mary26, chaque pièce se tricote séparément avec une couture sur les côtés rebrodée au point de croix. Il est ainsi recommandé de bien suivre les indications telles quelles. Bon tricot!
16.01.2017 - 16:54
![]() Gabriella wrote:
Gabriella wrote:
Il numero di maglie che viene indicato a formare il giro collo non mi sembra corrispondere all'ampiezza del collo in fotografia grazie per l'attenzione.
07.01.2017 - 19:42DROPS Design answered:
Buonasera Gabriella, non ci sono errori nelle spiegazioni: ci può dire in particolare a qiale misura si riferisce? Buon lavoro!
07.01.2017 - 20:04
![]() Ine Dobbelsteen wrote:
Ine Dobbelsteen wrote:
Goedemiddag, Is het garen Drops Air kleur mosgroen nog te bestellen? Ik brei zeer weinig maar heb dit garen ooit gekocht. Ik wil er nu eigenlijk deze trui, Cozy Afternoon van gaan breien. Hoeveel garen heb ik nodig voor maat L en welke naalden gebruik ik hiervoor? Alvast bedankt voor jullie reactie. Met vriendelijke groet, Ine Dobbelsteen
27.12.2016 - 16:52DROPS Design answered:
Hoi Ine. Er staat in het patroon hoeveel garen je nodig hebt en welke naalden je moet gebruiken (vergeet niet het proeflapje): Maat: S - M - L - XL - XXL - XXXL Materiaal: DROPS AIR van Garnstudio 300-300-350-400-400-450 gr. kleur nr. 10, mist DROPS RONDBREINLD (60 of 80 cm) 5,5 mm - of de maat die u nodig hebt voor een stekenverhouding van 16 st x 20 nld in tricotst = 10 x 10 cm. DROPS RONDBREINLD (40 en 60 of 80 cm) 4,5 mm - voor de ribbelst. En mosgroen is gewoon verkrijgbaar (zie het kleurenkaart hier)
30.12.2016 - 12:30
|
||||
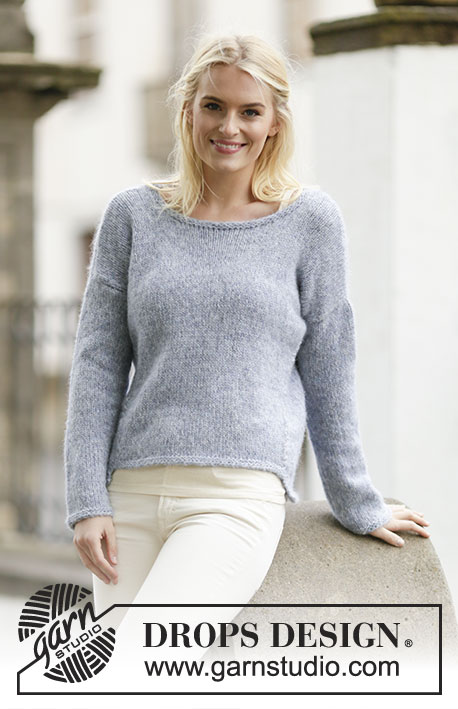
Cozy Afternoon#cozyafternoonsweater |
||||
 |
 |
|||
Knitted DROPS jumper, worked top down in ”Air”. Size S – XXXL
DROPS 161-4 |
||||
|
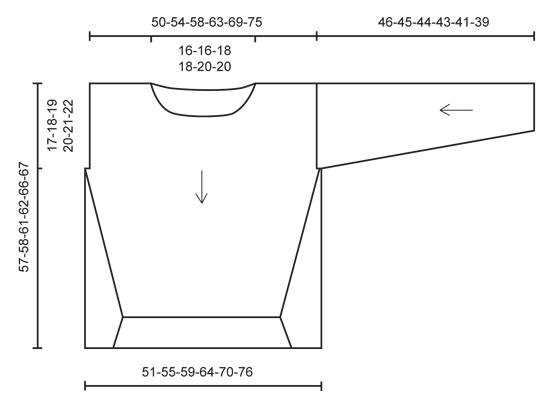
GARTER ST (back and forth): K all rows. 1 ridge = 2 rows K. GARTER ST (worked in the round): * K 1 round and P 1 round *, repeat from *-*. 1 ridge = 2 rounds. ---------------------------------------------------------- JUMPER: Worked top down, back and forth on circular needle. FRONT PIECE: Cast on 26-29-31-35-39-44 sts on circular needle size 5.5 mm with Air and work in stocking st. When piece measures 2-2-3-3-4-4 cm, inc at beg on every row from RS as follows: Inc 1 st 2 times, then cast on 2 sts 2 times = 32-35-37-41-45-50 sts (= left shoulder). Slip the sts on 1 stitch holder. Cast on and work right shoulder the same way but inc at beg of every row from WS = 32-35-37-42-45-50 sts (work next row from RS). Work 1 row over all sts, cast on 16-16-18-18-20-20 sts for neck at the end of row and work the 32-35-37-41-45-50 sts from stitch holder = 80-86-92-100-110-120 sts. Continue in stocking st. REMEMBER THE KNITTING TENSION When piece measures 17-18-19-20-21-22 cm, cast on 2 new sts at the end of the next 2 rows = 84-90-94-104-114-124 sts (incl 1 edge st in each side). Insert 1 marker in each side for assembly. Work in stocking st with 1 edge st in GARTER ST - see explanation above, in each side – AT THE SAME TIME dec on 2nd row as follows: Dec 1 st inside 1 edge st in garter st in each side. Repeat dec alternately on every other 4th and 2nd row 17-17-18-18-19-19 more times = 48-54-56-66-74-84 sts. Insert 1 marker in each side for assembly. Work 2 rows. Switch to circular needle size 4.5 mm and work 2 ridges, cast off. Piece measures approx. 50-51-53-54-57-58 cm. BACK PIECE: Cast on 26-29-31-35-39-44 sts on circular needle size 5.5 mm with Air and work in stocking st. When piece measures 3 cm, inc 1 st at beg of next row from RS = 27-30-32-36-40-45 sts (= right shoulder). Slip the sts on 1 stitch holder. Cast on and work left shoulder the same way but inc at beg of row from WS (work next row from RS) = 27-30-32-36-40-45 sts. Work 1 row over all sts, cast on 26-26-28-28-30-30 sts for neck at the end of row and work the 27-30-32-36-40-45 sts from stitch holder = 80-86-92-100-110-120 sts. Continue in stocking st. When piece measures 17-18-19-20-21-22 cm, cast on 2 new sts at the end of the next 2 rows = 84-90-96-104-114-124 sts (incl 1 edge st in each side). Insert 1 marker in each side for assembly. Work in stocking st with 1 edge st in garter st in each side – AT THE SAME TIME inc on 2nd row as follows: Inc 1 st inside 1 edge st in garter st in each side. Repeat inc alternately on every 4th and 2nd row 17-17-18-18-19-19 more times = 120-126-134-142-154-164 sts on needle. Insert 1 marker in each side for assembly. Then work in stocking st with 3 edge sts in garter st in each side, work 2 rows, then dec on next row from RS as follows: Dec 1 st inside 3 sts in garter st in each side. Repeat dec on every other row 7-7-8-8-9-9 more times = 104-110-116-124-134-144 sts. Switch to circular needle size 4.5 mm and work 2 ridges, cast off. Piece measures approx. 57-58-61-62-66-67 cm. SLEEVE: Worked back and forth on circular needle. Cast on 34-36-37-38-40-42 sts (incl 1 edge st in each side) on circular needle size 4.5 mm with Air. Work 2 ridges. Switch to circular needle size 5.5 mm and work in stocking st with 1 edge st in garter st in each side of piece. When piece measures 7-7-6-7-8-7 cm, inc 1 st inside 1 edge st in each side of piece. Repeat inc every 3½-3-3-2½-2-2 cm 10-11-12-13-14-14 more times = 56-60-63-66-70-72 sts. Work in stocking st until piece measures 46-45-44-43-41-39 cm (shorter measurements in the larger sizes because of wider shoulders). Cast off. Knit another sleeve. ASSEMBLY: Sew the shoulder seams. Sew in sleeves - make sure that markers meet on front and back piece. Sew the sleeve seams inside 1 edge st. Sew the side tog as follows: Place front and back piece edge to edge. Sew them tog with cross stitches over 3 sts in width (i.e. in the mid of st inside edge st in each piece) and 3 sts vertically. Sew down to edge to and with ridges on front piece (make sure that the markers meet). NECK EDGE: Pick up 67-83 sts on a short circular needle size 4.5 mm with Air around the neck. Work 2 ridges in GARTER ST in the round on circular needle - see explanation above. Cast off. |
||||
Diagram explanations |
||||
|
||||
 |
||||
Have you finished this pattern?Tag your pictures with #dropspattern #cozyafternoonsweater or submit them to the #dropsfan gallery. Do you need help with this pattern?You'll find 23 tutorial videos, a Comments/Questions area and more by visiting the pattern on garnstudio.com. © 1982-2026 DROPS Design A/S. We reserve all rights. This document, including all its sub-sections, has copyrights. Read more about what you can do with our patterns at the bottom of each pattern on our site. |
||||


With over 40 years in knitting and crochet design, DROPS Design offers one of the most extensive collections of free patterns on the internet - translated to 17 languages. As of today we count 324 catalogues and 12290 patterns translated into English (UK/cm).
We work hard to bring you the best knitting and crochet have to offer, inspiration and advice as well as great quality yarns at incredible prices! Would you like to use our patterns for other than personal use? You can read what you are allowed to do in the Copyright text at the bottom of all our patterns. Happy crafting!
Post a comment to pattern DROPS 161-4
We would love to hear what you have to say about this pattern!
If you want to leave a question, please make sure you select the correct category in the form below, to speed up the answering process. Required fields are marked *.