
Popular categories
Looking for a yarn?


Comments / Questions (24)
Laura wrote:
Hi, thanks for the pattern it looks amazing and i'm trying to make it but i don't understand how to "work veritcally" the patterns a1 and a2. are there any tutorials on this please or would you be so kind and explain? thank you
06.12.2015 - 09:21DROPS Design answered:
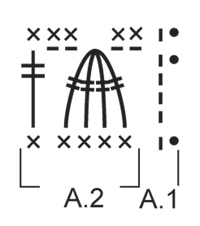
Dear Laura, A.1 only shows how to finish & start the round: replace 1st dc (UK-English) with 1 ch and 1st dtr with 4 ch. Finish round with a sl st in the 1st ch at beg of dc round /in the 4th ch at beg of dtr round. Repeat then A.2 around. Happy crocheting!
07.12.2015 - 10:30
![]() Erika wrote:
Erika wrote:
Ik lees het volgende in de 1e regel van de kroon: KROON: Haak nu verder langs de rand van het lint. Haak * 1 v in elke van de volgende 3 toeren, haak 2 v in de volgende toer *, herhaal van *-* de hele toer -moet hier toer niet het woord steek zijn?
07.10.2015 - 16:32DROPS Design answered:
Hoi Erika. Nee, omdat je haakt in de toeren van de LINT, haak je in elke toer (of steek van de toer)
13.10.2015 - 15:21
![]() Didier wrote:
Didier wrote:
Bonsoir, j'aimerais me faire expliquer comment faire le motif diagramme..... Je ne le connais pas et ne le comprend pas. Merci Didier
25.09.2015 - 03:45DROPS Design answered:
Bonjour Didier, le diagramme se lit tous les tours de droite à gauche, A.1 montre comment terminer chaque tour (mc dans la 1ère ml du tour) et comment le commencer (1 ou 4 ml). Répétez ensuite A.2 au-dessus des 5 m suivantes soit au rang 1: 1 ms dans chacune des 5 m suivantes, au rang 2, 2 ml, 4 DB écoulées ensemble, 2 ml, 1 DB dans la ms suivante. Au rang 3: 2 ms dans les 2 ml, 2 ms dans les 2 ml, 1 ms dans la DB. Reprenez ensuite au rang 1. Bon crochet!
25.09.2015 - 09:41
![]() Catia wrote:
Catia wrote:
Bonjour, je ne comprends pas cette partie du bonnet : Crocheter *1 ms dans chacun des 3 rangs suivants, 2 ms dans le rang suivant*, répéter de *-* tout le tour Qu'est-ce que vous appelez ''un rang'' dans ce passage? Merci de détaillez le plus possible votre réponse, Bonne journée
09.02.2015 - 22:28DROPS Design answered:
Bonjour Catia, on a tricoté juste avant la bordure du bonnet (dans le sens de la longueur) que l'on a cousu pour former un anneau (tour de tête). On crochète ensuite le long d'un des côtés de la bordure pour faire le haut du bonnet: vous crochetez alors dans les rangs de la bordure. Bon crochet!
10.02.2015 - 08:44
![]() Silvia wrote:
Silvia wrote:
Hi, I don't understand this part of the hat pattern: "Work * 1 sc in each of the next 3 rows, work 2 sc in next row *, repeat from *-* the entire round " Does it mean I have to sc in each of the next 3 STICHES and then work 2sc in the next stitch, or does it mean I need to complete 3 rows around? thank you for your kind answer
05.02.2015 - 15:21DROPS Design answered:
Dear Silvia, you work the crown of the hat around the ribbon, the ribbon has been worked sideways, so that you crochet then along the end/beg of rows of ribbon. Happy crocheting!
05.02.2015 - 17:08
![]() Helianna wrote:
Helianna wrote:
Hei! Jos tämä - viiva on ketjusilmukka niin mitä tuo | pystyviiva tarkoittaa mallikuviossa? Ja jos on välin näköinen kohta, kuuluuko siinä hypätä silmukan yli?
09.01.2015 - 21:12DROPS Design answered:
Myös pystyviiva on ketjusilmukka, eli kerroksen alkuun virkattavat ketjusilmukat. Jos tiettyyn kohtaan piirrokseen ei ole tehty merkkiä, siihen ei virkata mitään, eli jätät tämän silmukan väliin.
06.02.2015 - 17:31
![]() Line wrote:
Line wrote:
Jeg forstår ikke diagrammet. Kan det forklares tydeligere hvor jeg begynder og hvilken vej i diagrammet, jeg skal hækle og hvad de lodrette stiplede linjer betyder?
01.01.2015 - 20:48DROPS Design answered:
Hej Line. Du starter nederst og haekler fra venstre mod höjre. Det gör du i hvor omgang, hvis du haekler rundt. Beskrivelse af symbolerne staar nederst i opskriften lige over diagrammet selv. Se ogsaa her hvordan du skal laese vores diagrammer
06.01.2015 - 17:01
![]() Ida Steen wrote:
Ida Steen wrote:
Har nå heklet ferdig lua i str. s/m og brukte bare 100 g garn.
09.11.2014 - 21:36Silvia wrote:
I don´t understand how should I adjust stitches during crocheting the neckwarmer. Thnx
23.09.2014 - 12:45DROPS Design answered:
Dear Silvia, work pattern for neckwarmer until stated measurements (36-38 cm approx) adjusting to finish after a whole repetition of the diagram in height. Happy crocheting!
23.09.2014 - 14:28
![]() Ingrid wrote:
Ingrid wrote:
En 3: vergeet vorige twee vragen. Ik ben gewoon begonnen en dan wordt het vanzelf duidelijk. Het ziet er mooi uit! Bedankt voor dit leuke patroon!
07.09.2014 - 09:39
|
||||||||||||||||
Tell Me#tellmeset |
||||||||||||||||
 |
 |
|||||||||||||||
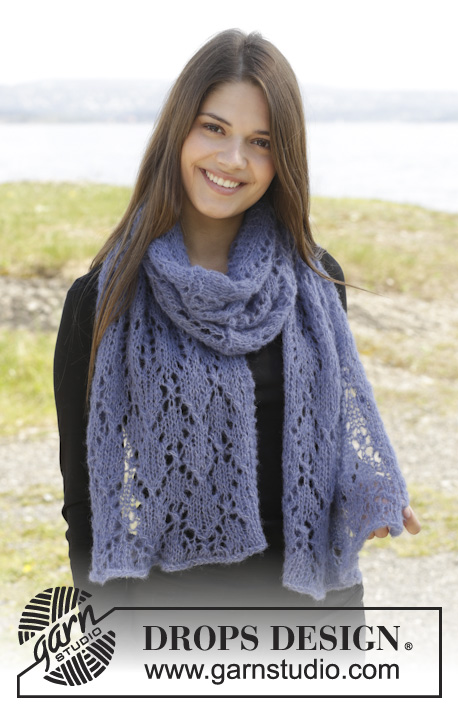
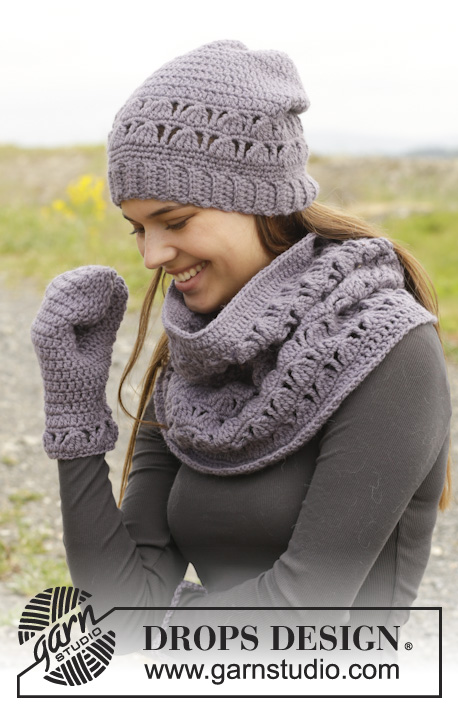
Crochet DROPS hat, neck warmer and mitten with lace pattern in “Nepal”.
DROPS 158-41 |
||||||||||||||||
|
PATTERN: See diagrams A.1 and A.2 – work 1st row from RS. CROCHET INFO 1: Replace first htr at beg of every htr row with 2 ch. CROCHET INFO 2: At beg of every dc round, replace first dc with 1 ch and finish every round with 1 sl st in first ch from beg of round. Replace first tr at beg of every tr round with 3 ch, finish every round with 1 sl st in 3rd ch from beg of round. DECREASE TIP 1: Work 2 dc into 1 dc: Work 1 dc but wait with last pull through (= 2 sts on hook), then work next dc but on last pull through, pull yarn through all sts on hook. DECREASE TIP 2: Work 2 tr into 1 tr: Work 1 tr but wait with last pull through (= 2 strands on hook), then work next tr but on last pull through, pull yarn through all sts on hook. -------------------------------------------------------- HAT: Work in the round but beg with a ribbon worked sideways at the bottom. RIBBON: Work 8 ch on hook size 4.5 mm with Nepal, and work 1st row as follows: 1 htr in 3rd ch from hook (= 2 htr), 1 htr in each of the next 5 ch = 7 htr, turn piece. READ CROCHET INFO 1. Then work htr back and forth but work every htr in back loop of st (i.e. not through whole st) = rib texture. Continue until piece measures approx. 49-53 cm, cut the yarn and sew tog short sides to form a ring – ribbon measures approx. 4 cm in width. Fasten the strand. CROWN: Now work around the edge on ribbon. Work * 1 dc in each of the next 3 rows, work 2 dc in next row *, repeat from *-* the entire round - READ CROCHET INFO 2. = approx. 83-90 dc - then work 1 round with dc AT THE SAME TIME adjust no of sts to 80-85 dc - READ DECREASE TIP 1! Now work according to 1st round in diagram as follows: A.1, A.2 16-17 times in total in width. Repeat row 2 and 3 of diagram 2 times vertically, then piece will measure approx. 11 cm incl ribbon. REMEMBER THE CROCHET TENSION! Continue to work in tr, AT THE SAME TIME dec as follows: READ DECREASE TIP 2! Dec 8-9 sts evenly = 72-76 tr. On next round, dec 8-7 tr evenly. Repeat dec every other round 4 times in total = 40-48 tr. Then dec 8-6 tr evenly every round 1-2 times in total = 32-36 tr. Now work dc with dec as follows: READ DECREASE TIP 1 – Work 2 and 2 dc tog = 16-18 dc. Repeat dec on next round = 8-9 dc. Cut the yarn, baste it up and down through sts, pull yarn to tighten and fasten tightly. The hat measures approx. 24-25 cm vertically. ---------------------------------------------------------- NECK WARMER: Worked in the round. Crochet 144-156 ch on hook size 4.5 mm with Nepal and form 1 ring with 1 sl st in 1st ch. ROUND 1: READ CROCHET INFO 2 - Work 1 tr in each of the first 5 ch, * skip 1 ch, 1 tr in each of the next 5 ch *, repeat from *-* = 120-130 tr. ROUND 2: Work 1 tr in every tr. Now work according to 1st round in diagram as follows: A.1, A.2 24-26 times in total in width. REMEMBER THE CROCHET TENSION! Repeat row 2 and 3 of diagram vertically until piece measures approx. 36-38 cm – adjust after 1 whole repetition vertically - then continue as follows: 1 round with 1 tr in every dc, then 1 round with 1 tr in every tr. Fasten off. ---------------------------------------------------------- MITTEN: Crochet 30-35 LOOSE ch on hook size 4.5 mm with Nepal and form 1 ring with 1 sl st in 1st ch. Work cuff according to diagram's 1st round as follows: A.1, A.2 6-7 times in total in width. Work diagram 1 time vertically, then work 1 round with 1 dc in every dc - READ CROCHET INFO 2 = 30-35 dc. REMEMBER THE CROCHET TENSION! Then work tr in the round with 1 tr in every st AT THE SAME TIME adjust no of sts to 27-30 tr by working 2 tr tog evenly – READ DECREASE TIP 2 - AT THE SAME TIME when 3 rounds have been worked with tr, inc 1 tr for thumb on each side of 1st st at beg of round - inc 1 tr by working 2 tr in same tr. Repeat inc on each side of this st every round 4-5 times in total = 35-40 tr on round (thumb sts = 9-11 tr). Work next round as follows: Work 1 sl st in each of the first 6-7 tr at beg of round, 3 ch (= 1 tr), then work 1 tr in each of the next 25-28 tr, 1 ch and finish with 1 sl st in 3rd ch at beg of round = 26-29 tr and 1 ch on round. On next round, work 1 tr in every tr and 1 tr in ch at end of round = 27-30 tr. Then work tr in the round until mitten measures 18-21 cm from division at cuff (try the mitten on, approx. 3 cm remain until finished measurements). Continue to work as follows: ROUND 1: Work 1 tr in every tr AT THE SAME TIME work every 2nd and 3rd tr tog = 18-20 tr. ROUND 2: Work 1 tr in every tr AT THE SAME TIME work 2 and 2 tr tog = 9-10 tr. ROUND 3: Work 1 dc in every tr AT THE SAME TIME work 2 and 2 dc tog. Cut the yarn, baste it up and down through sts, pull yarn to tighten and fasten tightly. THUMB: ROUND 1: Work 1 sl st in the first of the 9-11 thumb sts, 3 ch (= 1 tr), then work 1 tr in each of the 8-10 tr, then work 6 tr behind thumb AT THE SAME TIME work these 6 tr tog 2 by 2 – see explanation above = 12-14 tr. ROUND 2 + 3: Work 1 tr in every tr = 12-14 tr. Try the mitten on, approx. 1 cm remains until finished thumb measurements. Work 1 more round with 1 tr in every tr if needed. NEXT ROUND: Work 1 tr in every tr AT THE SAME TIME work 2 and 2 tr tog = 6-7 tr. LAST ROUND: Work 1 dc in every tr AT THE SAME TIME work 2 and 2 dc tog. Cut the yarn, baste it up and down through sts, pull yarn to tighten and fasten tightly. Work another mitten but make sure to work thumb inc on each side of last st on round (instead of 1st st on round). |
||||||||||||||||
Diagram explanations |
||||||||||||||||
|
||||||||||||||||
 |
||||||||||||||||
Have you finished this pattern?Tag your pictures with #dropspattern #tellmeset or submit them to the #dropsfan gallery. Do you need help with this pattern?You'll find 12 tutorial videos, a Comments/Questions area and more by visiting the pattern on garnstudio.com. © 1982-2026 DROPS Design A/S. We reserve all rights. This document, including all its sub-sections, has copyrights. Read more about what you can do with our patterns at the bottom of each pattern on our site. |
||||||||||||||||


With over 40 years in knitting and crochet design, DROPS Design offers one of the most extensive collections of free patterns on the internet - translated to 17 languages. As of today we count 324 catalogues and 12290 patterns translated into English (UK/cm).
We work hard to bring you the best knitting and crochet have to offer, inspiration and advice as well as great quality yarns at incredible prices! Would you like to use our patterns for other than personal use? You can read what you are allowed to do in the Copyright text at the bottom of all our patterns. Happy crafting!
Post a comment to pattern DROPS 158-41
We would love to hear what you have to say about this pattern!
If you want to leave a question, please make sure you select the correct category in the form below, to speed up the answering process. Required fields are marked *.