-------------------------------------------------------
Alternative Yarn – See how to change yarns here
Yarn Groups A to F – Use the same pattern and change the yarn here
Yarn usage using an alternative yarn – Use our yarn converter here
-------------------------------------------------------
This pattern has been corrected. Click here to see the correction/s.
= K from RS, P from WS | |
= K 2 tog | |
= slip 1 st as if to K, K 1, psso |
|
= slip 1 st as if to K, K 2 tog, psso |
|
= 1 YO between 2 sts | |
= K from RS, K from WS | |
= cast off st |
Each of our patterns has specific tutorial videos to help you.
These step-by-step tutorials might also help you:
Why is the knitting/crochet tension so important?
Knitting tension is what determines the final measurements of your work, and is usually measured per 10 x 10 cm. It is provided like so: number of stitches in width x number of rows in height - eg: 19 stitches x 26 rows = 10 x 10 cm.
The knitting tension is very individual; some people knit/crochet loosely while others work tightly. You adjust the knitting tension with the needle size, which is why the suggested needle size is only meant as a guide! You need to adjust this (up or down) to ensure that YOUR knitting tension matches the knitting tension provided in the pattern. If you work with a different knitting tension than provided you will have a different yarn consumption, and your work will have different measurements than what the pattern suggests.
The knitting tension also determines which yarns can replace each other. As long as you achieve the same knitting tension you can replace one yarn with another.
See DROPS lesson: How to measure your tension/gauge
See DROPS video: How to make a gauge tension swatch
How do I know how many balls of yarn I need?
The required amount of yarn is provided in grams, eg: 450 g. To calculate how many balls you’ll need you first need to know how many grams are in 1 ball (25g, 50g or 100g). This information is available if you click on the individual yarn quality on our pages. Divide the amount required with the amount of each ball. For example, if each ball is 50g (the most common amount), the calculation will be as follows: 450 / 50 = 9 balls.
Can I use a different yarn than what the pattern suggests?
The important thing when changing from one yarn to another is that the knitting/crochet tension remains the same. This is so that the measurements of the finished piece will be the same as on the sketch provided. It is easier to achieve the same knitting tension using yarns from the same yarn group. It is also possible to work with multiple strands of a thinner yarn to achieve the knitting tension of a thicker one. Please try our yarn converter. We recommend you to always work a test swatch.
Please NOTE: when changing yarn the garment might have a different look and feel to the garment in the photo, due to individual properties and qualities of each yarn.
See DROPS lesson: Can I use a different yarn than the one mentioned in the pattern?
What are the yarn groups?
All our yarns are categorised into yarn groups (from A to F) according to thickness and knitting tension – group A contains the thinnest yarns and group F the thickest. This makes it easier for you to find alternative yarns to our patterns, should you wish to switch yarn. All yarns within the same group have a similar knitting tension and can easily replace each other. However, different yarn qualities have different structures and properties which will give the finished work a unique look and feel.
How do I use the yarn calculator?
At the top of all our patterns you’ll find a link to our yarn calculator, which is a helpful tool should you wish to use a different yarn than suggested. By filling in the yarn quality you wish to replace, the amount (in your size) and number of strands, the calculator will present good alternative yarns with the same knitting tension. Additionally it will tell you how much you’ll require in the new qualities and whether you’ll need to work with multiple strands. Most skeins are 50g (some are 25g or 100g).
If the pattern is worked with multiple colours, every colour will have to be calculated separately. Similarly, if the pattern is worked with several strands of different yarns (for example 1 strand Alpaca and 1 strand Kid-Silk) you will have to find alternatives for each, individually.
Why do you show discontinued yarns in the patterns?
Since different yarns have different qualities and textures we have chosen to keep the original yarn in our patterns. However, you can easily find options among our available qualities by using our yarn calculator, or simply pick a yarn from the same yarn group.
It is possible that some retailers still have discontinued yarns in stock, or that someone has a few skeins at home that they would like to find patterns for.
The yarn calculator will provide both alternative yarn as well as required amount in the new quality.
What size should I knit?
If you think it's hard to decide what size to make, it can be a good idea to measure a garment you own already and like the size of. Then you can pick the size by comparing those measures with the ones available in the pattern's size chart.
You'll find the size chart at the bottom of the pattern.
See DROPS lesson: How to read size chart
Why do I get the wrong knitting tension with the suggested needle size?
The needle size provided in the pattern serves only as a guide, the important thing is to follow the knitting tension. And since knitting tension is very individual, you will have to adjust the needle size to ensure that YOUR tension is the same as in the pattern – maybe you’ll have to adjust 1, or even 2 needle sizes, up or down to achieve the correct tension. For this, we recommend that you work test swatches.
Should you work with a different knitting tension than the one provided, the measurements of the finished garment might deviate from the measurement sketch.
See DROPS lesson: How to measure your tension/gauge
See DROPS video: How to make a tension/gauge swatch
Why is the pattern worked top-down?
Working a garment top-down provides more flexibility and room for personal adjustment. For example it is easier to try the garment on while working, as well as making adjustments to length of yoke and shoulder caps.
The instructions are carefully explaining every step, in the correct order. Diagrams are adjusted to the knitting direction and are worked as usual.
How do I work according to a knitting diagram?
The diagram depicts all rows/rounds, and every stitch seen from the right side. It is read from bottom to top, from right to left. 1 square = 1 stitch.
When working back and forth, every other row is worked from the right side and every other row is worked from the wrong side. When working from the wrong side, the diagram will have to be worked reversed: from left to right, knit stitches are purled, purl stitches are knit etc.
When working in the round every round is worked from the right side and the diagram are worked from right to left on all rounds.
See DROPS lesson: How to read knitting diagrams
How do I work according to a crochet diagram?
The diagram depicts all rows/rounds, and every stitch seen from the right side. It is worked from bottom to top, from right to left.
When working back and forth every other row is worked from the right side: from right to left and every other row is worked from the wrong side: from left to right.
When working in the round, every row in the diagram are worked from the right side, from right to left.
When working a circular diagram you start in the middle and work your way outwards, counter clockwise, row by row.
The rows usually start with a given number of chain stitches (equivalent to the height of the following stitch), this will either be depicted in the diagram or explained in the pattern.
See DROPS lesson: How to read crochet diagrams
How do I work several diagrams simultaneously on the same row/round?
Instructions for working several diagrams after each other on the same row/round, will often be written like so: “work A.1, A.2, A.3 a total of 0-0-2-3-4 times". This means you work A.1 once, then A.2 is worked once, and A.3 is repeated (in width) the number of times provided for your size – in this case like so: S = 0 times, M = 0 times, L=2 times, XL= 3 times and XXL = 4 times.
The diagrams are worked as usual: begin with the first row in A.1, then work the first row in A.2 etc.
See DROPS lesson: How to read knitting diagrams
See DROPS lesson: How to read crochet diagrams
Why are the sleeves shorter in larger sizes?
The total width of the garment (from wrist-to-wrist) will be larger in the larger sizes, despite the actual sleeves being shorter. The larger sizes have longer sleeve caps and wider shoulders, so there will be a good fit in all sizes.
Where on the garment is the length measured?
The measurement sketch/schematic drawing provides information regarding the full length of the garment. If it’s a jumper or a jacket the length is measured from the highest point on the shoulder closest to the neckline, and straight down to the bottom of the garment. It is NOT measured from the tip of shoulder. Similarly, the length of yoke is measured from the highest point on the shoulder and down to where yoke is split into body and sleeves.
On a jacket measures are never taken along bands, unless specifically stated. Always measure inside band stitches when measuring the length.
See DROPS lesson: How to read a schematic drawing
What is a repeat?
Diagrams are often repeated on the round or in height. 1 repeat is the diagram the way it appears in the pattern. If it says to work 5 repeats of A.1 in the round, then you work A.1 a total of 5 times after/next to each other in the round. If it says to work 2 repeats of A.1 vertically/in height you work the entire diagram once, then begin again at the start and work the entire diagram one more time.
Why does the piece start with more chain stitches than it’s worked with?
Chain stitches are slightly narrower than other stitches and to avoid working the cast-on edge too tight, we simply chain more stitches to begin with. The stitch count will be adjusted on the following row to fit the pattern and measurement sketch.
Why increase before the rib edge when the piece is worked top-down?
The rib edge is more elastic and will contract slightly compared to, for example, stocking stitch. By increasing before the rib edge, you avoid a visible difference in width between the rib edge and the rest of the body.
Why increase in the cast-off edge?
It’s very easy to cast off too tightly, and by making yarn overs while casting off (and simultaneously casting these off) you avoid a too tight cast off edge.
See DROPS video: How to bind off with yarn overs (yo)
How do I increase/decrease on every 3rd and 4th row/round alternately?
To achieve an even increase (or decrease) you can increase on, for example: every 3rd and 4th row alternately, like so: work 2 rows and increase on the 3rd row, work 3 rows and increase on the 4th. Repeat this until the increase is complete.
See DROPS lesson: Increase or decrease 1 st on every 3rd and 4th row alternately
How can I work a jacket in the round instead of back and forth?
Should you prefer to work in the round instead of back and forth, you may of course adjust the pattern. You’ll need to add steeks mid-front (usually 5 stitches), and follow the instructions. When you would normally turn and work from the wrong side, simply work across the steek and continue in the round. At the end you’ll cut the piece open, pick up stitches to work bands, and cover the cut edges.
See DROPS video: How to knit steeks and cut open
Can I work a jumper back and forth instead of in the round?
Should you prefer to work back and forth instead of in the round, you may of course adjust the pattern so you work the pieces separately and then assemble them at the end. Divide the stitches for the body in 2, add 1 edge stitch in each side (for sewing) and work the front and back pieces separately.
See DROPS lesson: Can I adapt a pattern for circular needles into straight needles?
Why is the pattern slightly different than what I see in the photo?
Pattern repeats can vary slightly in the different sizes, in order to get the correct proportions. If you’re not working the exact same size as the garment in the photo, yours might deviate slightly. This has been carefully developed and adjusted so that the complete impression of the garment is the same in all sizes.
Make sure to follow instructions and diagrams for your size!
How do I make a women’s size garment into a men’s size one?
If you have found a pattern you like which is available in women’s size it’s not very difficult to convert it to men’s size. The biggest difference will be the length of sleeves and body. Start working on the women size that you think would fit across the chest. The additional length will be worked right before you cast off for the armhole/sleeve cap. If the pattern is worked top-down you can add the length right after the armhole or before the first decrease on sleeve.
Regarding additional yarn amount, this will depend on how much length you add, but it is better with a skein too many than too few.
How do I prevent a hairy garment from shedding?
All yarns will have excess fibres (from production) that might come off as lint or shedding. Brushed yarns (ie hairier yarns) have more of these loose, excess fibres, causing more shedding.
Shedding also depends on what is worn under or over the garment, and whether this pulls at the yarn fibres. It’s therefore not possible to guarantee that there will be no shedding
Below are some tips on how to get the best result when working with hairier yarns:
1. When the garment is finished (before you wash it) shake it vigorously so the looser hairs come off. NOTE: do NOT use a lint roller, brush or any method that pulls at the yarn.
2. Place the garment in a plastic bag and put it in your freezer - the temperature will cause the fibres to become less attached to each other, and excess fibres will come off easier.
3. Leave in the freezer for a few hours before taking it out and shaking it again.
4. Wash the garment according to the instructions on the yarn label.
Why does my garment pill?
Pilling is a natural process that happens to even the most exclusive of fibers. It's a natural sign of wear and tear that is hard to avoid, and that is most visible in high friction areas of your garment like a sweater's arms and cuffs.
You can make your garment look as new by removing the pilling, using a fabric comb or a pill/lint remover.
Feathers |
||||||||||||||||||||||
|
||||||||||||||||||||||
Knitted DROPS jacket with raglan, lace pattern and sleeves in stocking st in ”BabyAlpaca Silk”. Size: S - XXXL.
DROPS 158-37 |
||||||||||||||||||||||
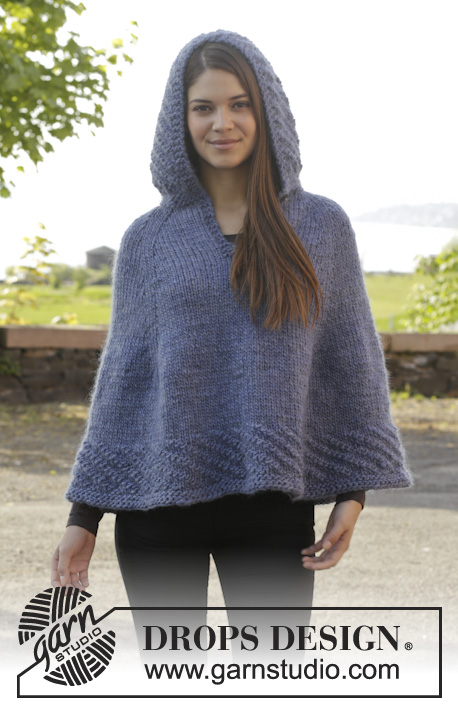
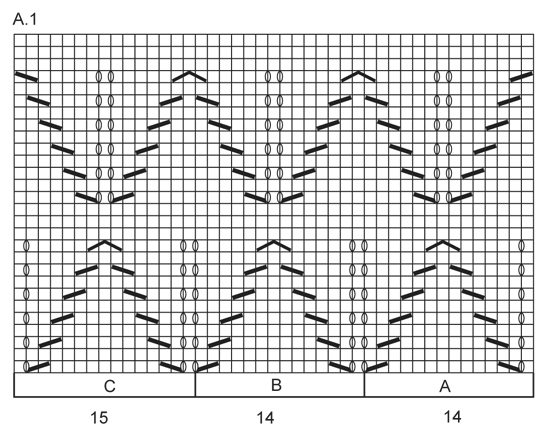
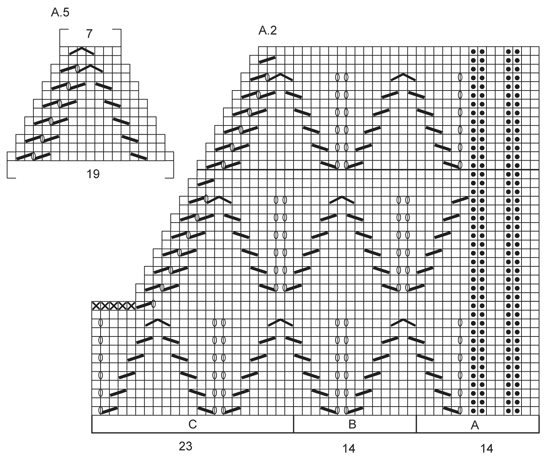
GARTER ST (back and forth on needle): K all rows. 1 ridge = 2 rows K. ADJUSTMENT TIP: If you want to work the jacket a bit longer, there are two ways to adjust. Either work stocking st longer before beg pattern, or work more repetitions with pattern before casting off for armholes. PATTERN: See diagrams A.1 to A.6. The diagrams show all rows in pattern seen from RS. RAGLAN: Dec 2 sts in every transition between body and sleeves. Dec 1 st on each side of 2 sts in stocking st in transitions. Dec are shown in diagram for body and dec are done the same way on sleeves, i.e. inside 1 st in stocking st towards transitions. Before transition K 2 tog, after transitions slip 1 st as if to K, K 1 and psso. BUTTONHOLES: Dec for buttonholes on right band from RS. 1 buttonhole = K tog 5th and 6th st from mid front, then make 1 YO. Dec for buttonholes when piece measures: SIZE S/M: 3, 12, 21, 29, 37 and 45 cm. SIZE L/XL: 4, 13, 22, 31, 40 and 49 cm. SIZE XXL/XXXL: 3, 12, 21, 29, 37, 45 and 53 cm ---------------------------------------------------------- BODY: Worked back and forth on circular needle from mid front. Cast on 242-300-354 sts on circular needle size 3 mm with BabyAlpaca Silk (1st row = RS). K 2, 2 sts in garter st, K 2, 2 sts in garter st (= band), work rib with K 2 / P 2 until 8 sts remain, 2 sts in garter, K 2, 2 sts in garter st and K 2 (= band). Work rib band this way until rib measures approx. 1 cm. Work band as before the rest of piece while working body sts in stocking st. REMEMBER THE KNITTING TENSION! On first row in stocking st dec 1-3-1 sts evenly on needle, do not dec over band sts = 241-297-353 sts. NOTE! Beg dec for BUTTONHOLES – see explanation above – when piece measures 3-4-3 cm. Work until piece measures 12 cm - read ADJUSTMENT TIP. Then work according to diagram A.1 as follows: 8 band sts as before, A.1A over 14 sts, repeat A.1B until 23 sts remain, A.1C over 15 sts and 8 band sts as before. Work diagram 2 times vertically, piece measures approx. 30 cm. Then work as follows: A.2A over 14 sts, A.2B over 28-42-56 sts, A.2C over 23 sts, A.4A over 19 sts, A.4B over 70-98-126 sts, A.4C over 23 sts, A.3A over 22 sts, A.3B over 28-42-56 sts and finish with A.3C over 14 sts. After the first 13 rows of these diagrams, 9 sts have been cast off in each side for armholes. 223-279-335 sts remain on needle and piece measures ca 34 cm. Put piece aside and work the sleeves. SLEEVES: Worked in stocking st in the round on double pointed needles. Cast on 48-54-58 sts on double pointed needles size 3 mm with BabyAlpaca Silk. Work rib (= K 2/P 2) for 1 cm. Then work in stocking st. Insert a marker at beg of round = mid under sleeve. When piece measures 8-8-9 cm, inc 1 st on each side of marker by making a YO. Inc approx. every 2-1½-1 cm. Work YO twisted on next row to avoid holes. Repeat inc 17-21-26 more times (= 18-22-27 times in total) = 84-98-112 sts on needle. Work until piece measures 46-43-40 cm, cast off 9 sts mid under sleeve = 75-89-103 sts remain on needle. Put piece aside and knit another sleeve the same way. YOKE: Slip sleeves on to same circular needle as body = 373-457-541 sts. Insert 4 markers in the piece, one between each piece. Dec for RAGLAN - see explanation above, inside 1 st in stocking st on each side of the 4 transitions. Work as follows from 14th row in diagram: (= WS): P 2, 2 sts in garter st, P 2, 2 sts in garter st, P until 8 sts remain, 2 sts in garter st, P 2, 2 sts in garter st and P 2. Work next row as follows from RS: A.2A over 14 sts, A.2B over 28-42-56 sts, A.2C over 18 sts, stocking st over 75-89-103 sts (= sleeve sts, remember dec on sleeve) A.4A over 15 sts, A.4B over 70-98-126 sts, A.4C over 18 sts, stocking st over 75-89-103 sts (= sleeve sts, remember dec on sleeve), A.3A over 18 sts, A.3B over 28-42-56 sts and A.3C over 14 sts. Continue working according to diagram and dec on every row from RS on sleeves and body. Every time 14 rows have been worked of A.2, A.3 and A.4, work 1 less B between A and C. Work until pattern A.2, A.3 and A.4 have been work 1 time vertically. Now repeat the top 28 rows in all patterns. Continue until a total of 56-70-84 rows with pattern A.2, A.3 and A.4 have been worked. On next row slip the first and last 13-20-27 sts on a stitch holder for neck. Work A.5 over sts from A.2 and A.6 over sts from A.3, continue the remaining sts and dec as before. When A.5 and A.6 have been worked 1 time vertically, there are 73-87-101 sts on needle. Slip sts on stitch holder back on needle = 99-127-155 sts, pick 14 sts along the side of A.5 and A.6 = 127-155-183. Work band as before, work the remaining sts in GARTER ST - see explanation above. AT THE SAME TIME on 1st row dec evenly to approx. 100-115-130 sts on needle. Work 2 ridges in total and cast off with double yarn from RS. ASSEMBLY: Sew tog the openings under the sleeves and sew buttons on left front piece. |
||||||||||||||||||||||
Diagram explanations |
||||||||||||||||||||||
|
||||||||||||||||||||||
Have you made this or any other of our designs? Tag your pictures in social media with #dropsdesign so we can see them! Do you need help with this pattern?You'll find tutorial videos, a Comments/Questions area and more by visiting the pattern on garnstudio.com. © 1982-2024 DROPS Design A/S. We reserve all rights. This document, including all its sub-sections, has copyrights. Read more about what you can do with our patterns at the bottom of each pattern on our site. |
With over 40 years in knitting and crochet design, DROPS Design offers one of the most extensive collections of free patterns on the internet - translated to 17 languages. As of today we count 304 catalogues and 11422 patterns - 11422 of which are translated into English (UK/cm).
We work hard to bring you the best knitting and crochet have to offer, inspiration and advice as well as great quality yarns at incredible prices! Would you like to use our patterns for other than personal use? You can read what you are allowed to do in the Copyright text at the bottom of all our patterns. Happy crafting!
Comments / Questions (27)
Aline wrote:
Bonjour cher Studio, sans diagramme pour tricoter l'encolure, première fois que je tricote un gilet, je ne comprends pas comment finir ce col, ni à quoi il ressemble. Pourquoi mettre des mailles en attente devant (20 de chaque côté) ? Pourquoi ne pas former cette encolure en tricotant toutes les mailles ? Merci beaucoup de votre réponse
31.03.2022 - 09:07DROPS Design answered:
Bonjour Aline, en début de rang sur l'endroit, tricotez les 20 premières mailles et glissez-les en attente; tricotez le rang comme avant, tournez, tricotez les 20 premières mailles sur l'envers et mettez-les en attente, tricotez le reste du rang comme avant. Ces 20 mailles de chaque côté seront reprises ensuite pour le col. Tricotez maintenant les diagrammes A.5 au-dessus de A.2 et A.6 au-dessus de A.3 et les autres mailles comme avant (vous allez diminuer comme indiqué dans les diagrammes). Après A.5/A.6, reprenez les 20 mailles de chaque côté et relevez 14 m le long de A.5/A.6 (de chaque côté) et tricotez le col. Bon tricot!
31.03.2022 - 09:53Renata wrote:
Przerobiłam na wysokość schematy A2, A3 i A4, w opisie jest napisane, że teraz należy cyt.: "Powt. teraz 28 rz. na górze wszystkich schematów. Dalej przer. aż w sumie będzie przerobionych 56-70-84 rz. ściegiem fantazyjnym A.2, A.3 i A.4. " Ponieważ nie ma schematu do kontynuacji wzoru a opis jest niejasny, proszę o pomoc: jakie rzędy powtórzyć Jak od tego momentu ma wyglądać robótka?
16.07.2018 - 22:23DROPS Design answered:
Witaj Renato, Robisz to samo co dotychczas, czyli zamykasz oczka na reglan, ale teraz przerabiasz od 15-tego rzędu w schematach A.2, A.3 i A.4. Będzie po prostu mniej motywów, ale zaczynasz od początku 15-tego rz. i przerabiasz na takiej liczbie oczek jaka ci pozostała, aż dojdziesz do brzegu (nie zapomnij o obszyciach przodów, które są przerabiane jak dotychczas). Ażur biegnie do końca karczku na przodzie i na tyle. Powodzenia!
18.07.2018 - 10:12Christiane wrote:
Hallo, sehr schönes Muster. Ich habe jetzt A5 und A6 einmal in der Höhe gestrickt in Größe L/XL. Ich habe aber nicht 87 Maschen auf der Nadel, sondern 121. Ich habe alles kontrolliert und nachgerechnet, aber es bleiben viel zu viele Maschen. Muss ich weitere Male Reihen in A2 und A 3 stricken? Aber es sind insgesamt 70 Reihen. Vielleicht können Sie mir helfen. Danke und viele Grüße
18.04.2017 - 17:20Olga Zurkova wrote:
Hallo! Beginnt man jede Reihe gleich mit dem Bündchen? Oder strickt man zuerst eine Randmasche? Und wenn eine Randmasche gestrickt wie, dann wie? Vielen Dank vorab!
01.10.2016 - 12:08DROPS Design answered:
Liebe Frau Zurkova, wenn man die Bündchen strickt, hat man keine Randmasche, dh. Mit 2 M glatt re anfangen (Hin-R) und mit 2 M glatt re enden (Hin-R).
03.10.2016 - 09:00Anne wrote:
Kaarrokkeessa kun otetaan ensimmäiset ja viimeiset silmukat apulangalle (tässä tapauksessa 13kpl) ja jatketaan ohjeen mukaisesti A2 mallineuleen silmukoilla piirrosta A5 ja vastaavasti A3 kanssa, niin jäävätkö kuviot A5 ja A6 vajaaksi? Koska minulla jää vain 12 silmukkaa näitä kuvioita varten. Vai siirretäänkö jotkut muut silmukat apulangalle kuin etukappaleiden reunimmaiset?
17.04.2016 - 18:27DROPS Design answered:
Vain ensimmäiset ja viimeiset 13 s siirretään apulangalle. Piirrosten A.5 ja A.6 mallikertojen ensimmäisellä kerroksella tulee olla 19 s. Voit aina ottaa yhteyttä lähimpään DROPS-jälleenmyyjäliikkeeseen, he auttavat sinua mielellään paikan päällä.
21.09.2016 - 16:47Dorothy Storm wrote:
Jeg har i mit foregående notat skrevet om en fejl i opskriften. Jeg har nu strikket 42 pinde i A4 og har 2 steder opdaget at maskeantallet ikke passer i forhold til mønsteret. Det drejer sig om 2 steder ved raglanindtagningen i pind 27 og 41 hvor der står en indtagningen og en løs af. Mit spørgsmål er: Er løs af ikke en fejl? Hvis det er rigtigt bør man se bort fra min kommentar fra 7/4.
08.04.2016 - 07:31DROPS Design answered:
Hej Dorothy, Jeg kan godt se hvad du mener, der burde ikke have været et omslag i forbindelse med indtagningerne i hver side på p 27 og 41. Jeg skal bede Design om at se på det. Tak for info!
08.04.2016 - 09:54Dorothy Storm wrote:
Der er fejl i mønsteret ved A4 , og C4, pind 27 fra 4. Maske hvor der mangler 1 løs af 1 ret træk den løse maske over. Det samme gælder i slutningen af pinden hvor der mangler 2 ret sammen. Ellers mangler selve raglanindtagningen på denne pind.
07.04.2016 - 13:47Babika Szunomar wrote:
Beste Dropsdesign, Ik ben bezig met de meerderingen in de mouwen - ik begrijp dat ik aan het begin van de pen links en rechts van de eerste steek 1 steek meerder. Klopt het dat de meerderingen alleen aan de ene kant plaatsvinden? De mouw wordt dan aan een kant breder. Of moet het aan weerszijden van de mouw. Alvast bedankt voor uw antwoord.
31.10.2015 - 20:05DROPS Design answered:
Hoi Babika. Je breit in de rondte en meerdert aan elke kant van de markeerder (= midden onder mouw). Dus je maakt 1 omsl voor en 1 omsl na = 2 st gemeerderd aan beide zijkanten van de midden onder de mouw. Dus je meerdert niet aan één kant.
02.11.2015 - 14:42Sallyanne Lewis wrote:
In the first row it says K 2, 2 sts in garter st, K 2, 2 sts in garter st (= band), does this mean K8 garter stitch or K4 garter stitch It does not make sense to me please help
05.02.2015 - 03:41DROPS Design answered:
Dear Mrs Lewis, the 8 sts front band are worked as follows : 2 sts in stocking st, 2 sts in garter st, 2 sts in stocking st and 2 sts in garter st (1st band, seen from RS). Happy knitting!
05.02.2015 - 09:39Astrid wrote:
Ich stricke gerade Größe L/XL und wundere mich, warum 54 Maschen für die Ärmel angeschlagen werden sollen. Im Rippenmuster sollte die Zahl doch durch 4 teilbar sein, damit nicht irgendwo 4 gleiche Maschen sind, oder?
17.01.2015 - 19:18DROPS Design answered:
Liebe Astrid, Sie haben Recht, das Muster geht nur in der kleinsten Größe auf. Ich werde die Frage an die Designerinnen weiterleiten, allerings ist die neue Kollektion gerade noch sehr vorrangig. Damit Sie weiterstricken können, würde ich empfehlen, 2 M weniger anzuschlagen und nach dem Bündchen diese 2 M gleichmäßig verteilt zuzunehmen.
18.01.2015 - 18:45