
Popular categories
Looking for a yarn?


Comments / Questions (99)
![]() Trees wrote:
Trees wrote:
Bedankt voor de magic loop. Ik ga em zeker proberen.
28.05.2013 - 19:51
![]() Hilde wrote:
Hilde wrote:
Hvis jeg vil strikke denne nydelige jakken med v-hals i stedet for rund hals hva gjør jeg annerledes da?
27.05.2013 - 23:36DROPS Design answered:
Hej Hilde. De nemmeste er nok at du finder en opskrift i samme kategori/garn som denne med en v-hals. Du kan da overföre beskrivelsen fra det andet mönster til dette. God fornöjelse.
28.05.2013 - 11:19Tania Regina M. Simião wrote:
Brasil - Adoro as receitas! Fiz vários casacos o catavento. Quero tirar mais modelos. È bem explicado as receitas.
27.05.2013 - 16:24
![]() Sir Napsalot wrote:
Sir Napsalot wrote:
Can you explain the gauge in this pattern in more detail, please? What does "size needed to get 24 sts x 28 rows pattern according to A.1 + A.4 = 10 x 10 cm" mean? Figure A.1 has 4 sts and 16 rows; while figure A.4 has 11 sts and 8 rows. Do you mean to knit A.1+A.4 (i.e. 15 st) side-by-side then two repeats of A.4 for every A.1 (i.e., 16 rows), then measure 24 sts x 28 rows for 10 x 10 cm?
13.05.2013 - 01:22DROPS Design answered:
Dear Sir Napsalot, to check your gauge, knit a swatch larger than the recommanded tension, ie for example : A4/A1/A4/A1 and measure so that 24 sts = 10 cm. Happy knitting!
13.05.2013 - 09:32
![]() Ingrid wrote:
Ingrid wrote:
Geachte lezer, Mogelijk is mijn vraag niet overgekomen en zal ik nu anders formuleren. Wat is de breedte van de manchet?
01.04.2013 - 21:59DROPS Design answered:
Uw vraag was duidelijk. Zie reactie hieronder.
05.04.2013 - 12:18
![]() Ingrid wrote:
Ingrid wrote:
Geachte lezer, Volgens de stekenverhouding is 24 steken in patroon 10 cm breed. Voor de mouw maat L zet ik 68 steken op. 10 : 24 x 68 = 28.5 cm. Dat is precies de maat van het werk. De onderkant van de mouw staat op de foto aangesloten. Maar dan is 28.5 veel te wijd. Wat te doen?
25.03.2013 - 19:58DROPS Design answered:
We hebben het patroon gecontrolleerd en het klopt. De breedte van de mouw is met de juiste stekenverhouding inderdaad ca 28 cm. Op de tekening ziet u ook dat de mouw onderaan iets uitloopt. Op de foto ziet u het een beetje. In het patroon staat dat u na 9 cm nog 60 st over hebt. Dus een wijd randje, een mindering in patroon A.5 en dan wordt uw mouw iets smaller.
05.04.2013 - 12:17
![]() Elisabet E Thenor wrote:
Elisabet E Thenor wrote:
Min mor som är ytterst skicklig och stickat i 65 år tyckte mönstret endast var en prototyp. Det gick inte att sticka efter, jag kommer att returnera garnet!
13.02.2013 - 17:57
![]() Emelie wrote:
Emelie wrote:
Hej, Jag har en fråga angående det här stycket: "(från avigsidan stickas det rm över rm och am över am)" Menar ni då att man ska sticka räta över de som stickades räta förra varvet eller över de som är räta från avigsidan sett? Mvh Emelie
08.02.2013 - 15:25DROPS Design answered:
Du stickar rm över rm och am över am sett från rätsidan.
11.02.2013 - 16:15
![]() Natalie wrote:
Natalie wrote:
Vielen Dank! Die Jacke ist ein ausgesprochen schönes Design!
07.02.2013 - 10:43
![]() Natalie wrote:
Natalie wrote:
Guten Tag! Ich stricke gerade die Ärmel, und da scheint sich ein kleiner Fehler eingeschlichen zu haben. In der Anleitung heißt es: BEACHTEN: Die ersten 4 M, die beidseitig zugenommen werden, fortlaufend in A.6 einarbeiten, die nächsten 11-11-9-11-9-11 M fortlaufend in A.2 einarbeiten und die verbleibenden 0-3-0-2-0-0 M li stricken. Muss es statt "A2" nicht A1" heißen? Viele Grüße, Natalie
06.02.2013 - 12:47DROPS Design answered:
Liebe Natalie, vielen Dank für den Hinweis. Wir haben eine Korrektur vorgenommen: die ersten 4 M werden in A.1 gestrickt, die anderen in A.6.
07.02.2013 - 08:31
|
|||||||||||||||||||||||||
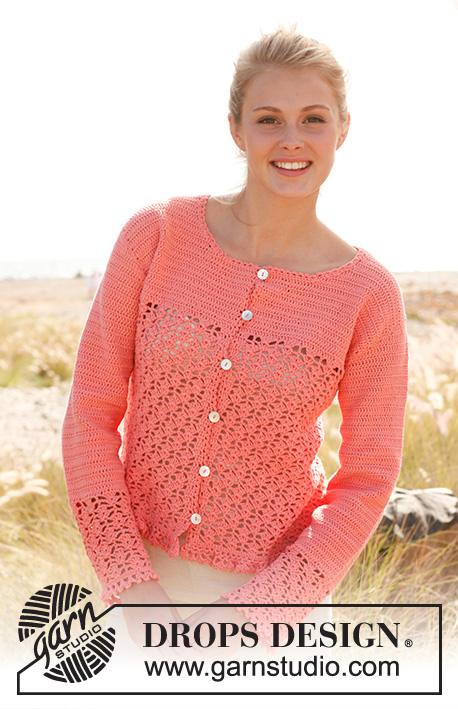
Rosalinde#rosalindecardigan |
|||||||||||||||||||||||||
 |
 |
||||||||||||||||||||||||
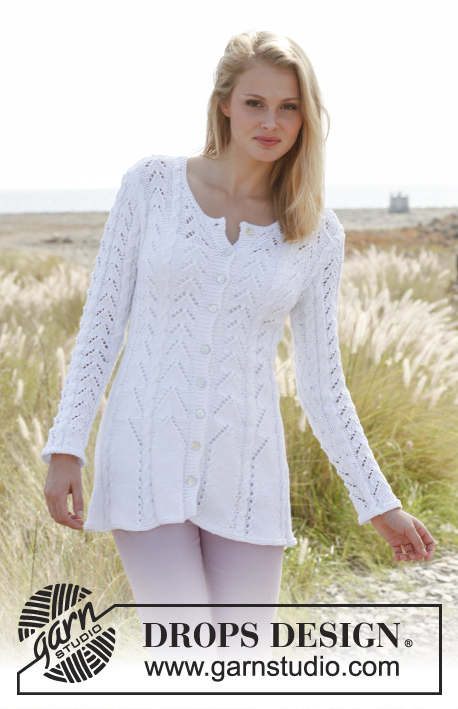
Knitted DROPS fitted jacket with lace pattern and cables in ”Muskat”. Size: S - XXXL.
DROPS 148-2 |
|||||||||||||||||||||||||
|
GARTER ST (back and forth on circular needle): K all rows. 1 ridge = 2 rows K. GARTER ST (in the round on double pointed needles): 1 ridge = * K 1 round and P 1 round *, repeat from *-*. PATTERN: See diagrams A.1 to A.6. Diagrams show all rows/rounds in pattern seen from RS. DECREASE TIP: Dec in each side on section in stocking st in both sides on body as follows: Slip 1st st as if to K, K 1, psso, work in stocking st until 2 sts remain, K 2 tog (= 2 sts dec). INCREASE TIP: Inc 1 st by making 1 YO. On next row work YOs twisted to avoid holes (i.e. work in back loop of st instead of front). BUTTONHOLE: Dec for buttonholes on right band. 1 buttonhole = K tog third and fourth st from mid front and make 1 YO. Dec for buttonholes when piece measures: SIZE S: 8, 14, 20, 26, 32, 38, 44, 50 and 56 cm SIZE M: 8, 15, 22, 28, 34, 40, 46, 52 and 58 cm SIZE L: 8, 14, 21, 27, 34, 40, 47, 53 and 60 cm SIZE XL: 6, 13, 20, 27, 34, 41, 48, 55 and 62 cm SIZE XXL: 8, 15, 22, 29, 36, 43, 50, 57 and 64 cm SIZE XXXL: 10, 17, 24, 31, 38, 45, 52, 59 and 66 cm ---------------------------------------------------------- BODY: Worked back and forth on circular needle from mid front. Cast on 244-264-312-332-404-420 sts (incl 6 band sts in each side towards mid front) on circular needle size 4 mm with Muskat. K 3 rows (1st row = WS). Work next row as follows from RS: SIZE S + M: 6 band sts in GARTER ST – see explanation above, P 2, * A.2 (= 19 sts), A.1 (= 4 sts) *, repeat from *-* 2 times in total, P 2 and K 8-13, insert 1 marker (= side), K 8-13, P 2, ** A.1 (= 4 sts), A.2 (= 19 sts) **, repeat from **-** 4 times in total, work A.1 (= 4 sts), P 2 and K 8-13, insert 1 marker (= side), K 8-13, P 2, ** A.1 (= 4 sts), A.2 (= 19 sts) **, repeat from **-** 2 times in total and finish with P 2 and 6 band sts in GARTER ST. SIZE L + XL: 6 band sts in GARTER ST - see explanation above, P 2, A.2 (= 19 sts), * A.2 (= 19 sts), A.1 (= 4 sts) *, repeat from *-* 2 times in total, P 2 and K 6-11, insert 1 marker (= side), K 6-11, P 2, ** A.1 (= 4 sts), A.2 (= 19 sts) **, repeat from **-** 2 times in total, work A.2 (= 19 sts), A.1 (= 4 sts), A.2 (= 19 sts), * A.2 (= 19 sts), A.1 (= 4 sts) *, repeat from *-* 2 times in total, P 2 and K 6-11, insert 1 marker (= side), K 6-11, P 2, ** A.1 (= 4 sts), A.2 (= 19 sts) **, repeat from **-** 2 times in total, work A.2 (= 19 sts) and finish with P 2 and 6 band sts in GARTER ST. Size XXL + XXXL: 6 band sts in GARTER ST - see explanation above, P 2, A.2 (= 19 sts), * A.2 (= 19 sts), A.1 (= 4 sts) *, repeat from *-* 3 times in total, P 2 and K 6-10, insert 1 marker (= side), K 6-10, P 2, ** A.1 (= 4 sts), A.2 (= 19 sts) **, repeat from **-** 3 times in total, work A.2 (= 19 sts), A.1 (= 4 sts), A.2 (= 19 sts), * A.2 (= 19 sts), A.1 (= 4 sts) *, repeat from *-* 3 times in total, P 2 and K 6-10, insert 1 marker (= side), K 6-10, P 2, ** A.1 (= 4 sts), A.2 (= 19 sts) **, repeat from **-** 3 times in total, work A.2 (= 19 sts) and finish with P 2 and 6 band sts in GARTER ST. ALL SIZES - READ ALL OF THE FOLLOWING SECTION BEFORE CONTINUING! Continue pattern like this (from WS work K over K and P over P). REMEMBER THE KNITTING TENSION! When piece measures 8 cm, (adjust so that next row is worked from RS), dec 1 st in each side on body (i.e. at the edge in each side on both sections in stocking st with markers) – READ DECREASE TIP (= 4 sts dec). Repeat dec every 8 cm 3 more times (= 4 dec in total – after last dec 8-18-4-14-4-12 sts in stocking st remain in each side, i.e. 4-9-2-7-2-6 sts on each side of both markers). AT THE SAME TIME when piece measures 8-8-8-6-8-10 cm, beg dec for BUTTONHOLES - see explanation above. After diagram A.2 continue with diagram A.3 (instead of A.2 - work the other sts as before). After all dec in the sides and in A.3, 164-184-200-220-260-276 sts remain on needle and piece measures approx. 32 cm. Then continue as before but work pattern according to diagram A.4 instead of A.3. When piece measures approx. 40 cm in all sizes (adjust so that next row is worked from RS), inc as follows: ALL SIZES: Inc 1 st on the right side of every cable (i.e. in every other P-section with 2 P sts seen from RS) – READ INCREASE TIP (= 9-9-9-9-13-13 sts inc). When piece measures 42-42-42-42-43-43 cm, inc 1 st on the left side of every cable (i.e. in the remaining P-sections with 2 P sts = 9-9-9-9-13-13 sts inc). Repeat inc on the right side of every cable (i.e. in every other P-section with 3 P sts) when piece measures 44-44-44-44-46-46 cm and on the left side of every cable (i.e. in the remaining P-sections with 3 P sts) when piece measures 46-46-46-46-49-49 cm. SIZE L + XL (only applies to these 2 sizes): AT THE SAME TIME when piece measures 42 cm, inc 1 st on each side of marker in each side - READ INCREASE TIP (= 4 sts inc). Repeat inc when piece measures 46 cm. ALL SIZES: When all inc are done there are 200-220-244-264-312-328 sts in total on needle. Continue pattern. When piece measures 47-48-49-50-51-52 cm, work next row from RS as follows: Work 48-52-59-63-74-77 sts as before (= right front piece), cast off 8-10-8-10-12-14 sts for armhole, work 88-96-110-118-140-146 sts as before (= back piece), cast off 8-10-8-10-12-14 sts for armhole and work the last 48-52-59-63-74-77 sts as before (= left front piece). Finish each part separately. LEFT FRONT PIECE: = 48-52-59-63-74-77 sts. Continue pattern as before (1st row = WS). Then cast off for armhole at beg of every row from RS: 2 sts 1-2-1-2-6-7 times and 1 st 1-3-1-3-6-7 times = 45-45-56-56-56-56 sts. When piece measures 56-58-60-62-64-66 cm, slip the outermost 12-12-15-15-15-15 sts towards mid front on 1 stitch holder for neck (work them before slipping them on the stitch holder). Continue to cast off for neck at beg of every row from WS: 2 sts 2 times and 1 st 4 times - NOTE: Work sts that do not fit the pattern in stocking st when casting off for neck. After all cast offs for armhole and neck, 25-25-33-33-33-33 sts remain on shoulder. Continue pattern as before with 1 edge st in garter st in each side until piece measures approx. 66-68-70-72-74-76 cm - adjust after 1 whole repetition with A.4 vertically, cast off. RIGHT FRONT PIECE: Work as left front piece but reversed, i.e. when casting off for armholes, cast off at beg of every row from WS (instead of RS) and cast off for neck at beg of every row from RS (instead of WS) – NOTE: When slipping sts on 1 stitch holder for neck, adjust so that 1 row from WS has been worked after last buttonhole before slipping sts on stitch holder. BACK PIECE: = 88-96-110-118-140-146 sts. Continue to cast off for armholes at beg of every row in each side as on front piece = 82-82-104-104-104-104 sts. Continue pattern as before with 1 edge st in garter st in each side. When piece measures 64-66-68-70-72-74 cm, cast off the middle 30-30-36-36-36-36 sts for neck. Continue to cast off 1 st on next row from neck = 25-25-33-33-33-33 sts remain on the shoulder. Continue pattern with 1 edge st in garter st in each side until back piece is the same length as front piece, cast off. Repeat on the other shoulder. SLEEVE: Worked in the round on double pointed needles, switch to circular needle when needed. Cast on 51-51-68-68-85-85 sts on double pointed needles size 4 mm with Muskat. Work 2 ridges in GARTER ST in the round on double pointed needles - see explanation above! Work next round as follows: * Work A.1 (= 4 sts), work A.5 (= 13 sts) *, repeat from *-* 3-3-4-4-5-5 times in total. Continue pattern like this upwards. When A.5 has been worked, 45-45-60-60-75-75 sts remain on needle and piece measures approx. 9 cm. Now continue pattern but work A.6 instead of A.5 until finished measurements (work the other sts as before). AT THE SAME TIME when piece measures 11-11-10-12-12-12 cm, inc 1 st on each side of A.1 at beg of round (inc by making 1 YO which is worked P twisted on next round). Repeat inc every 2½-2-3-2-2½-2 cm 14-17-12-16-12-14 more times (= 15-18-13-17-13-15 inc in total) = 75-81-86-94-101-105 sts – NOTE: Work the first 4 sts inc in each side in A.1, work the next 11-11-9-11-9-11 sts in A.6 and P the remaining 0-3-0-2-0-0 sts. READ ALL OF THE FOLLOWING SECTION BEFORE CONTINUING! When piece measures 49-49-48-48-45-44 cm (shorter measurements in the larger sizes because of wider shoulders), cast off 8-10-8-10-12-14 sts mid under sleeve (i.e. cast off A.1 and 2-3-2-3-4-5 sts on each side of A.1), finish the sleeve working back and forth on needle. Then cast off for sleeve cap at beg of every row in each side as follows: Cast off 2 sts 3-4-3-4-4-4 times and 1 st 3-3-2-2-7-10 times, then cast off 2 sts in each side until piece measures approx. 56-57-54-55-56-57 cm – adjust after 1 whole repetition with A.6 vertically. Then cast off the remaining sts, piece measures approx. 57-58-55-56-57-58 cm. Knit another sleeve. ASSEMBLY: Sew the shoulder seams. Sew the sleeves inside 1 edge st. Sew on buttons. Steam the garment to make it hang nicely. NECK EDGE: Pick up approx. 90 to 110 sts around the neck (incl sts on stitch holders at the front) on circular needle size 4 mm. K 3 rows and cast off with K from RS. |
|||||||||||||||||||||||||
Diagram explanations |
|||||||||||||||||||||||||
|
|||||||||||||||||||||||||
 |
|||||||||||||||||||||||||
 |
|||||||||||||||||||||||||
Have you finished this pattern?Tag your pictures with #dropspattern #rosalindecardigan or submit them to the #dropsfan gallery. Do you need help with this pattern?You'll find 28 tutorial videos, a Comments/Questions area and more by visiting the pattern on garnstudio.com. © 1982-2026 DROPS Design A/S. We reserve all rights. This document, including all its sub-sections, has copyrights. Read more about what you can do with our patterns at the bottom of each pattern on our site. |
|||||||||||||||||||||||||


With over 40 years in knitting and crochet design, DROPS Design offers one of the most extensive collections of free patterns on the internet - translated to 17 languages. As of today we count 324 catalogues and 12290 patterns translated into English (UK/cm).
We work hard to bring you the best knitting and crochet have to offer, inspiration and advice as well as great quality yarns at incredible prices! Would you like to use our patterns for other than personal use? You can read what you are allowed to do in the Copyright text at the bottom of all our patterns. Happy crafting!
Post a comment to pattern DROPS 148-2
We would love to hear what you have to say about this pattern!
If you want to leave a question, please make sure you select the correct category in the form below, to speed up the answering process. Required fields are marked *.