
Popular categories
Looking for a yarn?


Comments / Questions (89)
![]() Marita Annus wrote:
Marita Annus wrote:
Varför är era mönster så små i stolekarna? Jag stickade just den här tröjan i storlek 3-4 år passar kanske en tvååring.
01.09.2021 - 14:17DROPS Design answered:
Hej Marita, det er de ikke.... Har du strikket den i DROPS Merino Extra Fine? Du finder målene i de forskellige størrelser i måleskitsen nederst i opskriften. For at få målene i måleskitsen er du nødt til at overholde strikkefastheden som står i opskriften :)
02.09.2021 - 16:01
![]() Christa Clemens wrote:
Christa Clemens wrote:
Was bedeutet bei den Ärmeln : 8 Maschen darüber anschlagen?
12.08.2021 - 18:33DROPS Design answered:
Liebe Frau Clemens, schauen Sie diese Lektion, ab Bild 10 wird es gezeigt, wie man die maschen von der 1. Ärmel stilllegt, und die neuen Maschen unter der Ärmel (= diese 8 Maschen hier)anschlägt (diese Maschen sind für die Seite vom Rumpfteil). Viel Spaß beim stricken!
13.08.2021 - 07:20
![]() Ginz wrote:
Ginz wrote:
Hei. På bol så står det fortsett med glattstrikk og A1. Hvor skal jeg fortsette med glattstrikk? Er det Ikke A1 hele runden ?
19.05.2021 - 02:10DROPS Design answered:
Hei Ginz. Jo, du fortsetter med A.1 og når du har strikket A.3 1 gang i høyden fortsetter du med glattstrikk. mvh DROPS design
19.05.2021 - 10:45
![]() Christine Paterson wrote:
Christine Paterson wrote:
Hi, this is my first time knitting from top down. I have managed to follow the instructions until I get to the increasing for raglan AT THE SAME TIME as keeping the A1 moss stitch pattern going. How does the pattern keep straight when increasing on every row, and later every other row? I can't see from the picture what happens around the raglan itself, so I don't know if you are supposed to make adjustments to the pattern to keep it working right. Can you send enlarged picture?
23.03.2021 - 04:52DROPS Design answered:
Dear Christine, unfortunately we cannot send you another picture than what is available on teh site. However, I will try to explane what is happening there. You already have put 4 markers in the piece, and the one stitch of both side of these markers are knitted in every round. Increases are done just before and after these stitches, The new stitches are knitted into the seed stitch, so ilet's suppose, the seed stitch ended in two K stitch before you started the increase, at the 1st and 2nd increase the new stitches are knitted, the 3d and 4th increase they are purled, then at the 5th and 6th they are knitted again, etc. I hope this helps. Happy Knitting!
23.03.2021 - 05:49
![]() Andrea wrote:
Andrea wrote:
Jetzt hat sie`s verstanden!!!! Danke!!!
11.02.2021 - 15:13
![]() Andrea wrote:
Andrea wrote:
Danke für die rasche Antwort. Ja, so steht es in der Strickschrift, das habe ich schon verstanden. Mein Problem ist, dass ich doch in der einen Runde die Zunahme per Umschlag stricke und diese Umschläge dann in der Folgerunde rechts verschränkt abstricke. Also kann ich doch nicht in jeder Runde zunehmen, oder? LG Andrea
11.02.2021 - 09:40DROPS Design answered:
Liebe Andrea, wenn Sie also in jede Runde zunehmen, dann stricken Sie die Umschläge von vorrigen Runden verschränkt, und machen die Umschläge wie zuvor bei der selben Runde. Auf der Nadel haben Sie: 1 Umschlag, 2 M rechts mit der Markierung, 1 Umschlag, so strickenSie: Umschlag verschränkt stricken, 1 Umschlag, 2 M rechts mit der Markierung, 1 Umschlag, Umschlag verschränkt stricken - so nehmen Sie in jeder Runde zu. Kann es Ihnen weiterhelfen? Viel Spaß beim stricken!
11.02.2021 - 10:56
![]() Andrea wrote:
Andrea wrote:
Hallo, ich bin mir nicht sicher, ob ich die Strickanleitung richtig verstanden habe. Bei der Raglanzun. steht (10x) in jeder Runde zunehmen und dann in jeder 2.Rd. (14x). Nach der Runde mit den Umschlägen zur Zunahme muss ich doch diese in der darauffolgenden (also der 2.Runde) rechts verschränkt abstricken. Also nehme ich doch nur in jeder 2.Rd zu, oder? Und ab der 11.Zunahme ? - dann in jeder 4. Rd oder habe ich da einen Denkfehler? Vielen Dank für Ihre Hilfe und bleiben Sie schön gesund!
10.02.2021 - 13:46DROPS Design answered:
Liebe Andrea, in die 4. Größe sollen Sie zuerst 11 Mal in jeder Runde zunehmen, dann 14 Mal in jeder 2. Runde zunehmen - so haben Sie 96 + 8x 11 + 8 x 14 = 296 Maschen. Viel Spaß beim stricken!
10.02.2021 - 14:36
![]() Michèle wrote:
Michèle wrote:
Bonjour, Ce modèle existe-t-il pour les grandeurs 18 ou 24 mois?
04.02.2021 - 18:54DROPS Design answered:
Bonjour Michèle, ce modèle existe du 1/3 mois au 3/4 ans sous le nom "McDreamy, ici. Bon tricot!
05.02.2021 - 08:07
![]() Birgitta Appelholm wrote:
Birgitta Appelholm wrote:
Hej! Nu har jag förstått mönstret! Behöver ingen hjälp.
06.11.2020 - 10:18
![]() Birgitta Appelholm wrote:
Birgitta Appelholm wrote:
Stickar minsta storleken. Gäller ökn för raglan. 88 m från början. Efter 8 ökn varje v har jag 152 m på stickan. Efter 11 ökn vartannat v har jag 192 m på stickan, inte 240 m. Vad är fel
06.11.2020 - 08:49DROPS Design answered:
Hej Birgitta. När du ökat så du har 152 m så ska du öka 11 gånger till (öka på vartannat varv); 11 ökningar x 8 m = 88 m ökade. 152+88= 240 m. Mvh DROPS Design
06.11.2020 - 12:06
|
|||||||
Paulina#paulinasweater |
|||||||
|
|
|||||||
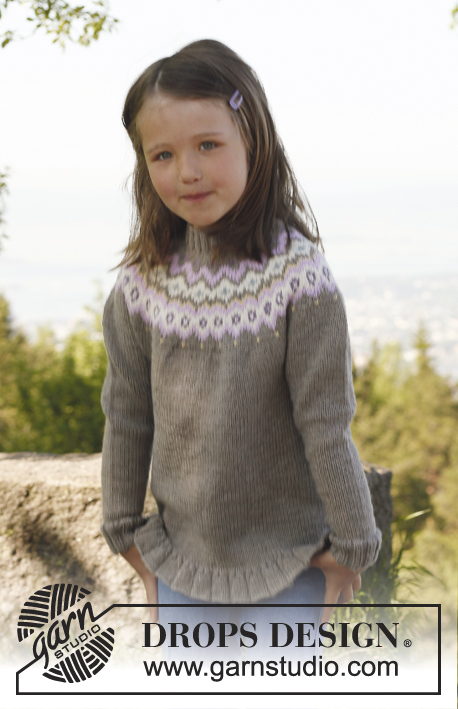
Knitted jumper with raglan, worked top down in DROPS Merino Extra Fine. Size children 3 to 12 years.
DROPS Children 23-7 |
|||||||
|
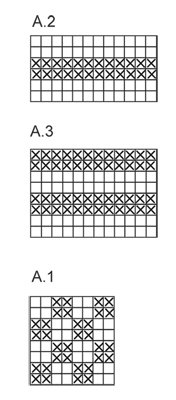
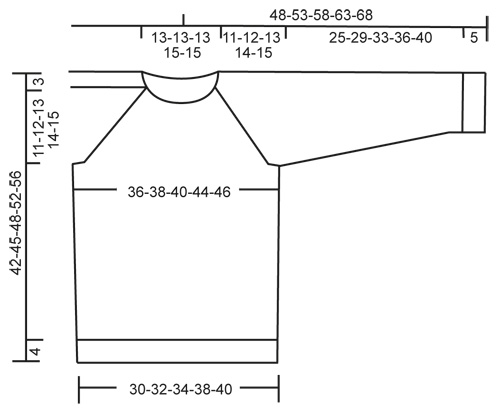
INCREASE TIP (applies to raglan): Work until 1 st remain before marker: Make 1 YO, K 2 sts (marker is in the middle of these sts), make 1 YO. On next round K YOs twisted (i.e. work in back loop of st instead of front) to avoid holes. Work the inc sts in the pattern. PATTERN: See diagrams A.1, A.2 and A.3. Diagrams show pattern from RS. DECREASE TIP (applies to body and sleeves): Work until 2 sts remain before marker, K 2 tog, marker, and K 2 twisted tog (i.e. work in back loop of st instead of front). -------------------------------------------------------- JUMPER: Worked in the round, top down. YOKE: Cast on 84-84-84-92-92 sts on a short circular needle size 3 mm with Merino Extra Fine. Insert a marker at beg of round (= mid back). K 1 round. Then work rib = K 2/P 2 for 3 cm. Then work an elevation in back of neck as follows (continue in rib): Work 8 sts past marker, turn, tighten thread and work 16 sts back, turn, tighten thread and work 24 sts, turn, continue by working 8 sts more on every turn until a total of 64 sts have been worked, turn and work 1 round until marker mid back again. READ ALL OF THE FOLLOWING SECTION BEFORE CONTINUING! Switch to circular needle size 4 mm and work 1 round in stocking st while at the same time inc 4 sts evenly = 88-88-88-96-96 sts. Now insert 4 new markers (for raglan) as follows: Work 15-15-15-17-17 sts from marker mid back, insert 1st marker here (at the same time remove marker mid back), work 14 sts more (= sleeve), insert 2nd marker, work 30-30-30-34-34 sts (= front piece) and insert 3rd marker, work 14 sts (= sleeve), insert 4th marker and work until 1st marker again (there are 30-30-30-34-34 sts between markers on back piece). Work A-1, AT THE SAME TIME on 1st round, inc 1 st on each side of the 4 markers for raglan (= 8 inc) - SEE INCREASE TIP! Repeat inc every round 7-7-9-10-11 more times and then every other round 11-13-13-14-15 times = 240-256-272-296-312 sts on needle. AT THE SAME TIME when piece measures 8-8-8-9-9 cm from mid front, work A.2 1 time vertically, then work A.1 again. After all inc, work next round as follows: Work until 1st marker. Slip the 52-56-60-64-68 sts between 1st and 2nd marker on a stitch holder, cast on 8 new sts over stitch holder, work until 3rd marker, slip the 52-56-60-64-68 sts between 3rd and 4th marker on a stitch holder, cast on 8 new sts over stitch holder, work until 1st marker again = 152-160-168-184-192 sts on needle. BODY: Continue in A.1 – AT THE SAME TIME insert a marker in the middle of the 8 new sts in each side. When piece measures 3 cm from where sleeve sts were put on a stitch holder, work A-3 1 time vertically, then continue in stocking st. AT THE SAME TIME when 4 cm have been worked from where sleeve sts were slipped on a stitch holder, dec 1 st on each side of the markers in the sides – SEE DECREASE TIP! Repeat dec every 3-4-4-5-5 cm 4 more times = 132-140-148-164-172 sts. Continue to work until piece measures 38-41-44-48-52 cm from shoulder. Work 1 round while AT THE SAME TIME inc 4 sts evenly = 136-144-152-168-176 sts. Switch to circular needle size 3 mm and work rib = K 2/P 2 for 4 cm. LOOSELY cast off with K over K and P over P. Piece measures approx. 42-45-48-52-56 cm from shoulder. SLEEVE: Slip sts from one stitch holder on double pointed needles size 4 mm and in addition cast on 8 new sts under sleeve = 60-64-68-72-76 sts. Insert a marker mid under sleeve (i.e. in the middle of the 8 new sts). NOW MEASURE PIECE FROM HERE! Continue with A.1 until piece measures 3 cm from marker, now work A.3 1 time vertically, then work in stocking st. AT THE SAME TIME when 1 cm of A.3 has been worked, dec 1 st on each side of marker – SEE DECREASE TIP! Repeat dec every 4-3-4-4-3½ cm 5-7-7-7-9 more times = 48-48-52-56-56 sts. Continue to work until sleeve measures 25-29-33-36-40 cm. Switch to double pointed needles size 3 mm and work rib = K 2/P 2 for 5 cm. Then LOOSELY cast off with K over K and P over P. Work the other sleeve the same way. ASSEMBLY: Sew the openings under the sleeves. |
|||||||
Diagram explanations |
|||||||
|
|||||||
 |
|||||||
 |
|||||||
Have you finished this pattern?Tag your pictures with #dropspattern #paulinasweater or submit them to the #dropsfan gallery. Do you need help with this pattern?You'll find 12 tutorial videos, a Comments/Questions area and more by visiting the pattern on garnstudio.com. © 1982-2026 DROPS Design A/S. We reserve all rights. This document, including all its sub-sections, has copyrights. Read more about what you can do with our patterns at the bottom of each pattern on our site. |
|||||||


With over 40 years in knitting and crochet design, DROPS Design offers one of the most extensive collections of free patterns on the internet - translated to 17 languages. As of today we count 324 catalogues and 12290 patterns translated into English (UK/cm).
We work hard to bring you the best knitting and crochet have to offer, inspiration and advice as well as great quality yarns at incredible prices! Would you like to use our patterns for other than personal use? You can read what you are allowed to do in the Copyright text at the bottom of all our patterns. Happy crafting!
Post a comment to pattern DROPS Children 23-7
We would love to hear what you have to say about this pattern!
If you want to leave a question, please make sure you select the correct category in the form below, to speed up the answering process. Required fields are marked *.