
Popular categories
Looking for a yarn?


Comments / Questions (207)
![]() Tulla wrote:
Tulla wrote:
Hei, kan denne jakken strikkes med merino extra fine - garnet med pinne 3,5? Hvor mye større vil jakken bli? Skal strikke til en på 5 1/2 år.
29.09.2013 - 00:54DROPS Design answered:
Hej Tulla. Det kan vi desvaerre ikke lige svare paa. Men strik en pröve 10x10 cm med pind 3.5 og maal strikkefastheden. Naar du ved den kan du beregne hvor meget större din model bliver.
01.10.2013 - 14:02
![]() Fianna wrote:
Fianna wrote:
Habe diese Weste gestrickt, nach leichten Startschwierigkeiten hat es super geklappt. Sie sieht sehr süß aus.
07.07.2013 - 20:59
![]() Fianna wrote:
Fianna wrote:
Ich sollte noch dazu sagen das ich die Größe 110/116 stricken möchte.
06.06.2013 - 07:04
![]() Fianna1 wrote:
Fianna1 wrote:
Hallo zusammen, ich bräuchte mal Hilfe. Zwischen welchen Maschen platziere ich die Makierungsring? Habe noch nicht wirklich den Durchblick. Freue mich über baldige Antwort :-). Danke schon mal. fianna
05.06.2013 - 19:29DROPS Design answered:
Liebe Fianna, die Markierungen braucht man in dieser Anleitung um die Höhe zu markieren, es kommt also nicht darauf an, in welcher Masche sie platziert wird (aber in welcher Reihe).
07.06.2013 - 07:43
![]() Enni wrote:
Enni wrote:
Hei, en ymmärrä kaaviota, tuossa sanotaan, että vain oikeat kerrokset näkyvät kaaviossa. Kuitenkin ohjevideossa nurjalla puolella neulotaa myös kaaviota, vasemmalta oikealle?! Ja jos x tarkoittaa oikealla puolella neulotaan nurjaa ja nurjalla oikeata niin mitenkä tämä jos kerta kaaviota kuitenkin luetaan molemmin puolin. En tosiaankaan ymmärrä mitään. :D Kiitos etukäteen avusta!
14.05.2013 - 19:20DROPS Design answered:
Hei, ohjeessa lukee, että piirros näyttää mallineuletta oikealta puolelta katsottuna. Eli piirroksessa on sekä oikean että nurjan puolen kerrokset, mutta näet nurjan puolen kerrokset oikealta puolelta katsottuna.
17.05.2013 - 13:09
![]() Doris Luksic wrote:
Doris Luksic wrote:
Ab hier kann ich die Anleitung nicht verstehen: Danach wie folgt: 41-45-52 (60-65) M. immer re., M1 (= 23 M.), 6-8-11 (13-16) M. immer re. GLEICHZEITIG wie folgt die verkürzten Reihen stricken –
30.03.2013 - 15:46DROPS Design answered:
Liebe Doris, haben Sie den Video gesehen, auf den in der vorangehenden Antwort verwiesen wird?
05.04.2013 - 09:03
![]() Sylvia wrote:
Sylvia wrote:
Wie stricke ich die umschläge im muster? links oder rechts?
25.03.2013 - 09:11DROPS Design answered:
Hallo Sylvia, die Umschläge werden so gestrickt wie in der Legende zum Diagramm beschrieben (das Symbol in der Reihe über dem Umschlag). Beim mittleren Motiv ist das z.B. immer links in der Rück-R.
26.03.2013 - 08:48
![]() Sylvia wrote:
Sylvia wrote:
Ich verstehe den stricktipp nicht. es steht 50 maschen stricken(hier dreht man nach den ersten 5 maschen im muster).wie ist das gemeint?soll ich die 50 die ich benötige oder nur die 5 maschen stricken?was passsiert mit dem rest?
23.03.2013 - 09:05DROPS Design answered:
Liebe Sylvia, im Stricktipp steht nur, dass man den Faden fest anziehen soll, damit kein Loch entsteht. Meinten Sie etwas anderes?
25.03.2013 - 09:32
![]() Caterina wrote:
Caterina wrote:
Per semplificare la lavorazione vi consiglio di di fare il secondo giro ferri PRIMA del diagramma così lo seguite sempre per intero.il resto rimane invariato
18.02.2013 - 16:48
![]() Regenfrau wrote:
Regenfrau wrote:
Bei Baby drops 20/14 dreht man wegen der verkürzten Reihen im Muster nach der 5. Masche. Wie stricke ich aber dieses Muster, wenn ich da ständig hin und her drehen muss? Kann mir da jemand helfen? Gruß Regenfrau
05.02.2013 - 20:25DROPS Design answered:
Liebe Regenfrau, bitte schauen Sie den Video an (link ist unter der Anleitung), den wir dazu gemacht machen: Wenden im Diagramm.
06.02.2013 - 09:48
|
||||||||||||||||||||||
Nova#novajacket |
||||||||||||||||||||||
 |
 |
|||||||||||||||||||||
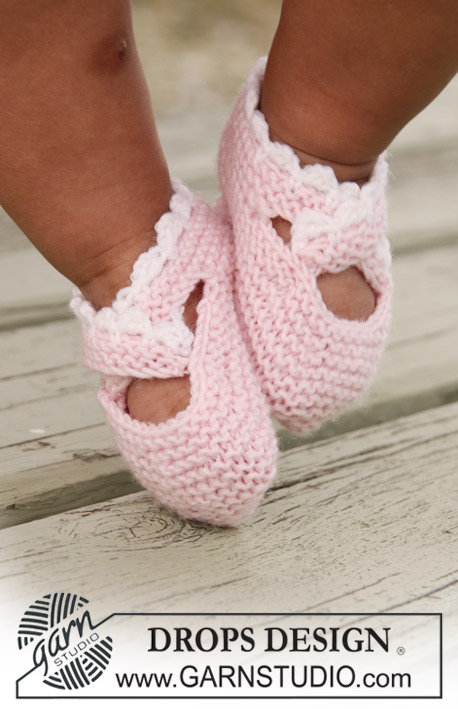
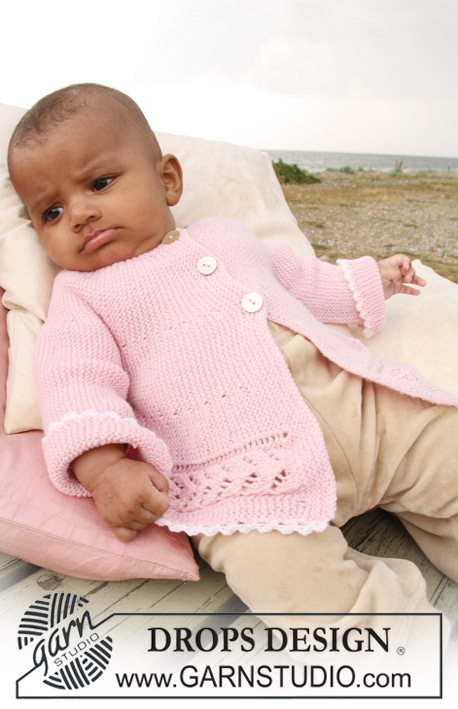
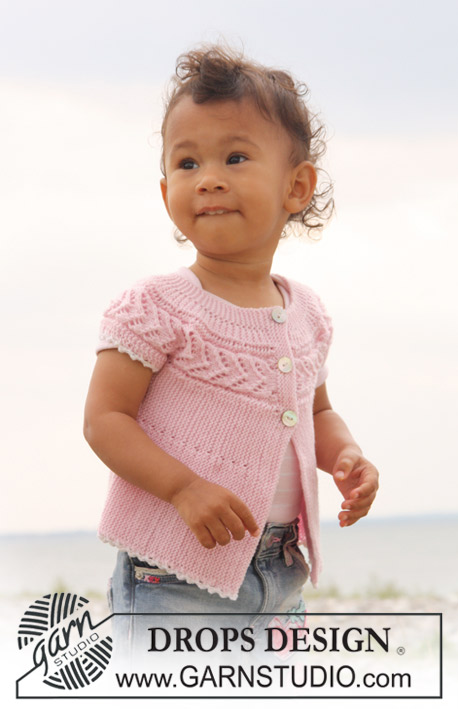
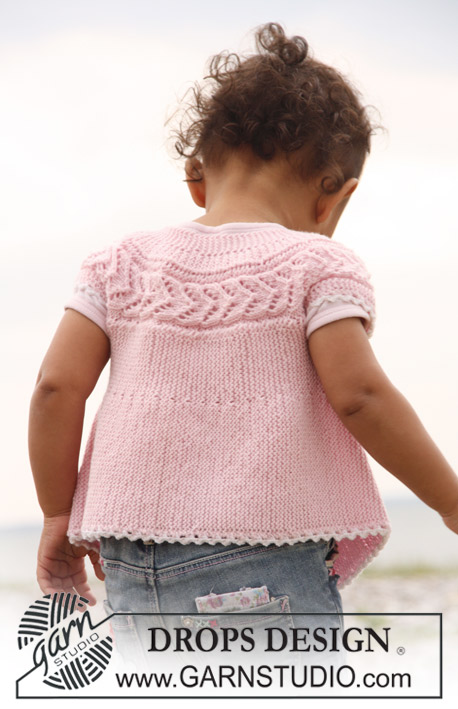
Short sleeve cardigan knitted from side to side in garter st and lace pattern for baby and children in DROPS BabyMerino
DROPS Baby 20-14 |
||||||||||||||||||||||
|
SLEEVELESS TOP: PATTERN: See diagram M.1. Diagram shows the pattern from RS. KNITTING TIP: When turning mid piece, slip first st as if to K, tighten thread and work return row in order to avoid a hole in transition. -------------------------------------------------------- -------------------------------------------------------- SLEEVELESS TOP: Beg on left front piece and work towards the armhole, work wide shoulder, work back piece, the other shoulder and then right front piece. LOOSELY cast on 62-68-78 (88-96) sts on needle size 2.5 mm with light pink and K 8 rows for front band (first row = RS). Work next row as follows from RS: K 41-45-52 (60-65) sts, K the next 15 sts AT THE SAME TIME inc 8 sts evenly (inc 1 st by making 1 YO), K the last 6-8-11 (13-16) sts = 70-76-86 (96-104) sts. K 1 row on all sts (work YO into back of loop to avoid a hole). Continue as follows: K 41-45-52 (60-65) sts (K these sts on all rows), chart M.1 (= 23 sts), K 6-8-11 (13-16) sts (K these sts on all rows). AT THE SAME TIME work shortened rows as follows - SEE KNITTING TIP: * work the first 30-32-38 (42-47) sts, turn piece and work return row, work the first 46-50-57 (65-70) sts, turn (for all sizes this will be after 5 sts in M.1) and work return row, work the first 64-70-80 (90-98) sts, turn and work return row, work all 70-76-86 (96-104) sts, turn and work return row *, repeat from *-* until piece measures approx 16-18-19 (20,5-22) cm from cast on row, measured where widest (= bottom edge). Cut the thread. Now slip the first 41-45-52 (60-65) sts towards bottom edge on a stitch holder (= the side) = 29-31-34 (36-39) sts left on needle for wide shoulder. Continue with shortened rows as follows (first row = from RS): * Work in pattern on the first 23-25-28 (30-33) sts, turn and work return row, work in pattern on all 29-31-34 (36-39) sts, turn and work return row *, repeat from *-* until piece measures 16-17-18 (18-20) cm from where sts were put on stitch holder. Cut the thread. Slip the 41-45-52 (60-65) sts from stitch holder at the side back on needle for back piece and insert a marker in piece. Continue from bottom edge of jacket (first row = RS) in pattern and with shortened rows as described for front piece. When piece measures 28-31-35 (37-40) cm from marker at the side, measured where widest (= bottom edge) cut the thread. Slip the first 41-45-52 (60-65) sts from bottom edge on a stitch holder (= the side). Continue on remaining sts for wide shoulder as described for the first shoulder until shoulders are the same length. Cut the thread. Slip the 41-45-52 (60-65) sts from stitch holder at the side back on needle and continue as described for the other front piece. When right front piece is the same length as left front piece (without front band) work next row from RS as follows: work 41-45-52 (60-65) sts, work the next 23 sts AT THE SAME TIME dec 8 sts evenly (dec by K2 tog), work the last 6-8-11 (13-16) sts = 62-68-78 (88-96) sts. Now work front band as follows: K 3 rows on all sts. On next row from RS make 3 buttonholes as follows (i.e. from bottom edge towards the top): K 41-45-53 (61-65) sts, 1 YO, K2 tog, K 7-8-9 (10-12) sts, 1 YO, K2 tog, K 7-8-9 (10-12) sts, 1 YO, K2 tog and finish with K1. Turn and K all sts. K 5 rows on all sts and cast off loosely. CROCHET BORDER: Crochet a border round bottom edge of jacket and round shoulder edges with crochet hook size 3 mm with white as follows: 1 dc, * 3 ch, 1 tr in the first of the 3 ch, skip approx 1 cm, 1 dc *, repeat from *-*. Cut and fasten thread. ASSEMBLY: Sew on buttons. |
||||||||||||||||||||||
Diagram explanations |
||||||||||||||||||||||
|
||||||||||||||||||||||
 |
||||||||||||||||||||||
Have you finished this pattern?Tag your pictures with #dropspattern #novajacket or submit them to the #dropsfan gallery. Do you need help with this pattern?You'll find 16 tutorial videos, a Comments/Questions area and more by visiting the pattern on garnstudio.com. © 1982-2026 DROPS Design A/S. We reserve all rights. This document, including all its sub-sections, has copyrights. Read more about what you can do with our patterns at the bottom of each pattern on our site. |
||||||||||||||||||||||


With over 40 years in knitting and crochet design, DROPS Design offers one of the most extensive collections of free patterns on the internet - translated to 17 languages. As of today we count 325 catalogues and 12298 patterns translated into English (UK/cm).
We work hard to bring you the best knitting and crochet have to offer, inspiration and advice as well as great quality yarns at incredible prices! Would you like to use our patterns for other than personal use? You can read what you are allowed to do in the Copyright text at the bottom of all our patterns. Happy crafting!
Post a comment to pattern DROPS Baby 20-14
We would love to hear what you have to say about this pattern!
If you want to leave a question, please make sure you select the correct category in the form below, to speed up the answering process. Required fields are marked *.