
Popular categories
Looking for a yarn?


Comments / Questions (207)
![]() Sylvette wrote:
Sylvette wrote:
Merciiii...j'ai reussi à coordonner le dessin et les rangs raccourcis.J'arrive où il faut couper le fil et separer le travail...les 34 mailles (86/92)restantes se tricotent a l'endroit? Ce sont bien les mailles du motif?? merci infiniment pour votre aide. C'est top!!!
21.04.2015 - 08:54DROPS Design answered:
Bonjour Sylvette, Coupez le fil après un rang sur l'envers et glissez les 52 premières m du bas en attente. Continuez maintenant sur l'endroit sur les 34 m du haut (= fin du rang sur l'endroit) en continuant le motif avec les nouveaux rangs raccourcis. Bon tricot!
21.04.2015 - 09:05
![]() Sylvette wrote:
Sylvette wrote:
Merciiii...j'ai reussi à coordonner le dessin et les rangs raccourcis.J'arrive où il faut couper le fil et separer le travail...les 34 mailles (86/92)restantes se tricotent a l'endroit? Ce sont bien les mailles du motif?? merci infiniment pour votre aide. C'est top!!!
20.04.2015 - 17:59DROPS Design answered:
Bonjour Sylvette, effectivement les 34 m pour la manche sont celles du haut (= avec le motif) et continuez en rangs raccourcis sur ces 34 m (2 rangs sur 28 m, 2 rangs sur 34 m). Bon tricot!
20.04.2015 - 18:18
![]() Cosandey Sylvette wrote:
Cosandey Sylvette wrote:
J'ai regardé la vidéo: je comprends le système des rangs raccourcis. Nous avons 86 mailles. A un moment il faut en tricoter 57, donc les 5 1eres du motif, ( 1er et 2eme rang de celui ci). Lorsque ensuite je tricote 80 mailles comment suivre ce motif puisque je suis décalée.. : j'en ai deja tricoté 2 rangs sur 5 mailles... merci de m'aider si c'est possible...
18.04.2015 - 23:31DROPS Design answered:
Bonjour Mme Cosandey, les 2 premiers rangs sur les 5 premières m de M1 se répètent tout le long du diagramme, ainsi, quand vous tricotez les 80 m, tricotez les 5 premières m comme dans le diagramme, puis les mailles suivantes en suivant le 1er rang de M1. Au rang suivant, tricotez les mailles comme au 2ème rang de M1 (ceci pour la 1ère fois où l'on tricote les rangs raccourcis). Bon tricot!
20.04.2015 - 09:23
![]() Marjo wrote:
Marjo wrote:
De maten die in het Nederlandse patroon worden opgegeven, wijken volledig af van de maten in het Noors of Engels. Er staat bijv. in het Nederlandse patroon dat de grootste maat voor 3/4 jaar is (mt. 98/104). Maar in het Noorse/Engelse patroon staat 5/6 jaar (mt. 110-116). Dat is een fors verschil. Hoe kan ik weten welke patroon de juiste maten opgeeft?
16.04.2015 - 14:55DROPS Design answered:
Hoi Marjo. Het was een fout in de Nederlandse vertaling. Het is nu aangepast.
16.04.2015 - 15:37
![]() Jette Nybro Kristiansen wrote:
Jette Nybro Kristiansen wrote:
Vil det så sige, at man strikker 1. pind i diagrammet samtidig med pind 3 i vendepindene?
08.04.2015 - 12:28DROPS Design answered:
Hej Jette. Ja, du vender efter den 5e maske i diagrammet. Det betyder at du strikker de förste 5 masker af diagrammet oftere end resten. Men det er samme maade du skal strikke ret og vrang hver gang, saa du behöver ikke holde öje med hvilken pind du er i med de förste 5 masker i forhold til resten.
08.04.2015 - 15:28
![]() Davesne wrote:
Davesne wrote:
J'adore ce petit modèle mais même avec la vidéo je ne comprend pas comment on peux faire des rangs raccourcis sur le motif !je renonce dommage il est jolis mais les explications sont trop confuses
01.04.2015 - 13:26DROPS Design answered:
Bonjour Mme Davesne, pour toute assistance à la réalisation d'un modèle, rappelez-vous que vous pouvez vous adresser à votre magasin ou au forum DROPS. Bon tricot!
01.04.2015 - 16:42
![]() Marit Hugøy,Landingsveien132 Oslo wrote:
Marit Hugøy,Landingsveien132 Oslo wrote:
Når man skal snu midt i mønsteret skal man da også ta av første maske og hva da med kast? Syns det er veldig forvirrende.
15.03.2015 - 15:41DROPS Design answered:
Hej Marit, Se den video vi henviser til flere gange længere nede under kommentarer, her ser du nøjagtig hvordan vi har gjort. God fornøjelse!
21.05.2015 - 10:28
![]() Doreen Husen wrote:
Doreen Husen wrote:
Hallo, wie füge ich das Muster in die verkürzten mit ein? Es sieht bei mir ganz anders aus.
10.03.2015 - 22:15DROPS Design answered:
Sie stricken das Muster nach Diagramm. Es sind alle R des Musters eingezeichnet, Hin- und Rück. Bei den ersten 5 M und den letzten 5 M wird auch in der Rück-R gemustert. Die ersten 5 M des Musters werden in jedem Rapport der verkürzten R 1x zusätzlich in der Höhe gestrickt (denn Sie wenden ja nach diesen 5 M). Die ersten 5 M des Musters haben ja sozusagen einen Rapport von 2 R, daher passt das in die verkürzten R. Wenn es der Vorstellungskraft hilft, tun Sie einfach so, als hätten Sie 2 verschiedene Diagramme - die ersten 5 M von M.1 als ein gesondertes Muster, dann die restlichen M von M.1 als nächstes Muster.
11.03.2015 - 09:54
![]() Nelly Søgaard wrote:
Nelly Søgaard wrote:
Er det rigtig at første pind, er strik 38 masker. Vender. Næste pind 5 m ind ii mønsteret, vend. Næste pind hele mønsteret vend, og strik tilbage og næste pind strikkes helt. Ok men starter man magen til i næste halvdel af mønstret. Mangler at videoen strikkene hele mønsteret, så derfor er jeg i tvivl. Mvh Nelly
22.01.2015 - 20:44DROPS Design answered:
Hej Nelly. Ja, i anden omgang strikker du 5 masker ind i diagrammet för du vender. Dvs, du vil komme til at strikke disse 5 masker oftere en resten af maskerne i diagrammet, men da det hele tiden er det samme paa retten og vrangen, saa er det ret nemt naar man först er kommet igang (det er ogsaa at se i videoen). God fornöjelse med den.
23.01.2015 - 16:10
![]() Nelly Søgaard wrote:
Nelly Søgaard wrote:
BabyDROPS 20-14 M1 Digram ? 2 sidste linje er der ikke en fejl i midten, jeg mangler en maske eller hvordan tager man 2 masker sammen 2 gange over 3 masker. Mvh Nelly
21.01.2015 - 11:51DROPS Design answered:
Hej Nelly. Det er ikke forkert. Du starter med at tage 1 maske löst af, saa strikker du de naeste 2 m ret sammen og löfter efterfölgende den löse maske over de sammenstrikkede 2 masker: 1 maske tilbage.
21.01.2015 - 15:25
|
||||||||||||||||||||||
Nova#novajacket |
||||||||||||||||||||||
 |
 |
|||||||||||||||||||||
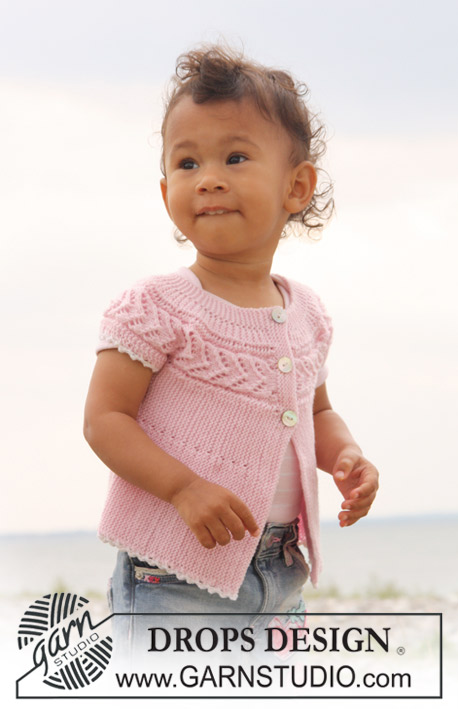
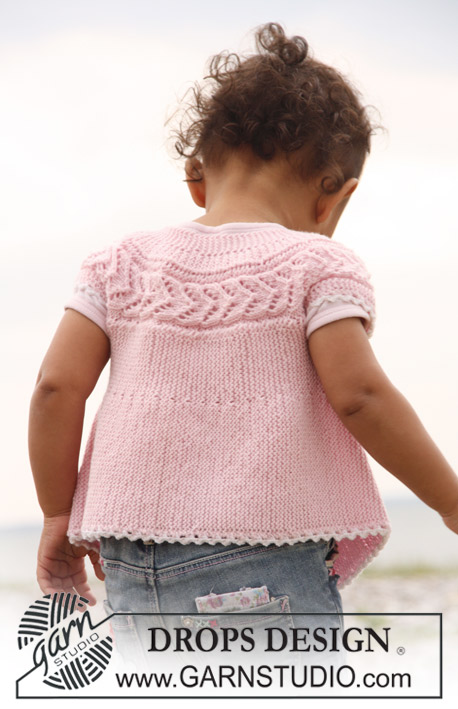
Short sleeve cardigan knitted from side to side in garter st and lace pattern for baby and children in DROPS BabyMerino
DROPS Baby 20-14 |
||||||||||||||||||||||
|
SLEEVELESS TOP: PATTERN: See diagram M.1. Diagram shows the pattern from RS. KNITTING TIP: When turning mid piece, slip first st as if to K, tighten thread and work return row in order to avoid a hole in transition. -------------------------------------------------------- -------------------------------------------------------- SLEEVELESS TOP: Beg on left front piece and work towards the armhole, work wide shoulder, work back piece, the other shoulder and then right front piece. LOOSELY cast on 62-68-78 (88-96) sts on needle size 2.5 mm with light pink and K 8 rows for front band (first row = RS). Work next row as follows from RS: K 41-45-52 (60-65) sts, K the next 15 sts AT THE SAME TIME inc 8 sts evenly (inc 1 st by making 1 YO), K the last 6-8-11 (13-16) sts = 70-76-86 (96-104) sts. K 1 row on all sts (work YO into back of loop to avoid a hole). Continue as follows: K 41-45-52 (60-65) sts (K these sts on all rows), chart M.1 (= 23 sts), K 6-8-11 (13-16) sts (K these sts on all rows). AT THE SAME TIME work shortened rows as follows - SEE KNITTING TIP: * work the first 30-32-38 (42-47) sts, turn piece and work return row, work the first 46-50-57 (65-70) sts, turn (for all sizes this will be after 5 sts in M.1) and work return row, work the first 64-70-80 (90-98) sts, turn and work return row, work all 70-76-86 (96-104) sts, turn and work return row *, repeat from *-* until piece measures approx 16-18-19 (20,5-22) cm from cast on row, measured where widest (= bottom edge). Cut the thread. Now slip the first 41-45-52 (60-65) sts towards bottom edge on a stitch holder (= the side) = 29-31-34 (36-39) sts left on needle for wide shoulder. Continue with shortened rows as follows (first row = from RS): * Work in pattern on the first 23-25-28 (30-33) sts, turn and work return row, work in pattern on all 29-31-34 (36-39) sts, turn and work return row *, repeat from *-* until piece measures 16-17-18 (18-20) cm from where sts were put on stitch holder. Cut the thread. Slip the 41-45-52 (60-65) sts from stitch holder at the side back on needle for back piece and insert a marker in piece. Continue from bottom edge of jacket (first row = RS) in pattern and with shortened rows as described for front piece. When piece measures 28-31-35 (37-40) cm from marker at the side, measured where widest (= bottom edge) cut the thread. Slip the first 41-45-52 (60-65) sts from bottom edge on a stitch holder (= the side). Continue on remaining sts for wide shoulder as described for the first shoulder until shoulders are the same length. Cut the thread. Slip the 41-45-52 (60-65) sts from stitch holder at the side back on needle and continue as described for the other front piece. When right front piece is the same length as left front piece (without front band) work next row from RS as follows: work 41-45-52 (60-65) sts, work the next 23 sts AT THE SAME TIME dec 8 sts evenly (dec by K2 tog), work the last 6-8-11 (13-16) sts = 62-68-78 (88-96) sts. Now work front band as follows: K 3 rows on all sts. On next row from RS make 3 buttonholes as follows (i.e. from bottom edge towards the top): K 41-45-53 (61-65) sts, 1 YO, K2 tog, K 7-8-9 (10-12) sts, 1 YO, K2 tog, K 7-8-9 (10-12) sts, 1 YO, K2 tog and finish with K1. Turn and K all sts. K 5 rows on all sts and cast off loosely. CROCHET BORDER: Crochet a border round bottom edge of jacket and round shoulder edges with crochet hook size 3 mm with white as follows: 1 dc, * 3 ch, 1 tr in the first of the 3 ch, skip approx 1 cm, 1 dc *, repeat from *-*. Cut and fasten thread. ASSEMBLY: Sew on buttons. |
||||||||||||||||||||||
Diagram explanations |
||||||||||||||||||||||
|
||||||||||||||||||||||
 |
||||||||||||||||||||||
Have you finished this pattern?Tag your pictures with #dropspattern #novajacket or submit them to the #dropsfan gallery. Do you need help with this pattern?You'll find 16 tutorial videos, a Comments/Questions area and more by visiting the pattern on garnstudio.com. © 1982-2026 DROPS Design A/S. We reserve all rights. This document, including all its sub-sections, has copyrights. Read more about what you can do with our patterns at the bottom of each pattern on our site. |
||||||||||||||||||||||


With over 40 years in knitting and crochet design, DROPS Design offers one of the most extensive collections of free patterns on the internet - translated to 17 languages. As of today we count 325 catalogues and 12298 patterns translated into English (UK/cm).
We work hard to bring you the best knitting and crochet have to offer, inspiration and advice as well as great quality yarns at incredible prices! Would you like to use our patterns for other than personal use? You can read what you are allowed to do in the Copyright text at the bottom of all our patterns. Happy crafting!
Post a comment to pattern DROPS Baby 20-14
We would love to hear what you have to say about this pattern!
If you want to leave a question, please make sure you select the correct category in the form below, to speed up the answering process. Required fields are marked *.