DROPS Children 49 · Lots of new kid designs!
Product image DROPS Baby Merino yarn
DROPS Baby Merino
100% Wool
from 3.50 £ /50g
Get the yarn to make this pattern from 10.50£.

The yarn cost is calculated from the pattern’s smallest size and the yarn’s cheapest product type. Looking for an even better price? You might find it on the DROPS Deals!

DROPS AW2425

Nova

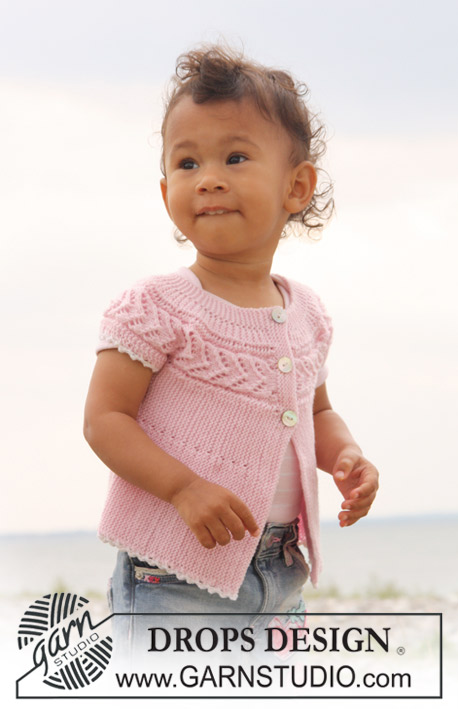
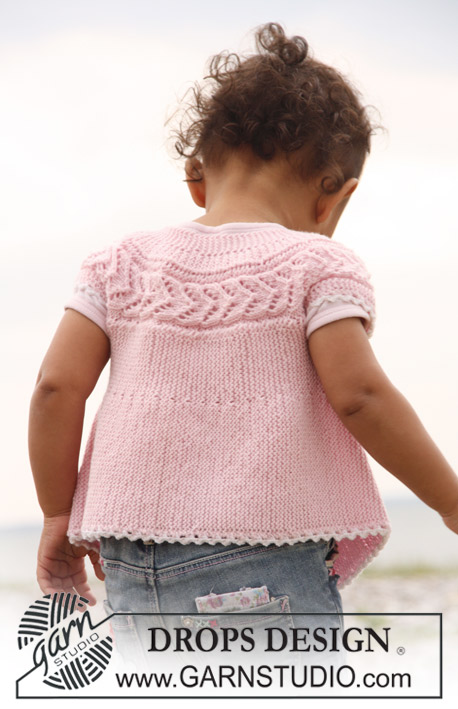
Short sleeve cardigan knitted from side to side in garter st and lace pattern for baby and children in DROPS BabyMerino

DROPS Baby 20-14

#novajacket

DROPS design: Pattern no BM-005-by
--------------------------------------------------------
Size: 6/9-12/18-24 months (3/4-5/6) years
Size in cm: 62/68 - 74/80 - 86/92 (98/104 -110/116)

Materials: DROPS BABY MERINO from Garnstudio
100-150-150 (150-200) g colour no 05, light pink
50 g for all sizes colour no 01, white

DROPS POINTED NEEDLES size 2.5 mm - or size needed to get 26 sts x 51 rows in garter st = 10 x 10 cm.
DROPS CROCHET HOOK size 3 mm – for crochet borders.

DROPS MOTHER OF PEARL BUTTONS, no 521: 3 pcs.

-------------------------------------------------------

Alternative Yarn – See how to change yarns here
Yarn Groups A to F – Use the same pattern and change the yarn here
Yarn usage using an alternative yarn – Use our yarn converter here

-------------------------------------------------------

You might also like...

Product image DROPS Baby Merino
DROPS Baby Merino
100% Wool
from 3.50 £ /50g
Get the yarn to make this pattern from 10.50£.

The yarn cost is calculated from the pattern’s smallest size and the yarn’s cheapest product type. Looking for an even better price? You might find it on the DROPS Deals!

Pattern instructions

NOTE: This pattern is written in British English. All measurements in charts are in cm. Convert from cm to inches here. There are different terms for crocheting in British and American English. If this pattern includes crochet, convert "crochet terms" here. See this pattern in American English here..
SLEEVELESS TOP:

PATTERN: See diagram M.1. Diagram shows the pattern from RS.

KNITTING TIP: When turning mid piece, slip first st as if to K, tighten thread and work return row in order to avoid a hole in transition.
--------------------------------------------------------
--------------------------------------------------------

SLEEVELESS TOP:
Beg on left front piece and work towards the armhole, work wide shoulder, work back piece, the other shoulder and then right front piece.

LOOSELY cast on 62-68-78 (88-96) sts on needle size 2.5 mm with light pink and K 8 rows for front band (first row = RS).
Work next row as follows from RS: K 41-45-52 (60-65) sts, K the next 15 sts AT THE SAME TIME inc 8 sts evenly (inc 1 st by making 1 YO), K the last 6-8-11 (13-16) sts = 70-76-86 (96-104) sts. K 1 row on all sts (work YO into back of loop to avoid a hole).
Continue as follows: K 41-45-52 (60-65) sts (K these sts on all rows), chart M.1 (= 23 sts), K 6-8-11 (13-16) sts (K these sts on all rows).
AT THE SAME TIME work shortened rows as follows - SEE KNITTING TIP:
* work the first 30-32-38 (42-47) sts, turn piece and work return row, work the first 46-50-57 (65-70) sts, turn (for all sizes this will be after 5 sts in M.1) and work return row, work the first 64-70-80 (90-98) sts, turn and work return row, work all 70-76-86 (96-104) sts, turn and work return row *, repeat from *-* until piece measures approx 16-18-19 (20,5-22) cm from cast on row, measured where widest (= bottom edge).
Cut the thread.

Now slip the first 41-45-52 (60-65) sts towards bottom edge on a stitch holder (= the side) = 29-31-34 (36-39) sts left on needle for wide shoulder.
Continue with shortened rows as follows (first row = from RS): * Work in pattern on the first 23-25-28 (30-33) sts, turn and work return row, work in pattern on all 29-31-34 (36-39) sts, turn and work return row *, repeat from *-* until piece measures 16-17-18 (18-20) cm from where sts were put on stitch holder. Cut the thread. Slip the 41-45-52 (60-65) sts from stitch holder at the side back on needle for back piece and insert a marker in piece. Continue from bottom edge of jacket (first row = RS) in pattern and with shortened rows as described for front piece.
When piece measures 28-31-35 (37-40) cm from marker at the side, measured where widest (= bottom edge) cut the thread. Slip the first 41-45-52 (60-65) sts from bottom edge on a stitch holder (= the side). Continue on remaining sts for wide shoulder as described for the first shoulder until shoulders are the same length. Cut the thread. Slip the 41-45-52 (60-65) sts from stitch holder at the side back on needle and continue as described for the other front piece. When right front piece is the same length as left front piece (without front band) work next row from RS as follows:
work 41-45-52 (60-65) sts, work the next 23 sts AT THE SAME TIME dec 8 sts evenly (dec by K2 tog), work the last 6-8-11 (13-16) sts = 62-68-78 (88-96) sts.
Now work front band as follows: K 3 rows on all sts.
On next row from RS make 3 buttonholes as follows (i.e. from bottom edge towards the top): K 41-45-53 (61-65) sts, 1 YO, K2 tog, K 7-8-9 (10-12) sts, 1 YO, K2 tog, K 7-8-9 (10-12) sts, 1 YO, K2 tog and finish with K1. Turn and K all sts. K 5 rows on all sts and cast off loosely.

CROCHET BORDER:
Crochet a border round bottom edge of jacket and round shoulder edges with crochet hook size 3 mm with white as follows: 1 dc, * 3 ch, 1 tr in the first of the 3 ch, skip approx 1 cm, 1 dc *, repeat from *-*. Cut and fasten thread.

ASSEMBLY:
Sew on buttons.

This pattern has been corrected.

Updated online: 21.01.2011
VEST:... * work the first 30-32-38 (42-47) sts, turn piece and work return row, work the first 46-50-57 (65-70) sts, turn (for all sizes this will be after 5 sts in M.1) and work return row,...
Updated online: 26.10.2011
Materials: DROPS BABY MERINO from Garnstudio
100-150-150 (150-200) g colour no 05, light pink

Diagram

K from RS, P from WS = K from RS, P from WS
P from RS, K from WS = P from RS, K from WS
K2 tog = K2 tog
slip 1 st as if to K, K1, psso = slip 1 st as if to K, K1, psso
K2 tog into back of loop = K2 tog into back of loop
slip 1 st as if to K, K2 tog, psso<br />
= slip 1 st as if to K, K2 tog, psso
1 YO between 2 sts = 1 YO between 2 sts
Diagram for DROPS Baby 20-14
Do you have a question? See a list of frequently asked questions (FAQ)

Knitting tension is what determines the final measurements of your work, and is usually measured per 10 x 10 cm. It is provided like so: number of stitches in width x number of rows in height - eg: 19 stitches x 26 rows = 10 x 10 cm.

The knitting tension is very individual; some people knit/crochet loosely while others work tightly. You adjust the knitting tension with the needle size, which is why the suggested needle size is only meant as a guide! You need to adjust this (up or down) to ensure that YOUR knitting tension matches the knitting tension provided in the pattern. If you work with a different knitting tension than provided you will have a different yarn consumption, and your work will have different measurements than what the pattern suggests.

The knitting tension also determines which yarns can replace each other. As long as you achieve the same knitting tension you can replace one yarn with another.

See DROPS lesson: How to measure your tension/gauge

See DROPS video: How to make a gauge tension swatch

The required amount of yarn is provided in grams, eg: 450 g. To calculate how many balls you’ll need you first need to know how many grams are in 1 ball (25g, 50g or 100g). This information is available if you click on the individual yarn quality on our pages. Divide the amount required with the amount of each ball. For example, if each ball is 50g (the most common amount), the calculation will be as follows: 450 / 50 = 9 balls.

The important thing when changing from one yarn to another is that the knitting/crochet tension remains the same. This is so that the measurements of the finished piece will be the same as on the sketch provided. It is easier to achieve the same knitting tension using yarns from the same yarn group. It is also possible to work with multiple strands of a thinner yarn to achieve the knitting tension of a thicker one. Please try our yarn converter. We recommend you to always work a test swatch.

Please NOTE: when changing yarn the garment might have a different look and feel to the garment in the photo, due to individual properties and qualities of each yarn.

See DROPS lesson: Can I use a different yarn than the one mentioned in the pattern?

All our yarns are categorised into yarn groups (from A to F) according to thickness and knitting tension – group A contains the thinnest yarns and group F the thickest. This makes it easier for you to find alternative yarns to our patterns, should you wish to switch yarn. All yarns within the same group have a similar knitting tension and can easily replace each other. However, different yarn qualities have different structures and properties which will give the finished work a unique look and feel.

Click here for an overview of the yarns in each yarn group

At the top of all our patterns you’ll find a link to our yarn calculator, which is a helpful tool should you wish to use a different yarn than suggested. By filling in the yarn quality you wish to replace, the amount (in your size) and number of strands, the calculator will present good alternative yarns with the same knitting tension. Additionally it will tell you how much you’ll require in the new qualities and whether you’ll need to work with multiple strands. Most skeins are 50g (some are 25g or 100g).

If the pattern is worked with multiple colours, every colour will have to be calculated separately. Similarly, if the pattern is worked with several strands of different yarns (for example 1 strand Alpaca and 1 strand Kid-Silk) you will have to find alternatives for each, individually.

Click here to see our yarn calculator

Since different yarns have different qualities and textures we have chosen to keep the original yarn in our patterns. However, you can easily find options among our available qualities by using our yarn calculator, or simply pick a yarn from the same yarn group.

It is possible that some retailers still have discontinued yarns in stock, or that someone has a few skeins at home that they would like to find patterns for.

The yarn calculator will provide both alternative yarn as well as required amount in the new quality.

If you think it's hard to decide what size to make, it can be a good idea to measure a garment you own already and like the size of. Then you can pick the size by comparing those measures with the ones available in the pattern's size chart.

You'll find the size chart at the bottom of the pattern.

See DROPS lesson: How to read size chart

The needle size provided in the pattern serves only as a guide, the important thing is to follow the knitting tension. And since knitting tension is very individual, you will have to adjust the needle size to ensure that YOUR tension is the same as in the pattern – maybe you’ll have to adjust 1, or even 2 needle sizes, up or down to achieve the correct tension. For this, we recommend that you work test swatches.

Should you work with a different knitting tension than the one provided, the measurements of the finished garment might deviate from the measurement sketch.

See DROPS lesson: How to measure your tension/gauge

See DROPS video: How to make a tension/gauge swatch

Working a garment top-down provides more flexibility and room for personal adjustment. For example it is easier to try the garment on while working, as well as making adjustments to length of yoke and shoulder caps.

The instructions are carefully explaining every step, in the correct order. Diagrams are adjusted to the knitting direction and are worked as usual.

The diagram depicts all rows/rounds, and every stitch seen from the right side. It is read from bottom to top, from right to left. 1 square = 1 stitch.

When working back and forth, every other row is worked from the right side and every other row is worked from the wrong side. When working from the wrong side, the diagram will have to be worked reversed: from left to right, knit stitches are purled, purl stitches are knit etc.

When working in the round every round is worked from the right side and the diagram are worked from right to left on all rounds.

See DROPS lesson: How to read knitting diagrams

The diagram depicts all rows/rounds, and every stitch seen from the right side. It is worked from bottom to top, from right to left.

When working back and forth every other row is worked from the right side: from right to left and every other row is worked from the wrong side: from left to right.

When working in the round, every row in the diagram are worked from the right side, from right to left.

When working a circular diagram you start in the middle and work your way outwards, counter clockwise, row by row.

The rows usually start with a given number of chain stitches (equivalent to the height of the following stitch), this will either be depicted in the diagram or explained in the pattern.

See DROPS lesson: How to read crochet diagrams

Instructions for working several diagrams after each other on the same row/round, will often be written like so: “work A.1, A.2, A.3 a total of 0-0-2-3-4 times". This means you work A.1 once, then A.2 is worked once, and A.3 is repeated (in width) the number of times provided for your size – in this case like so: S = 0 times, M = 0 times, L=2 times, XL= 3 times and XXL = 4 times.

The diagrams are worked as usual: begin with the first row in A.1, then work the first row in A.2 etc.

See DROPS lesson: How to read knitting diagrams

See DROPS lesson: How to read crochet diagrams

The total width of the garment (from wrist-to-wrist) will be larger in the larger sizes, despite the actual sleeves being shorter. The larger sizes have longer sleeve caps and wider shoulders, so there will be a good fit in all sizes.

The measurement sketch/schematic drawing provides information regarding the full length of the garment. If it’s a jumper or a jacket the length is measured from the highest point on the shoulder closest to the neckline, and straight down to the bottom of the garment. It is NOT measured from the tip of shoulder. Similarly, the length of yoke is measured from the highest point on the shoulder and down to where yoke is split into body and sleeves.

On a jacket measures are never taken along bands, unless specifically stated. Always measure inside band stitches when measuring the length.

See DROPS lesson: How to read a schematic drawing

Diagrams are often repeated on the round or in height. 1 repeat is the diagram the way it appears in the pattern. If it says to work 5 repeats of A.1 in the round, then you work A.1 a total of 5 times after/next to each other in the round. If it says to work 2 repeats of A.1 vertically/in height you work the entire diagram once, then begin again at the start and work the entire diagram one more time.

Chain stitches are slightly narrower than other stitches and to avoid working the cast-on edge too tight, we simply chain more stitches to begin with. The stitch count will be adjusted on the following row to fit the pattern and measurement sketch.

The rib edge is more elastic and will contract slightly compared to, for example, stocking stitch. By increasing before the rib edge, you avoid a visible difference in width between the rib edge and the rest of the body.

It’s very easy to cast off too tightly, and by making yarn overs while casting off (and simultaneously casting these off) you avoid a too tight cast off edge.

See DROPS video: How to bind off with yarn overs (yo)

To achieve an even increase (or decrease) you can increase on, for example: every 3rd and 4th row alternately, like so: work 2 rows and increase on the 3rd row, work 3 rows and increase on the 4th. Repeat this until the increase is complete.

See DROPS lesson: Increase or decrease 1 st on every 3rd and 4th row alternately

Should you prefer to work in the round instead of back and forth, you may of course adjust the pattern. You’ll need to add steeks mid-front (usually 5 stitches), and follow the instructions. When you would normally turn and work from the wrong side, simply work across the steek and continue in the round. At the end you’ll cut the piece open, pick up stitches to work bands, and cover the cut edges.

See DROPS video: How to knit steeks and cut open

Should you prefer to work back and forth instead of in the round, you may of course adjust the pattern so you work the pieces separately and then assemble them at the end. Divide the stitches for the body in 2, add 1 edge stitch in each side (for sewing) and work the front and back pieces separately.

See DROPS lesson: Can I adapt a pattern for circular needles into straight needles?

Pattern repeats can vary slightly in the different sizes, in order to get the correct proportions. If you’re not working the exact same size as the garment in the photo, yours might deviate slightly. This has been carefully developed and adjusted so that the complete impression of the garment is the same in all sizes.

Make sure to follow instructions and diagrams for your size!

If you have found a pattern you like which is available in women’s size it’s not very difficult to convert it to men’s size. The biggest difference will be the length of sleeves and body. Start working on the women size that you think would fit across the chest. The additional length will be worked right before you cast off for the armhole/sleeve cap. If the pattern is worked top-down you can add the length right after the armhole or before the first decrease on sleeve.

Regarding additional yarn amount, this will depend on how much length you add, but it is better with a skein too many than too few.

All yarns will have excess fibres (from production) that might come off as lint or shedding. Brushed yarns (ie hairier yarns) have more of these loose, excess fibres, causing more shedding.

Shedding also depends on what is worn under or over the garment, and whether this pulls at the yarn fibres. It’s therefore not possible to guarantee that there will be no shedding

Below are some tips on how to get the best result when working with hairier yarns:

1. When the garment is finished (before you wash it) shake it vigorously so the looser hairs come off. NOTE: do NOT use a lint roller, brush or any method that pulls at the yarn.

2. Place the garment in a plastic bag and put it in your freezer - the temperature will cause the fibres to become less attached to each other, and excess fibres will come off easier.

3. Leave in the freezer for a few hours before taking it out and shaking it again.

4. Wash the garment according to the instructions on the yarn label.

Pilling is a natural process that happens to even the most exclusive of fibers. It's a natural sign of wear and tear that is hard to avoid, and that is most visible in high friction areas of your garment like a sweater's arms and cuffs.

You can make your garment look as new by removing the pilling, using a fabric comb or a pill/lint remover.

Still can't find the answer you need? Then scroll down and leave your question so one of our experts can try to help you. This will be done normally within 5 to 10 working days.
In the meantime, you can read the questions and answers that others have left to this pattern or join the DROPS Workshop on Facebook to get help from fellow knitters/crocheters!
Have you finished this pattern?
Tag your pictures with #dropspattern #novajacket or submit them to the #dropsfan gallery.

Post a comment to pattern DROPS Baby 20-14

We would love to hear what you have to say about this pattern!

If you want to leave a question, please make sure you select the correct category in the form below, to speed up the answering process. Required fields are marked *.

Comments / Questions (213)

country flag Lory wrote:

Bonjour, j'arrive à la fin du modèle et j'ai une question au sujet de la bordure. Vous dites pour grandeur 24 mois de tricoter sur l'endroit 52 m, 23m avec 8 diminution puis 11 m. Ensuite faire la bordure à partir du bas. Donc, dois-je revenir sur l'env jusqu'en bas ou je coupe le fil. Selon moi, je dois revenir mais ce n'est pas mentionné Merci

16.02.2025 - 17:29

DROPS Design answered:

Bonjour Lory, tricotez 1 rang sur l'envers après le rang de diminutions, ainsi, vous commencez la bordure devant à partir du bas, et sur l'endroit. Bon tricot!

17.02.2025 - 09:56

country flag Антонида wrote:

Здравствуйте! Помогите мне разобраться, в какой момент начинаются короткие ряды и как при этом вывязывать М1?

03.02.2025 - 17:24

DROPS Design answered:

Dear Антонида, I can only answer in English sorry - work the short rows as explained for the size worked, and work/continue M.1 as in diagram over the stitches worked, this means the first stitches will be worked more often than the lace pattern and last stitches, but it's okay as long as you continue the lace pattern without skipping rows. this video should help you to figure out how work both short rows and M.1. Happy knitting!

04.02.2025 - 08:48

country flag Margaretha Jonsson wrote:

Hur stickas aviga varv på mönsterdelen M1 23 m Är det aviga maskor ?

03.02.2025 - 08:55

DROPS Design answered:

Hej Margaretha. Det står förklarat vid varje ikon hur du stickar, den tomma rutan stickas t.ex. "rm från rätsidan, am från avigsidan". Mvh DROPS Design

04.02.2025 - 09:10

country flag Lory wrote:

Pouvez vous me confirmer si je suis correcte dans ma compréhension. Pour réaliser le motif M.1 une fois au complet, incluant les rangs raccourcis, je dois tricoter 16 rangs au total. (je compte les rangs endroits et envers) Merci encore de votre aide.

27.01.2025 - 21:09

DROPS Design answered:

Bonjour Lory, je ne suis pas bien sûre d'avoir compris vos calculs, lorsque vous tricotez le 2ème des rangs raccourcis, vous ne tricotez que les 5 premières mailles de M.1, mais lorsque vous tricotez les rangs 5 et 7 des rangs raccourcis (de *à*) vous tricotez toutes les mailles de M.1, ainsi, le point ajouré continue lorsque vous tricotez ces mailles. Regardez la vidéo, le principe des rangs raccourcis sera exactement le même, ce n'est que le nombre de mailles qui va changer. Bon tricot!

28.01.2025 - 10:04

country flag Lory wrote:

J'ai une question au sujet du moment de tourner pour le 5e rang. (Pour 12/18 mois). Il est écrit dans le texte de votre vidéo = 5e rang, on tourne au 4e marqueur et on tricote le rang suivant. Le marqueur est placé après le point fantaisie donc après 45+23=68 mailles. Dans les explications du modèle il est écrit pour (12/18 mois) =Tricoter les 70 premières mailles et tourner. Dois-je tourner à 68 ou 70 Merci de confirmer

27.01.2025 - 14:57

DROPS Design answered:

Bonjour Mme Lory, tricotez bien le nombre de mailles indiqué pour la taille choisie, la vidéo montre juste la technique, la façon de faire les rangs raccourcis tout en tricotant le diagramme. Bon tricot!

27.01.2025 - 17:58

country flag Lory wrote:

Me répondre en français s.v.p. Vous donnez une astuce quand on tourne l'ouvrage en cours de rang. Glisser la 1ere maille, etc. Est ce que l'on doit le faire même si on tourne dans la portion M.1 ou ça va modifier le motif. Je pense qu'il ne faut pas le faire mais pouvez vous confirmer Merci

24.01.2025 - 14:27

DROPS Design answered:

Bonjour Lory, retrouvez dans cette vidéo comment procéder pour tricoter les rangs raccourcis de ce modèle, avec l'astuce indiquée. Bon tricot!

27.01.2025 - 07:57

country flag Johanna Nilsson wrote:

När jag stickat 38 m, vänt och sticka tillbaka så kommer jag ju inte in i mönstret (eftersom det börjar först from maska 53). När jag därefter stickar 57 m så ska jag vända efter 5 maskor i mönstret. Frågan är då vilken rad i mönstret jag är på? Är jag på rad 1 eller 3? Ni har tidigare svarat att jag efter att ha vänt efter de 5 första maskorna ska fortsätta sticka vidare från rad 1 och från 6:e maskan?? Jag förstår inte den sista meningen.

21.01.2025 - 21:28

DROPS Design answered:

Hej Johanna, se videoen vi har lavet til denne søde lille trøje, den viser nøjagtig hvilke masker du skal strikke når du vender :)

24.01.2025 - 09:50

country flag Johanna Nilsson wrote:

Efter att jag stickat 52 räta m, 23 m M.1, 11 räta - hur ska jag SAMTIDIGT kunna sticka förkortade varv? Ska jag istället för att sticka 52 m sticka 38 m? Men hur ska jag då hålla reda på var jag är i mönstret? De förkortade varv som man stickar - ska man då inte följa mönstret i M.1? Videon är svår att följa då den inte har ljud och hon pekar bara på samma rader hela tiden. Hur kan jag få hjälp?

19.01.2025 - 09:23

DROPS Design answered:

Hei Johanna. Du strikker forkortede pinner samtidig som du stikker etter diagram M.1, så noter ned hver gang du strikker M. 1 hvor du er, så har du en bedre oversikt. Om du leser oppskriften og ser på videoen så vil du se at det ikke pekes på samme sted, men det pekes på hvor man er i oppskriften / hvor det skal strikkes i diagrammet når det strikkes forkortede pinner. Feks når det strikkes forkortede pinner 2. gang skal man strikke de 5 første maskene fra 3.rad, men så skal det strikkes videre og da fra 1. rad og fra 6. maske. mvh DROPS Design

20.01.2025 - 13:09

country flag Jette Nolsøe wrote:

Jeg er kommet til at jeg skal strikke over den første 50 m, i ( står der: her vender man efter de første 5 m i M1. Det forstår jeg ikke . Opskrift Nova børnebluse str 12-18 mdr.

14.10.2024 - 09:52

DROPS Design answered:

Hej Jette, klik på Videoer øverst i opskriften, den øverste video viser nøjagtig hvordan man gør :)

16.10.2024 - 15:15