
Popular categories
Looking for a yarn?


Comments / Questions (68)
![]() Anna Michailidis wrote:
Anna Michailidis wrote:
Hello, You state: "Diagram - All measurements in charts are in cm." The bust measurements are: 44cm - 48cm - 51cm etc. so in inches they are: 17 2/8" - 18" - 20 1/8" - etc. - correct? Thanks, Anna
05.05.2021 - 16:37DROPS Design answered:
Dear Anna, you are right, all the measurements on the schematic drawing are given in cm because they are made in Europe. A short google search will help you to change that into inches. Happy Knitting!
05.05.2021 - 20:21
![]() Janet wrote:
Janet wrote:
Body says 228 - 24 stitches =104, but directions say 102.
19.01.2021 - 16:42Janet answered:
Sorry please ignore my earlier question. My mistake.
19.01.2021 - 16:45
![]() Lone Kristensen wrote:
Lone Kristensen wrote:
Hej Jeg vil gerne strikke Witherspoon Moos men garn 7323 står som grågrøn. Når jeg søger den frem er det aquagrå. Er det det samme? Lone
29.12.2020 - 21:03DROPS Design answered:
Hej Lone, Farven er den sammen men den har fået nyt navn. Farverne ser ud som de gør i farvekortet. God fornøjelse!
07.01.2021 - 14:42
![]() Elisa Iso-Ahola-Ihamäki wrote:
Elisa Iso-Ahola-Ihamäki wrote:
I'd like this in finnish. It did not workshop out, when I tryed.
06.08.2020 - 09:47DROPS Design answered:
Dear Mrs Iso-Ahola-Ihamäki, click on the scroll down menu below foto and choose "suomi" - to get this pattern in finnish. Happy knitting!
06.08.2020 - 13:02
![]() Marlene wrote:
Marlene wrote:
Buenos días. Antes que nada me gustaría felicitarlos por los hermosos diseños que publican. Y quisiera consultar acerca de las agujas circulares que utilizan en la mayoría de las prendas y que no se consiguen facilmente en mi localidad. Hay alguna forma de adaptar los patrones para tejerlos con dos agujas? Gracias
04.06.2019 - 16:11DROPS Design answered:
Hola Marlene! Tiene que ver lección DROPS: AQUI. Buen trabajo!
04.06.2019 - 17:27
![]() Karin wrote:
Karin wrote:
Ich hänge an den verkürzten Reihen. Ich verstehe nicht ganz, wo ich dort ansetzen muss. Setze ich einen neuen Faden an der Markierung hinten an und stricke dann hin und her? Wie komme ich überhaupt zu den 96 Maschen? Wenn ich 96 Maschen abzähle, dann gehen die verkürzten Reihen bis zum vorderen Halsausschnitt (was auf dem Foto aber definitiv nicht zu sehen ist). Warum müssen so viele Maschen am Ende abgenommen werden?
07.11.2018 - 15:48DROPS Design answered:
Liebe Karin, die verkürzten Reihen beginnen hingen am mittleren Rückenteil, hier eine Markierung einsetzen und jetzt hin- und zurückstricken: 8 M re bei der 1. Hinreihe, wenden 16 M. li. bei der 2. Reihe (=Rückreihe), und dann immer 8 Maschen mehr stricken = bei der 3. Reihe stricken Sie 16+8= 24 M re, bei der 4. Reihe 24+8= 32 M. li usw bis 96 M gestrickt wurden. Siehe auch dieses Video. Viel Spaß beim stricken!
07.11.2018 - 16:00
![]() Sandra wrote:
Sandra wrote:
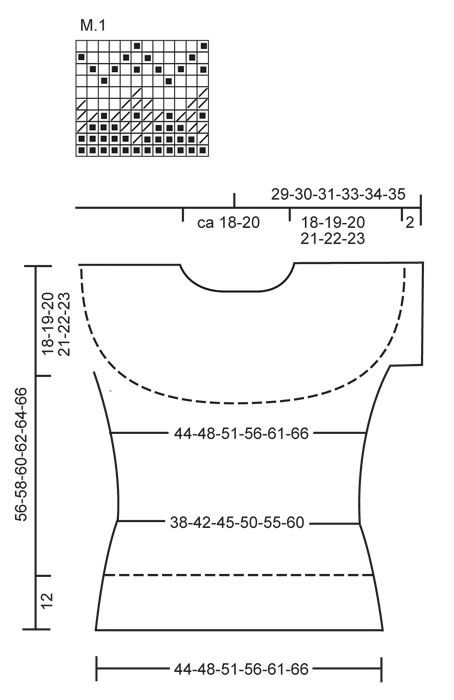
I am trying to work out how to work the M.1 chart. 210 sts divided by 12 sts in M.1 = 17.5 repeats? Please tell me what I am missing. Thank you!
03.08.2018 - 15:30DROPS Design answered:
Dear Sandra, you will repeat 17 times M.1 and then work the first 6 sts (= half repeat) in M.1. Happy knitting!
06.08.2018 - 08:26
![]() Hannoy wrote:
Hannoy wrote:
Je viens de terminer ce tricot ; les couleurs , la taille , les explications très bien ; je suis contente . merci à votre équipe . Une question technique : faut-il faire un "blocage" ou repassage patte mouille pour le jacquard?
21.03.2018 - 17:44DROPS Design answered:
Bonjour Mme Hannoy, vous pouvez laver et sécher le pull (en suivant bien les indications de l'étiquette + les consignes générales), le jacquard n'en sera que plus beau. Bon tricot!
06.04.2018 - 09:53
![]() Caroline wrote:
Caroline wrote:
I've just finished this project, it was really easy to follow the pattern.
22.02.2018 - 21:12
![]() Dagmar wrote:
Dagmar wrote:
Tippfehler: In der letzten Reihe der Anleitung "Passe" muss es nicht heißen "Die Arbeit drehen und re. bis hinten in die Mitte stricken. 1 R. stricken und gleichzeitig gleichmässig verteilt 112-116-120-124-128-132 M. abn." sondern: 12-16-20-24-28-32 Es blieben sonst für Gr. L nur 20 M übrig, um damit den AUsschnitt zu arbeiten, und das wäre doch arg eng.
10.10.2017 - 09:07DROPS Design answered:
Liebe Dagmar, die letzte verkürzte Reihe wird bis rechts (= Vorderseite/Hinreihe) bis hinten in der Mitte gestrickt (mitte Rückenteil), und dann von hier (= Beginn der Runde) 1 Runde über alle Maschen stricken und gleichzeitig gleichmässig verteilt 112-116-120-124-128-132 M. abnehmen. Viel Spaß beim stricken!
10.10.2017 - 09:48
|
|||||||||||||
Winter Moss#wintermosssweater |
|||||||||||||
|
|
|||||||||||||
Knitted DROPS jumper in ”Alpaca” with short raglan sleeves and Norwegian pattern. Size S to XXXL.
DROPS 122-41 |
|||||||||||||
|
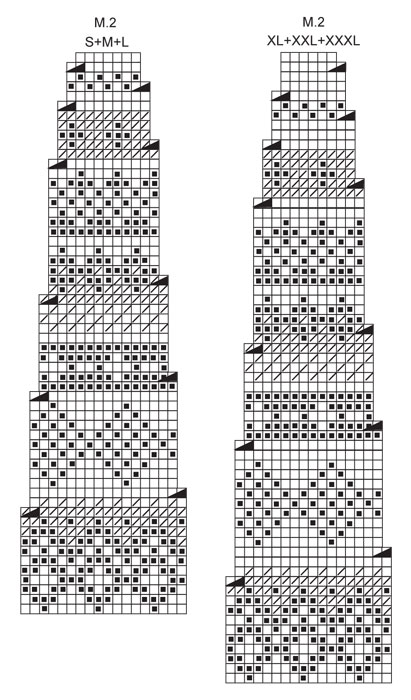
------------------------------------------------------- PATTERN: See diagram M.1 and M.2 – entire pattern worked in stocking st. -------------------------------------------------------- BODY PIECE: Worked in the round. Cast on 350-380-410-450-490-530 sts on circular needle size 2.5 mm with green/turquoise mix. Work 3 rounds rib, K2/P3. On next round dec all P3 to P2 = 280-304-328-360-392-424 sts and continue with K2/P2. When piece measures 12 cm change to circular needle size 3 mm. Work 1 round stocking st, AT THE SAME TIME K tog every 3rd and 4th st = 210-228-246-270-294-318 sts. Work 1 vertical repeat M.1 and then continue in light lavender. REMEMBER THE KNITTING TENSION! AT THE SAME TIME on round 2 after M.1 dec 28 sts evenly = 182-200-218-242-266-290 sts. Insert a marker each side (= 91-100-109-121-133-145 sts on front and back piece). When piece measures 18-19-20-21-22-23 cm inc 1 st each side of both markers. Repeat the inc on every 8th round a total of 7 times = 210-228-246-270-294-318 sts. When piece measures 38-39-40-41-42-43 cm cast off 12 sts each side (i.e. 6 sts each side of marker) = 93-102-111-123-135-147 sts left on front and back piece. SLEEVE EDGE: Worked in the round on small circular needle. Cast on 96-104-108-116-124-128 sts on circular needle size 2.5 mm with light lavender. Work rib, K2/P2 for 2 cm and work next round as follows from RS: * K4, K2 tog *, repeat from *-* until 6-2-0-2-4-2 sts remain, K these = 81-87-90-97-104-107 sts. On next round cast off the first 12 sts = 69-75-78-85-92-95 sts. Put piece aside and knit the other sleeve edge. YOKE: Slip sleeve edges on the same circular needle as body pieces where cast off for armhole = 324-354-378-416-454-484 sts. Round now beg in transition between one of the sleeves and back piece. K 1 round with light lavender, AT THE SAME TIME dec 18-12-18-20-22-16 sts evenly = 306-342-360-396-432-468 sts. Work 0-2-5-1-4-7 rounds in light lavender before continuing in M.2 – see diagram for your Size. After M.2 there are 119-133-140-132-144-156 sts on needle. Now complete piece in light lavender. Insert a marker mid back and now work elevation as follows: K 8 sts past marker mid back, turn, tighten thread and P 16 sts, turn, tighten thread and K 24 sts, turn. Continue like this with 8 more sts before each turn until you have knitted over a total of 96-96-112-112-112-128 sts, turn and K 1 row to mid back. K 1 round on all sts, AT THE SAME TIME dec evenly to 112-116-120-124-128-132 sts. NECKLINE: Change to circular needle size 2.5 mm and work 5 rounds rib, K2/P2 with light lavender. Cast off with K over K and P over P. ASSEMBLY: Sew tog openings under sleeves. |
|||||||||||||
Diagram explanations |
|||||||||||||
|
|||||||||||||
 |
|||||||||||||
 |
|||||||||||||
Have you finished this pattern?Tag your pictures with #dropspattern #wintermosssweater or submit them to the #dropsfan gallery. Do you need help with this pattern?You'll find 20 tutorial videos, a Comments/Questions area and more by visiting the pattern on garnstudio.com. © 1982-2026 DROPS Design A/S. We reserve all rights. This document, including all its sub-sections, has copyrights. Read more about what you can do with our patterns at the bottom of each pattern on our site. |
|||||||||||||


With over 40 years in knitting and crochet design, DROPS Design offers one of the most extensive collections of free patterns on the internet - translated to 17 languages. As of today we count 325 catalogues and 12298 patterns translated into English (UK/cm).
We work hard to bring you the best knitting and crochet have to offer, inspiration and advice as well as great quality yarns at incredible prices! Would you like to use our patterns for other than personal use? You can read what you are allowed to do in the Copyright text at the bottom of all our patterns. Happy crafting!
Post a comment to pattern DROPS 122-41
We would love to hear what you have to say about this pattern!
If you want to leave a question, please make sure you select the correct category in the form below, to speed up the answering process. Required fields are marked *.