
Popular categories
Looking for a yarn?


Comments / Questions (143)
![]() Klara wrote:
Klara wrote:
Jeg er nået til m1 i størrelse M og har derfor 322 masker på min rundpind. M1 starter med en gentagelse af de samme 11 masker, men jeg kan ikke få det til at gå op med maskeantallet, så mit mønster bliver ikke symmetrisk fordelt i begge sider. Heller ikke hvis jeg fraregner de to kantmasker (dvs 320 masker). Misforstår jeg noget?
30.12.2019 - 22:27DROPS Design answered:
Hei Klara. Du strikker M.1 29 ganger (=319 masker) og du starter og slutter hver pinne med 1 kantmaske i RILLE (= 321 masker), MEN nest siste maske på hver pinne strikkes som første maske i M.1 (husk det felles ikke i denne masken) = 322 masker. Det vil da bli et par masker symmetrisk forskjell i begynnelsena av diagrammet. God Fornøyelse!
03.02.2020 - 13:10
![]() Sandra wrote:
Sandra wrote:
Hallo, die Jacke ist wunderschön! Was muss ich beachten wenn ich statt Jacke einen Pullover stricken möchte?
06.11.2019 - 20:58DROPS Design answered:
Liebe Sandra, leider können wir jeder Anleitung nach jedem individuellen Frage anpassen und einzelne Modelle auf individuellen Wunsch hin umrechnen. Wenn sie Hilfe damit brauchen, wenden Sie sich bitte an dem Laden wo Sie die Wolle gekauft haben, dort hilft man Ihnen gerne weiter. Viel Spaß beim stricken!
07.11.2019 - 09:02
![]() Christina wrote:
Christina wrote:
Jag vill sticka denna som en tröja. Hur många maskor ska jag lägga upp till storlek M?
19.09.2019 - 18:58DROPS Design answered:
Hej Christina, Du lägger upp 354 maskor i M, följer mönstret och siffer nr 2 när du har 6 på rad som här: Lägg upp 314-354-394-434-474-514 m. Lycka till!
26.09.2019 - 09:48
![]() Lisbeth Snell wrote:
Lisbeth Snell wrote:
Kan den ikke strikkes i lidt takker garn evt ??? På p 4-4 1/2 Og så lidt længere ??? Jeg skal have den strikket i xl , men syntes målene er svære at forstå
13.09.2019 - 15:56DROPS Design answered:
Hej Lisbeth, Hvis du strikker i tykkere garn, så vil du få en helt anden størrelse. Det er vigtigt at du overholder strikkefastheden som står i opskriften. God fornøjelse!
17.09.2019 - 14:08
![]() Gale wrote:
Gale wrote:
I am working on the yoke and have finished all the decreases. Just have the last 4 rows of plain white. Should I work those 4 rows before going on to the next paragraph that includes 1 row of decreases and short rows?
18.07.2019 - 18:41DROPS Design answered:
Dear Gale, you first work diagram M.1 to the end (including the rows without decreases) then work 1 row from WS decreasing evenly and then work the elevation on back piece. Happy knitting!
19.07.2019 - 07:56
![]() Sissel Jacobsen wrote:
Sissel Jacobsen wrote:
Vil gjærne strikke genser i dette flotte mønsteret, og lurer på om det går greit med bare å strikke rundt. Savner mønster nede på armene, hvordan går jeg fram for å få til det?
15.07.2019 - 22:00DROPS Design answered:
Hei Sissel. Du kan fint strikke den jakken rundt og så klipp den opp. Bare husk å legge til midtmasker/oppklippsmasker og at du får mønstret pent foran. Sjekk maske antallet på ermene og bruk evnt diagrammet til sokkene for å få mønster på ermene. God Fornøyelse"
26.08.2019 - 14:05
![]() Annelies Burri wrote:
Annelies Burri wrote:
Hallo,habe eine Frage zum Diagramm M1, wie stricke ich die Rũckseite? Links, ist klar aber die Farben, immer deckend oder sind Vorder-und Rũckseite auf dem Diagramm angegeben ? Herzlichen Dank fũr ihre Mũhe.
23.06.2019 - 21:07DROPS Design answered:
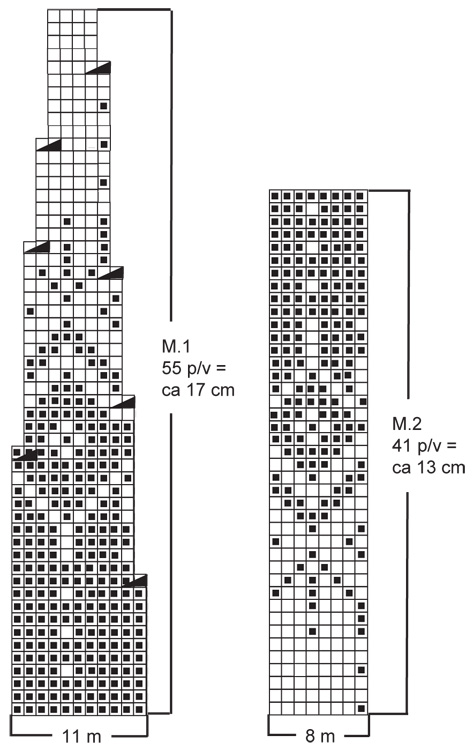
Liebe Frau Burri, das Diagram zeigt alle Reihen, dh die Hin- sowie die Rückreihen, die Rückreihen lesen Sie dann links nach rechts (= die zweitletzen M von der Hinreihe wird immer als erste M in M.1 gestrickt aber dann zuerst, dann wiederholen sie M.1 links nach rechts. Hier lesen Sie mehr über Diagramme. Viel Spaß beim stricken!
24.06.2019 - 08:12
![]() Knitix wrote:
Knitix wrote:
Beautiful cardigan. I believe "Lagertha" would have been a much better name for it. I saw the picture and I immediately thought of "Lagertha" from the Vikings TV series.
18.05.2019 - 14:27
![]() Martha Pinzón wrote:
Martha Pinzón wrote:
Siempre he querido tejer un suéter así y seria el primero pero para empezar necesito un patrón en español. Me puedes recomendar uno? muchas gracias. Muy lindo.
05.04.2019 - 04:31DROPS Design answered:
Hola Martha. Echa un vistazo a nuestra colección de jerséis con dibujo nórdico: https://www.garnstudio.com/search.php?action=search&w=jersey&c=7&mt=1&t=0&k=0&yg=0&y=0&col=0&df=0&lang=es
07.04.2019 - 21:49
![]() Gale wrote:
Gale wrote:
I am knitting the cardigan with the design also on the sleeves near the cuffs as shown in one of your photos. There are 60 stitches which cannot be divided evenly in the M.2 pattern. What should I do?
02.04.2019 - 21:00DROPS Design answered:
Dear Gale, you can adjust the number of sts to a number divisible by 8 (M.2) on the first round in M.2, then make sure to adjust the number of sts after M.2 has been worked (and remember the decrease mid under sleeve, you may have to adjust alos the decreases if M.2 is not finished when starting to decrease). Happy knitting!
03.04.2019 - 09:31
|
||||||||||
Winter Fantasy |
||||||||||
 |
 |
|||||||||
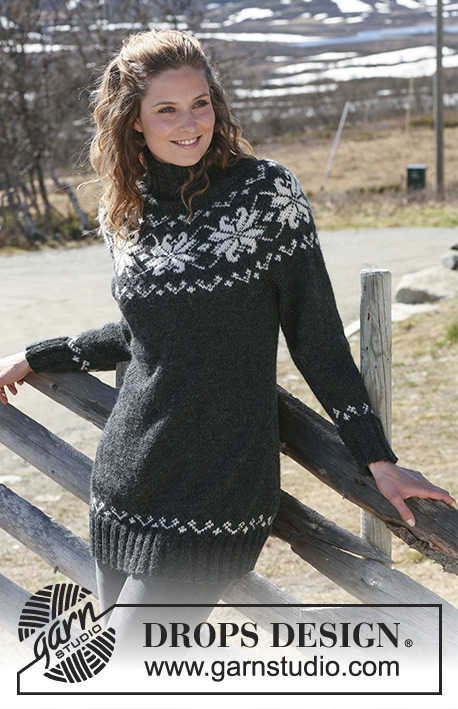
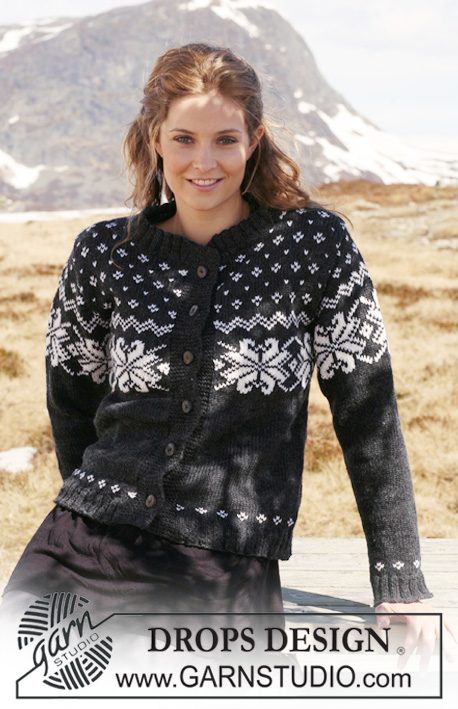
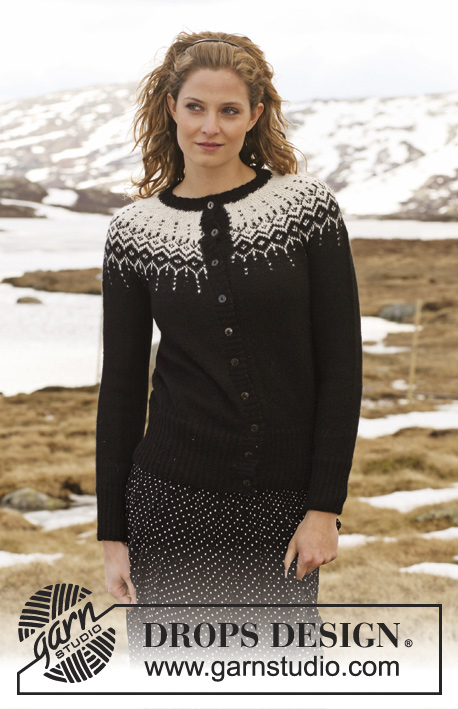
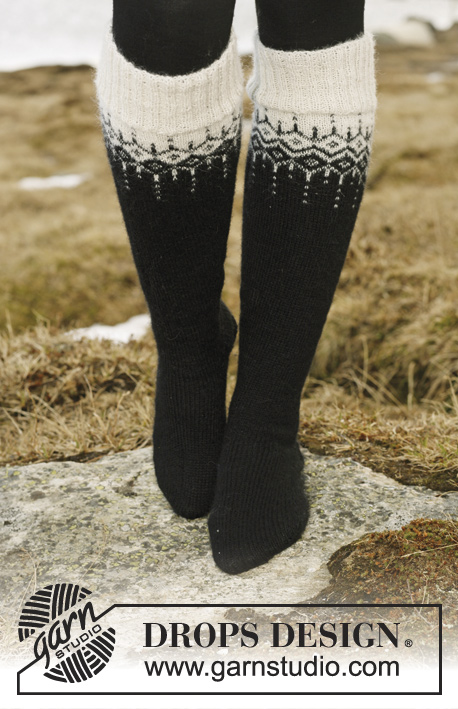
DROPS Jacket in ”Alpaca” and ”Glitter” with 2-colour pattern in round yoke. Size S to XXXL. Long socks in ”Fabel” with the same pattern.
DROPS 116-1 |
||||||||||
|
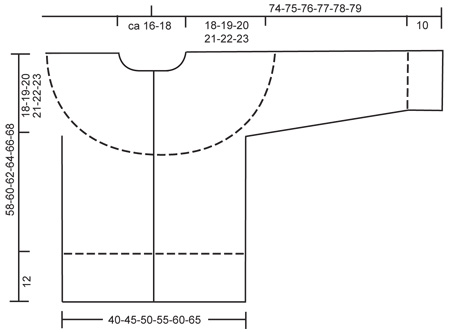
JACKET: PATTERN: See diagram M.1 – diagram is seen from RS and shows 1 pattern repeat. GARTER ST (back and forth on needle): K all rows. ---------------------------------------------------------- BODY PIECE: Worked back and forth on circular needle from mid front. Cast on 314-354-394-434-474-514 sts on circular needle size 2.5 mm with 1 thread black Alpaca + 1 thread Glitter. Work rib as follows (first row = RS): 1 edge st in GARTER ST – see above, * K2 / P3 *, repeat from *-* until 3 sts remain, K2, 1 edge st in GARTER ST. Continue like this until piece measures 2 cm, now dec all P3 to P2 (as seen from RS) = 252-284-316-348-380-412 sts. Continue in rib, K2 / P2, with 1 edge st in garter st each side. When piece measures 12 cm dec all P2 to P1 (as seen from RS) = 190-214-238-262-286-310 sts. Change to circular needle size 3 mm and continue in stocking st. REMEMBER THE KNITTING TENSION! When piece measures 40-41-42-43-44-45 cm work next row as follows from RS: 41-47-54-59-65-71 sts (= front piece), cast off 12 sts for armhole, 84-96-106-120-132-144 sts (= back piece), cast off 12 sts for armhole, 41-47-54-59-65-71 sts (= front piece) = 166-190-214-238-262-286 sts left on needle. Put piece aside and knit the sleeves. SLEEVE: Worked in the round on double pointed needles. Cast on 80-80-80-88-88-88 sts on double pointed needles size 2.5 mm with 1 thread black Alpaca + 1 thread Glitter. Work rib, K2 / P2. When piece measures 10 cm dec all P2 to P1 = 60-60-60-66-66-66 sts. Insert a marker at beg of round. Change to double pointed needles size 3 mm and continue in stocking st. When piece measures 11-11-11-14-14-14 cm inc 1 st each side of marker mid under sleeve, repeat the inc on every 4.5-3.5-2.5-2.5-2-2 cm a total of 8-11-14-13-15-17 times = 76-82-88-92-96-100 sts. When piece measures 48 cm cast off 12 sts mid under sleeve = 64-70-76-80-84-88 sts left on needle. Put piece aside and knit the other sleeve. YOKE: Slip sleeves on the same circular needle size 3 mm as body piece where cast off for armhole = 294-330-366-398-430-462 sts. Work 3-5-9-13-15-17 rows stocking st with black Alpaca + Glitter, AT THE SAME TIME on first row dec 5-8-11-10-9-8 sts evenly = 289-322-355-388-421-454 sts. Now continue in M.1 (first row = RS) with 1 edge st in garter st each side, work the last but 1 st on row like first st in M.1, but without the dec, to make the pattern identical on both front pieces. When all dec are complete there are 107-119-131-143-155-167 sts on needle and piece measures approx 58-60-62-64-66-68 cm. Work 1 row with off-white (from WS), AT THE SAME TIME dec 15-19-23-27-31-35 sts evenly = 92-100-108-116-124-132 sts. Now work shortened rows mid back with off-white as follows: Work 56-60-64-68-72-76 sts, turn, work 20 sts, turn, work 30 sts, turn, work 40 sts. Continue like this with 10 more sts before each turn until you have worked shortened rows on a total of 60-80-80-100-120 sts, turn and work return row and work 1 row on all sts. Slip sts on a stitch holder. LEFT FRONT BAND: Pick up approx 180 to 212 sts (divisible by 4) inside 1 edge st along left front piece with 1 thread black Alpaca + 1 thread Glitter on circular needle size 2.5 mm. Work rib as follows (first row = WS): 1 edge st in garter st, * P2 / K2 *, repeat from *-* and finish with P2 and 1 edge st in garter st. Continue with K over K and P over P until rib measures 3 cm, cast off loosely. RIGHT FRONT BAND: Like left front band, but after 1 cm make 9 buttonholes evenly distributed (make buttonholes in P-sections as seen from RS). 1 BUTTONHOLE = P2 tog and make 1 YO – place the bottom buttonhole in the 2nd P-section and the top one approx 6 cm from neckline (the last buttonhole is made on the neck). NECK: Worked with 1 thread black Alpaca + 1 thread Glitter on circular needle size 2.5 mm as follows: Pick up 8 sts on right front band (inside 1 edge st), work the 92-100-108-116-124-132 sts from stitch holder back on needle and pick up 8 sts on left front band = 108-116-124-132-140-148 sts. P 1 row from WS, AT THE SAME TIME inc 20 sts evenly = 128-136-144-152-160-168 sts. Continue in rib as follows (from RS): 1 edge st in garter st, * K2 / P2 *, repeat from *-* and finish with K2 and 1 edge st in garter st. Continue with K over K and P over P. When neck measures 1 cm make 1 buttonhole in line with the others on front band. When neck measures 3 cm cast off with K over K and P over P. ASSEMBLY: Sew on buttons. Sew openings under sleeves. ---------------------------------------------------------- SOCKS: PATTERN: See diagram M.2 – diagram shows 1 pattern repeat. We knitted the socks without Glitter. DECREASING TIP: Dec as follows before marker: K2 tog. Dec as follows after marker: K2 tog into back of loop. HEEL DECREASES: Row 1 (= RS): Work row until 8-9-9 sts remain, K2 tog into back of loop, turn piece. Row 2 (= WS): Work row until 8-9-9 sts remain, P2 tog, turn piece. Row 3 (= RS): Work row until 7-8-8 sts remain, K2 tog into back of loop, turn piece. Row 4 (= WS): Work row until 7-8-8 sts remain, P2 tog, turn piece. Continue dec like this with 1 less st before each dec until there are 14-14-16 sts on needle. ---------------------------------------------------------- SOCKS: Worked in the round on double pointed needles. Cast on 108-108-116 sts on double pointed needles size 2.5 mm with off-white. Work rib, K2 / P2 for 8 cm. K 1 round, AT THE SAME TIME dec 20 sts evenly = 88-88-96 sts. Continue in M.2. REMEMBER THE KNITTING TENSION! After M.2 piece measures approx 21 cm. Insert a marker at beg of round. Continue in black stocking st, AT THE SAME TIME dec 1 st each side of marker – SEE DECREASING TIP, and repeat the dec on every 4-5-5 round a total of 16-14-16 times = 56-60-64 sts. When piece measures 42-44-46 cm keep the first 28-30-32 sts on needle for heel and slip the remaining 28-30-32 sts on a stitch holder (= mid upper foot). Continue in stocking st back and forth on heel-sts for 5-5.5-6 cm - insert a marker. Now work HEEL DECREASES – see above. After heel dec pick up 13-14-16 sts each side of heel and slip the 28-30-32 sts from stitch holder back on needle = 68-72-80 sts. Insert a marker each side of the 28-30-32 sts on upper foot. Continue in stocking st in the round, AT THE SAME TIME dec each side as follows: K tog into back of loop the last 2 sts BEFORE first marker on upper foot, and K tog the first 2 sts AFTER the second marker on upper foot. Repeat the dec on every other round a total of 8-8-10 times = 52-56-60 sts. Continue until piece measures 18-19-22 cm from marker on heel (= approx 4-5-5 cm remain). Insert a marker each side with 26-28-30 sts on upper foot and 26-28-30 sts under foot. Continue in stocking st AT THE SAME TIME dec for toes each side of both markers as follows: Before marker: K2 tog. After marker: K2 tog into back of loop. Repeat the dec on every other round a total of 4-5-5 times and then on every round 7-7-8 times = 8 sts left on needle. Cut the thread, pull it through remaining sts, tighten and fasten. |
||||||||||
Diagram explanations |
||||||||||
|
||||||||||
 |
||||||||||
 |
||||||||||
Have you finished this pattern?Tag your pictures with #dropspattern or submit them to the #dropsfan gallery. Do you need help with this pattern?You'll find 29 tutorial videos, a Comments/Questions area and more by visiting the pattern on garnstudio.com. © 1982-2026 DROPS Design A/S. We reserve all rights. This document, including all its sub-sections, has copyrights. Read more about what you can do with our patterns at the bottom of each pattern on our site. |
||||||||||


With over 40 years in knitting and crochet design, DROPS Design offers one of the most extensive collections of free patterns on the internet - translated to 17 languages. As of today we count 324 catalogues and 12278 patterns translated into English (UK/cm).
We work hard to bring you the best knitting and crochet have to offer, inspiration and advice as well as great quality yarns at incredible prices! Would you like to use our patterns for other than personal use? You can read what you are allowed to do in the Copyright text at the bottom of all our patterns. Happy crafting!
Post a comment to pattern DROPS 116-1
We would love to hear what you have to say about this pattern!
If you want to leave a question, please make sure you select the correct category in the form below, to speed up the answering process. Required fields are marked *.