
Popular categories
Looking for a yarn?


Comments / Questions (62)
![]() Hélène wrote:
Hélène wrote:
Merci pour ces précisions et la rapidité de vos réponses. Bon après-midi.
01.02.2022 - 16:16
![]() Hélène wrote:
Hélène wrote:
Je parlais également du premier rang tout de suite après avoir monté les mailles, qui est indiqué envers., contrairement au dos. Merci beaucoup .
01.02.2022 - 12:07DROPS Design answered:
Bonjour Hélène, tout à fait, mais le dos/devants se tricotent en rangs, on tricote 2 rangs endroit en violet (= 1 côte mousse), pour les manches, on tricote en rond = 1 côte mousse se tricote 1 tour endroit, 1 tour envers. Bonne continuation!
01.02.2022 - 16:42
![]() Hélène wrote:
Hélène wrote:
Plus précisément de commencer par un rang envers violet, puis 7 rangs endroit écru, puis à nouveau 1 rg endroit violet puis 1 rang envers.
01.02.2022 - 11:23DROPS Design answered:
Bonjour Hélène, ah j'étais plus loin dans les explications, désolée: ce rang sur l'envers sert de rang de cassure pour permettre de bien plier l'ouvrage en 2 - comme dans cette vidéo, sauf que vous avez 2 couleurs ici: 7 tours endroit écru, 1 tour end violet, 1 tour env violet (= rang de cassure), et 7 tours endroit écru. Puis encore 1 tour end + 1 tour env en Violet (donc 2 côtes mousse au total en bas des manches). Bon tricot!
01.02.2022 - 11:52
![]() Hélène wrote:
Hélène wrote:
Bonjour. Je ne comprends pas pourquoi il est indiqué d'exécuter des rangs envers pour les manches alors que le tricot se fait en rond sur l’endroit . Pour obtenir le même résultat que pour le dos et les devants, ne faut-il pas tricoter des rangs endroit . Merci de votre réponse. Cordialement. Hélène
01.02.2022 - 11:15DROPS Design answered:
Bonjour Hélène, le bas du gilet et les manches se tricotent de la même façon en suivant M.1, autrement dit vous répétez des "rayures" de 5 rangs jersey endroit, 1 rang jersey envers (autrement dit, tous les 6 rangs, vous tricotez à l'endroit sur l'envers pour le dos/les devants, et pour les manches, vous tricoterez à l'envers sur l'endroit pour former le même effet). Bon tricot!
01.02.2022 - 11:48
![]() Emilie wrote:
Emilie wrote:
Bonjour sur l'image les couleurs sur les photos et les numeros associés aux couleurs indiquées dans le patron ne semble pas être les bonnes? Pouvez-vous m'indiquer qu'elles sont les couleurs utilisées?
11.01.2022 - 02:09DROPS Design answered:
Bonjour Emilie, faites confiance au numéro des couleurs indiquées, les nuanciers évoluent avec le temps et les noms des couleurs sont parfois modifiés, mais les numéros restent les bons. Bon tricot!
11.01.2022 - 09:15
![]() Sigurbjörg Björnsdóttir wrote:
Sigurbjörg Björnsdóttir wrote:
Hvenar á að byrja á M1 munstrinu? stendur haldið áfram að með munstur M1 eftir 7 umfer ðir í peysu en ekki sagt hvenar á að byrja ?
27.08.2021 - 19:18DROPS Design answered:
Blessuð Sigurbjörg. Eftir uppfit með bleikur er prjónuð 1 umferð slétt síðan er skipt yfir í natur og prjónaðar 7 umferðir í sléttprjóni, síðan er skipt aftur yfir í bleikur og prjónuð 1 umferð slétt frá réttu og 1 umferð slétt frá röngu (uppábrot). Prjónaðar eru 7 umferðir í sléttprjóni með natur (lykkjurnar færðar til eins og segir í uppskrift). Prjónið 2 umferðir slétt með bleikur og síðan á að prjóna mynstur M.1 með natur. Gangi þér vel.
30.08.2021 - 10:51
![]() Sylvie wrote:
Sylvie wrote:
Avant de commencer ce magnifique gilet au tricot,je voudrais bien le comprendre. Pourquoi tricoter en écru puis couper le fil puis pousser les mailles ? Quel en est l effet ? Cela signifie t il retourner le tricot sur l autre face ? Faut il alors continuer en écru ? Merci pour votre reponse Sylvie
26.04.2020 - 17:00DROPS Design answered:
Bonjour Sylvie, le dernier rang de la bordure se tricote sur l'endroit, mais le rang suivant doit se tricoter sur l'endroit également, on va donc couper le fil, glisser les mailles à l'autre extrémité de l'aiguille circulaire pour tricoter le rang suivant sur l'endroit également. Bon tricot!
27.04.2020 - 09:22
![]() Beate Schurrmann wrote:
Beate Schurrmann wrote:
Ich möchte diese Haube stricken. Aber ich habe keine Vorstellung, wie sie von hinten aussehen soll. Können Sie auch von Hinten ein Bild oder eine Zeichnung machen, wie bei der Jacke? Vielen Dank Beate Schurrmann
27.11.2019 - 19:09DROPS Design answered:
Liebe Frau Schurrmann, wir haben kein weiteres Bild von der Hauben, hier können Sie mal Projekte von anderen Strickerinnnen (bei Ravelry). Viel Spaß beim stricken!
28.11.2019 - 09:38
![]() Carina Grunditz wrote:
Carina Grunditz wrote:
Hej! Jag undrar om det verkligen ska vara 7 varv rätstickning på ärmens början, ser ut som slätstickning och på bak- och framstyckena är det ju slätstickning?
06.03.2019 - 09:19DROPS Design answered:
Hej. Det ska vara 7 räta v (inte rätstickning) med natur och eftersom ärmen stickas runt så blir det då slätstickning. Lycka till!
08.03.2019 - 11:43
![]() Heidrun Voßmeier wrote:
Heidrun Voßmeier wrote:
Ich habe gerade mit der Jacke begonnen: 1. Die erste Reihe natur ist eine linke Reihe? 2. Nach 7 Reihen natur bin ich dann ja nicht auf der Seite, auf der ich den rosafarbenen Faden hängen habe, oder? wie geht das dann? Abschneiden? Maschen auf die andere Seite schieben? Aber bin ich dann nicht auf der linken Seite? Danke für Ihre Antwort
26.09.2018 - 23:25DROPS Design answered:
Liebe Frau Voßmeier, nach der 1. Reihe mit rosa können Sie den Faden abschneiden, so daß Sie dann die Krausrippe mit rosa bei einer Hinreihe anfangen. Viel Spaß beim stricken!
27.09.2018 - 08:37
|
||||||||||||||||
Easter Finest#easterfinestset |
||||||||||||||||
 |
 |
|||||||||||||||
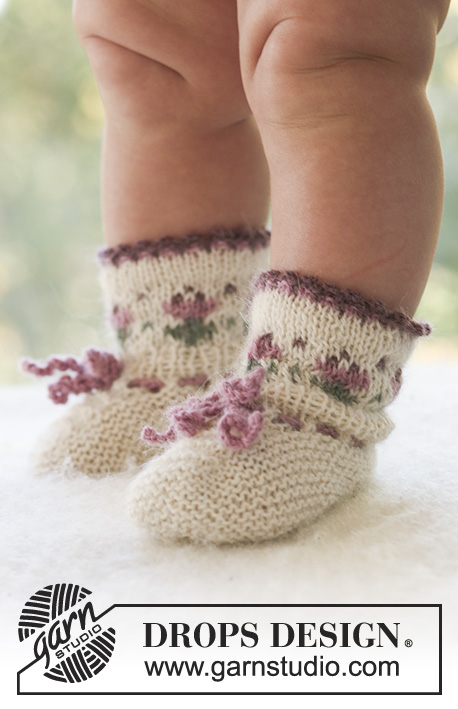
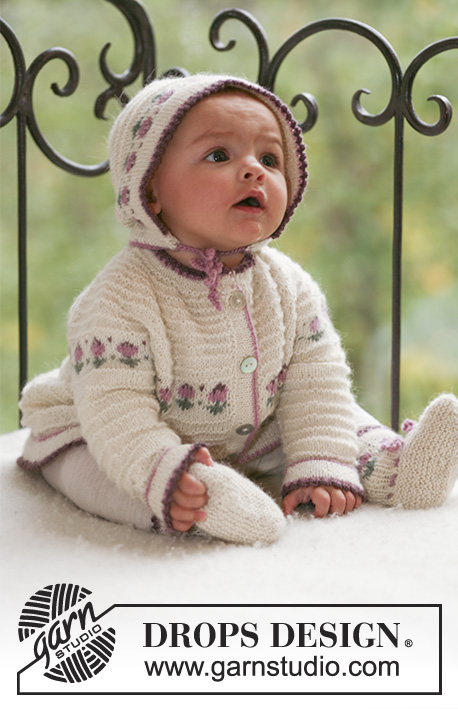
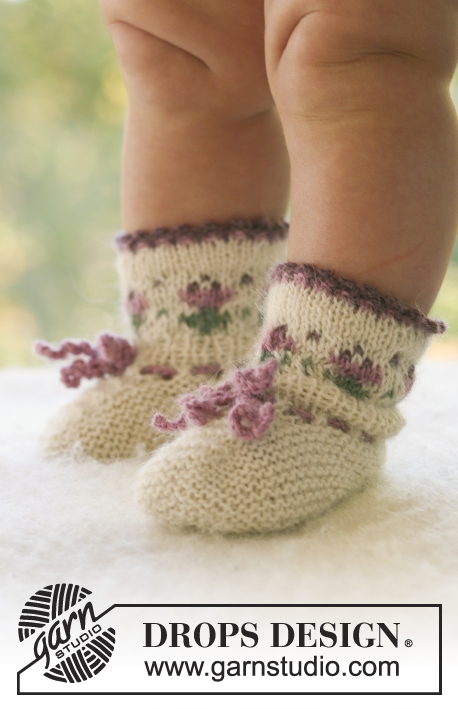
Set of jacket with with raglan sleeves, bonnet and socks with flower detail, for baby and children in DROPS Alpaca
DROPS Baby 17-14 |
||||||||||||||||
|
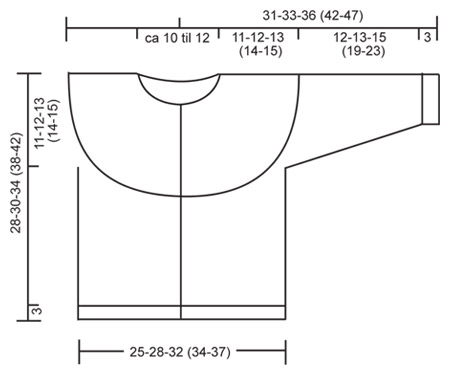
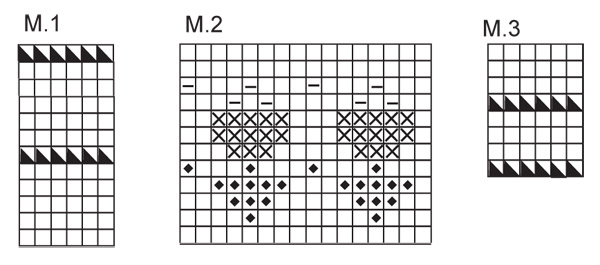
PATTERN: See diagram M.1, M.2 and M.3 – the diagrams are seen from the RS, M.2 is worked in stocking st. GARTER ST (back and forth on needle): K all rows. DECREASING TIP (applies to jacket): Dec 1 st to the left and to the right alternately of all markers by K2 tog. CROCHET PICOT BORDER: Crochet a border with heather and crochet hook size 2.5 mm in violet folding edge as follows: 1 dc in first st, * 3 ch, 1 dc in the first ch (= 1 picot), skip 1 st, 1 dc in next st *, repeat from *-*. ---------------------------------------------------------- JACKET: BODY PIECE: Worked back and forth on circular needle from mid front. Cast on 132-148-164 (176-192) sts (includes 1 edge st each side towards mid front) on circular needle size 2.5 mm with violet. K 1 row from RS, change to off-white and work 7 rows stocking st (first row = WS). Change back to violet, K 1 row from RS and K 1 row from WS (= folding edge, measure piece from here). Change to off-white and work 7 rows stocking st, cut the thread (next time you use off-white you beg the other side). Now push sts to the other end of needle and beg from RS again. K 2 rows with violet and then continue in M.1 with off-white. REMEMBER THE KNITTING TENSION! When piece measures approx 17-18-21 (24-27) cm – adjust to a full repeat of M.1 – work next row as follows from RS: K 29-33-37 (40-44) sts = right front piece, cast off 8 sts for armhole, K 58-66-74 (80-88) sts = back piece, cast off 8 sts for armhole, K 29-33-37 (40-44) sts = left front piece. Cut the thread, put piece aside and knit the sleeves. SLEEVE: Worked in the round on double pointed needles. Cast on 36-38-40 (42-44) sts on double pointed needles size 2.5 mm with violet and P 1 round. Continue as follows: 7 rounds stocking st with off-white, K 1 round with violet, P 1 round with violet (= folding edge, measure piece from here), 7 rounds stocking st with off-white, K 1 round with violet, P 1 round with violet. Now insert a marker at beg of round (= mid under arm). Continue in M.1 with off-white. AT THE SAME TIME when piece measures 4 cm inc 1 st on each side of marker and repeat the inc on every 6-5-5 (6-6) round a total of 6-7-9 (10-12) times = 48-52-58 (62-68) sts. When piece measures approx 15-16-18 (22-26) cm – adjust to a full repeat of M.1 – K 1 round, AT THE SAME TIME cast off 8 sts mid under arm (= 4 sts on each side of marker) = 40-44-50 (54-60) sts. Put piece aside and knit the other sleeve. YOKE: Slip sts on the same circular needle as body piece where cast off for armholes = 196-220-248 (268-296) sts. K 1 row off-white from RS, AT THE SAME TIME dec 3-3-7 (3-7) sts evenly = 193-217-241 (265-289) sts. Continue in M.2 with 1 garter st each side – SEE ABOVE. Before the last row in M.2 insert 15 markers in piece from RS as follows: first marker after 13-18-16 (21-19) sts, and the remaining markers with 12-13-15 (16-18) sts between each = 12-17-15 (20-18) sts left after the last marker. On next row (= last row in M.2) dec 1 st to the right of all markers by K2 tog. Now work M.3, AT THE SAME TIME dec – SEE DECREASING TIP – on every 4th row 6-7-8 (9-10) more times = 88-97-106 (115-124) sts. Continue in M.3 until piece measures approx 28-30-34 (38-42) cm – adjust to after row 3 in pattern repeat. K 1 row from RS, AT THE SAME TIME adjust no of sts to 54-60-66 (72-78). Slip sts on a stitch holder. ASSEMBLY: Sew openings under arms. Fold edges double towards WS and fasten. LEFT FRONT BAND: Worked back and forth on circular needle. Pick up approx 65-70-80 (90-100) sts along left front piece inside 1 edge st on needle size 2.5 mm with off-white, K 1 row from WS, and then work 6 rows stocking st with 1 garter st each side. Change to violet and K 2 rows (= folding edge), change to off-white, work 7 rows stocking st with 1 garter st each side and cast off in K sts from WS. Fold edge double towards WS and fasten. RIGHT FRONT BAND: Like left front band but after 2 rows stocking st make 5-5-6 (6-6) buttonholes evenly distributed – place the top buttonhole 2 sts from neckline and the bottom one approx 3 cm from bottom edge. 1 buttonhole = cast off 2 sts and cast on 2 new sts on return row. On row 4 in stocking st after folding edge make buttonholes in the same places. NECKLINE: Pick up 5 sts on right front band with off-white, work sts from stitch holder back on needle and then pick up 5 sts on left front band = approx 64-70-76 (82-88) sts. K 1 row from WS, work 4 rows stocking st with 1 garter st each side, change to violet, K 2 rows (= folding edge), change to off-white and work 5 rows stocking st with 1 garter st each side. Cast off in K sts from WS. Fold edge double towards WS and fasten. Sew on buttons. CROCHET BORDER: Crochet a picot border along bottom edge, round sleeve edges and round neckline – SEE ABOVE. ---------------------------------------------------------- SOCKS: Worked in the round on double pointed needles. Cast on 40-40-40 (48-48) sts on double pointed needles size 2.5 mm with off-white and work 4 rounds stocking st. Change to violet, K 1 round, P 1 round (= folding edge), change back to off-white and work 4 rounds stocking st. Now continue in M.2 – beg in top right hand corner of diagram and work diagram from top down. After M.2 complete piece in off-white. K 1 round, AT THE SAME TIME adjust no of sts to 40-44-44 (48-52). Now work 2 cm rib, K1/P1 and work next round as follows: * K2 tog, 1 YO *, repeat from *-* (= casing). K 1 round, AT THE SAME TIME dec 6 sts evenly = 34-38-38 (42-46) sts. Now slip the first 12-14-14 (15-17) sts on a stitch holder, keep the next 10-10-10 (12-12) sts on row and slip the last 12-14-14 (15-17) sts on a stitch holder. Work M.3 back and forth on sts on needle for 3.5-4-4.5 (6-7) cm (= upper foot). Pick up 9-10-12 (15-19) sts on each side of upper foot and slip sts from stitch holders back on needles = 52-58-62 (72-84) sts. Continue in garter st – SEE ABOVE – back and forth on needle from mid back, AT THE SAME TIME after 1.5-2.5-3 (3-4) cm dec as follows: K2 tog at the beg and at the end of row and K2 tog on each side of the middle 2 sts. Repeat the dec on every other row until edge measures 3-4-5 (5-6) cm. Cast off and sew sock tog mid under foot and continue to casing mid back – sew in outer loops of sts to avoid a chunky seam. Fold edge double at top of sock towards WS and fasten. Crochet a Picot border at the top – SEE ABOVE. TIE STRING: Crochet a ch-string with crochet hook size 2.5 mm and violet measuring approx 50 cm. Thread string through casing. ---------------------------------------------------------- BONNET: Worked back and forth on circular needle. LOOSELY cast on 81-89-97 (105-105) sts on circular needle size 2.5 mm with off-white. Work 6 rows stocking st (first row = RS), change to violet, K 1 row from RS and K 1 row from WS (= folding edge, measure piece from here). Change back to off-white and work 6 rows in stocking st. Continue with M.2 with 1 garter st each side – beg in top right hand corner of diagram and work diagram from top down, AT THE SAME TIME on last row dec 1 st in the middle of row by K2 tog = 80-88-96 (104-104) sts. Continue in M.1 – beg on row 5 in diagram in order to have 2 rows stocking st in off-white before the P row. When piece measures 12-13-14 (15-16) cm cast off 4-5-6 (4-4) sts each side = 72-78-84 (96-96) sts. Now insert 6 markers in piece as follows: the first marker after 1 st, the next 5 markers with 12-13-14 (16-16) sts between each = 11-12-13 (15-15) sts after the last marker. Continue in garter st – SEE ABOVE – AT THE SAME TIME dec 1 st after each marker on next row from RS. Repeat the dec on every row from RS until there are 12 sts left on row. K2 tog across the row, cut thread, pull through remaining sts and use thread end to sew bonnet tog mid back – sew in outer loops of sts, and also sew tog the 4-5-6 (4-4) sts cast off each side. ASSEMBLY: Fold edge double towards WS and fasten. CASING: Pick up approx 66 to 80 sts inside 1 edge st on circular needle size 2.5 mm with off-white along bottom edge of bonnet. K 1 row from WS and then work 4 rows stocking st. Change to violet, K 1 row from RS and K 1 row from WS (= folding edge), and then work 5 rows stocking st with off-white, cast off in K sts from WS. Fold casing double towards WS and fasten. Crochet a Picot border round the front opening of bonnet – SEE ABOVE. TIE STRING: Crochet a ch-string with crochet hook size 2.5 mm and 2 threads violet measuring approx 70 cm. Thread string through casing. |
||||||||||||||||
Diagram explanations |
||||||||||||||||
|
||||||||||||||||
 |
||||||||||||||||
 |
||||||||||||||||
Have you finished this pattern?Tag your pictures with #dropspattern #easterfinestset or submit them to the #dropsfan gallery. Do you need help with this pattern?You'll find 20 tutorial videos, a Comments/Questions area and more by visiting the pattern on garnstudio.com. © 1982-2026 DROPS Design A/S. We reserve all rights. This document, including all its sub-sections, has copyrights. Read more about what you can do with our patterns at the bottom of each pattern on our site. |
||||||||||||||||


With over 40 years in knitting and crochet design, DROPS Design offers one of the most extensive collections of free patterns on the internet - translated to 17 languages. As of today we count 324 catalogues and 12290 patterns translated into English (UK/cm).
We work hard to bring you the best knitting and crochet have to offer, inspiration and advice as well as great quality yarns at incredible prices! Would you like to use our patterns for other than personal use? You can read what you are allowed to do in the Copyright text at the bottom of all our patterns. Happy crafting!
Post a comment to pattern DROPS Baby 17-14
We would love to hear what you have to say about this pattern!
If you want to leave a question, please make sure you select the correct category in the form below, to speed up the answering process. Required fields are marked *.