
Popular categories
Looking for a yarn?


Comments / Questions (106)
![]() Drops Design wrote:
Drops Design wrote:
19 rounds of tr (US dc) and then 8 (1+7) rounds with dc (US sc). When adding the additional thread just add it to the thread you are working with and fasten the end afterward.
30.01.2010 - 02:22Monique wrote:
I think I've read this pattern wrong. 10-16 I did rounds of 100, 1 tr in each tr, then added the marking threads for round 17 and did 3 rounds with dec to get to 70 tr. Am I wrong? How many total rounds of tr should there be? Also, I can't figure out how to join in the second thread for the headband. I've found videos of how to change colour or join in a new ball, but not join in a second thread. Please help! This is a birthday gift for my Mum. I need to get it finished in 6 days!
29.01.2010 - 16:53
![]() DROPS Design NL wrote:
DROPS Design NL wrote:
Hoi Irene. Je moet elke toer als een soort "rij" zien. Je begint inderdaad elke toer door 3 lossen - eindig met 1 hv in de derde losse van het begin van de toer. Begin op de volgende toer/rij. Begin weer met 3 lossen, enz. Succes verder. Gr. Tine
31.08.2009 - 10:45
![]() Irene wrote:
Irene wrote:
Kan iemand mij het stukje info haken mij uitleggen? Je vervangt de eerste steek door 3 lossen, en aan het einde gerbuik je de eerste 2 lossen niet maar steek je in de 3e, dat snap ik. Maar dan staat er weer dat je de eerste moet vervangen, maar dat doen je toch al door die 3 lossen? Of geldt het alleen voor de eerste toer, en dat je daarna die andere methode doet?
30.08.2009 - 14:49
![]() Drops Design wrote:
Drops Design wrote:
Oui tout à fait, c'est bien ce qui est indiqué : "Continuer en B, en diminuant 1B à gauche de chaque marqueur 3 fois tous les rangs " 3 fois tous les rangs = 3 rangs.
14.08.2009 - 13:15Artistikhandcraft wrote:
Très facile à réaliser pour une débutante! Toutefois, je n'si pas trouvé les explications claires pour les diminutions du béret (elles doivent se faire sur 3 rangs, donc 10 diminutions par rang pour un total de 30 dim)
13.08.2009 - 21:09
![]() DROPS Design wrote:
DROPS Design wrote:
Since you are working in the round there are sts also after the last marker. You make dec also in those sts.
01.08.2009 - 11:31
![]() Ann wrote:
Ann wrote:
I am having problems with rows 10-16. It says to place the markers in between every 10 stitches which I did, then it says to decrees on the LEFT side of the markers, but the last marker is on the last stitch. How do I do this part?
29.07.2009 - 04:33
![]() Drops Design wrote:
Drops Design wrote:
Omg. 10, 11, 12, 13, 14, 15, og 16 hekler du: Hekle 1 st i hver st uten å øke. Sett 10 merketråder i arb med 10 st mellomrom.
13.04.2009 - 10:55
![]() Masaja wrote:
Masaja wrote:
Jeg kan ikke se, hvordan omgang 10 - 16 går op i det, der står i teksten. Så vidt jeg kan se, kommer jeg op på 21 omgange, og hvis jeg ikke tæller fastmaske omgangene med, så har jeg kun 13, hvor der står 10-16. Nå, men jeg må prøve alligevel.
10.04.2009 - 22:59
|
|
DROPS 103-24 |
|
|
|
|
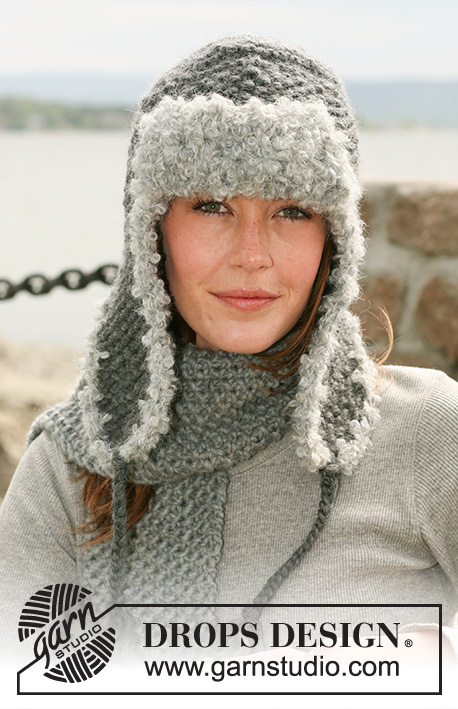
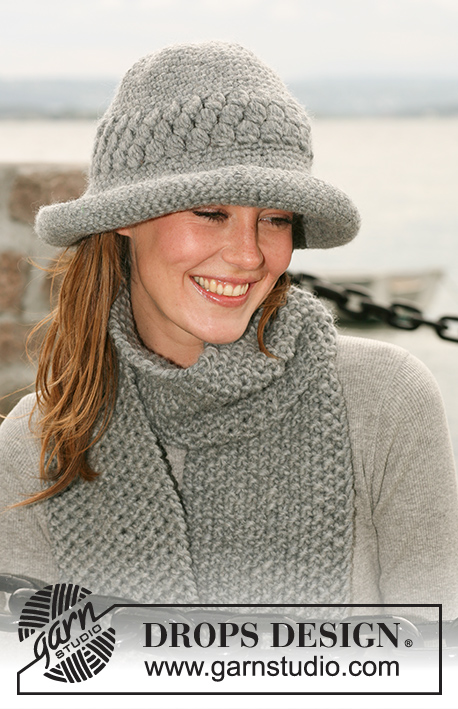
A set of: Crocheted DROPS beret in ”Alaska” and knitted scarf in ”Puddel”.
DROPS 103-24 |
|
|
Chrochet tension: 14 tr x 8 rounds = 10 x 10 cm Crochet info: Substitute first tr on round with 3 ch. Rounds ends with 1 sl st in 3rd ch in the beg of row. Substitute first dc on round with 1 ch. Round ends with 1 sl st in 1st ch in the beg of row. Decrease tip: Dec 1 tr like this: Crochet 1 tr, but wait with last “pull through” (= 2 loops on hook), crochet another tr but on the last pull through pull the yarn through all loops on hook. Beret: Check your crochet tension! The beret is crocheted from top and down. Crochet 10 ch with hook size 5 mm and Alaska and form a ring with 1 sl st in first ch. 1st round: Read Crochet info! Crochet 20 tr on ring. 2nd round: * 1 tr in first tr, 2 tr in next tr *, repeat *-* = 30 tr. 3rd round: * 1 tr in first 2 tr, 2 tr in next tr *, repeat *-* = 40 tr. 4th round: * 1 tr in first 3 tr, 2 tr in next tr *, repeat *-* = 50 tr. 5th -9th round: Continue the same way but with 1 more tr between every inc (i.e. inc 10 tr per round) = 100 tr. 10th-16th round: Crochet 1 tr in every tr without inc. Then put 10 marking threads in piece with 10 tr in between. Continue to crochet in the round with tr, at the same time dec 1 tr on left side of every marking thread on every round – read Dec. tip! Crochet a total of 3 rounds with dec = 70 tr. Continue crocheting the beret to finished measurement with double thread. Crochet 1 round with 1 dc in every tr, then crochet 7 rounds with 1 dc in every dc. Cut and fasten the thread. Pompon: Make a pompon with a diameter of approx 5 cm. Attach the pompon on top of the beret. SCARF Measurement: approx 15 x 80 cm + crocheted edge Materials: DROPS Puddel from Garnstudio 100 g colour no. 8, dark grey DROPS needle size 7 mm - or size needed to make 10 sts x 14 rows in stocking stitch on 10 x 10 cm DROPS Crochet hook size 7 mm – for crocheted edge. Knitting tension: 10 sts x 14 rows in stocking stitch = 10 x 10 cm. Scarf: Cast on 15 sts on 2 needles size 7 mm with Puddel (this will make the casting on edge elastic). Pull out one needle and K1 row from WS. Continue in stocking stitch until piece measures approx 79 cm. K1 row from WS. Cast off loosely. Crocheted edge: Crochet 1 round around the scarf with hook size 7 mm like this: 1 dc, * 4 ch, skip approx 2 cm and crochet 1 dc in following st *, repeat *-*. |
|
Have you finished this pattern?Tag your pictures with #dropspattern or submit them to the #dropsfan gallery. Do you need help with this pattern?You'll find 21 tutorial videos, a Comments/Questions area and more by visiting the pattern on garnstudio.com. © 1982-2026 DROPS Design A/S. We reserve all rights. This document, including all its sub-sections, has copyrights. Read more about what you can do with our patterns at the bottom of each pattern on our site. |


With over 40 years in knitting and crochet design, DROPS Design offers one of the most extensive collections of free patterns on the internet - translated to 17 languages. As of today we count 324 catalogues and 12290 patterns translated into English (UK/cm).
We work hard to bring you the best knitting and crochet have to offer, inspiration and advice as well as great quality yarns at incredible prices! Would you like to use our patterns for other than personal use? You can read what you are allowed to do in the Copyright text at the bottom of all our patterns. Happy crafting!
Post a comment to pattern DROPS 103-24
We would love to hear what you have to say about this pattern!
If you want to leave a question, please make sure you select the correct category in the form below, to speed up the answering process. Required fields are marked *.