
Popular categories
Looking for a yarn?


Comments / Questions (53)
![]() Bruun wrote:
Bruun wrote:
Hei;)hvorfor er det fargeforskjell på den nederste delen av skjørtet?er det synsbedrag?
02.07.2018 - 21:19DROPS Design answered:
Hej, ja det er samme mønster hele vejen ned til kanten, men det kan have noget med at gøre at du tager en del masker ud på det nederste stykke og da vil det ikke sidde så tæt på kroppen. God fornøjelse!
03.07.2018 - 10:34
![]() Chris wrote:
Chris wrote:
There seems to be a glitch in round 7 in the directions, if I do three dc in each loop, then I have space for the 20 looks for round 8. Doing the 54 stitches makes all the numbers afterwards incorrect. Should I change round 7 to have more stitches?
27.09.2017 - 00:18DROPS Design answered:
Dear Chris, on round 7 work: 3 dc in each of the first 2 ch-spaces (= 6 dc), then work: *2 dc in the next ch-space, 3 dc in each of the next 2 ch-spaces (= 2 + 3 + 3 dc) repeat to the end of round ie a total of 6 times, you will have: 6 dc + 8 dc x 6 = 54 dc. Happy crocheting!
27.09.2017 - 09:27
![]() Matthew Pyle wrote:
Matthew Pyle wrote:
I tried many times to make this particular top, but each attempt produced a piece which was far too large, and had a puffy protrusion at the center of each cup. Nevertheless, I was enamored with the potential result so I tried it yet again. This time I substited the beginning chains with a magic circle, skipped the 5 sc in the first row, and began with the 10 dc in row 2. I also used a 3.25mm hook with worsted weight cotton yarn which corrected the size issue.
13.07.2017 - 09:11
![]() Corrie Klut wrote:
Corrie Klut wrote:
Op de foto van het rokje lijkt het of er steeds een losse tussen de stokjes van het bovenste tweederde deel zit, de onderkant lijkt wel vaster gehaakt. Wat maakt dit verschil?
30.03.2017 - 10:22DROPS Design answered:
Hoi Corrie. Ik denk dat het simpelweg is dat de rok strakker zit aan de bovenkant dan aan de onderkant - en de steken dan anders eruitziet daar.
30.03.2017 - 11:41
![]() Francine wrote:
Francine wrote:
Pour la majorité des patrons au crochets qu'il faut tourner en rond comme une jupe il ne faut pas tourner à la fin du rang vous attacher avec la première maille du rang et vous revenez sur vos pas si vous tourner votre modèle ne sera pas droit depuis que j'ai changer ma façon de faire je n'ai plus aucun problème avec mes créations
06.01.2017 - 21:25
![]() Wally wrote:
Wally wrote:
Hallo nochmal, womit soll der Knopf geschlossen werden. Macht man da noch eine Schlaufe?
16.05.2014 - 16:13DROPS Design answered:
Die Knöpfe werden einfach durch die Stäbchen hindurch geschlossen. So bleibt der Bikini in der Größe etwas variabler.
16.05.2014 - 22:08
![]() Wally wrote:
Wally wrote:
Hallo, ich verstehe zwei saxhen nicht. Könnt ihr mir helfen? 1. Träger 2. R. Sollen in jedes Stäbchen 2 Stäbchen gehäckelt werden( abzüglich Rand) das ergibt bei mir 16 und nicht 8 Stäbchen 2. Beim zusammennähen des Körbchens, vier Stäbchen in den LM Bogen und dann 5 Reiehn mit je vier Stäbchen, ist das nicht zu lang? Wo liegt mein denkfehler Danke Gruß Wally
15.05.2014 - 16:39DROPS Design answered:
Zur 1. Frage: Die Angabe in der Anleitung war leider fehlerhaft, Sie müssen 1 Stb in jedes Stb häkeln, das wurde nun behoben. Zur 2. Frage: Sie können das Verbindungsstück ja anpassen und so viele R häkeln, wie zu Ihren Maßen passen, oder es ggf an einem gut sitzenden Bikinioberteil ausmessen. Viel Spaß am Strand mit diesem schönen Set!
15.05.2014 - 17:06
![]() :) wrote:
:) wrote:
Witam, czy jest mozliwe zamieszczenie instukcji w jezyku polskim?
12.02.2014 - 08:58
![]() Barby wrote:
Barby wrote:
Cosa significa lavorare ad uncinetto davanti e dietro
31.05.2013 - 09:28DROPS Design answered:
Buon giorno. Nel testo viene indicato, per la spallina, di lavorare avanti e indietro. Non si lavora quindi più in tondo, ma da destra verso sinistra e poi si gira il lavoro. Se però non era questa la sua domanda, se per cortesia, ci può indicare il punto esatto della spiegazione che non le è chiaro. Grazie e buon lavoro!
03.06.2013 - 23:22
![]() Maciac wrote:
Maciac wrote:
Merci pour votre message. Mais, alors, j'imagine qu'avant de tourner, on ne fait pas de mailler coulée. Je trouve que ça fait bizarre sans "fermer" avec un côté plus haut que l'autre!
27.02.2013 - 13:16DROPS Design answered:
Bonjour Madame Maciac, on ne ferme pas avec une mc effectivement vu qu'on ne fait pas un tour entier : on continue en allers et retours, donc à la fin de ces 12 B, on tourne, et, en même temps, on diminue 2 B au début et à la fin du 2ème rang, et au 3ème rang, on diminue également 2 B de chaque côté, pour obtenir un joli rendu une diminution progressive de la bretelle. Bon crochet !
27.02.2013 - 13:52
|
|
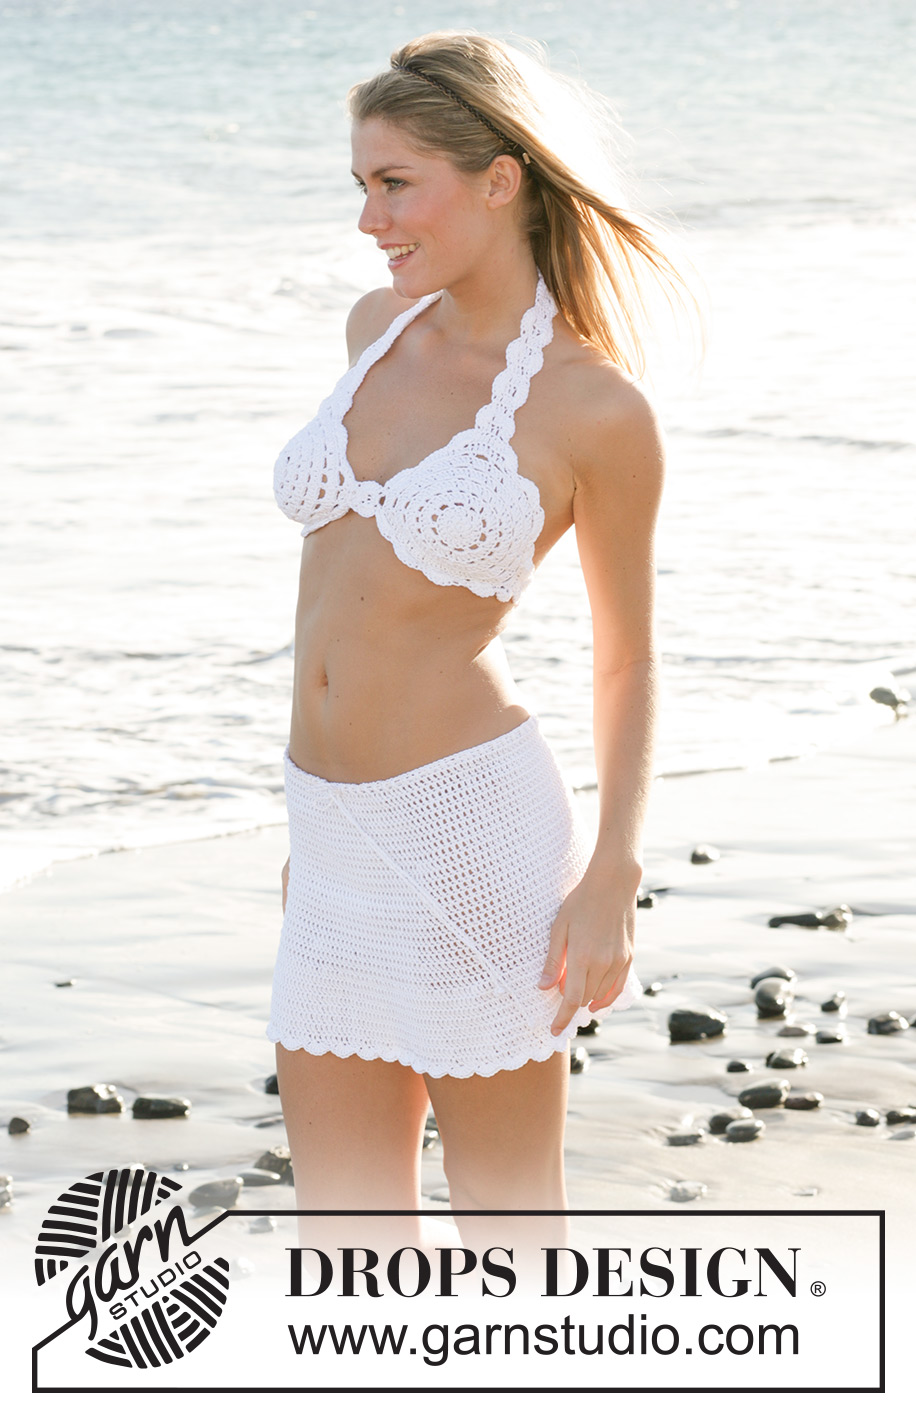
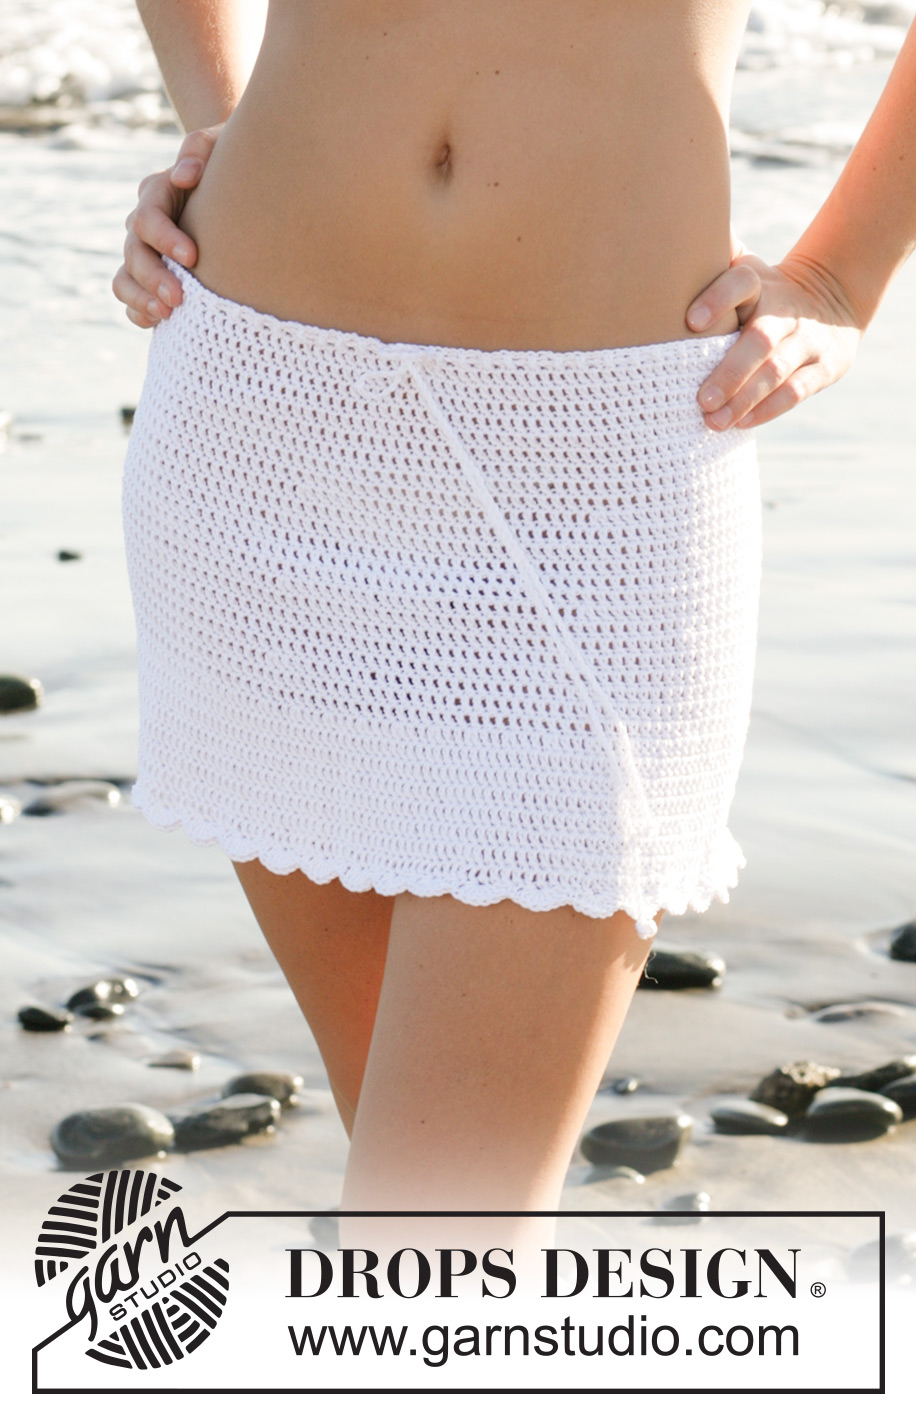
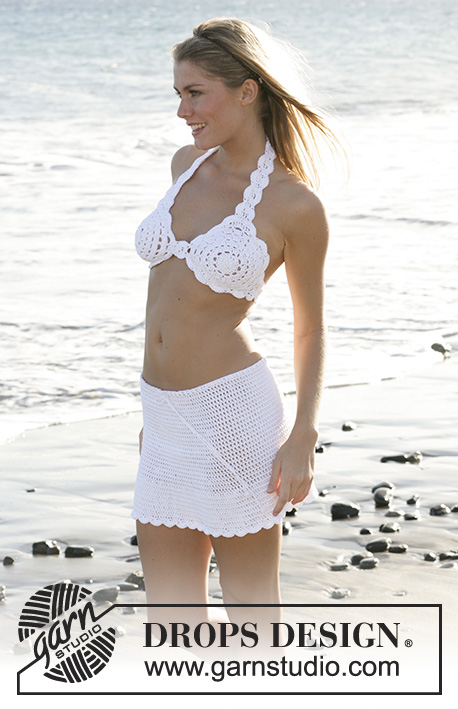
Summer Sweetheart#summersweetheartbikini |
|
 |
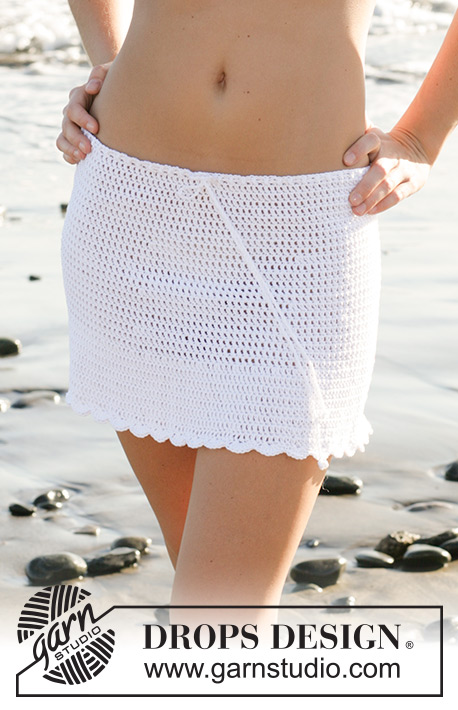 |
DROPS crochet bikini top and skirt in “Muskat” .
DROPS 99-28 |
|
|
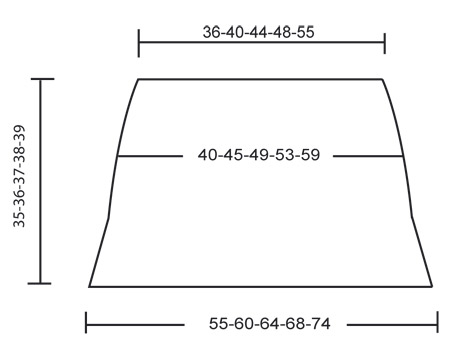
Crochet tension: 16 tr x 10 rows = 10 x 10 cm. Crochet info: Replace the first tr on each round with 3 ch. Replace first dc on round with 1 ch. Finish each round with 1 sl st in first tr/dc/ch. Casting off tip (apply to bikini top): Cast off as follows at beg of row: crochet sl sts on the number of tr to be cast off. Cast off as follows at the end of row: Turn piece when number of tr to be cast off are left on row. Increasing tip (apply to skirt): Inc by crocheting 2 tr in 1 tr. Bikini top: Right cup: A-cup: crochet round 1 to 10, B cup: crochet round 1-12, C cup crochet round 1-14. Right cup: Crochet 4 ch with crochet hook size 4 mm and form a ring with a sl st. Continue as follows: Round 1: 5 dc in ring Round 2: 2 tr in each dc = 10 tr Round 3: 2 tr in each tr = 20 tr Round 4: *4 ch, skip 1 tr, 1 dc in next tr*, repeat from *-*, = 10 ch-loops Round 5: 4 tr in each ch-loop = 40 tr Round 6: *3 ch, skip 1 tr, 1 dc in next tr*, repeat from *-*, = 20 ch-loops Round 7: 3 tr in each of the first 2 ch-loops, *2 tr in next ch-loop, 3 tr in each of the next 2 ch-loops*, repeat from *-*, = 54 tr Round 8: *3 ch, skip 2 tr, 1 dc in next tr, 3 ch, skip 2 tr, 1 dc in next tr, 3 ch, skip 1 tr, 1 dc in next tr*, repeat from *-* and finish round with 3 ch, skip 2 tr, 1 dc in next tr, 3 ch, skip 2 tr and 1 sl st = 20 ch-loops Round 9: 3 tr in first ch-loop, *4 tr in next ch-loop, 3 tr in next ch-loop*, repeat from *-* and finish round with 4 tr in the last ch-loop = 70 tr Round 10: *3 ch, skip 2 tr, 1 dc in next tr, 3 ch, skip 3 tr, 1 dc in next tr*, repeat from *-* = 20 ch-loops (Cup size A finishes here) Round 11: 4 tr in each ch-loop = 80 tr Round 12: 4 ch, skip 3 tr, 1 dc in next tr*, repeat from *-* = 20 ch-loops (Cup size B finishes here) Round 13: Like round 11 = 80 tr Round 14: Like round 12 = 20 ch-loops (Cup size C finishes here) Now crochet shoulder/neck strap. Continue from last round on cup and crochet back and forth. Row 1: 3 tr in first ch-loop, 1 tr in first dc, *3 tr in next ch-loop, 1 tr in next dc*, repeat from *-* a total of 2 times = 12 tr. Turn piece. Row 2: 1 tr in each tr, but cast off 2 tr each side – see Casting off tip = 8 tr. Turn piece Row 3: 1 tr in each tr, but cast off 2 tr each side = 4 tr. Turn piece Row 4: 1 tr in each tr, and continue until strap measures approx 28 cm, or required length. Cut the thread and sew. Now crochet back strap as follows: Crochet as follows in the 5th ch-loop to the left of shoulder/neck strap: Row 1: 4 tr, 1 tr in next dc and 4 tr in next ch-loop = 9 tr Row 2: 1 tr in each tr, but cast off 2 tr each side – see Casting off tip = 5 tr. Turn piece Row 3: 1 tr in each tr, but cast off 1 tr each side = 3 tr. Turn piece Row 4: 1 tr in each tr, and continue until strap measures approx 30 cm, or required length. Cut the thread and sew. Left cup: Like right cup, but crochet back strap in the 5th ch-loop to the right of shoulder/neck strap. Now crochet the 2 cups tog as follows: beg at right cup. Crochet 4 tr in the 4th ch-loop from shoulder strap on the opposite side of back strap. Crochet 5 rows with 1 tr in each tr. Sew this piece to left cup. Crochet border: Crochet round all edges, incl straps and piece between cups, as follows: * 1 dc, skip 2 cm, 6 tr in the same tr, skip 2 cm*, repeat from *-*. Buttons: Sew on 1 button on shoulder/neck strap and 1 button on back strap. Use crochet border as buttonholes. Skirt: Crochet in the round from top down. Read Crochet Info! Crochet 151-171-187-203-231 ch on crochet hook size 4 mm and form a ring with a sl st. Crochet 1 tr in each of the first 3 ch, *skip 1 ch, 1 tr in each of the next 3 ch*, repeat from *-* and finish with 1 sl st in first tr from beg of round = 114-129-141-153-174 tr. Continue with 1 tr in each tr. When piece measures 10, 15 and 20 cm inc 5 tr evenly on round – see Increasing tip = 129-144-156-168-189 tr. When piece measures 25-26-27-28-29 cm inc 48 tr evenly = 177-192-204-216-237 tr. When piece measures 35-36-37-38-39 cn crochet a border along the bottom edge as follows: *1 dc, skip 2 cm, 6 tr in the same tr, skip 2 cm*, repeat from *-*. Cut the thread and sew. Ribbon: Cut 2 threads measuring approx 300 cm each. Twist until they resist and fold them double. Tie a knot either end and pull ribbon through the second row at top of skirt, beg mid front. |
|
 |
|
Have you finished this pattern?Tag your pictures with #dropspattern #summersweetheartbikini or submit them to the #dropsfan gallery. Do you need help with this pattern?You'll find 11 tutorial videos, a Comments/Questions area and more by visiting the pattern on garnstudio.com. © 1982-2026 DROPS Design A/S. We reserve all rights. This document, including all its sub-sections, has copyrights. Read more about what you can do with our patterns at the bottom of each pattern on our site. |
|


With over 40 years in knitting and crochet design, DROPS Design offers one of the most extensive collections of free patterns on the internet - translated to 17 languages. As of today we count 325 catalogues and 12298 patterns translated into English (UK/cm).
We work hard to bring you the best knitting and crochet have to offer, inspiration and advice as well as great quality yarns at incredible prices! Would you like to use our patterns for other than personal use? You can read what you are allowed to do in the Copyright text at the bottom of all our patterns. Happy crafting!
Post a comment to pattern DROPS 99-28
We would love to hear what you have to say about this pattern!
If you want to leave a question, please make sure you select the correct category in the form below, to speed up the answering process. Required fields are marked *.