
Popular categories
Looking for a yarn?


Comments / Questions (49)
![]() Nathalie wrote:
Nathalie wrote:
Ich verstehe beim Rücken den Teil mit dem Schlitz nicht. Bitte genaue Beschreibung
27.04.2026 - 18:28DROPS Design answered:
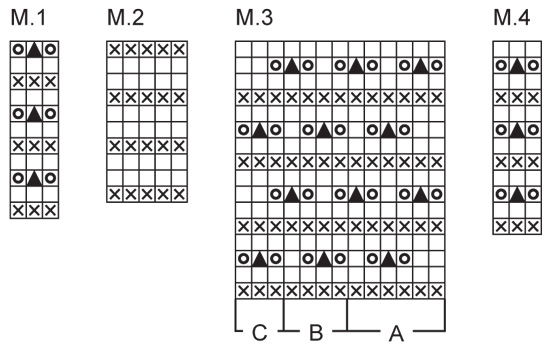
Liebe Nathalie, bei der Jacke gibt einen 15 cm Schlitz beidseitig, so man strickt zuerst 15 cm mit Muster und 3 Maschen kraus rechts beidseitig, und nach 15 cm wird man eine extra Masche beidseitig für die Naht anschlagen. Dann strickt man 4 Reihen mit 3 Maschen krausrechts beidseitig und nach diesen 4 Reihen strickt man die beidseitigen Maschen glattrechts (und die anderen dazwischen immer wie zuvor). Viel Spaß beim Stricken!
28.04.2026 - 08:22
![]() Pilar wrote:
Pilar wrote:
En el patrón 81-5 no entiendo cómo hacer el punto que es un ⏺️. Pone: 2 heb, en la siguiente fila dejar caer una heb y trabajar del revés la otra
10.03.2026 - 22:43
![]() Joke wrote:
Joke wrote:
Achterpand: “ brei 4 nld in patroon..” welk patroon wordt hier bedoeld? “ en brei hierna tricotsteek over alle steken”…. Wordt hier bedoeld dat je tricotst breidt zonder M1 motief?
28.10.2025 - 19:29DROPS Design answered:
Dag Joke,
Je zet in dit geval het patroon voort waar je mee bezig was op het achterpand, dus telpatroon 1 met tricotsteek ertussen.
29.10.2025 - 18:05
![]() Joke wrote:
Joke wrote:
Top: achterpand/hals:”kant vervolgens 1x2 steken af voor de hals…”. Zit deze afkanting dan pal naast de middelste 35 st die al afgekant zijn? Daarna weer doorgaan met het patroon over 11 steken voor de schouder?
09.10.2025 - 10:14DROPS Design answered:
Dag Joke,
Ja, deze zitten direct naast de reeds afgekante steken, maar dan 1 naald later.
09.10.2025 - 21:26
![]() Joke wrote:
Joke wrote:
Ik heb een vraag over Hals: “ neem ca 105-125 steken op ( incl. de hulpdraden) langs de hals. Vraag: staan de middelste steken van het voor en achterpand ( voor de hals) op een draad of zijn deze reeds afgekant? Of is het de bedoeling dat ik rond de gehele hals met een haaknaald tussen de 105-125 steken ga maken en dan met een rondbreinaald 3 nld. Ribbelsteek brei en dan afkant? Wat zijn de hulpdraden langs de hals?
08.10.2025 - 14:42DROPS Design answered:
Dag Joke,
Als het goed is heb je ook een aantal steken op hulpdraden of hulpnaalden gezet langs de hals. Deze zet je nu weer op de naald en samen met de steken die je opneemt rondom de hals heb je in totaal 105 tot 125 (dit aantal is dus inclusief de steken die op die hulpnaalden/draden stonden).
08.10.2025 - 19:37
![]() Carla Saccani wrote:
Carla Saccani wrote:
Le misure delle maniche sono sbagliate, ci vogliono molti più punti
11.08.2025 - 20:49
![]() Carole wrote:
Carole wrote:
Bonsoir…merci pour l’info. Mais j’ai finalement trouvé mon erreur…je connaissais le point mais je n’arrivais jamais à 6 m. M3A… J’avais séparé m3a-b et c avec des marqueurs…j’a enlevé tous mes 3 marqueurs et maintenant ça fonctionne…merci quand même pour votre aide…
29.04.2025 - 01:59
![]() Carole wrote:
Carole wrote:
Bonjour…je ne comprend pas! Les diagrammes du modele DROPS 81-5 SUMMER SHADOWS ne foncrionne pas… le triangle sur l’endroit : glisser 1 m à l’end, 2 m ens à l’end, passer la m glissée par-dessus la m. Tricotée….il me manque toujours 1 m. Pourquoi? Merci
26.04.2025 - 21:24DROPS Design answered:
Bonjour Carole, lorsque vous tricotez ce symbole, vous diminuez 2 mailles, et en même temps, vous faites 1 jeté avant et 1 jeté après cette double diminution, votre nombre de mailles doit ainsi rester la même. Bon tricot!
28.04.2025 - 08:09
![]() Zoe Mason-Chard wrote:
Zoe Mason-Chard wrote:
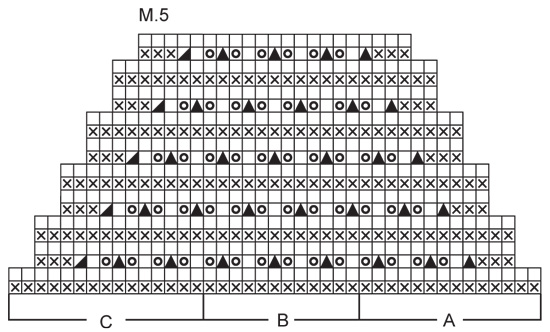
Hi , a bit confused, I am starting the M5 chart , do I decrease each end with skpo and K2 tog as before as well as K3 tog as stated in the diagram or is the K3 tog in the chart the decrease as it is only on the chart when decreasing is needed , thanks Zoe
30.10.2023 - 23:15DROPS Design answered:
Dear Zoe, in M.5A you will start by decreasing with Slip 1, K2 tog, peso and you will end M.5 with M.5C and K3 tog just as shown in diagram. Happy knitting!
31.10.2023 - 15:53
![]() Veronica Righi wrote:
Veronica Righi wrote:
Buongiorno ,Che rimanessero 11 maglie ci ero arrivata ! Ma continuando con il motivo fino a 56 cm di lunghezza inevitabilmente si riducono , per questo le ho chiesto aiuto , altrimenti provero' a chiedere a qualche professionista . La ringrazio per la disponibilità
07.05.2023 - 15:11
|
||||||||||||||||
Summer Shadows |
||||||||||||||||
|
|
||||||||||||||||
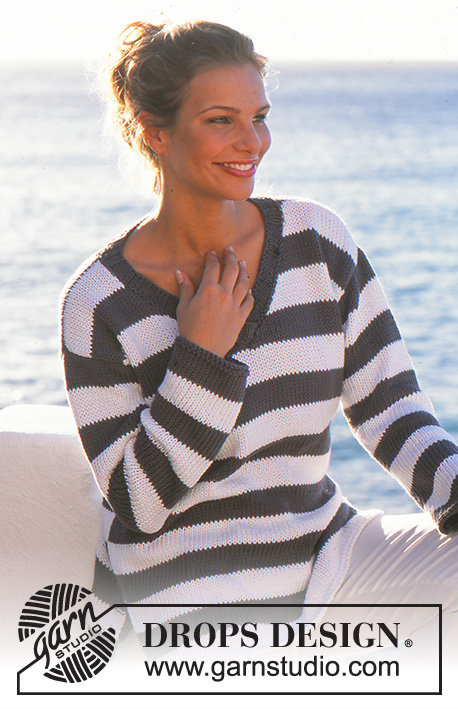
DROPS Top and Cardigan in Muskat
DROPS 81-5 |
||||||||||||||||
|
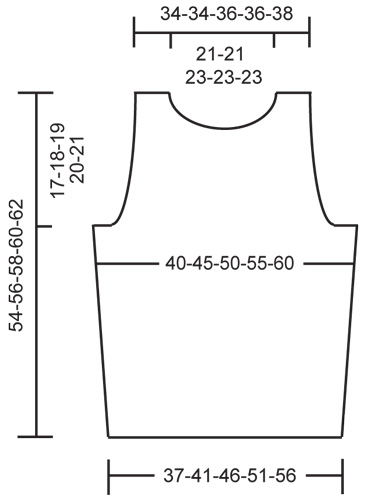
TOP: Gauge: Stockinette st: 21 sts x 28 rows = 10 x 10 cm. Pattern: 17 sts = 10 cm in width Pattern: See charts for Patterns 4 and 5. The pattern is seen from the right side. Knitting tips (for the first 2 decs at armhole edge): All decs are made from right side. Dec 1 st inside of 3 edge sts in garter st as follows: After 3 ede sts: Slip 1 st as if to knit, K 1, psso. Before 3 edge sts: K 2 tog. Front: Cast on 79-89-99-109-119 sts and knit 4 rows garter st. Establish pattern on the next row as follows (right side row): K 1 (edge st knit in garter st), 7-6-11-10-15 sts stockinette st, * Pattern 4 (= 3 sts), 17-21-21-25-25 sts stockinette st *, repeat from * - * a total of 3 times, finish with Pattern 4 (= 3 sts), 7-6-11-10-15 sts stockinette st and K 1 (edge st knit in garter st). Continue in pattern as established. When the piece measures 10 cm inc 1 st at each side every 7 cm a total of 4 times = 87-97-107-117-127 sts – knit the increased sts in stockinette st. Read the entire section before knitting: Armhole: When the piece measures 36-37-38-39-40 cm knit 4 rows with garter st over the 6-7-8-9-10 sts at each side (knit the remaining sts the same as before), then bind off 3-4-5-6-7 sts at each side for armhole. Keep 3 sts in garter st at each side and dec 1 st at each side every other row 2 times – see knitting tips = 77-85-93-101-109 sts. K 1 row back (wrong side row), decreasing 8 sts evenly distributed on the row = 69-77-85-93-101 sts. Knit the next row as follows from right side: Pattern 5A (= 14 sts), Pattern 5B over 40-48-56-64-72 sts, Pattern 5C (= 15 sts) – this is 2 rows of purl over all sts, including the 3 sts at each side previously knit in garter st. From now on, P these 3 sts every row. Dec at each side as seen in Pattern 5 a total of 3-5-6-8-9 times. The chart shows a maximum of 5 decs – for Size S, stop decreasing after 3 decs, for Sizes L + XL + XXL, continue to decrease as before, even though it is not shown on the chart. Continue the pattern, now keeping the 3 edge sts in garter st at each armhole – sts that are not in pattern, knit in stockinette st. Neck: When the piece measures 46-47-48-49-50 cm put the center 19-19-23-23-23 sts on a st holder for the neck. Continue with pattern, and dec at each neck edge in the manner that you decreased for armholes (= Pattern 5) 4 times. After all armhole and neck shaping is complete 11-11-11-11-13 sts remain on each shoulder (= 3 sts in garter st + 8-8-8-8-10 sts pattern). Continue the pattern and bind off when the piece measures 54-56-58-60-62 cm. Back: Cast on and knit the same as the front. Bind off for armhole as on front = 57-57-61-61-65 sts. When the piece measures 51-53-55-57-59 cm bind off the center 31-31-35-35-35 sts for the neck. Then bind off 2 sts 1 time for the neck as on front = 11-11-11-11-13 sts remain on each shoulder. Bind off when the piece measures 54-56-58-60-62 cm. Assembly: Sew right shoulder. Neckband: Pick up approx. 105-125 sts (incl. sts on st holders) around the neck. Knit 3 rows garter st, bind off. Sew left shoulder and up along neckband. Sew side seams using edge sts as seam allowance. CARDIGAN IN MUSKAT: Sizes: S - M - L - XL - XXL Finished measurements: Bust: 90-100-110-120-128 cm Materials: DROPS MUSKAT from Garnstudio 600-650-700-750-850 gr nr 24, grey. DROPS 4 mm needles, or size needed to obtain correct gauge. 5 DROPS Silver buttons nr 533 Gauge: Stockinette st: 21 sts x 28 rows = 10 x 10 cm. Pattern: 17 sts = 10 cm in width Pattern: See charts for Patterns 1, 2 and 3. The pattern is seen from the right side. Knitting tips (for neck shaping): All decs are made on right side rows. Dec inside of 5 edge sts in garter st by P 2 tog. Back: Cast on 95-105-115-125-135 sts and knit 6 rows garter st. Establish pattern on the next row as follows: K 3 (edge sts in garter st for side split edge), 7-12-11-16-15 sts stockinette st, * Pattern 1 (= 3 sts), 21-21-25-25-29 sts stockinette st *, repeat from * - * a total of 3 times, finish with Pattern 1 (= 3 sts), 7-12-11-16-15 sts stockinette st and K 3 sts (edge sts in garter st for side split edge). Continue in pattern as established. When the piece measures 15 cm end side split and cast on 1 new st at each side = 97-107-117-127-137 sts. Knit 4 rows in pattern keeping 4 sts in garter st at each side, then knit stockinette st over all sts. When the piece measures 38 cm knit Pattern 2 one time, then knit reverse stockinette st to finished measurements. When the piece measures 49-50-51-52-53 cm bind off for armhole at each side every other row: 4 sts 1 time, 3 sts 0-1-1-2-2 times, 2 sts 1-2-3-4-5 times and 1 st 4-3-5-4-5 times = 77-79-81-83-87 sts. When the piece measures 65-67-69-71-73 cm knit 4 rows with garter st over the center 33-35-35-37-37 sts (knit the remaining sts the same as before). Then bind off the center 23-25-25-27-27 sts for the neck edge (bind off a little tightly). Then dec 1 st at each neck edge every other row 2 times – see knitting tips = 25-25-26-26-28 sts remain on each shoulder. Bind off when the piece measures 68-70-72-74-76 cm. Left front: Cast on 53-58-63-68-73 sts and knit 6 rows garter st. Establish pattern on the next row as follows (from right side): K 3 (edge sts in garter st for side split), 7-12-11-16-15 sts stockinette st, Pattern 1 (= 3 sts), 21-21-25-25-29 sts stockinette st, Pattern 1 (= 3 sts), 11-11-13-13-15 sts stockinette st and K 5 (buttonband sts in garter st). When the piece measures 15 cm end side split and cast on 1 new st at the side = 54-59-64-69-74 sts. Knit 4 rows in pattern keeping 4 sts in garter st at the side, then knit stockinette st over all sts. When the piece measures 38 cm knit Pattern 2 over all sts (keep buttonband sts in garter st). Then knit reverse stockinette st and buttonbands in garter st to finished measurements. Read entire section before knitting: Neckband: When the piece measures 45-46-47-48-49 cm dec 1 st for the neck – see knitting tips: every other row 10 times and then every 4 rows 9-10-10-11-11 times. Armhole: When the piece measures 49-50-51-52-53 cm bind off for armhole at the side as on back. After all armhole and neck shaping is complete 25-25-26-26-28 sts remain on shoulder. Bind off when the piece measures 68-70-72-74-76 cm. Right front: Cast on and knit the same as the left, reversing all shaping. Make buttonholes along buttonband. 1 buttonhole = K tog the 2nd and 3rd sts from center front edge and yo. Make buttonholes when the piece measures: Size S: 11, 19, 27, 35 and 43 cm. Size M: 12, 20, 28, 36 and 44 cm. Size L: 13, 21, 29, 37 and 45 cm. Size XL: 14, 22, 30, 38 and 46 cm. Size XXL: 15, 23, 31, 39 and 47 cm. Sleeve: Loosely cast on 43-43-47-47-47 sts. Knit 6 rows garter st, then establish pattern on the next row as follows: K 1 (edge st knit in garter st), Pattern 3A (= 6 sts), Pattern 3B over 32-32-36-36-36 sts, Pattern 3C (= 3 sts) and K 1 (edge st knit in garter st). When the piece measures 14 cm inc 1 st at each side every 4.5-3-3-2-2 cm a total of 8-10-10-12-13 times = 59-63-67-71-73 sts – knit the increased sts in stockinette st until there are enough increased sts to knit in the pattern. When sleeve measures 48-46-44-42-41 cm bind off for sleeve cap at each side every other row: 3 sts 1 time and 2 sts 2 times, then dec 1 st at each side until the piece measures 54 cm, then bind off 2 sts 1 time and then bind off 3 sts 1 time at each side. The piece measures approx. 56 cm, bind off the remaining sts. Assembly: Sew shoulder seams. Sew in sleeves. Sew sleeve and side seams using edge sts as a seam allowance, leaving side split open at each side. Sew on buttons. |
||||||||||||||||
Diagram explanations |
||||||||||||||||
|
||||||||||||||||
 |
||||||||||||||||
 |
||||||||||||||||
 |
||||||||||||||||
 |
||||||||||||||||
Have you finished this pattern?Tag your pictures with #dropspattern or submit them to the #dropsfan gallery. Do you need help with this pattern?You'll find 27 tutorial videos, a Comments/Questions area and more by visiting the pattern on garnstudio.com. © 1982-2026 DROPS Design A/S. We reserve all rights. This document, including all its sub-sections, has copyrights. Read more about what you can do with our patterns at the bottom of each pattern on our site. |
||||||||||||||||


With over 40 years in knitting and crochet design, DROPS Design offers one of the most extensive collections of free patterns on the internet - translated to 17 languages. As of today we count 324 catalogues and 12290 patterns translated into English (UK/cm).
We work hard to bring you the best knitting and crochet have to offer, inspiration and advice as well as great quality yarns at incredible prices! Would you like to use our patterns for other than personal use? You can read what you are allowed to do in the Copyright text at the bottom of all our patterns. Happy crafting!
Post a comment to pattern DROPS 81-5
We would love to hear what you have to say about this pattern!
If you want to leave a question, please make sure you select the correct category in the form below, to speed up the answering process. Required fields are marked *.