
Popular categories
Looking for a yarn?


Comments / Questions (151)
![]() Sofie Nielsen wrote:
Sofie Nielsen wrote:
Halstørklædet: Hvad gør jeg med garnet, når jeg skifter til 2. lag ved hullet: "Sæt m fra den første sikkerhedsnål over på p og strik retstrik over disse masker" - her kommer garnet til at tage et spring. Skal jeg klippe det og strikke det ind eller er der en smart måde? Hvis der er en video, som viser det, kan jeg ikke finde den. De videoer, der er henvist til opskriften har ikke et link og jeg kan kun se dem, når jeg printer. Tak.
17.10.2013 - 22:34
![]() Margareta wrote:
Margareta wrote:
Round cord I found the answer online to my question.
17.10.2013 - 09:02
![]() PRETEUX wrote:
PRETEUX wrote:
Si on augmente sur l'endroit au debut du rang et sur l'envers a la fin du rang cela signifie que l'on augmente toujours du meme cote, or l'echarpe s'evase bien des 2 cotes..
13.10.2013 - 09:50
![]() Vanessa wrote:
Vanessa wrote:
Beste, ook ik zit al een uur te turen op de uitleg: vanaf 11cm moet je een steek minderen op de goede kant in elke vierde naald en in elke tweede naald een steek minderen. Tot hier ben ik volledig mee. Maar jullie zeggen ook dat de meerderin moet gebeuren op de goede kant van het werk maar de goede kant van het werk zijn de oneven naalden??
16.06.2013 - 11:43DROPS Design answered:
Je meerdert in elke 2e nld en mindert in elke 4e nld. Het heeft niets te doen met het nummer van de nld. Bijvoorbeeld; je breit 1 nld op de goede kant en meerdert. Dan brei je 1 nld op de verkeerde kant (= 1e nld) en in de volgende nld op de gode kant (= 2 nld) meerder je nog een keer. Ik hoop dat het zo duidelijk is.
19.06.2013 - 13:35
![]() Brenda wrote:
Brenda wrote:
Love the pattern. Never tried knitting on dp needles but this pattern makes me want to try.
03.04.2013 - 22:50
![]() 14 16 wrote:
14 16 wrote:
Seria possivel de ver a video do caichecol
13.01.2013 - 23:55DROPS Design answered:
Na parte de cima do site, na página inicial, tem um separador "Dicas e ajuda" com mais de 200 vídeos que ensinarão tudo a você sobre como tricotar qualquer peça! Confira e descobrirá muitas dicas! Bom tricô!
17.01.2013 - 11:25
![]() Maria Bader wrote:
Maria Bader wrote:
Haben sie eine skizze über die noch nicht zusammengenähte mütze bezw. bis zu wieviel Maschen geht man bei jeder 2. bezw. jeder 4. Reihe? Mit Grüßen Maria Bader
07.11.2012 - 16:36
![]() Christina Larsson wrote:
Christina Larsson wrote:
Förstår mej inte på tubstickningens mönster, har provat alla möjliga sätt. bara 4 maskor men så svårt.Hopp om hjälp MVH christina Larsson
25.04.2012 - 13:24DROPS Design answered:
Prova att titta på videon som är länkad från mönstret under mönstertexten. Det kanske kan hjälpa.
25.04.2012 - 22:04
![]() Mari wrote:
Mari wrote:
Ble helt feil for meg på lua. når jeg har satt merketråd, skal jeg da felle i hver 4. pinne og øke i hver 2. pinne til arbeidet måler 21 cm(str 6-9mnd) fra merketråden, eller fra oppleggskanten?
22.04.2012 - 16:23DROPS Design answered:
Etter merketråden felles det på høyre siden på hver 4. p. og det økes på hver 2. p. på venstre side. Til arb måler totalt 21 cm.
23.04.2012 - 09:18
![]() Hege wrote:
Hege wrote:
Jeg forstår ikke hva dere mener med 4. pinne på aviator luen. Synes det er dårlig forklart. Betyr det at for hver fjerde pinne skal en øke, men en for hver 2. pinne skal felle av. Hvor mange masker sitter en da igjen med når man er kommet på midten?
02.04.2012 - 07:41DROPS Design answered:
Ja, på hver 4. p økes det på høyre side og på hver 2. p felles det i venstere side.
10.04.2012 - 10:11
|
|
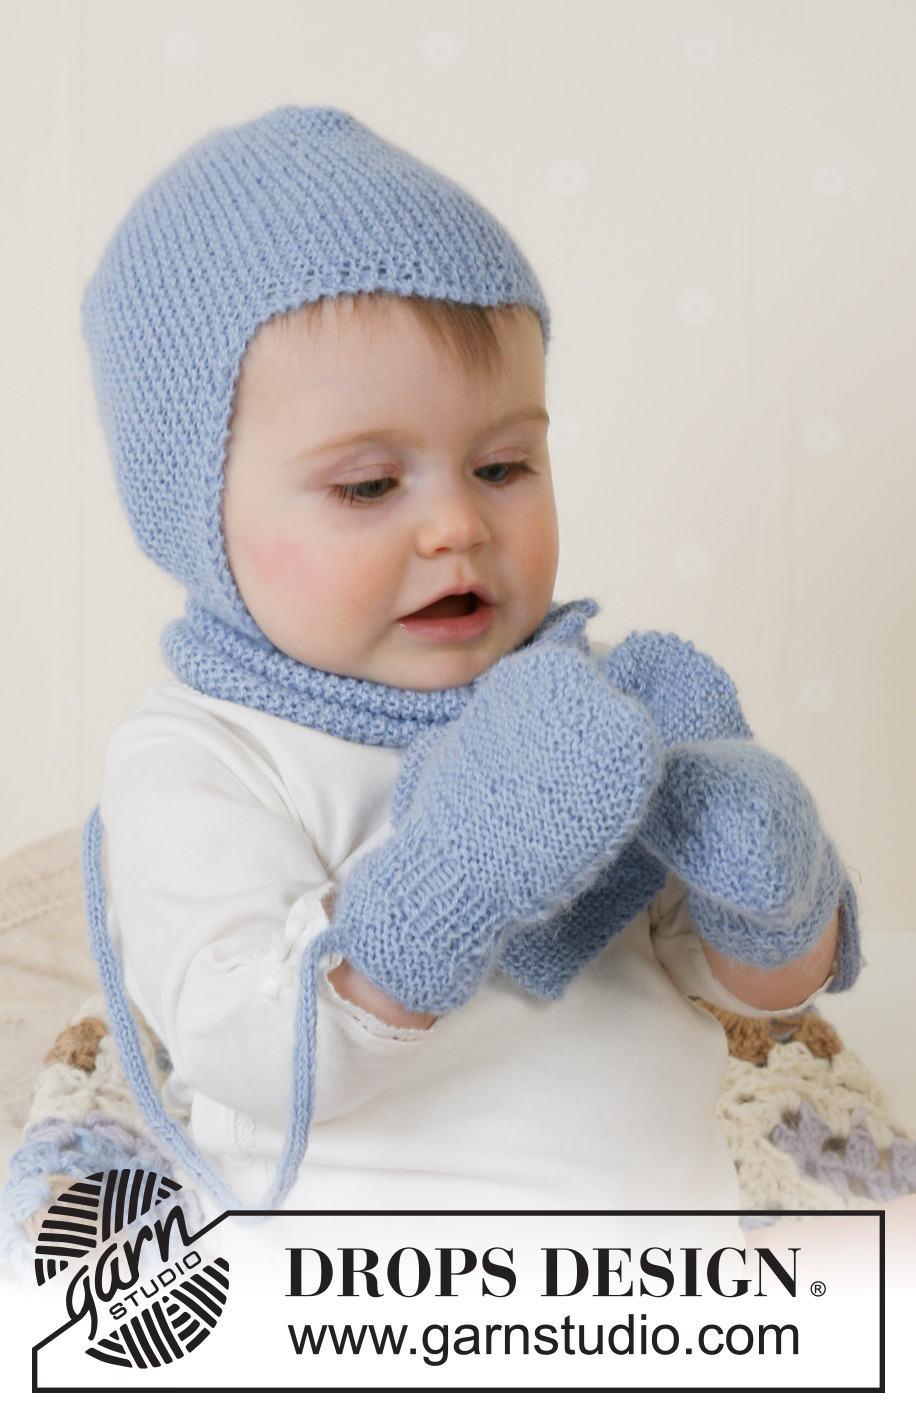
Baby Aviator Hat#babyaviatorhat |
|
 |
 |
Set of knitted helm hat, scarf and gloves for baby in DROPS Alpaca. Sizes from 1 month to 4 years.
DROPS Baby 14-16 |
|
|
Knitting tension: 26 sts x 52 rows on needles size 2.5mm in garter sts = 10 x 10 cm. Garter sts (back and forth on needle): Knit all sts. Tube knitting: *K1, put thread in front of piece, slip 1 st as if to purl, put thread behind piece*, repeat from *-* on all rows. This creates a round string. HAT: Cast on 33-38-42 (46-50) sts on needle size 2.5mm. Knit garter sts, at the same time inc 1 st at the right side and dec 1 st at the left side as follows: 1st row (=right side): K2, yo (= 1 inc), knit until there are 4 sts left on row and K2 tog, K2. 2nd row (=wrong side): Knit (knit yo into back of st). Repeat these two rows until piece measures 5.5-6-6.5 (7-8) cm. Now dec 1 st at the right side and inc 1 st at the left side as follows: Right side: K1, slip 1 st as if to knit, K1, psso, knit until there are 2 sts left, yo, K2 Wrong side: Knit (knit yo into back of st). Repeat these two rows until piece measures 11-12-13 (14-16) cm. Continue to inc 1 st at the right side on every 4th row and dec 1 st at the left side on every other row until piece measures 15.5-16.5-17.5 (18-19) cm. Insert a marking thread each side. Continue as follows: Dec 1 st at the right side on every 4th row and inc 1 st at the left side on every other row until piece measures 20-21-22 (22-22) cm. Now dec 1 st at the left side on every other row and inc 1 st at the right side on every other row until piece measures 25.5-27-28.5 (29-30) cm. Dec 1 st at the right side on every other row and inc 1 st at the left side on every other row until finished measurements. = 31-33-35 (36-38) cm. Cast off. Assembly: Back of hat = the side of piece with 2 whole points and 2 half points. The middle of the 3 whole points on the other side of the hat = point sitting at the middle of the forehead. Sew seams together with small, neat sts as follows: Sew tog back of hat by sewing tog the first half point with the first half of the first whole point. Now sew tog the other half of the first whole point with the first half of the second whole point. Now sew tog the other half of the second whole point with the last half of point. Sew hat tog mid back. String: Cast on 4 sts on needle size 2.5mm. Knit tube as described above. Cast off when tube measures approx 16-18-20 (22-24) cm. Knit another tube and attach strings to each side of hat. SCARF: Cast on 4 sts on needle size 2.5mm and knit garter sts, at the same time increasing as follows: Right side: Knit 2 sts in first st Left side: Knit 2 sts in last but one st. Inc on every other row a total of 10-11-12 (13-14) times = 24-26-28 (30-32) sts. Knit garter sts until piece measures 8-9-10 (11-12) cm. Knit next row as follows: *K1, put 1 st on safety pin (or cable needle) behind the piece*, repeat from *-* until the end of row. There are now 12-13-14 (15-16) sts on row and 12-13-14 (15-15) sts on safety pin/cable needle. Knit 4-4-4 (5-5) cm garter sts over sts on needle and put these on a new safety pin/cable needle. Put sts from the first safety pin/cable needle back on needle and knit garter sts over these until this piece is of the same length. Put the 2 pieces together again by knitting 1 st from needle and 1 st from safety pin/cable needle alternately until all sts are back on needle = 24-26-28 (30-32) sts. Knit garter sts until piece measures 40-42-46 (50-54) cm. Continue in garter stitch at the same time as decreasing in each side by knitting the 2 second outermost sts together. Dec like this on every 2nd row until there are 4 sts left on needle. Cast off. The scarf measures approx 44-47-51 (55-60) cm. MITTENS: Garter sts (on circular needle): Knit 1st round, purl 2nd row. The 3 bigger sizes with thumbs, the 2 smaller sizes without. The mitten is knitted round on double pointed needles. Loosely cast on 34-36-38 (40-42) sts with Alpaca on needles size 2.5mm and knit 12 rounds garter sts – see explanation above – at the same time on the last round dec evenly to 28-30-32 (34-36) sts. Continue in Rib with K1/P1. When piece measures 3-3-3 (4-4) cm knit garter sts, at the same time on 1st round increasing evenly to 30-33-36 (39-42) sts – insert a marker and measure piece from here from now on. The 3 bigger sizes: After 1 (2-3) cm, put the last 5 (5-6) sts on round on a thread for thumb. Cast on 5 (5-6) new sts over the thread on next row. All sizes: When piece measures 6-7-8 (9-10) cm dec as follows on next knitted round: *K1, K2 tog*, repeat from *-* until the end of round = 20-22-24 (26-28) sts. *Purl 1 round, on next round knit tog all sts 2 and 2*, repeat from *-* 1 more time. Pull a double strand of Alpaca through remaining sts, pull tight and sew. Thumb: Put the 5 (5-6) sts from thread back on double pointed needles size 2.5 mm and pick up 6 (6-7) sts behind these = 11 (11-13) sts. Knit garter sts until thumb measures 3 (4-5) cm. Now knit all sts tog 2 and 2. Pull thread through remaining sts and sew. Knit another mitten, but knit the thumb the other side (applies to the 3 bigger sizes). String: Cast on 4 sts using Alpaca on needles size 2.5 mm and knit a tube as follows: *K1, put thread in front of piece, slip 1 st as if to purl, put thread behind piece*, repeat from *-* on all rows until string measures approx 62-67-74 (86-96) cm (length between child’s wrists). Cast off and attach string to each mitten. |
|
Have you finished this pattern?Tag your pictures with #dropspattern #babyaviatorhat or submit them to the #dropsfan gallery. Do you need help with this pattern?You'll find 20 tutorial videos, a Comments/Questions area and more by visiting the pattern on garnstudio.com. © 1982-2026 DROPS Design A/S. We reserve all rights. This document, including all its sub-sections, has copyrights. Read more about what you can do with our patterns at the bottom of each pattern on our site. |
|


With over 40 years in knitting and crochet design, DROPS Design offers one of the most extensive collections of free patterns on the internet - translated to 17 languages. As of today we count 324 catalogues and 12290 patterns translated into English (UK/cm).
We work hard to bring you the best knitting and crochet have to offer, inspiration and advice as well as great quality yarns at incredible prices! Would you like to use our patterns for other than personal use? You can read what you are allowed to do in the Copyright text at the bottom of all our patterns. Happy crafting!
Post a comment to pattern DROPS Baby 14-16
We would love to hear what you have to say about this pattern!
If you want to leave a question, please make sure you select the correct category in the form below, to speed up the answering process. Required fields are marked *.