
Popular categories
Looking for a yarn?


Comments / Questions (97)
![]() Helena wrote:
Helena wrote:
Dobrý den, chtěla bych se zeptat, jaká délka kruhových jehlic znacky Drops je ideální pro pletení tohoho svetru ve velikosti S/M. Děkuji Helena
22.11.2014 - 17:41DROPS Design answered:
Dobrý den, Heleno, nejvhodnější jsou kruhové jehlice délky 80 cm. Hodně zdaru! Hana
22.11.2014 - 22:43
![]() Birgit Ludwig wrote:
Birgit Ludwig wrote:
Gibt es zu diesen Herren Pulloover auch eine Anleitung in Größe 50 (M)? Würde mich sehr darüber freuen. Welche Farbnummer hat dieser Pullover und wie viel wird für Gr. 50 benötigt. Mfg. Ludwig
27.09.2014 - 19:27DROPS Design answered:
Liebe Frau Ludwig, die verfügbaren Größen sehen Sie oben im Kopf: (12/14 Jahre) S/M - L - XL/XXL, d.h. in der Anleitung beschreibt die Zahl in der Klammer den Pullover für die Kindergröße und die anderen Zahlen beschreiben den Pullover für die jeweilige Herrengröße. Welche Maße zu der jeweiligen Größe gehören, können Sie der Schnittzeichung entnehmen, dort sind die Maße in derselben Reihenfolge aufgeführt.
28.09.2014 - 11:14Julie wrote:
Bonjour. La taille est indiqué seulement en 12/14 ans,comment savoir pour la grandeur en centimètre ?. Merci. Julie
05.04.2014 - 22:40DROPS Design answered:
Bonjour Julie, vous trouverez à la fin des explications un schéma avec toutes les mesures pour chaque taille. Ces mesures sont prises à plat, d'un côté à l'autre. Pour la taille 12/14 ans, ce sont les premiers nombres. Bon tricot!
07.04.2014 - 09:55
![]() Sabine wrote:
Sabine wrote:
Hallo, Könnte man dieses Modell auch in Cotton Merino stricken?
23.03.2014 - 09:22DROPS Design answered:
Liebe Sabine, Alaska gehört zu Garngruppe C, Cotton Merino zu Gruppe B. Innerhalb der Gruppe C können Sie Alaska gut ersetzen (ggf. ist der Verbrauch anders). Auch eine andere Garngruppe kann jedoch ggf. passen, Sie müssen dafür aber unbedingt die Maschenprobe einhalten. Cotton Merino ist dünner als Alaska, daher ergibt sich ein lockereres Strickbild, der Pullover fällt dadurch insgesamt lockerer. Probieren Sie am besten an einem Probestück aus, wie es Ihnen gefällt.
23.03.2014 - 12:18
![]() Mona wrote:
Mona wrote:
Hallo, ich habe Mühe mit dem Halsausschnitt, warum Maschen stilllegen und dann noch abnehmen gegen den Hals hin und dann heisst es noch " auch Maschen vom Hilfsfaden", ich versteh leider nur Bahnhof, kann mir jemand helfen???? Vielen Dank
27.01.2014 - 15:05DROPS Design answered:
Liebe MOna, wir haben diese ABschnitt neu formuliert und hoffen, dass es jetzt klarer ist. Grundsätzlich werden für die Halsblende aus den abgeketteten Maschen neue Maschen aufgefasst und die stillgelegten wieder anktiviert.
28.01.2014 - 07:51
![]() Lovison wrote:
Lovison wrote:
Bonjour j ai un problème par rapport aux diminution il est écrit que l on doit rabattre 12 mailles de chaques côtés pour les emmanchures (= 3m end 6 m env 3m end) = 108 m pour le dos et le devant en ce qui converne la taille xl j ai du mal a comprendre doit on diminuer d'1 maille de chaque côté donc devant et derrière ce qui fait 4 mailles sur 1 rang? j ai vraiment besoin d aide merci
20.01.2014 - 12:58DROPS Design answered:
Bonjour Mme Lovison, pour rabattre les mailles des emmanchures, tricotez jusqu'à 6 m avant le marqueur repère côté, rabattez les 12 m suivantes (6 m avant et 6 m après le marqueur), tricotez les mailles suivantes jusqu'à 6 m avant le 2ème marqueur côté, et rabattez 12 m de la même façon. Il reste 108 m pour le devant et autant pour le dos. Bon tricot!
20.01.2014 - 13:21
![]() Bourgeois wrote:
Bourgeois wrote:
Bonjour Il est dit de joindre après le montage des mailles, puis vous parlez de "rangs" et non de tours...et d'après les explications du montage, le tricot se fait en rond? est ce exact? Merci de votre réponse
14.01.2014 - 11:19DROPS Design answered:
Bonjour Mme Bourgeois, c'est exact, le pull se tricote entièrement en rond, dos & devant + manches jusqu'aux emmanchures, puis toutes les pièces ensemble, en rond jusqu'aux mailles rabattues pour l'encolure, on continue alors en allers et retours pour rabattre les mailles de chaque côté. Le col se fait ensuite également en rond. Bon tricot!
14.01.2014 - 13:57
![]() Dolina Von Raedern wrote:
Dolina Von Raedern wrote:
Hallo, da der Pullover schmaler wird als angegeben, wüsste ich gerne um wie viel. Bei einem Hüftumfang von 90 cm müsste ich normalerweise in der kleinsten Größe stricken. ist das richtig oder doch lieber die zweite Größe? Vielen Dank im voraus.
06.01.2014 - 22:32
![]() Monica wrote:
Monica wrote:
Hello. I am very confused about the increases in the sleeve. First, do I purl the three stitches after the marker, then add one stitch that I knit, then knit 6 purl 6 all the way around until I get to the last three purl stitches - where I add one stitch, which I knit, then knit the last three purl stitches before the marker? I find this confusing because then the first and last knit ribs before the stitch marker contain 7 stitches, not 6. Please help!!
16.11.2013 - 17:32DROPS Design answered:
Dear Monica, you will inc for sleeve each side of P6 mid under sleeve. First 6 inc should be P and next 6 inc should be K so that you will keep ribbing. Happy knitting!
18.11.2013 - 09:38
![]() Liesbeth wrote:
Liesbeth wrote:
Is het ook mogelijk dit patroon te beschrijven voor breien op 2 naalden i.p.v. rondbreinaald?
11.11.2013 - 21:02DROPS Design answered:
Hoi Liesbeth. Je kan natuurlijk altijd proberen een patroon aan te passen naar heen en weer breien, maar het is altijd lastiger met raglan.
12.11.2013 - 11:56
|
|
Of The Sea |
|
 |
 |
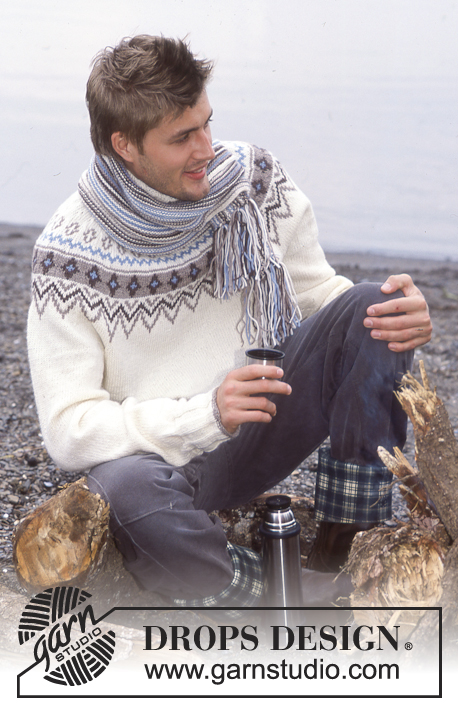
Men's knitted sweater with raglan and rib in DROPS Alaska, and scarf with English rib in DROPS Snow. Size: 12 years - XXL
DROPS 85-2 |
|
|
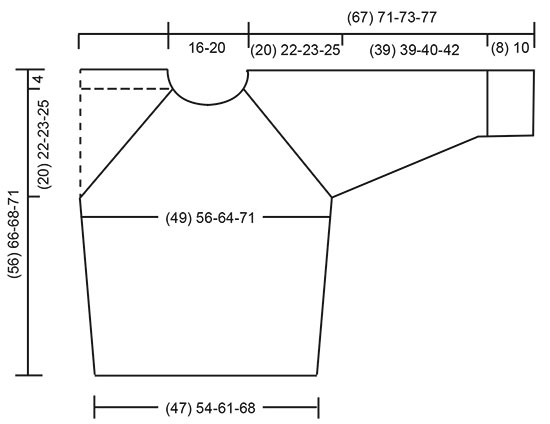
SWEATER Decreasing tips (for raglan): Dec as follows from right side: Start 4 sts before the marker: K 2 tog, K 4 (the marker is in the center of these 4 sts), slip 1 as if to knit, K 1, psso. Dec as follows from wrong side: Start 4 sts before the marker: P 2 tog, twisting sts, P 4 (the marker is in the center of these 4 sts), P 2 tog. (If it is too difficult to twist the sts, sl them, return to left needle 1 by 1, twisting each, and then P 2 tog). BODY Cast on 160-184-208-232 sts on circular needles; join and place a marker at the join. Knit 2 rows stockinette st, then establish rib as follows: P 1, *K 6, P 6*, repeat from *-* over 72-84-96-108 sts, K 6, P 1, place a marker (= side), P 1, *K 6, P 6*, repeat from *-* over 72-84-96-108 sts, K 6, P 1. Continue the rib as established. When the piece measures 10-15-15-15 cm and 20-30-30-30 cm inc 1 st at each side of each marker – P the increased sts – = 168-192-216-240 sts. When the piece measures 32-40-41-42 cm bind off 12 sts at each side for armhole (= K 3, P 6, K 3) = 72-84-96-108 sts remain on Front and Back. Lay piece aside and knit the sleeves. Sleeve: Cast on 48-48-60-60 sts on double-pointed needles; join and place a marker at the join. Knit 2 rows stockinette st, then knit rib (P 3, K 3) over all sts. When the piece measures 8-10-10-10 cm, change to * K 6, P 6 * rib as on Body – start at marker with P 3 so that the marker is centered in a P 6. When the piece measures 10-13-13-11 cm inc 1 st on both sides of the P 6 containing the marker every 3-3-3-3.5 cm a total of 12 times (knit the increased sts in the rib as you go along, i.e P first 6 inc sts, K next 6 sts) = 72-72-84-84 sts. When the piece measures 47-49-50-52 cm bind off 6 sts each side of marker = 60-60-72-72 sts remain. Lay piece aside and knit a second sleeve. Yoke: Put the sleeves in on the same circular needles as Body where you bound off for armholes = 264-288-336-360 sts. Put a marker in each transition between front, back and sleeves = 4 markers. Knit 0-1-1-1 row before raglan shaping begins. Raglan shaping: Dec 1 st at each side of all markers (= 8 decs) – see Decreasing tips above. Dec every other row 21-24-20-25 times and every row 3-0-10-5 times. At the same time when the piece measures 49-59-61-64 cm put the 8-20-20-32 sts at center front on a st holder for the neck and knit back and forth. Bind off at each neck edge every other row: 2 sts 1 time and 1 st 2 times. After all raglan and neck shaping is complete 56-68-68-80 sts remain and the piece measures approx. 56-66-68-71 cm to shoulder. Neckband: Pick up approx. 16 sts for smallest size, 28 to 40 sts for other sizes at front neck (incl. sts on st holder) = 72 sts for smallest size, 96 to 120 sts for other sizes; join and place a marker at the join. P 1 row, K 1 row and P 1 row, then K 1 row, decreasing evenly distributed to 72-84-90-96 sts. Then knit rib (K 3, P 3) until the collar measures 10-10-12-12 cm. Bind off in rib. Fold the rib in half to wrong side and stitch in place. Assembly: Sew opening under the sleeve. SCARF: English rib: Row 1 (wrong side): K 1 (edge st knit in garter st), *K 1, yo, sl 1 as if to purl*, repeat *-* to last 2 sts, K 2. Row 2 (right side): K 1 (edge st knit in garter st), *yo, sl 1 as if to purl, K tog the next st and yo from previous row*, repeat *-* to last 2 sts, yo, sl 1 as if to purl, K 1 (edge st knit in garter st). Row 3 (wrong side): K 1 (edge st), *K tog the next st and yo from previous row, yo, sl 1 as if to purl*, repeat *-* to last 2 sts + yo from previous row, K tog the next st and yo, K 1. Repeat rows 2 and 3 over all sts. Scarf: Loosely cast on 13 sts and knit English rib – see instructions above. Bind off when the piece measures approx 150 cm. |
|
 |
|
Have you finished this pattern?Tag your pictures with #dropspattern or submit them to the #dropsfan gallery. Do you need help with this pattern?You'll find 32 tutorial videos, a Comments/Questions area and more by visiting the pattern on garnstudio.com. © 1982-2026 DROPS Design A/S. We reserve all rights. This document, including all its sub-sections, has copyrights. Read more about what you can do with our patterns at the bottom of each pattern on our site. |
|


With over 40 years in knitting and crochet design, DROPS Design offers one of the most extensive collections of free patterns on the internet - translated to 17 languages. As of today we count 325 catalogues and 12298 patterns translated into English (UK/cm).
We work hard to bring you the best knitting and crochet have to offer, inspiration and advice as well as great quality yarns at incredible prices! Would you like to use our patterns for other than personal use? You can read what you are allowed to do in the Copyright text at the bottom of all our patterns. Happy crafting!
Post a comment to pattern DROPS 85-2
We would love to hear what you have to say about this pattern!
If you want to leave a question, please make sure you select the correct category in the form below, to speed up the answering process. Required fields are marked *.