
Popular categories
Looking for a yarn?


Comments / Questions (7)
![]() Sukhjinder Kaur wrote:
Sukhjinder Kaur wrote:
Could you please elaborate saddle shoulder increase because when I do the front piece 33 stitches are there after repetition of row 1 to 6 twice but for back piece it’s less than 65 stitches for size large Thanks
06.02.2026 - 12:20
![]() Sukhjinder Kaur wrote:
Sukhjinder Kaur wrote:
For saddle shoulder increase for size L I get 33 stitches for front pieces but for the the back ones are less than 65 stitches
06.02.2026 - 12:09
![]() Nicole wrote:
Nicole wrote:
When increasing on the sleeve after finishing the saddle shoulder, the instructions say increase from the right twice. Is this correct? Shouldn’t it be from the left and then from the right?
26.11.2025 - 19:26DROPS Design answered:
Hi Nicole, Yes you are correct, the first increase after the first marker is towards the left. Regards, Drops Team.
27.11.2025 - 06:50
![]() Lena wrote:
Lena wrote:
Wenn man die Beschreibung ganz liest, sind für mich Fehler dabei. Laut Anleitung ist die Passe Glatt Rechts, sowie die ganze Jacke. Die Blende aber wird im Rippenmuster gestrickt was ja dann zur Passe nicht übereinstimmt. Ich bin kein Profi aber komm mit den Anleitungen normalerweise gut klar. Ist nicht mein 1. Projekt von Drops. Aber das irritiert mich leider.
21.11.2025 - 07:44DROPS Design answered:
Liebe Lena, ganz am Anfang erklären wir, wie man Krausrippen/ kraus rechts strickt, das bedeutet aber nicht, daß die Jacke kraus rechts gestrickt wird, Wenn alle Maschen für den Hals angeschlagen sind (dh wenn man Sattelschulter-Zunahmen strickt), wird man glatt rechts mit 1 Masche kraus rechts beidseitig stricken, so wird man kraus rechts stricken (aber nur die Randmaschen). Viel Spaß beim Stricken!
21.11.2025 - 07:52
![]() Lena wrote:
Lena wrote:
Ist es richtig dass die Passe in Krauss Rechts gestrickt wird? Auf den Bildern hat die Passe aber ein links rechts Muster.
21.11.2025 - 07:19DROPS Design answered:
Liebe Lena, nur die Blenden werden krausrechts gestrickt, die Jacke wird man glatt rechts stricken, siehe PASSE: ... Nun wie folgt glatt rechts hin- und zurückstricken, .... Viel Spaß beim Stricken!
21.11.2025 - 07:50
![]() Babette wrote:
Babette wrote:
Hoe wordt een vest gebreid van boven af? Is daar ook een video van ? Waarom beginnen met een rondbreinaald, want de voorkant is open ivm knoopsluiting?
11.11.2025 - 11:19DROPS Design answered:
Dag Babette,
Het vest wordt van boven naar beneden gebreid. Er wordt met een rondbreinaald gebreid zodat alle steken goed op de naald passen.
12.11.2025 - 10:41
![]() Rosa wrote:
Rosa wrote:
Buongiorno, Seguendo questa indicazione “AUMENTARE 2 MAGLIE VERSO DESTRA: Usare il ferro sinistro per riprendere il filo davanti tra 2 maglie del ferro precedente, prenderlo da dietro e lavorarlo a diritto nel filo dietro della maglia senza far cadere la maglia dal ferro sinistro, poi lavorare un’altra maglia diritto nel filo dietro della stessa maglia (= 2 aumenti).” si forma un buco…
11.11.2025 - 08:33
|
|
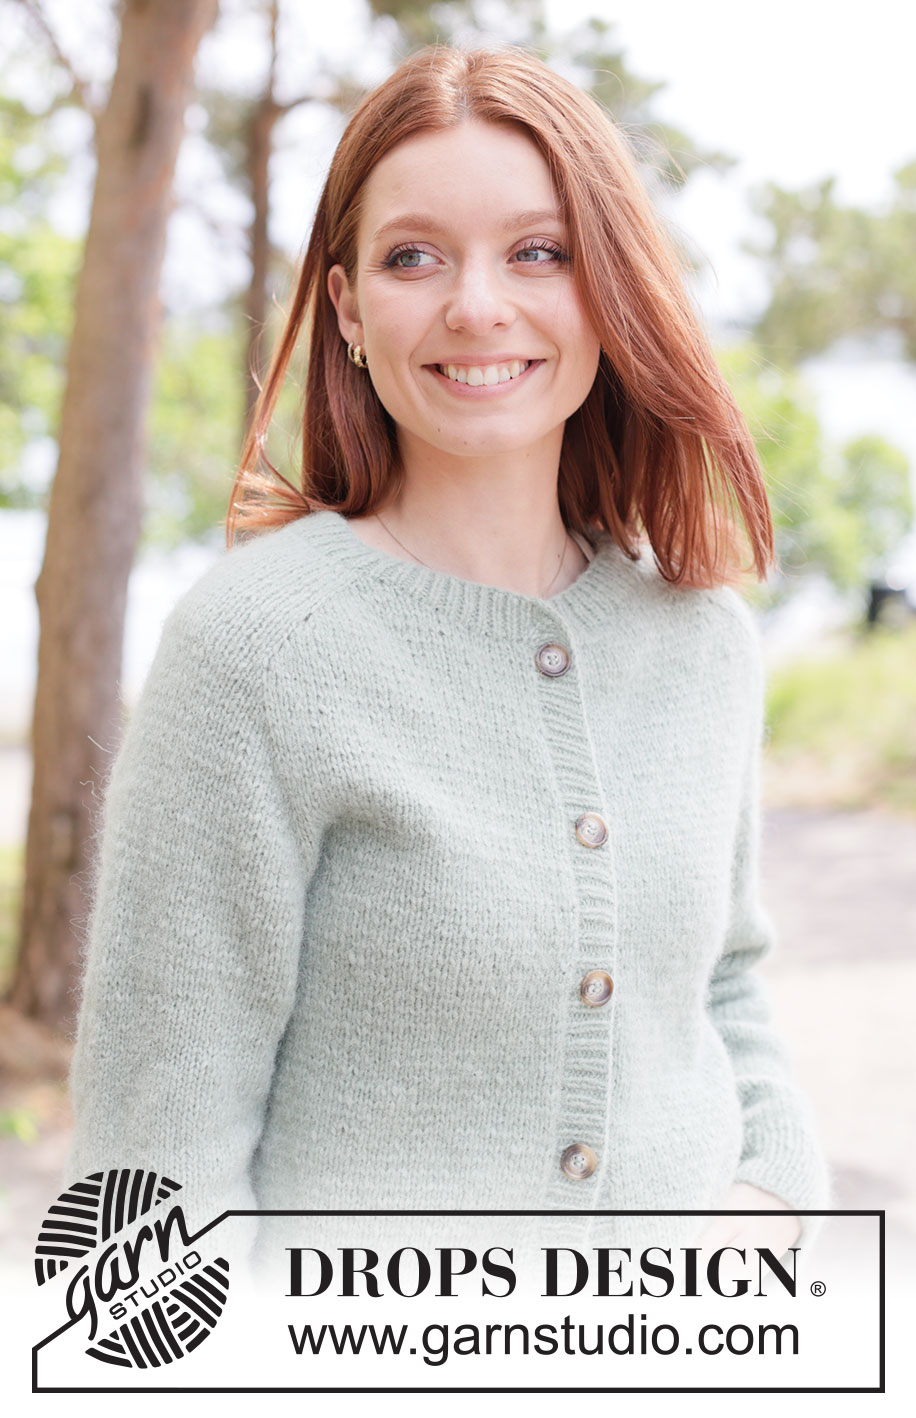
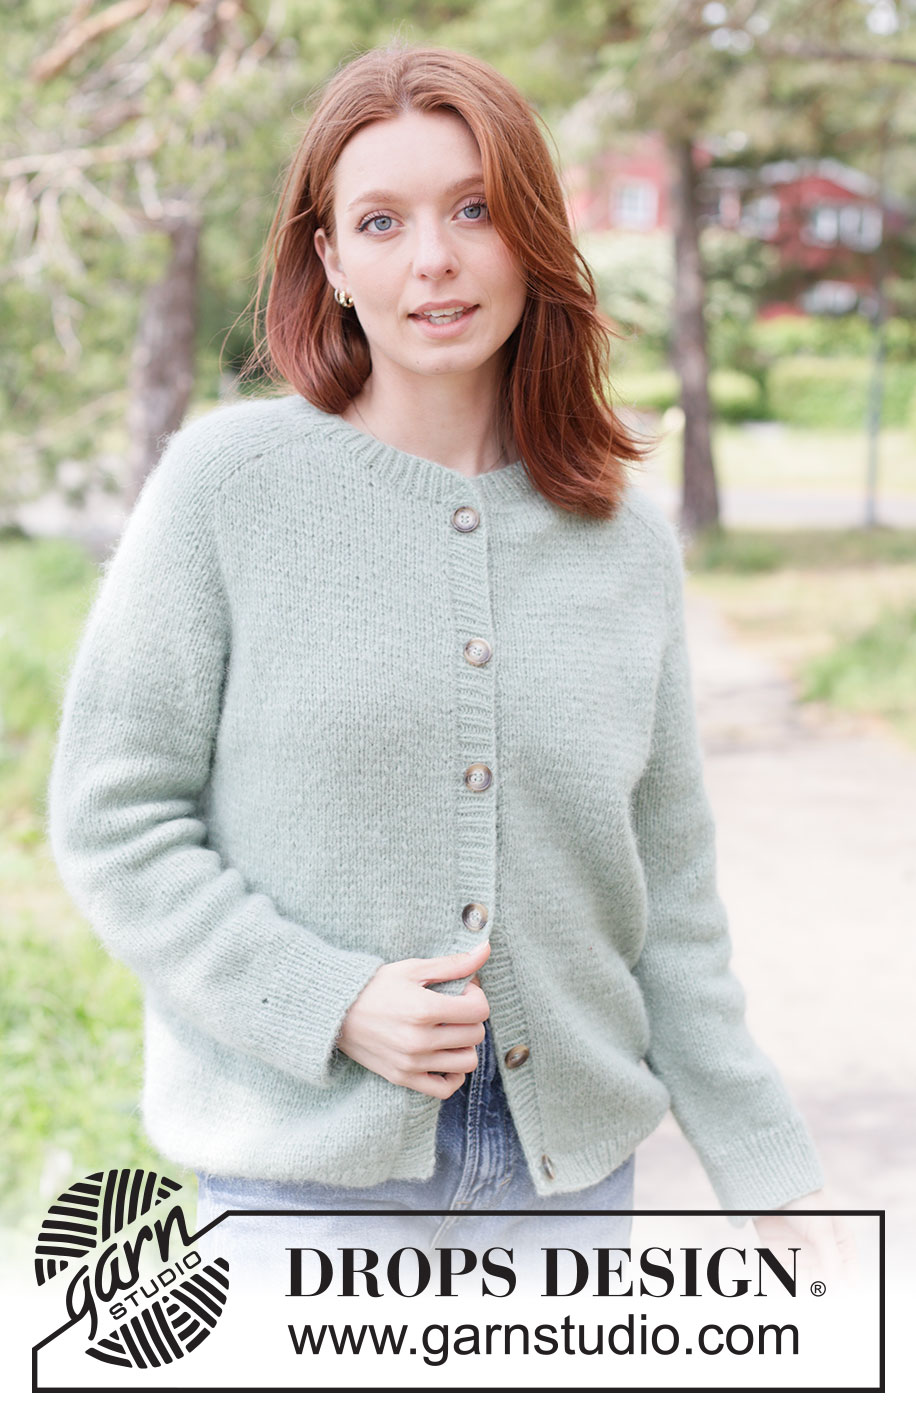
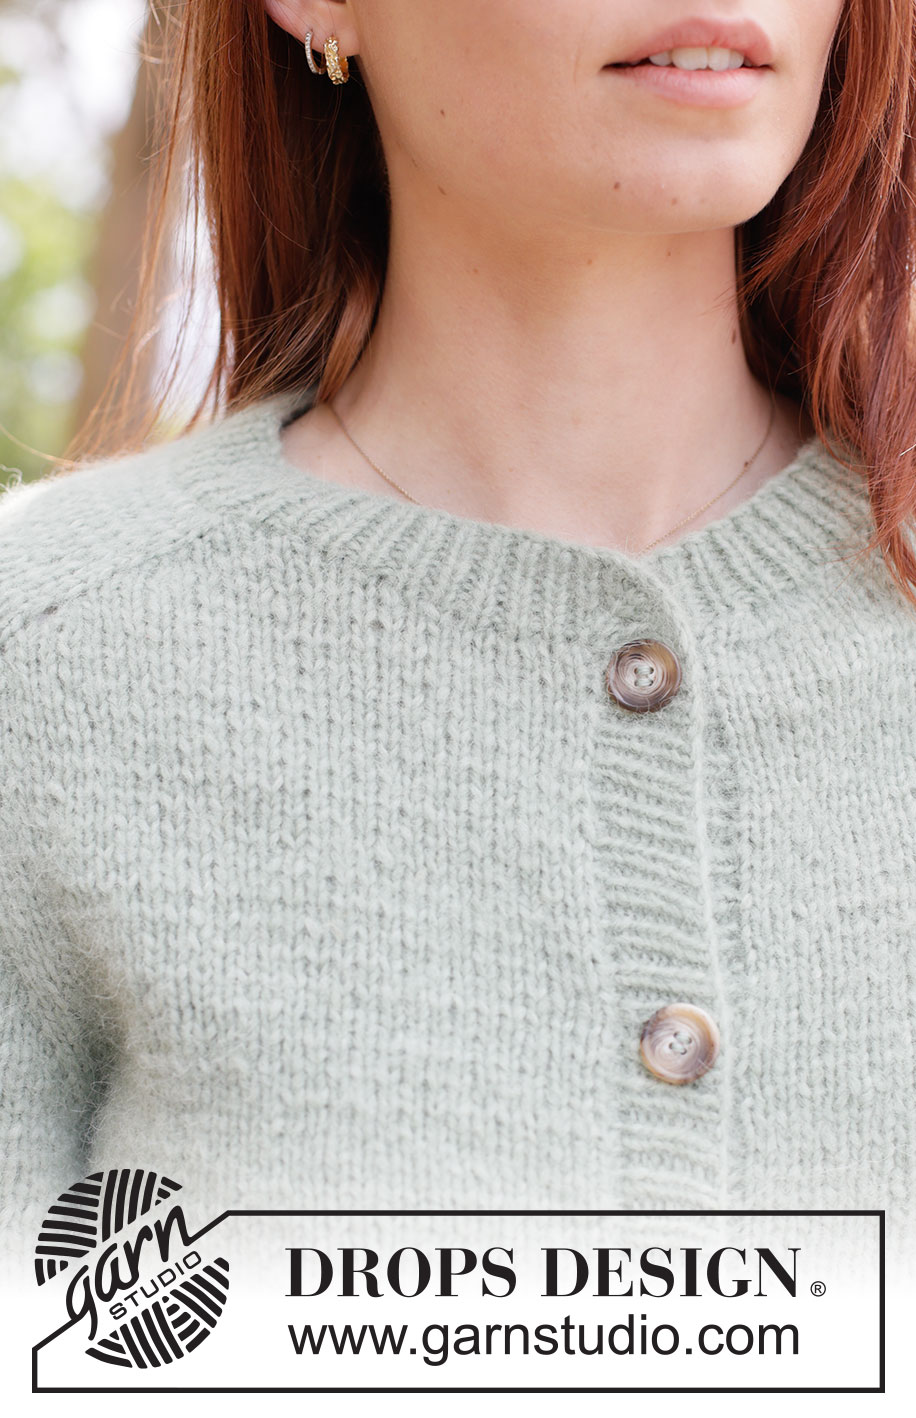
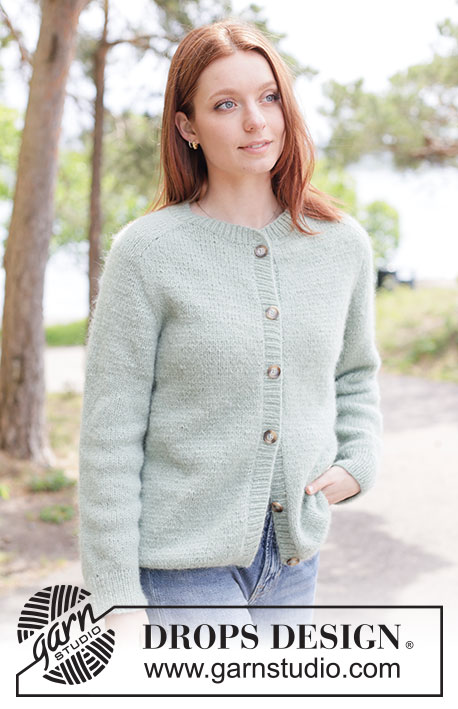
Pistachio Drift Cardigan#pistachiodriftcardigan |
|
 |
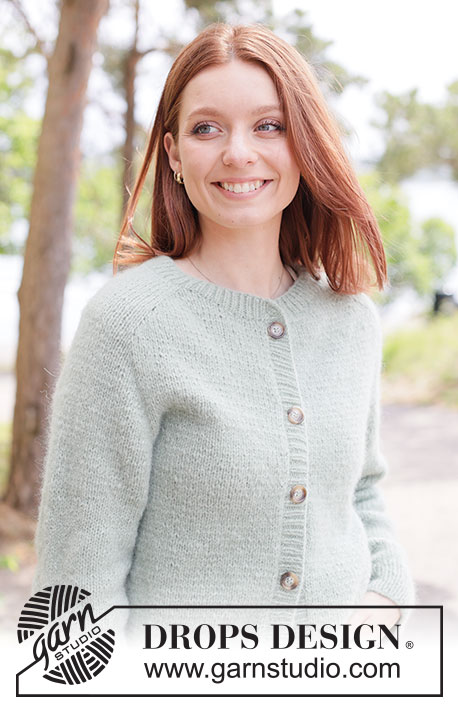 |
Knitted jacket in DROPS Air. Piece is knitted top down in stocking stitch with saddle shoulders and bands. Size XS – XXXL.
DROPS 263-15 |
|
|
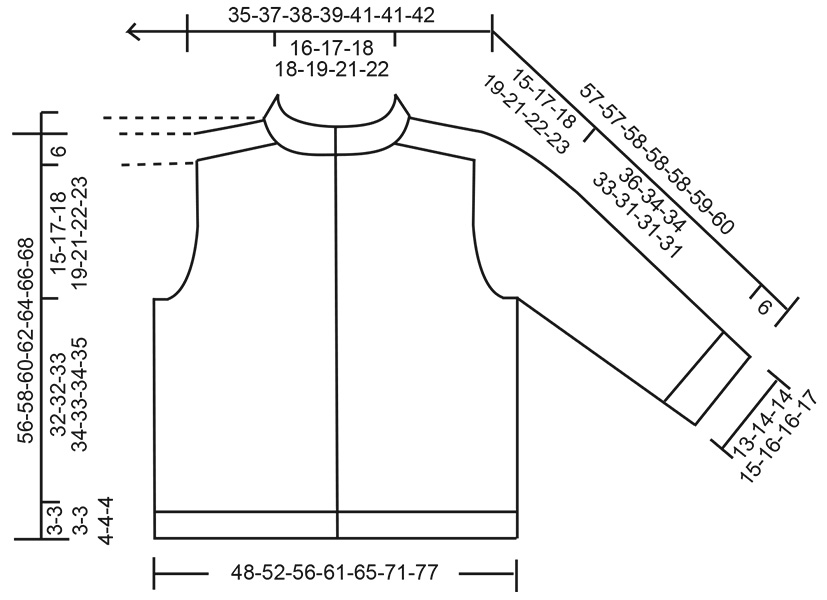
---------------------------------------------------------- EXPLANATION FOR THE PATTERN: ---------------------------------------------------------- INCREASE TIP-1: INCREASE 1 STITCH TOWARDS THE LEFT: Use left needle to pick up yarn between 2 stitches from row below, pick up yarn from the front and knit stitch in back loop of stitch. INCREASE 1 STITCH TOWARDS THE RIGHT: Use left needle to pick up yarn between 2 stitches from row below, pick up yarn from the back and knit stitch in front loop of stitch. INCREASE TIP-2: INCREASE 2 STITCHES TOWARDS THE LEFT: Use left needle to pick up yarn between 2 stitches from row below, pick up yarn from the front and knit stitch in back loop of stitch without slipping the stitch off left needle, then knit 1 more stitch in front loop of same stitch (= 2 stitches increased). INCREASE 2 STITCHES TOWARDS THE RIGHT: Use left needle to pick up yarn between 2 stitches from row below, pick up yarn from the back and knit stitch in back loop of stitch without slipping the stitch off left needle, then knit 1 more stitch in back loop of same stitch (= 2 stitches increased). GARTER STITCH (when working back and forth): Knit on all rows, i.e. knit from right side and knit from wrong side. 1 ridge vertically = knit 2 rows. SLEEVE TIP: When picking up stitches mid under sleeve, there will be a small hole in the transition between stitches on body and sleeves. The holes can be closed by picking up the strand between two stitches - work this strand twisted together with the first stitch between body and sleeve to close the hole. DECREASE TIP: Decrease 1 stitch on each side of marker thread as follows: Work until 3 stitches remain before marker thread, knit 2 together, knit 2 (marker thread is between these 2 stitches), slip 1 stitch knitwise, knit 1, pass slipped stitch over stitch worked (= 2 stitches decreased). BUTTONHOLES: Decrease for buttonholes on right band from right side- decrease for 1 buttonhole as follows: Knit 2 together, make 1 yarn over. On next row work yarn over as regular stitch to make a hole. Decrease for 6-7-7-7-8-8-8 buttonholes when bands measures 1½ cm, place buttonholes by measuring from the bottom edge of jacket in the different sizes as follows: XS: 4, 14, 25, 35, 46 and 56 cm. S: 4, 13, 22, 31, 40, 49 and 58 cm. M: 4, 14, 23, 33, 42, 52 and 61 cm. L: 4, 14, 24, 34, 44, 54 and 64 cm. XL: 4, 13, 22, 31, 40, 49, 58 and 66 cm XXL: 4, 13, 22, 31, 40, 49, 58 and 67 cm XXXL: 4, 14, 23, 33, 42, 51, 60 and 69 cm ---------------------------------------------------------- START THE PIECE HERE: ---------------------------------------------------------- JACKET - SHORT OVERVIEW OF THE PIECE: In this pattern needles of different length have been used, begin with fitting length for number of stitches and switch as needed. Worked top down. Work yoke back and forth to form a neck, then finish yoke before dividing for body and sleeves. Work body downwards back and forth on circular needle while putting the sleeves aside. Then work sleeves downwards in the round on needle. Pick up stitches around the neck and along the front pieces for bands, work bands back and forth and sewn mid back. YOKE: Cast on 69-71-73-73-75-77-79 stitches on circular needle size 5 mm with DROPS Air. Purl 1 row from wrong side. Insert 4 markers in piece as explained below – without working the stitches. Use these markers when increasing stitches for saddle shoulders, sleeves and yoke. 1st marker: Begin at the front, count 2 stitches (= front piece), insert 1st marker before next stitch. 2nd marker: Count 19 stitches from 1st marker, insert 2nd marker before next stitch (= sleeve). 3rd marker: Count 27-29-31-31-33-35-37 stitches from 2nd marker (= back piece), insert 3rd marker before next stitch. 4th marker: Count 19 stitches from 3rd marker, insert 4th marker before next stitch (= sleeve). 2 stitches remain on front piece after last marker. Move these 4 markers upwards when working, increase at each of these markers later. Work in stocking stitch back and forth while at the same time casting on new stitches for neckline at the end of every row as follows: ROW 1 (= right side) - read INCREASE TIP-1: * Work until first/next marker, increase 1 stitch towards the right, move marker on to right needle, work 19 stitches (= sleeve), move marker on to right needle, increase 1 stitch towards the left *, work from *-* 1 more time, knit the rest of row, finish by casting on 2 new stitches on row = 75-77-79-79-81-83-85 stitches. ROW 2 (= wrong side): Purl the entire row, finish by casting on 2 new stitches on row = 77-79-81-81-83-85-87 stitches. ROW 3 (= right side): * Work until first/next marker, increase 1 stitch towards the right, move marker on to right needle, work 19 stitches (= sleeve), move marker on to right needle, increase 1 stitch towards the left *, work from *-* 1 more time, knit the rest of row, finish by casting on 2 new stitches on row = 83-85-87-87-89-91-93 stitches. ROW 4 (= wrong side): Purl the entire row, finish by casting on 2 new stitches on row = 85-87-89-89-91-93-95 stitches. ROW 5 (= right side) - read INCREASE TIP-2: * Work until first/next marker, increase 2 stitches towards the right, move marker on to right needle, work 19 stitches, move marker on to right needle, increase 2 stitches towards the left *, work from *-* 1 more time, knit the rest of row, finish by casting on 3 new stitches on row = 96-98-100-100-102-104-106 stitches. ROW 6 (= wrong side): Purl the entire row, finish by casting on 3 new stitches on row = 99-101-103-103-105-107-109 stitches. ROW 7 (= right side): * Work until first/next marker, increase 1 stitch towards the right, move marker on to right needle, work 19 stitches, move marker on to right needle, increase 1 stitch towards the left *, work from *-* 1 more time, knit the rest of row, finish by casting on 5-6-7-7-8-9-10 new stitches on row = 108-111-114-114-117-120-123 stitches. ROW 8 (= wrong side): Purl the entire row, finish by casting on 5-6-7-7-8-9-10 new stitches on row = 113-117-121-121-125-129-133 stitches. There are 19-20-21-21-22-23-24 stitches on each front piece, 19 stitches on each sleeve and 37-39-41-41-43-45-47 stitches on back piece. 4 increases for saddle shoulders have been done in total. SADDLE SHOULDER INCREASE: Then work back and forth in stocking stitch with edge stitches in garter stitch while at the same time continuing to increase for saddle shoulders: ROW 1 (= right side): * Work until first/next marker, increase 1 stitch towards the right, move marker on to right needle, work 19 stitches, move marker on to right needle, increase 1 stitch towards the left *, work from *-* 1 more time, knit the rest of row (= 4 stitches increased). ROW 2 (= wrong side): Work 1 edge stitch in garter stitch, purl until 1 stitch remains, finish with 1 edge stitch in garter stitch. ROW 3 (= right side): * Work until first/next marker, increase 2 stitches towards the right, move marker on to right needle, work 19 stitches, move marker on to right needle, increase 2 stitches towards the left *, work from *-* 1 more time, knit the rest of row (= 8 stitches increased). ROW 4 (= wrong side): Work as 2nd ROW. ROW 5 (= right side): Work as 1st ROW (= 4 stitches increased). ROW 6 (= wrong side): Work as 2nd ROW. Work 1st to 6th ROW until 8-9-9-10-10-9-9 increases in addition to the 4 increases in neckline have been done - 12-13-13-14-14-13-13 increases have been done in total for saddle shoulders (= 24-26-26-28-28-26-26 rows worked in total and 64-68-68-72-72-68-68 stitches have been increased for saddle shoulders in total) = 157-165-169-173-177-177-181 stitches. Remember to follow the knitting tension! There are 30-32-33-34-35-35-36 stitches on each front piece, 19 stitches on each sleeve and 59-63-65-67-69-69-71 stitches on back piece. Then increase for sleeves as explained below. SLEEVE INCREASE: Now only increase on sleeves and number of stitches on back piece and front piece stays the same. Work in stocking stitch - AT THE SAME TIME increase 4 stitches on every row from right side - remember INCREASE TIP-1 and work as follows: ROW 1 (= right side): * Work until first/next marker, move marker on to right needle, increase 1 stitch towards the right, work until next marker, increase 1 stitch towards the right, move marker on to right needle, *, work from *-* 1 more time, work the rest of row (= 4 stitches increased). ROW 2 (= wrong side): Work 1 edge stitch in garter stitch, purl until 1 stitch remains, finish with 1 edge stitch in garter stitch. Work 1st and 2nd ROW 8-9-9-8-7-4-1 times in total (= 16-18-18-16-14-8-2 rows have been worked) = 189-201-205-205-205-193-185 stitches. There are 30-32-33-34-35-35-36 stitches on each front piece, 35-37-37-35-33-27-21 stitches on each sleeve and 59-63-65-67-69-69-71 stitches on back piece. Then increase for both body and sleeves as explained below. YOKE INCREASE: Now increase on both sleeves and on back piece and front piece. Work in stocking stitch - AT THE SAME TIME increase 8 stitches on every row from right side, increase before and after each marker - remember INCREASE TIP-1 and work as follows: ROW 1 (= right side): * Work until 2 stitches remain before first marker, increase towards the right, work 2 stitches, move marker on to right needle, increase 1 stitch towards the left, work until next marker, increase 1 stitch towards the right, move marker on to right needle, work 2 stitches, increase 1 stitch towards the left *, work from *-* one more time, work the rest of row (= 8 stitches increased) ROW 2 (= wrong side): Work 1 edge stitch in garter stitch, purl until 1 stitch remains, finish with 1 edge stitch in garter stitch. Work 1st and 2nd ROW 9-10-11-13-16-20-24 times in total (= 18-20-22-26-32-40-48 rows have been worked) = 261-281-293-309-333-353-377 stitches. There are 39-42-44-47-51-55-60 stitches on each front piece, 53-57-59-61-65-67-69 stitches on each sleeve and 77-83-87-93-101-109-119 stitches on back piece. Piece measures approx. 21-23-24-25-27-28-29 cm from edge on shoulder and down (= 6 cm saddle shoulder depth and 15-17-18-19-21-22-23 cm sleeve increases). Now divide yoke for body and sleeves. DIVIDING FOR BODY AND SLEEVES: AT THE SAME TIME as next row is worked divide yoke for body and sleeves as follows: 39-42-44-47-51-55-60 stitches as before (= front piece), slip the next 53-57-59-61-65-67-69 stitches on a thread for sleeve, cast on 4-6-8-10-10-12-12 new stitches on row (= in the side mid under sleeve), work 77-83-87-93-101-109-119 stitches as before (= back piece), slip the next 53-57-59-61-65-67-69 stitches on a thread for sleeve, cast on 4-6-8-10-10-12-12 new stitches on row (= in the side mid under sleeve) and work the last 39-42-44-47-51-55-60 stitches as before (= front piece). Finish body and sleeves separately. BODY: = 163-179-191-207-223-243-263 stitches. Work stocking stitch and edge stitches in garter stitch as before until piece measures 32-32-33-34-33-34-35 cm from division. On next row from right side begin rib while AT THE SAME TIME increasing 20-20-22-26-26-28-30 stitches evenly on row = 183-199-213-233-249-271-293 stitches, work as follows: Switch to circular needle size 4 mm and work 1 edge stitch in garter stitch as before, work rib (= knit 1 /purl 1 - remember increase) until 2 stitches remain, knit 1 and 1 edge stitch in garter stitch as before. When rib measures 3-3-3-3-4-4-4 cm, cast off with knit over knit and purl over purl. Jacket measures approx. 56-58-60-62-64-66-68 cm from the edge of shoulder. SLEEVES: Slip 53-57-59-61-65-67-69 sleeve stitches from one thread on to circular needle size 5 mm and pick in addition up 1 stitch in each of the 4-6-8-10-10-12-12 stitches cast on under sleeve - read SLEEVE TIP = 57-63-67-71-75-79-81 stitches. Insert 1 marker in the middle of the 4-6-8-10-10-12-12 new stitches under sleeve - round begins at the marker thread. Work in stocking stitch in the round on needle - AT THE SAME TIME when sleeve measures 1 cm from division, decrease mid under sleeve – read DECREASE TIP and decrease as follows: Decrease 2 stitches every 6-4½-4-3-2½-2½-2½ cm 6-8-9-10-11-12-12 times in total = 45-47-49-51-53-55-57 stitches on needle. Work until sleeve measures 36-34-34-33-31-31-31 cm from division. Switch to double pointed needles size 4 mm and work rib (= knit 1/purl 1) while AT THE SAME TIME increasing 7-7-7-7-7-7-7 stitches evenly on 1st round = 52-54-56-58-60-62-64 stitches. When rib measures 6-6-6-6-6-6-6 cm, cast off with knit over knit and purl over purl. Sleeve measures approx. 42-40-40-39-37-37-37 cm from division. BAND / NECK EDGE RIGHT FRONT PIECE: Insert 1 marker mid back of neck. Use circular needle size 4 mm, begin from right side at the bottom on right front piece and pick up stitches for band along front piece until marker mid back as follows: Pick up 109-115-117-123-127-129-133 stitches inside 1 stitch in garter stitch along the entire front edge up to corner between yoke and neckline (the last stitch should be in the corner on front piece mid front, insert 1 marker in this stitch), continue to pick up 49-51-53-53-55-59-61 stitches around the neck until marker mid back = 158-166-170-176-182-188-194 stitches. ROW 1 (= wrong side): Work rib (= knit 1/purl 1) - make sure to purl the stitch with marker from wrong side. ROW 2 (= right side): Work rib (= knit 1/purl 1) until knit stitch with marker (= corner at the front on jacket), remember INCREASE TIP-1 and increase 1 stitch towards the right, knit the stitch with marker, increase 1 stitch towards the left, work knit over knit and purl over purl the rest of row (= 2 stitches increased) - work the increased stitch in rib. ROW 3 (= wrong side): Work rib (= knit 1/purl 1) until stitch with marker, purl stitch with marker, work knit over knit and purl over purl the rest of row. ROW 4 (= right side): Work as 2nd ROW (= 2 stitches increased) while AT THE SAME TIME making BUTTONHOLES - read explanation above. ROW 5 (= wrong side): Work as 3rd ROW. ROW 6 (= right side): Work as 2nd ROW (= 2 stitches increased). ROW 7 (= wrong side): Work as 3rd ROW. ROW 8 (= right side): Work as 2nd ROW (= 2 stitches increased) while AT THE SAME TIME making 1 yarn over on each side of stitch with marker. Cast off with knit over knit and purl over purl - cast off yarn overs as knit stitches. BAND / NECK EDGE LEFT FRONT PIECE: Use circular needle size 4 mm, begin by picking up stitch from marker mid back of neck and down along left front piece as follows: Pick up 49-51-53-53-55-59-61 stitches around the neck from marker mid back and down to corner between yoke and neckline, then pick up 109-115-117-123-127-129-133 stitches inside 1 stitch in garter stitch along the entire front edge down to the bottom of front piece (the first stitch should be in the corner on front piece mid front, insert 1 marker in this stitch) = 158-166-170-176-182-188-194 stitches. ROW 1 (= wrong side): Work rib (= purl 1/knit 1) - make sure to purl the stitch with marker from wrong side. ROW 2 (= right side): Work rib (= purl 1/knit 1) until knit stitch with marker (= corner at the front on jacket), remember INCREASE TIP-1 and increase 1 stitch towards the right, knit the stitch with marker, increase 1 stitch towards the left, work knit over knit and purl over purl the rest of row (= 2 stitches increased) - work the increased stitch in rib. ROW 3 (= wrong side): Work rib (= purl 1/knit 1) until stitch with marker, purl stitch with marker, work knit over knit and purl over purl the rest of row. ROW 4 (= right side): Work as 2nd ROW (= 2 stitches increased). ROW 5 (= wrong side): Work as 3rd ROW. ROW 6 (= right side): Work as 2nd ROW (= 2 stitches increased). ROW 7 (= wrong side): Work as 3rd ROW. ROW 8 (= right side): Work as 2nd ROW (= 2 stitches increased) while AT THE SAME TIME making 1 yarn over on each side of stitch with marker. Cast off stitches with knit over knit and purl over purl. ASSEMBLY: Sew bands together mid back and sew stitch against stitch. Sew the buttons on to left band. |
|
 |
|
Have you finished this pattern?Tag your pictures with #dropspattern #pistachiodriftcardigan or submit them to the #dropsfan gallery. Do you need help with this pattern?You'll find 37 tutorial videos, a Comments/Questions area and more by visiting the pattern on garnstudio.com. © 1982-2026 DROPS Design A/S. We reserve all rights. This document, including all its sub-sections, has copyrights. Read more about what you can do with our patterns at the bottom of each pattern on our site. |
|


With over 40 years in knitting and crochet design, DROPS Design offers one of the most extensive collections of free patterns on the internet - translated to 17 languages. As of today we count 325 catalogues and 12298 patterns translated into English (UK/cm).
We work hard to bring you the best knitting and crochet have to offer, inspiration and advice as well as great quality yarns at incredible prices! Would you like to use our patterns for other than personal use? You can read what you are allowed to do in the Copyright text at the bottom of all our patterns. Happy crafting!
Post a comment to pattern DROPS 263-15
We would love to hear what you have to say about this pattern!
If you want to leave a question, please make sure you select the correct category in the form below, to speed up the answering process. Required fields are marked *.