
Popular categories
Looking for a yarn?


Comments / Questions (58)
![]() Daria wrote:
Daria wrote:
Thank you for such a beautiful pattern. I already knitted a sweater, and it turned out to be really good. I have a question about the neck because I would like it to be a little smaller. Maybe there is a way to make it smaller (to consist of a smaller number of stitches) if I knit, for example, size L?
13.01.2025 - 22:02DROPS Design answered:
Dear Daria, not sure how to adapt this sorry, what about just decreasing when starting neck so that you can adapt the to desired circumference? Happy knitting!
14.01.2025 - 10:30
![]() Elena Giacometti wrote:
Elena Giacometti wrote:
Buongiorno e complimenti per tutto il lavoro meraviglioso che fate! Io non capisco quando nelle istruzioni si dice di continuare a lavorare il motivo, dall'immagine in realtà il motivo è alternato a delle fasce lavorate con il colore di fondo( bianco) , ho capito giusto o sto sbagliando? Grazie mille
08.01.2025 - 13:04DROPS Design answered:
Buonasera Elena, trova le spiegazioni del motivo in alto all'inizio delle spiegazioni. Buon lavoro!
19.01.2025 - 15:28
![]() Alya wrote:
Alya wrote:
Hello, I'm confused when got to work in Back Piece: Continue as follows. What would I do first in this pattern? Is it this pattern telling me to work first row in A.1? or it is still not? Could you please explain more for this problem? Thank you... :)
16.12.2024 - 17:17DROPS Design answered:
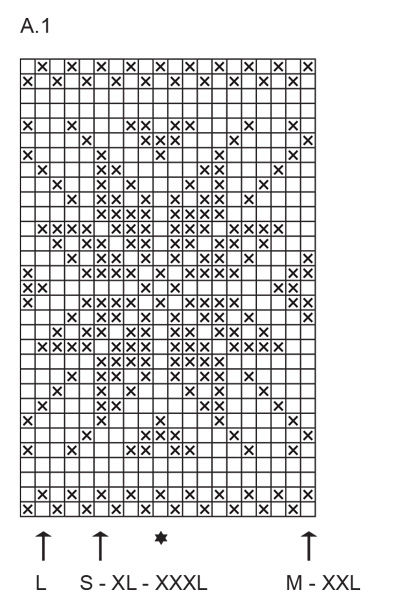
Dear Alya, correct you start now working A.1 over the 97-137 sts on needle, so start with 2 sts stocking stitch, then depending on the size work the last sts in A.1, then repeat A.1 (whole diagram) and finish with some of the first sts in A.1, and 2 sts stocking stitch. From right side read diagrams from the right towards the left and from wrong side read diagrams from the left towards the right. Happy knitting!
20.12.2024 - 08:43
![]() Eya wrote:
Eya wrote:
Hello! I am a little confused about how to work the pattern under the sleeve. I am making a size M and after casting on 7 stitches there are 224 stitches in total. Does that mean there are 112 stitches on both front and back piece? If so how do I measure my pattern from the centre stitch (56th stitch). Will there be any repeats? ( I referred the DROPS lesson but I\'m still confused). Thank you for the pattern though! :)
12.12.2024 - 15:45
![]() Alya wrote:
Alya wrote:
Hello, which part should we make short rows? I'm dazed with this one, like what part should I add short rows. Thank you
29.11.2024 - 17:35DROPS Design answered:
Dear Alya, the short rows are worked at the sleeve cap, at the top of the sleeves: "Work stocking stitch back and forth with short rows for the sleeve cap, starting mid-under the sleeve as follows". Happy knitting!
07.12.2024 - 20:25
![]() Jenny wrote:
Jenny wrote:
Muss ich die Maschenprobe mit der 4,5er Nadel oder mit der 3er Nadel machen?
28.11.2024 - 17:07DROPS Design answered:
Liebe Jenny, Maschenprobe wird mit der grösseren Nadel gestrickt, hier Nr 3,5. Viel Spaß beim Stricken!
29.11.2024 - 08:14
![]() Britt-Marie Abrahamsson wrote:
Britt-Marie Abrahamsson wrote:
Hej, det gäller ärmen. Ska man mäta från axeln efter att man stickat ärmkullen klart tills man börjarmed mönster? Isf. är det 4cm vid axeln och 2 cm vid armhålet. Mvh Britt-Marie Abrahamsson
19.11.2024 - 11:20
![]() Anne-Mona Kambestad wrote:
Anne-Mona Kambestad wrote:
Hei jeg forstår ikke økningen i begynnelsen av bakre stykke. Hvordan kan 17 økninger gi 34 pinner strikket? Skal man ikke øke på hver pinne?
18.11.2024 - 13:32DROPS Design answered:
Hei Anne-Mona, Du skal strikke både 2. og 3. pinne x 17. Det blir 2 pinner x 17 = 34 pinner totalt. God fornøyelse!
19.11.2024 - 10:53
![]() Adrianna wrote:
Adrianna wrote:
Gdy mam używać dwóch kolorów tła to powinnam nabrać raz oczko jednego koloru tła raz drugiego koloru tła czy połączyć włóczki jasne i nabierać jedno oczko nitką splecioną z dwóch nitek?
16.11.2024 - 22:12DROPS Design answered:
Witaj Adrianno, sweter jest przerabiany 2 nitkami razem. Kolor tła to kolor ecru. Nabierasz oczka włóczką Baby Merino biały i Kid-Silk ecru razem (nitka , którą przerabiasz składa się z 2 nitek). Pozdrawiamy!
18.11.2024 - 08:42
![]() Sophie wrote:
Sophie wrote:
Ich habe das Muster nun einmal auf dem Rücken gestrickt. Ich komme auf ca. 10.5 cm. Zwischen den Mustern sind auf dem trage Bild auch Spalten mit der Grundfarbe. Wie lang sind diese?
10.11.2024 - 19:05DROPS Design answered:
Liebe Sophie, siehe unter MUSTER, es sind je nach der Grösse 4 oder 5 cm zwischen den Diagrammen. Viel Spaß. beim Stricken!
11.11.2024 - 09:41
|
||||||||||
Far Away#farawaysweater |
||||||||||
 |
 |
|||||||||
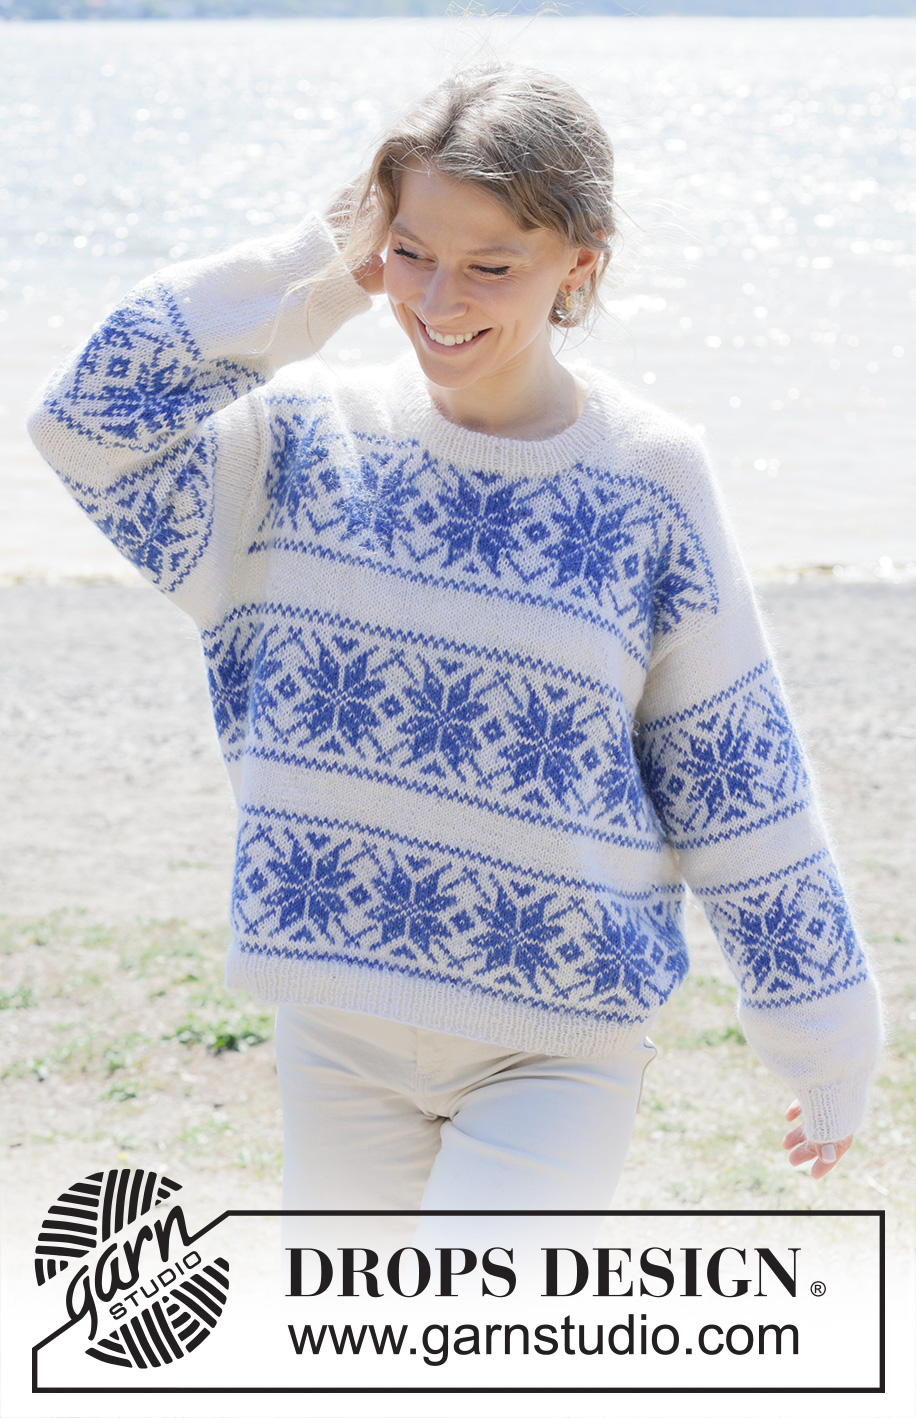
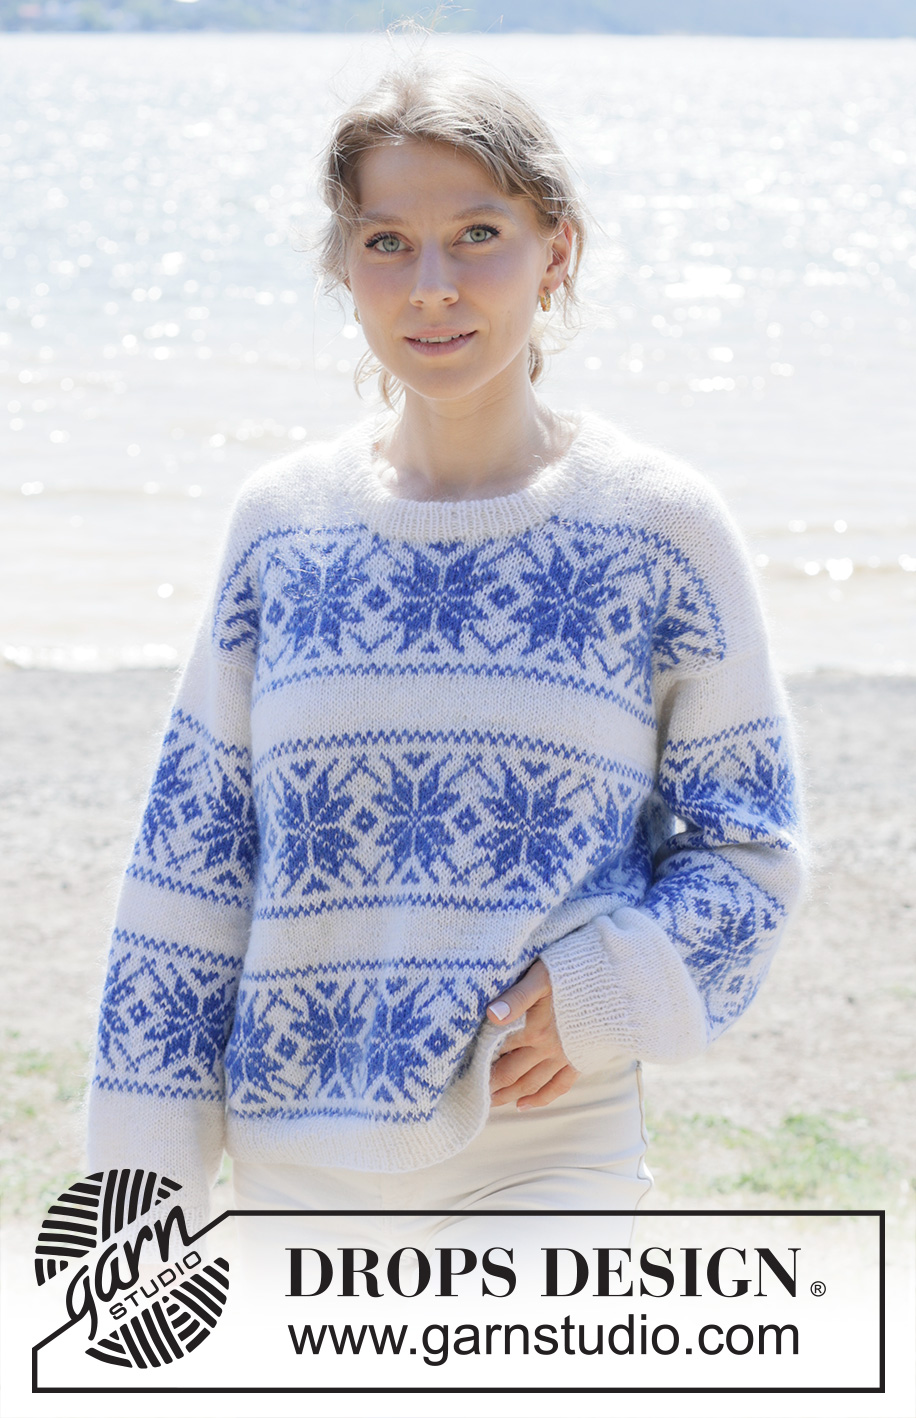
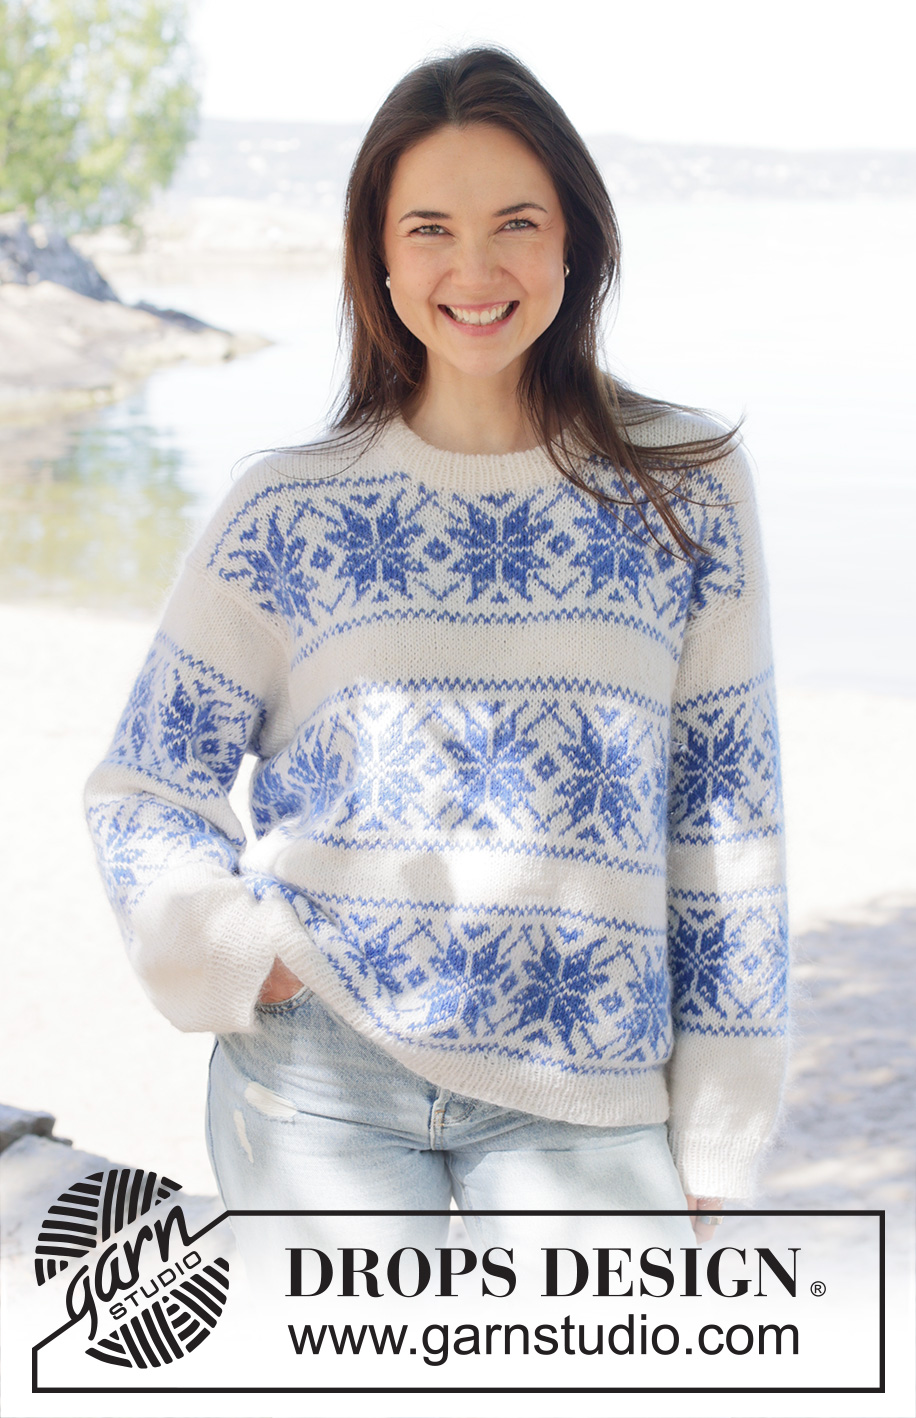
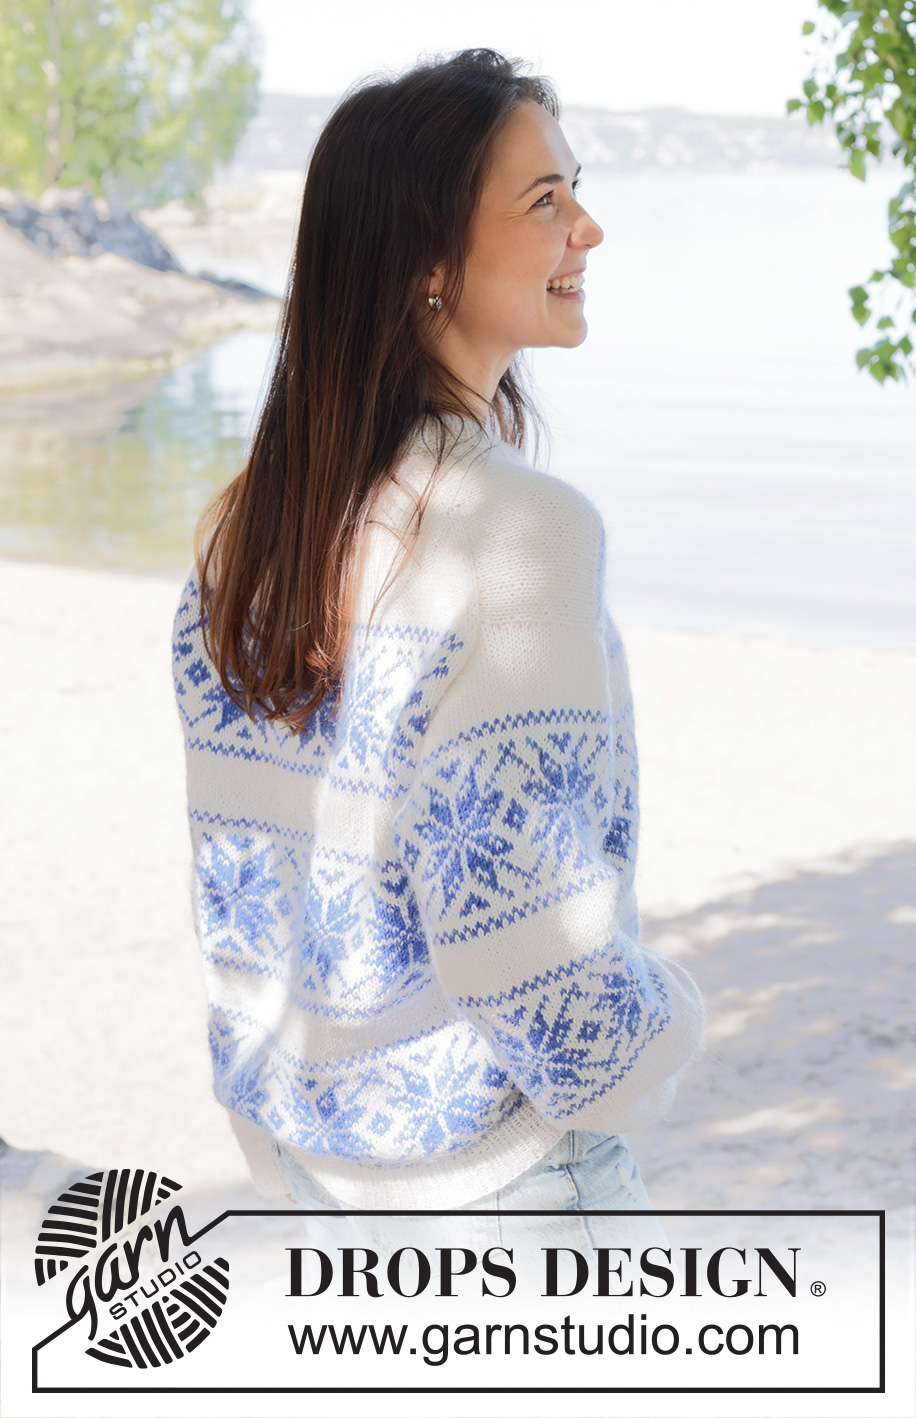
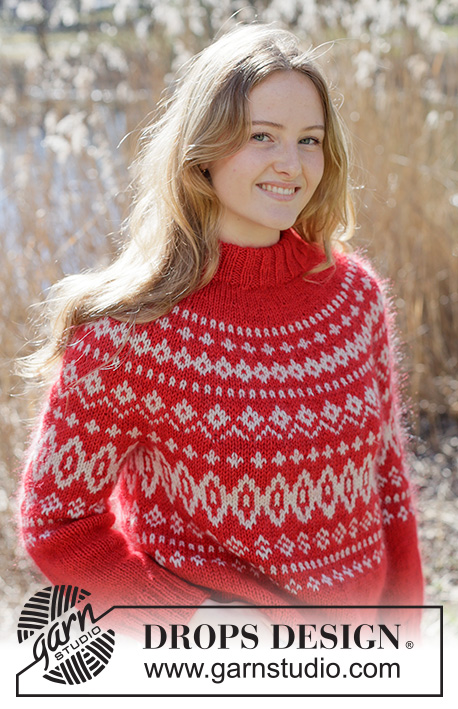
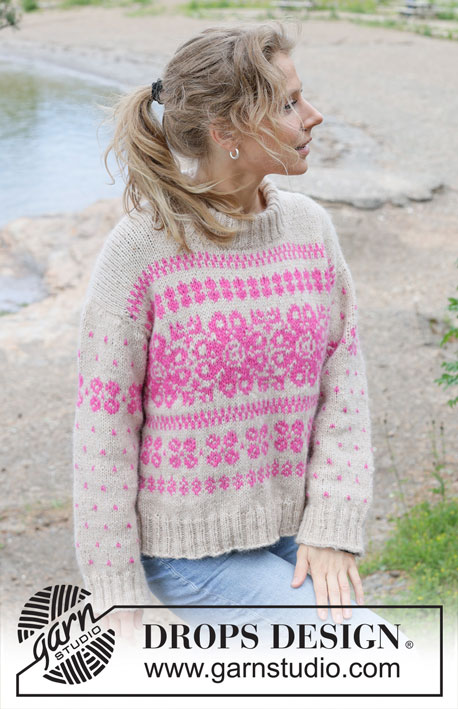
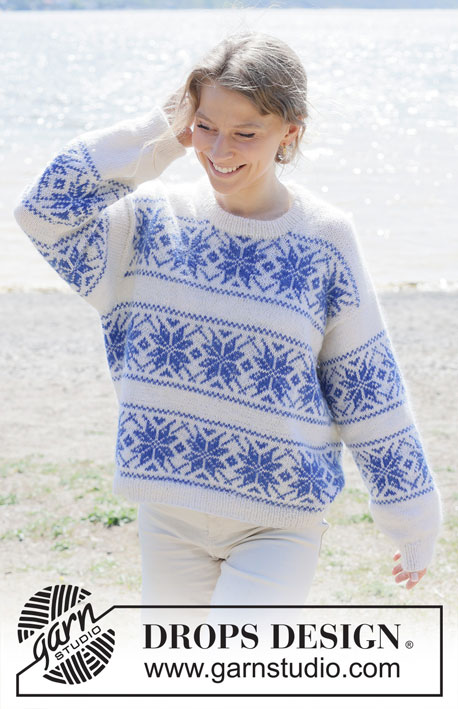
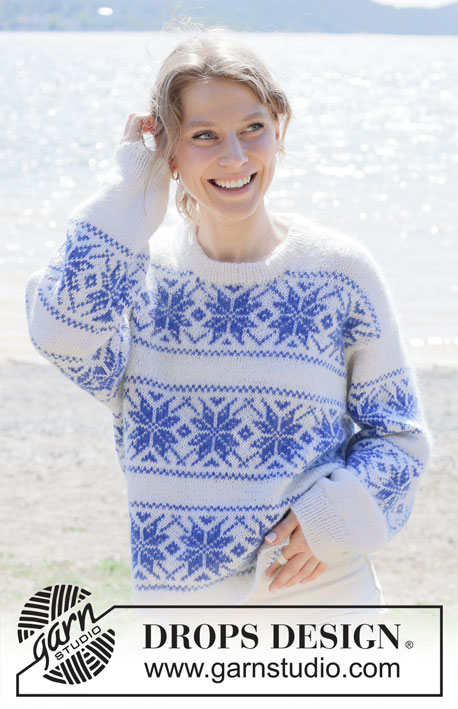
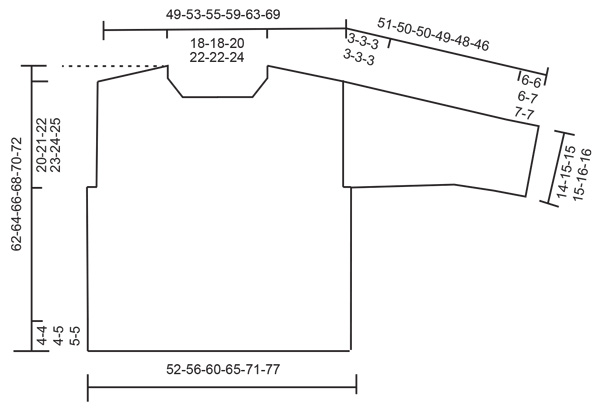
Knitted jumper in DROPS BabyMerino and DROPS Kid-Silk. The piece is worked top down with European/diagonal shoulders, Nordic pattern and double neck. Sizes S - XXXL.
DROPS 254-8 |
||||||||||
|
------------------------------------------------------- EXPLANATIONS FOR THE PATTERN: ------------------------------------------------------- PATTERN: See diagram A.1. The diagram shows the pattern from the right side and is worked in stocking stitch. Work pattern as follows: * A.1 one time in height, then 4-4-4-4-5-5 cm with background colour *, work from *-* until A.1 has been worked 3 times in height, finish the jumper with the background colour. To avoid the knitting tension losing its elasticity when working colour-pattern, it is important that the strands at the back are not tight. Use a size larger needle when working pattern if the piece becomes tight. INCREASE TIP-1: INCREASE 1 STITCH TOWARDS THE LEFT - from RIGHT SIDE: Use left needle to pick up yarn between 2 stitches from row below, pick up yarn from the front and knit in the stitch loop that is on the back of the needle. INCREASE 1 STITCH TOWARDS THE RIGHT - from RIGHT SIDE: Use left needle to pick up yarn between 2 stitches from row below, pick up yarn from the back and knit in the stitch loop that is on the front side of the needle. . INCREASE TIP-2: INCREASE 1 STITCH TOWARDS THE RIGHT - from WRONG SIDE: Use left needle to pick up yarn between 2 stitches from row below, pick up yarn from the back and purl in the stitch loop that is on the front side of the needle. INCREASE 1 STITCH TOWARDS THE LEFT - from WRONG SIDE: Use left needle to pick up yarn between 2 stitches from row below, pick up yarn from the front and purl in the stitch loop that is on the back side of the needle. DECREASE TIP (for sleeves): Decrease 1 stitch on each side of the marker-stitch as follows: Work until there are 2 stitches left before the marker-thread, knit 2 together, knit the marker-stitch, slip 1 stitch knit-wise, knit 1 and pass the slipped stitch over the knitted stitch (2 stitches decreased). KNITTING TIP: When working short rows, there will be a small hole after each turn. This hole can be closed by tightening the strand or using the technique German Short Rows as follows: Slip the first stitch purl-wise, take the strand over the right needle and tighten well from the back (2 loops on the needle). These loops are worked together on the next row. ------------------------------------------------------- START THE PIECE HERE: ------------------------------------------------------- JUMPER – SHORT OVERVIEW OF THE PIECE: The pattern uses both long and short needles; start with the length which fits the number of stitches and change when necessary. The piece is started back and forth, casting on stitches at the back of the neck and working the back piece top down, while increasing stitches on each side for the shoulders which become slightly diagonal. The back piece is then worked with pattern as far as the armholes and set aside. The front piece is worked in 2 sections, knitting up stitches first along 1 back shoulder and increasing for the neckline. This is repeated on the other shoulder, the 2 front sections are joined when the neckline is finished and worked with pattern until the armholes are finished. The front and back pieces are joined on the same circular needle and the body worked in the round Stitches are knitted up around the armholes for the sleeves, which are started back and forth for the sleeve cap then finished in the round. Stitches are knitted up around the neckline and the neck worked in the round then folded double to the inside to finish. BACK PIECE: The piece is worked back and forth. Cast on 37-37-41-45-45-49 stitches with circular needle size 3.5 mm, 1 strand colour white DROPS Baby Merino and 1 strand colour off white DROPS Kid-Silk (2 strands, hereafter called background colour). ROW 1 (wrong side): Purl. ROW 2 (right side): Read INCREASE TIP-1. Knit 3, increase 1 stitch towards the left, knit until there are 3 stitches left, increase 1 stitch towards the right, knit 3. ROW 3 (wrong side): Read INCREASE TIP-2. Purl 3, increase 1 stitch towards the right, purl until there are 3 stitches left, increase 1 stitch towards the left, purl 3. AFTER 3rd ROW: Work ROWS 2 and 3 a total of 15-17-17-18-20-22 times (30-34-34-36-40-44 rows worked). There are = 97-105-109-117-125-137 stitches. Insert 1 marker outermost on one side. The piece is now measured from here! Continue as follows: 2 stocking stitches with background colour, see start-arrow for your size and work the last 6-0-2-6-0-6 stitches in A.1, work A.1 across the next 80-100-100-100-120-120 stitches, work the first 7-1-3-7-1-7 stitches in A.1 (so the pattern is symmetric) and 2 stocking stitches with background colour. Continue this pattern until the piece measures 14-15-16-17-17-18 cm from the marker and finishing after a row from the wrong side. Note which row this is in the pattern. Cut the strand, place the stitches on a stitch holder and work the left front piece. LEFT FRONT PIECE: Find the left back shoulder as follows: Lay the back piece flat, right side up, with the stitch holder towards you; left side of piece = left shoulder. Start from the right side by the neck with background colour and knit up 1 stitch in each worked row on the left back shoulder (inside the outermost stitch) to the shoulder = 30-34-34-36-40-44 stitches. All measurements on the front piece are taken from this knitted-up row. Work stocking stitch (first row from wrong side). When the piece measures 10-10-10-10-12-12 cm, increase for the neck as follows: ROW 1 (right side): Remember INCREASE TIP-1. Knit 3, increase 1 stitch towards the left, work to end of row. ROW 2 (wrong side): Purl. Work ROWS 1 and 2 a total of 3 times (6 worked rows) = 33-37-37-39-43-47 stitches (last row from the wrong side). Work 2 rows of colour pattern according to A.1 with 2 stitches in background colour by the armhole. Rows 1 and 2 in A.1 have now been worked. Cut the strands, place the stitches on a stitch holder and work the right front piece. RIGHT FRONT PIECE: Start from the right side, outermost on the right back shoulder with background colour and knit up 1 stitch in each worked row along the shoulder (inside the outermost stitch) to the neckline = 30-34-34-36-40-44 stitches. All measurements on the front piece are taken from this knitted-up row. Work stocking stitch (first row from wrong side). When the piece measures 10-10-10-10-12-12 cm, increase for the neck as follows: ROW 1 (right side): Remember INCREASE TIP-1. Work until there are 3 stitches left on the row, increase 1 stitch towards the right, knit 3. ROW 2 (wrong side): Purl. Work ROWS 1 and 2 a total of 3 times (6 worked rows) = 33-37-37-39-43-47 stitches (last row from the wrong side). Work 2 rows of colour pattern according to A.1 with 2 stitches in background colour by the armhole. Rows 1 and 2 in A.1 have now been worked. Now join the 2 front pieces. FRONT PIECE: From the right side and with background colour (which is row 3 in A.1), work the 33-37-37-39-43-47 stitches on the right front piece, cast on 31-31-35-39-39-43 stitches for the neckline, work the 33-37-37-39-43-47 stitches on the left front piece = 97-105-109-117-125-137 stitches. Purl 1 row from the wrong side with background colour (this is row 4 in A.1). Work as follows from the right side (row 5 in A.1): 2 stitches with background colour, see start-arrow for your size and work the last 6-0-2-6-0-6 stitches in A.1, work A.1 across the next 80-100-100-100-120-120 stitches, work the first 7-1-3-7-1-7 stitches in A.1 (so the pattern is symmetrical), work 2 stitches with background colour. Continue working until the piece measures 26-27-28-29-31-32 cm, finishing on the same row as the back piece. Now join the front and back pieces. Cut the strand BODY: Cast on 4-4-6-7-9-9 new stitches then continue the pattern across the 97-105-109-117-125-137 stitches on the front piece, cast on 7-7-11-13-17-17 stitches (in side mid-under sleeve), continue the pattern across the 97-105-109-117-125-137 stitches on the back piece, cast on 3-3-5-6-8-8 stitches (in side mid-under sleeve) = 208-224-240-260-284-308 stitches. Continue A.1 in the round across all stitches. NOTE! The pattern will not fit under the sleeves; work the pattern as far as it will go. The middle stitch of the cast-on stitches under both sleeves is always worked with background colour. Work until the front piece measures 61-63-65-66-68-70 cm. Change to circular needle size 2.5 mm. Work rib with background colour (knit 1, purl 1), AT THE SAME TIME increase 20-22-24-26-28-30 stitches evenly on the first round = 228-246-264-286-312-338 stitches. When the rib measures 4-4-4-5-5-5 cm, cast off. The front piece measures approx. 65-67-69-71-73-75 cm from the knitted-up row and is 3 cm longer than the finished length as the knitted-up row is not on the shoulder but slightly down the back piece. The jumper measures approx. 62-64-66-68-70-72 cm. SLEEVES: The sleeve is worked top down. Lay the piece flat and insert 1 marker at the top of the armhole (NOTE! This is not in the knitted-up row on the front piece but approx. 6-6-6-6-7-7 cm down the front piece). Use circular needle size 2.5 mm and background colour. Start in the middle of the cast-on stitches under the sleeve, knit up 82-86-94-102-110-114 stitches around the armhole, with equal numbers of stitches on both sides of the marker. Change to circular needle size 3.5 mm. Insert 1 marker in the middle cast-on stitch and move the marker on top of the armhole to the middle stitch on the round – with equal numbers of stitches on each side. Work stocking stitch back and forth with short rows for the sleeve cap, starting mid-under the sleeve as follows: ROW 1 (right side): Knit to 8-8-12-12-12-14 stitches past the marker-stitch on top of the armhole, turn – read KNITTING TIP. ROW 2 (wrong side): Purl to 8-8-12-12-12-14 stitches past the marker-stitch, turn. ROW 3 (right side): Knit to 5 stitches past the previous turn, turn. ROW 4 (wrong side): Purl to 5 stitches past the previous turn, turn. Repeat ROWS 3 and 4 until you have turned a total of 8 times (4 times on each side, with the last row from the wrong side). AFTER THE LAST TURN: Knit back to the beginning of the round (mid-under sleeve). Now work stocking stitch and pattern in the round as follows, as well as decreasing under the sleeve. Read the next 2 sections before continuing. PATTERN: Remember to decrease as described below. After the sleeve cap continue in the round as follows: Work with background colour until piece measures 4-4-4-4-5-5 cm from the shoulder, then work A.1 in the round – the pattern will not fit under the sleeve. Count out from the marker-stitch on the shoulder to determine where the pattern should start under the sleeve – the marker-stitch should match the mid-stitch in A.1. Work pattern in the same way as on the body but after 2 repeats of A.1 in height finish the sleeve with background colour. DECREASES: Read DECREASE TIP. when the sleeve measures 1 cm from the join, decrease 2 stitches every 2nd round 4-4-5-6-7-8 times, then every 3-3-2½-1½-1½-1½ cm 9-10-12-15-17-17 times = 56-58-60-60-62-64 stitches Continue working until the sleeve measures 45-44-44-42-41-39 cm from the shoulder. Change to double pointed needles size 2.5 mm. Work rib (knit 1, purl 1), AT THE SAME TIME increase 6-6-6-6-6-6 stitches evenly on round 1 = 62-64-66-66-68-70 stitches. When the rib measures 6-6-6-7-7-7 cm, cast off. The sleeve measures approx. 51-50-50-49-48-46 cm from top of shoulder. NECK: Use circular needle size 2.5 mm and background colour. Start from the right side on one shoulder-line and knit up 112 to 148 stitches inside 1 stitch – the stitch count should be divisible by 2. Work rib in the round (knit 1, purl 1) for 9-9-9-10-10-10 cm. Change to circular needle size 3.5 mm and cast off a little loosely. Fold the neck double to the inside and fasten down with a couple of stitches by each shoulder. |
||||||||||
Diagram explanations |
||||||||||
|
||||||||||
 |
||||||||||
 |
||||||||||
Have you finished this pattern?Tag your pictures with #dropspattern #farawaysweater or submit them to the #dropsfan gallery. Do you need help with this pattern?You'll find 34 tutorial videos, a Comments/Questions area and more by visiting the pattern on garnstudio.com. © 1982-2026 DROPS Design A/S. We reserve all rights. This document, including all its sub-sections, has copyrights. Read more about what you can do with our patterns at the bottom of each pattern on our site. |
||||||||||


With over 40 years in knitting and crochet design, DROPS Design offers one of the most extensive collections of free patterns on the internet - translated to 17 languages. As of today we count 325 catalogues and 12298 patterns translated into English (UK/cm).
We work hard to bring you the best knitting and crochet have to offer, inspiration and advice as well as great quality yarns at incredible prices! Would you like to use our patterns for other than personal use? You can read what you are allowed to do in the Copyright text at the bottom of all our patterns. Happy crafting!
Post a comment to pattern DROPS 254-8
We would love to hear what you have to say about this pattern!
If you want to leave a question, please make sure you select the correct category in the form below, to speed up the answering process. Required fields are marked *.