
Popular categories
Looking for a yarn?


Comments / Questions (76)
![]() Susanne wrote:
Susanne wrote:
Ich glaube, es gibt einen Fehler in der Anleitung: rechtes Vorderteil sollen insgesamt 2 Rapporte A4 gestrickt werden, dann sind das aber nur insgesamt 25 Maschen. Ich denke, dass A4 3mal gestrickt werden muss.
29.10.2024 - 18:08
![]() Bri Lange wrote:
Bri Lange wrote:
But this does not equal 35 stitches!! I am doing size medium and adding 3 goldenrod to the beginning and end will not equal 35.
29.10.2024 - 17:21DROPS Design answered:
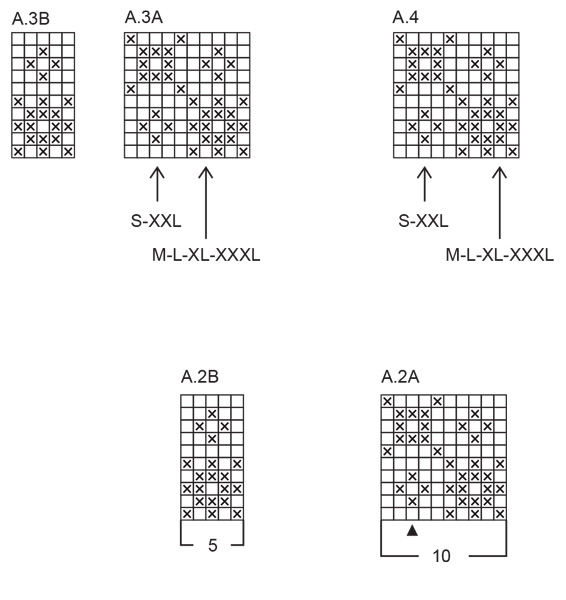
oops you are right, my bad, in M you will work: the last 7 sts in A.3A, then repeat the 10 sts A.3 A a total of 2 times (= 20 sts), and work the 5 sts A.3B and finish with 3 sts with goldenrod = 7+20+5+3=35 sts; the 3 sts with goldenrod are only one one side = towards armhole and not towards neck. Happy knitting!
29.10.2024 - 17:24
![]() Bri Lange wrote:
Bri Lange wrote:
Hi. Loving the pattern so far but, I am working left front piece and when I add in the pattern it says to follow from the arrow then follow the pattern and finish with 3 stockinette stitches in goldenrod but when I do that I am not getting the right pattern. Help!!!
28.10.2024 - 19:43DROPS Design answered:
Dear Mrs Lange, you first work the first 3 sts with goldenrod, then work either the last 3 or the last 7 sts (see size) of A.3A, then work all sts in A.3A = 10 sts a total of 2 or 3 times, and finish row with the 5 sts A.3B and 3 sts golden rod. From WS work reading diagrams from the right towards the left: A.3B, repeat A.3A a total of 3 times and work the first 3-7 sts (read from the left towards the right). Happy knitting!
29.10.2024 - 09:04
![]() Anette wrote:
Anette wrote:
Hej Jeg er nået til der, hvor jeg samler for og bag på rundpind under ærmegab. Hvordan sikrer jeg at mønstret bliver pænt, der hvor jeg henholdsvis afslutter og starter en runde? Her mødes jo den pind der afsluttes med den der starter, og så kommer det til at se ud som om, jeg lavet fejl i mønstret. Tak for hjælp.
25.10.2024 - 08:57DROPS Design answered:
Hej Anette, jo når du afslutter med samme pind fra vrangen som du gjorde på bagstykket, så kommer det til at passe med mønsteret :)
25.10.2024 - 10:34
![]() Phoebe wrote:
Phoebe wrote:
How much positive ease should be allowed for the dandelion field pullover pattern? That will determine whether I choose to knit a size S or a size M. Thank you!
21.10.2024 - 01:26DROPS Design answered:
Hi Phoebe, If you use the size chart at the bottom of the pattern, with the measurements specified for your size, you will get the loose-fit shape as shown in the photograph. Happy knitting!
21.10.2024 - 06:59
![]() Elodie wrote:
Elodie wrote:
Bonjour, J'ai commencé la partie devant gauche (taille S) et je me demande s'il faut tricoter les 7 cm puis faires les augmentations "rang1 - rang 2" ou si c'est à faire en même temps ? Autrement dit, est-ce qu'il faut faire 7 cm + 10 rangs ou juste les 10 rangs ? merci
14.10.2024 - 14:01DROPS Design answered:
Bonjour Élodie, tricotez d'abord 7 cm sur les 31 mailles relevées le long de l'épaule puis commencez à augmenter pour l'encolure (en début de rang sur l'endroit pour le devant gauche/ en fin de rang sur l'endroit pour le devant droit); vous aurez donc 7 cm + les 10 rangs d'augmentations pour l'encolure pour les 2 devants avant de les réunir. Bon tricot!
14.10.2024 - 16:19
![]() NN67 wrote:
NN67 wrote:
Bonjour, Je rencontre des difficultés pour monter et tricoter les manches. Est il possible de traduire en français la question posée par Susana Araujo ainsi que votre réponse ? (ou alors pourquoi pas une vidéo !). Merci pour vos réponses.
08.10.2024 - 22:08DROPS Design answered:
Bonjour NN67, dans cette leçon nous montrons comment relever les mailles des manches; et dans celle-ci comment centrer un diagramme. N'hésitez pas à poser directement votre question pour avoir la réponse adaptée (indiquez votre taille si besoin). Bon tricot!
09.10.2024 - 08:22
![]() Manon wrote:
Manon wrote:
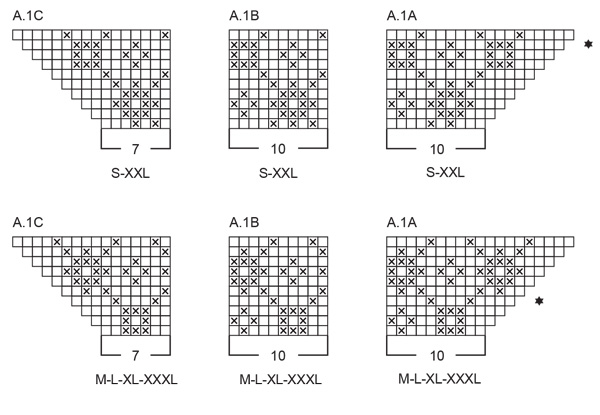
Bonjour - model 255-2 L (dos), après avoir fait un 1er diagram complet je devrais avoir 53m, comment dois-je repartir les m. sur l'aig pour assurer la répétition adequate de A.1B ? Merci
08.10.2024 - 12:56DROPS Design answered:
Bonjour Manon, quand vous avez tricoté les diagrammes 1 fois en hauteur, reprenez-les au 1er rang et tricotez comme avant: 3 m jaune, A.1A, tricotez maintenant 2 fois A.1B, tricotez A.1C et terminez par 3 m jaune. Bon tricot!
08.10.2024 - 16:31
![]() Manon wrote:
Manon wrote:
Veuillez ignorer ma question, j'ai trouvé mon erreur et figurer la démarche/motif.merci (Tips: sur les model vous devriez aussi suggérer l'ajout de marqueur entre chaque diag pour eviter la confusion dans le jacquard. Merci & Bonne journée
06.10.2024 - 21:47
![]() Manon wrote:
Manon wrote:
Bonjour , je debute le challenge avec le Super Dandelion et veut demarrer du bon pied: ) Dos: sur envers diagram A.1C, A1B ,A.1A,je les tric sur l'env en commencant le diag de gauche a droite sur le 1er ou 2e rang?..... Ce pull amenera surement d'autre defis en cours de route... merci de nous guider.
06.10.2024 - 21:18DROPS Design answered:
Bonjour Manon, sur l'endroit, on lit les diagrammes de droite à gauche et sur l'envers, on les lit de gauche à droite, donc le 1er rang du diagramme se fait sur l'endroit et se lit de droite à gauche et le 2ème rang du diagramme se fait sur l'envers et se lit de gauche à droite. Bon tricot!
07.10.2024 - 08:26
|
|||||||||||||
Dandelion Field#dandelionfieldsweater |
|||||||||||||
 |
 |
||||||||||||
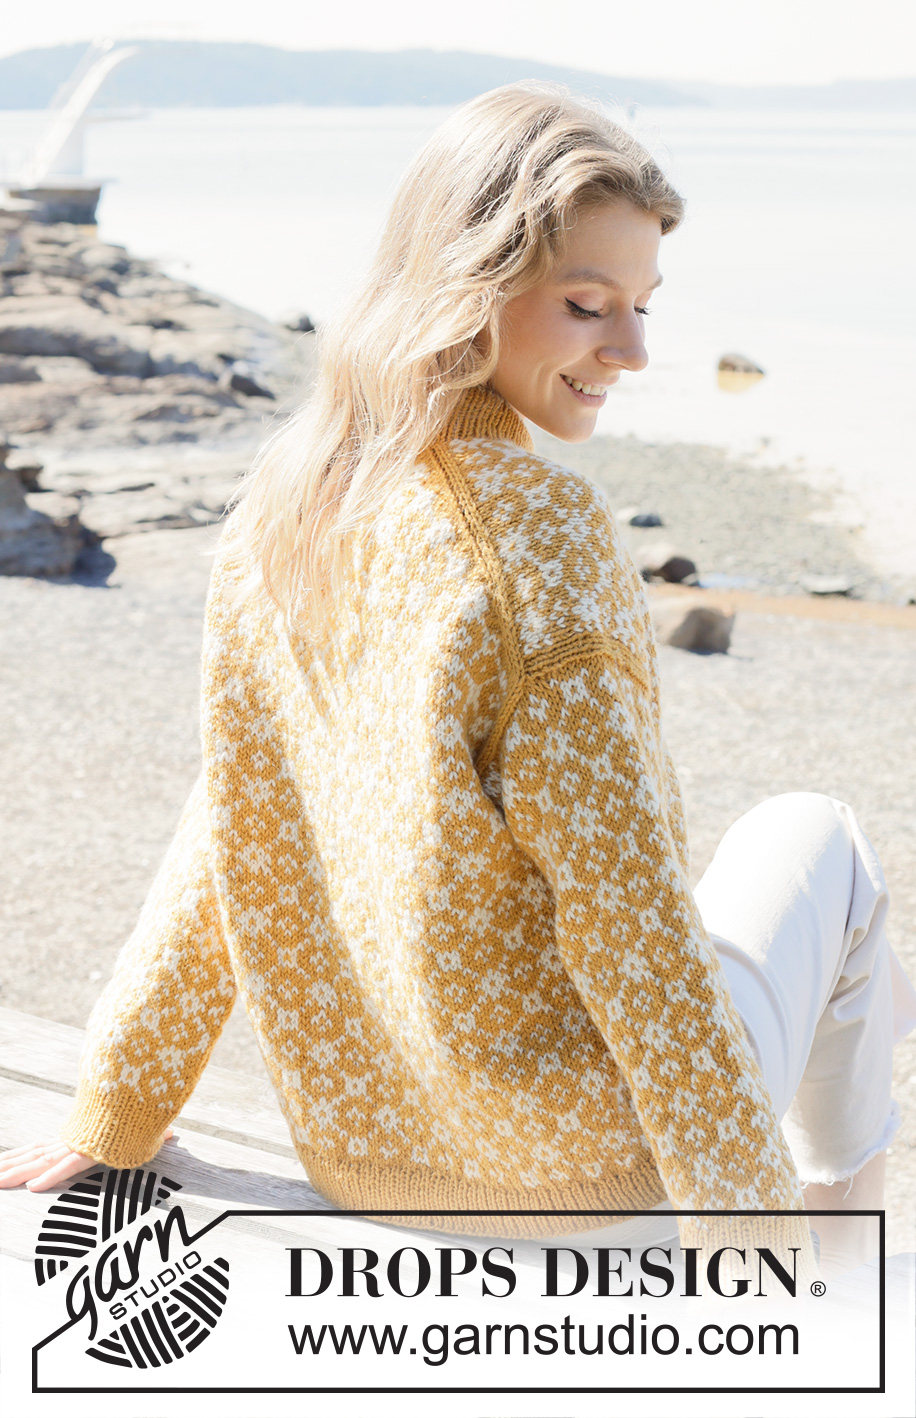
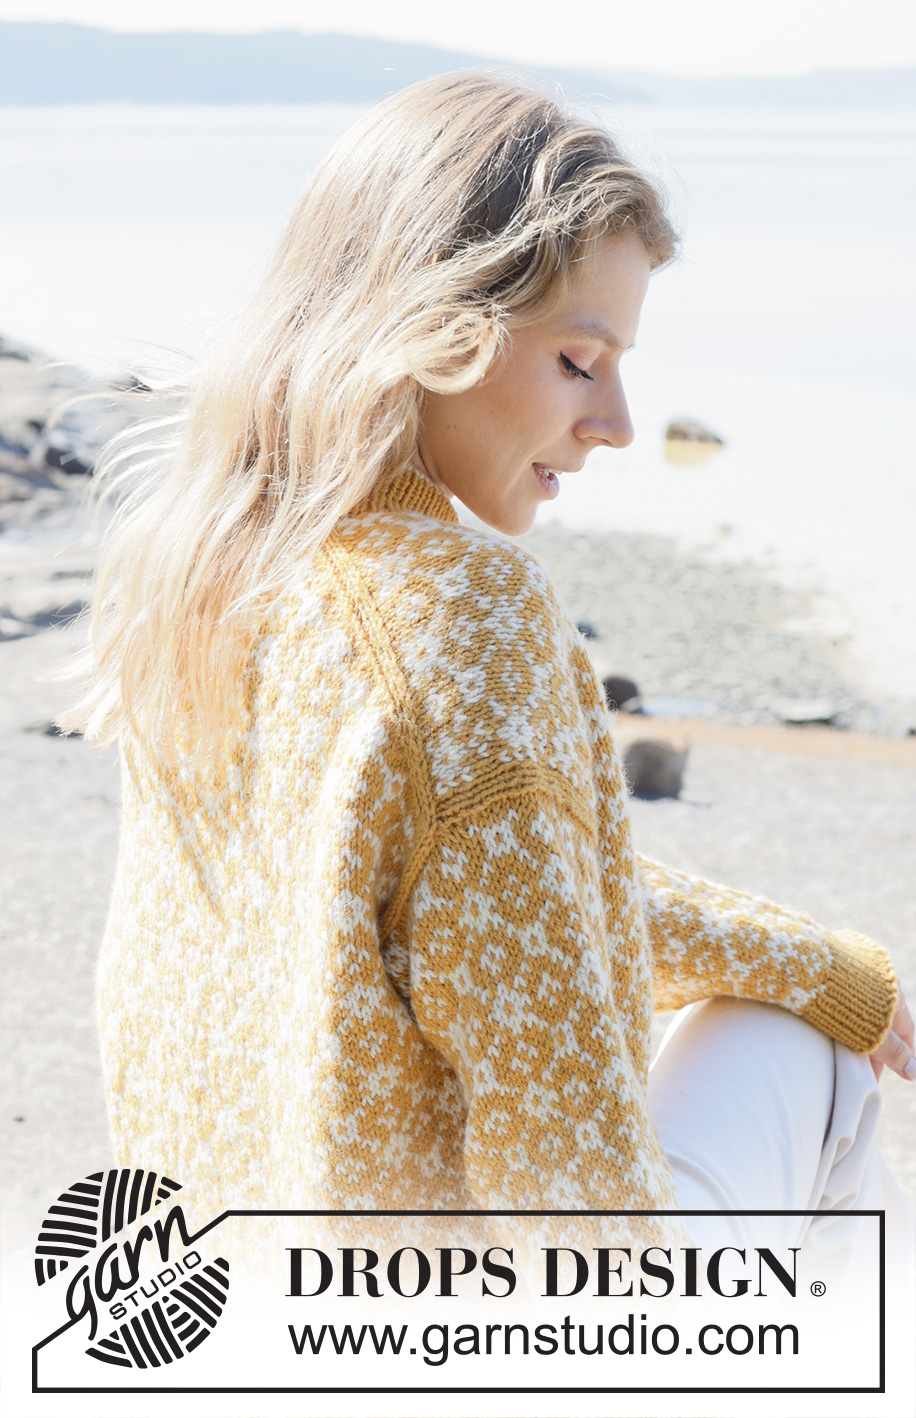
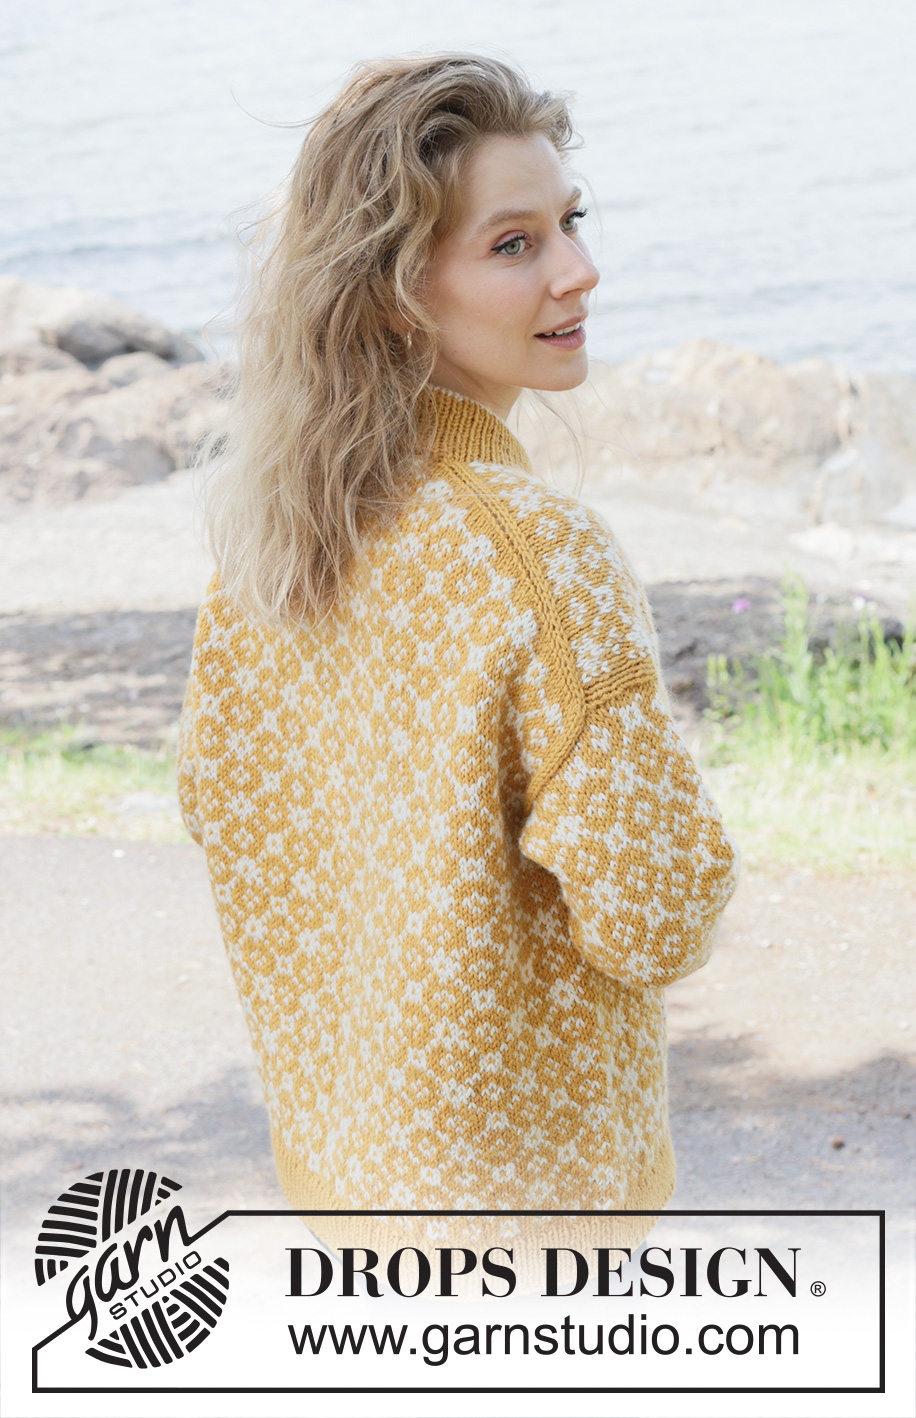
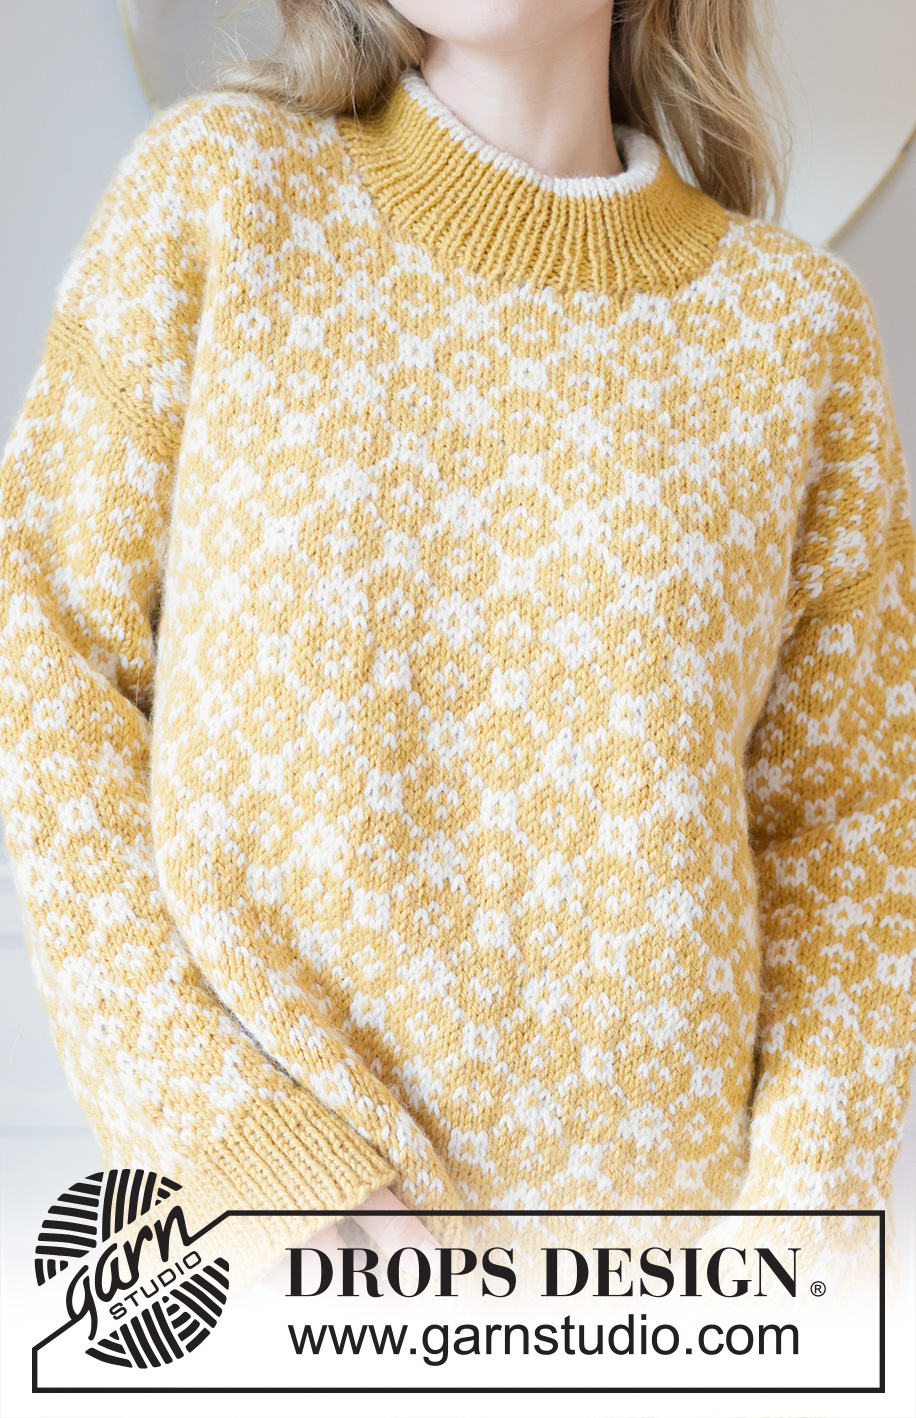
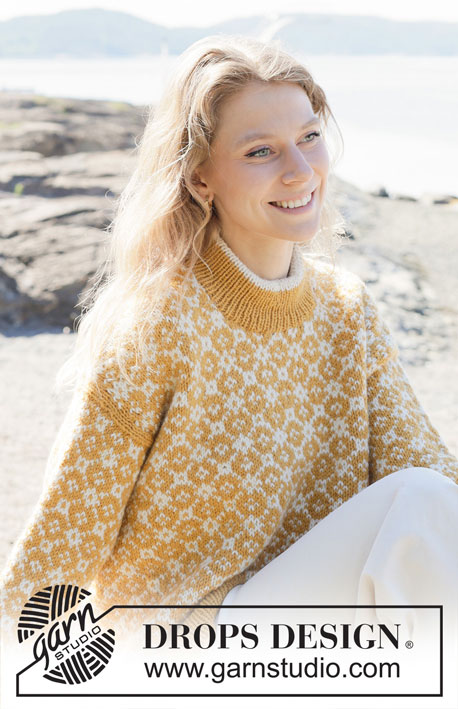
Knitted jumper in DROPS Nepal. The piece is worked top down with European/diagonal shoulders, Nordic pattern and double neck. Sizes S - XXXL.
DROPS 255-2 |
|||||||||||||
|
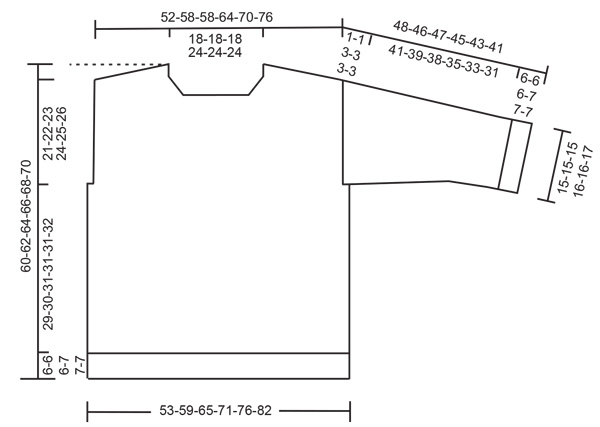
------------------------------------------------------- EXPLANATIONS FOR THE PATTERN: ------------------------------------------------------- GARTER STITCH (worked back and forth): Knit all rows, from both the right and wrong side. 1 ridge in height = knit 2 rows. PATTERN: See diagrams A.1 to A.4. The diagrams show the pattern from the right side. The pattern is worked in stocking stitch. Choose diagram for your size(applies to A.1). Start/finish at arrow for your size (applies to A.3 and A.4). INCREASE TIP-1: INCREASE 1 STITCH TOWARDS THE LEFT - from RIGHT SIDE: Use left needle to pick up yarn between 2 stitches from row below, pick up yarn from the front and knit in the stitch loop that is on the back of the needle. INCREASE 1 STITCH TOWARDS THE RIGHT - from RIGHT SIDE: Use left needle to pick up yarn between 2 stitches from row below, pick up yarn from the back and knit in the stitch loop that is on the front side of the needle. INCREASE TIP-2: INCREASE 1 STITCH TOWARDS THE RIGHT - from WRONG SIDE: Use left needle to pick up yarn between 2 stitches from row below, pick up yarn from the back and purl in the stitch loop that is on the front side of the needle. INCREASE 1 STITCH TOWARDS THE LEFT - from WRONG SIDE: Use left needle to pick up yarn between 2 stitches from row below, pick up yarn from the front and purl in the stitch loop that is on the back side of the needle. INCREASE TIP-3 (evenly spaced): To work out how to increase evenly, count the total number of stitches on the needle (e.g., 180 stitches) and divide by the number of increases to be made (e.g., 32) = 5.6. In this example, increase by making 1 yarn over after alternately each 5th and 6th stitch (approx.). On the next round work the yarn overs twisted to avoid holes. KNITTING TIP: Mark in the diagram the row the back piece finishes on. This makes it easier to match the front piece when working the armholes. DECREASE TIP: Decrease 1 stitch on each side of the marker as follows: Work until there are 2 stitches left before the marker-stitch under the sleeve, knit 2 together with colour goldenrod, knit 1 with colour goldenrod (marker-stitch), knit 2 twisted together with colour goldenrod (2 stitches decreased). ------------------------------------------------------- START THE PIECE HERE: ------------------------------------------------------- JUMPER – SHORT OVERVIEW OF THE PIECE: The pattern uses both long and short needles; start with the length which fits the number of stitches and change when necessary. The piece is started back and forth, casting on stitches at the back of the neck and working the back piece top down with pattern, while increasing stitches on each side for the shoulders, which become slightly diagonal. The back piece is worked as far as the armholes. The front piece is then worked in 2 sections, knitting up stitches along 1 back shoulder, working pattern and increasing for the neckline. This is repeated on the other shoulder. The 2 front sections are joined when the neckline is finished and then work until the armholes are finished. The front and back pieces are then joined and the body worked in the round. Stitches are knitted up around the armholes for the sleeves, which are worked in the round, top down. Stitches are knitted up around the neckline and the neck is worked in the round, then folded double to the inside. BACK PIECE: Cast on 33-33-33-43-43-43 stitches with circular needle size 5 mm and colour goldenrod DROPS Nepal. Work PATTERN – read description above, as follows: NOTE: The 3 outermost stitches in each side + increases are worked with colour goldenrod until the armholes are finished. ROW 1 (wrong side): Purl. ROW 2 (right side): Read INCREASE TIP-1. Knit 3, increase 1 stitch towards the left, work A.1A, then A.1B a total of 1-1-1-2-2-2 times, work A.1C, increase 1 stitch towards the right, knit 3. ROW 3 (wrong side): Read INCREASE TIP-2. Purl 3, increase 1 stitch towards the right, work A.1C, then A.1B as before, A.1A, increase 1 stitch towards the left, purl 3. Work ROWS 2 and 3 a total of 14-17-17-17-19-22 times (28-34-34-34-38-44 worked rows). NOTE: Each time A.1 is finished in height, there is room for 2 more repeats of A.1B in width. The increases for the diagonal shoulders are finished in sizes M, L, XL and XXXL. Continue as follows for sizes S and XXL. SIZES S and XXL: Work ROW 2 one more time, then ROW 3 one more time but without increasing (a total of 30-40 worked rows). ALL SIZES: After the last increase there are 91-101-101-111-121-131 stitches and the piece measures approx. 14-16-16-16-19-20 cm from the cast-on edge mid-back. Insert 1 marker outermost on one side. The piece is now measured from here! Work the next row as follows from the right side: 3 stocking stitches in colour goldenrod, work A.2A a total of 8-9-9-10-11-12 times (8 stitches left on row), work A.2B, 3 stocking stitches in colour goldenrod. Continue this pattern back and forth. Remember to maintain the knitting tension. Work until the piece measures 14-15-16-17-17-18 cm from the marker, measured along the armhole, and finishing with a row from the wrong side where you cast off 1 stitch on each side of the back piece = 89-99-99-109-119-129 stitches – read KNITTING TIP. Cut the strand, place the stitches on a stitch holder and work the left front piece along the left back shoulder. LEFT FRONT PIECE: Find the left back shoulder as follows: Lay the back piece flat, right side up, with the stitch holder towards you; left side of piece = left shoulder. Start from the right side on the left back shoulder by the neck. Use colour goldenrod and knit up 1 stitch in each worked row, inside 1 stitch, along the shoulder to the armhole then knit up 1 stitch in the next row at the outermost towards the armhole (pick up inside the outermost stitch)= 31-35-35-35-41-45 stitches. All lengths on the front piece are measured from this knitted-up row. Purl 1 row from the wrong side, then work as follows from the right side: Start at the arrow for your size in A.3A and work the last 3-7-7-7-3-7 stitches in A.3A, then repeat all of A.3A 2-2-2-2-3-3 times, work A.3B, finish with 3 stocking stitches in colour goldenrod. Continue this pattern back and forth until the piece measures 7-8-9-9-10-10 cm. Now increase for the neckline as follows (the increased stitches are worked into the pattern): ROW 1 (right side): Remember INCREASE TIP-1, knit 1 with colour goldenrod, increase 1 stitch towards the left (with colour goldenrod), continue A.3 as before, 3 stocking stitches with colour goldenrod. ROW 2 (wrong side): Purl 3 with colour goldenrod, work A.3 until there is 1 stitch left, purl 1 with colour goldenrod. Work ROWS 1 and 2 a total of 5 times (10 rows worked) = 36-40-40-40-46-50 stitches. Cut the strand, place the stitches on a stitch holder and work the right front piece along the right back shoulder. RIGHT FRONT PIECE: Start from the right side, 1 row before the last increase on the right back shoulder. Use colour goldenrod and knit up 1 stitch in each worked row, inside 1 stitch, from the armhole to the neckline = 31-35-35-35-41-45 stitches. All lengths on the front piece are measured from this knitted-up row. Purl 1 row from the wrong side, then work as follows from the right side: 3 stocking stitches with colour goldenrod, work A.4 a total of 2-3-3-3-3-4 times, then the first 8-2-2-2-8-2 stitches in A.4, finishing at the arrow for your size. Continue this pattern back and forth until the piece measures 7-8-9-9-10-10 cm. Now increase for the neckline as follows: ROW 1 (right side): Knit 3 with colour goldenrod, work A.4 until there is 1 stitch left, increase 1 stitch towards the right (with colour goldenrod), knit 1 with colour goldenrod – remember INCREASE TIP-1. ROW 2 (wrong side): Purl 1 with colour goldenrod, work A.4 until there are 3 stitches left, purl 3 with colour goldenrod. Work ROWS 1 and 2 a total of 5 times (10 rows worked) = 36-40-40-40-46-50 stitches. Now join the 2 front piece together. FRONT PIECE: Work as follows from the right side: Work the 36-40-40-40-46-50 stitches on the right front piece as before, cast on 19-21-21-31-29-31 stitches for the neckline, then work the 36-40-40-40-46-50 stitches on the left front piece as before = 91-101-101-111-121-131 stitches. Continue with stocking stitch and pattern as before, back and forth across all stitches (i.e., 3 stocking stitches in goldenrod at the beginning and end of the row and pattern otherwise). Work until the front piece measures 28-29-30-31-33-34 cm from the knitted-up row, finishing after the same row from the wrong side as on the back piece and casting off 1 stitch on each side on this last row = 89-99-99-109-119-129 stitches (to avoid cutting thread at the end of the row, the last 2 stitches can be purled together). The front and back pieces are joined for the body. The piece is now measured from here! BODY: Work pattern as before across the 89-99-99-109-119-129 stitches on the front piece, cast on 1-1-11-11-11-11 stitches (in side mid-under sleeve), work pattern as before across the 89-99-99-109-119-129 stitches from the back piece, cast on 1-1-11-11-11-11 stitches (in side mid-under sleeve) = 180-200-220-240-260-280 stitches. Continue the established pattern in the round, working across all stitches. The round starts in the middle of the cast-on stitches under one sleeve. Work until the body measures 28-29-30-30-30-31 cm from the join, finishing after row 5 or 9 in A.2 (the front piece measures approx. 56-58-60-61-63-65 cm from the knitted-up row). Work 2 rounds of stocking stitch with colour goldenrod. Change to circular needle size 3.5 mm. Work rib with colour goldenrod (knit 1, purl 1), AT THE SAME TIME increase 32-36-40-44-44-48 stitches evenly on round 1 – read INCREASE TIP-3 = 212-236-260-284-304-328 stitches. When the rib measures 6-6-6-7-7-7 cm, cast off a little loosely with rib. The front piece measures approx. 63-65-67-69-71-73 cm from the knitted-up row and is approx. 3 cm longer than the finished length, as the knitted-up row is not on top of shoulder but positioned slightly down the back piece. The jumper measures approx. 60-62-64-66-68-70 cm. SLEEVES: The sleeve is worked top down. Lay the piece flat and insert 1 marker mid-top of shoulder (NOTE! Mid-top of shoulder is not the knitted-up row on the front piece but approx. 7 to 8 cm down the front piece). Use circular needle size 3.5 mm and colour goldenrod. Start in the middle stitch of the cast-on stitches under the sleeve (insert 1 marker in this stitch) and knit up 72-76-90-92-96-100 stitches (inside 1 stitch) around the armhole, making sure you knit up 1 stitch in the marker-stitch under the sleeve and 1 stitch in the marker on top of the sleeve, and with equal numbers of stitches on each side of both marker-stitches. Count out from the marker-stitch on top of the shoulder to determine where to start the pattern – the marker-stitch should match the mid-stitch in A.2A. Change to circular needle size 5 mm. Work stocking stitch and A.2A in the round, but the middle 3 stitches under the sleeve are worked with colour goldenrod. When the sleeve measures 1 cm, decrease 1 stitch on each side of the marker-stitch under the sleeve - read DECREASE TIP. Decrease like this every 2nd round a total of 4-6-8-10-12-13 times, then every 5-4½-2½-2½-2-2 cm 7-7-11-9-8-8 times = 50-50-52-54-56-58 stitches. Continue the pattern with 3 stocking stitches in colour goldenrod under the sleeve, until the sleeve measures 42-40-41-38-36-34 cm from the shoulder-marker. Change to double pointed needles size 3.5 mm and work rib with colour goldenrod (knit 1, purl 1). AT THE SAME TIME increase 8-10-10-10-10-10 stitches evenly on round 1 = 58-60-62-64-66-68 stitches. When the rib measures 6-6-6-7-7-7 cm, cast off a little loosely with rib. The sleeve measures approx. 48-46-47-45-43-41 cm from top of shoulder. DOUBLE NECK: Use circular needle size 3.5 mm and colour goldenrod. Start from the right side on one shoulder-line and knit up 100-104-108-132-136-136 stitches, inside 1 stitch, around the neckline (if you knit up fewer stitches, this can be adjusted on the first round). The stitch count must be divisible by 2. Work rib in the round (knit 1, purl 1) for 4½-4½-5½-5½-6½-6½ cm (= approx. 12-12-15-15-18-18 rounds), change to colour off white and continue working until the rib measures 10-10-12-12-14-14 cm (= approx. 15-15-18-18-20-20 rounds with colour off white). Change to circular needle size 5 mm and cast off a little loosely with knit. Fold the neck double to the inside and sew down. There should be a visible stripe of colour off white at the top. To avoid the neck being tight and rolling outwards, it is important that the seam is elastic. |
|||||||||||||
Diagram explanations |
|||||||||||||
|
|||||||||||||
 |
|||||||||||||
 |
|||||||||||||
 |
|||||||||||||
Have you finished this pattern?Tag your pictures with #dropspattern #dandelionfieldsweater or submit them to the #dropsfan gallery. Do you need help with this pattern?You'll find 39 tutorial videos, a Comments/Questions area and more by visiting the pattern on garnstudio.com. © 1982-2026 DROPS Design A/S. We reserve all rights. This document, including all its sub-sections, has copyrights. Read more about what you can do with our patterns at the bottom of each pattern on our site. |
|||||||||||||


With over 40 years in knitting and crochet design, DROPS Design offers one of the most extensive collections of free patterns on the internet - translated to 17 languages. As of today we count 324 catalogues and 12290 patterns translated into English (UK/cm).
We work hard to bring you the best knitting and crochet have to offer, inspiration and advice as well as great quality yarns at incredible prices! Would you like to use our patterns for other than personal use? You can read what you are allowed to do in the Copyright text at the bottom of all our patterns. Happy crafting!
Post a comment to pattern DROPS 255-2
We would love to hear what you have to say about this pattern!
If you want to leave a question, please make sure you select the correct category in the form below, to speed up the answering process. Required fields are marked *.