
Popular categories
Looking for a yarn?


Comments / Questions (160)
![]() Anneli Ahnstedt Stengård wrote:
Anneli Ahnstedt Stengård wrote:
Jag ska börja med mönstret och har satt markörer efter 14, 19, 28, 19 och 14 maskor. Jag börjar med att sticka 14 madkor slätstickning sedan börjar det krångla. Jag stickat A1, A2, A3 och 1 maska slätstickning. Andra markören ska sitta i den maskan, men jag kommer inte ända dit fram när jag gjort A1, A2, A3 och 1 maska utan får flera maskor över. Vad kan jag ha gjort för fel? (Mönstret tar ju bara 13 maskor).
18.03.2025 - 18:06DROPS Design answered:
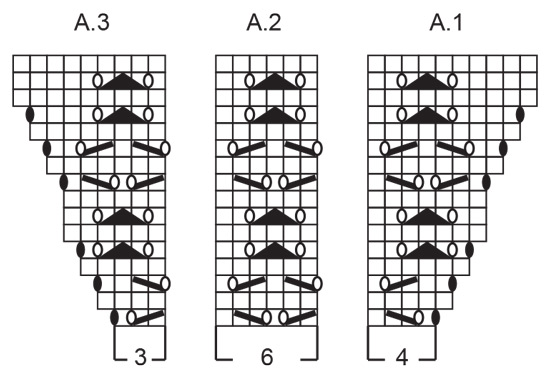
Hej Anneli. Stickade du A.2 över 12 maskor, dvs 2 gånger? Mellan 1a och 2a markören har du 19 maskor och de stickas såhär: A.1 (=4 m), A.2 över 12 maskor, A.3 (=3 m). Nästa maska stickas i slätstickning och den 2a markören sitter i denna maska. Mvh DROPS Design
21.03.2025 - 13:58
![]() Karolina wrote:
Karolina wrote:
Dzień dobry! We wszystkich schematach rozpisanych jest 16 rzędów. 17 rząd będzie przerabiany według schematu na rząd pierwszy? Jeżeli tak, ile razy przerobić schemat A.2?
24.02.2025 - 21:41DROPS Design answered:
Witaj Karolino, po przerobieniu schematów 1 raz na wysokość, zaczynasz je z powrotem od 1-szego rzędu, przerabiasz 1 raz schemat A.1, A.2 ponad 24 oczkami (po dodaniu 6 o. z każdej strony pojawi się miejsce na 2 dodatkowe schematy A.2) i A.3. Pozdrawiamy!
25.02.2025 - 08:09
![]() Jenny wrote:
Jenny wrote:
Pour les manches, comment continuer le point fantaisie quand il n'y a plus d'augmentation ? Doit on tout de même suivre A1, A2, A3 ou doit on tricoter A1 et A3 en Jersey? J'ai essayé de continuer A1,A2,A3 sans faire les augmentation sais le moins fantaisie se décalé à chaque tour...merci
13.02.2025 - 22:49DROPS Design answered:
Bonjour Jenny, tricotez A.2 autant que possible, autrement dit, au lieu de A.1 et A.3 tricotez A.2 pour continuer le point ajouré au début/à la fin de la manche, et si vous avez suffisamment de mailles au début/à la fin du tour, tricotez ces mailles aussi en suivant A.2 - mais tricotez-les en jersey si vous n'en avez pas suffisamment pour un motif complet au début/à la fin de la manche. Le point ajouré doit rester bien aligné et continuer celui de l'empiècement. Bon tricot!
14.02.2025 - 09:26
![]() Eva wrote:
Eva wrote:
Zur Frage davor.. also stricke ich A1 und A2 NICHT ? Ich soll also nur A2 stricken ? Und wenn es nicht aufgeht nur am Ende den Rest rechts stricken?
12.02.2025 - 10:22DROPS Design answered:
Liebe Eva, das Lochmuster stricken Sie wie zuvor aber ohne weitere Zunahmen, so stricken Sie das Lochmuster wie A.2, bzw die letzten 6 Maschen A.1 (Lochmuster) und die ersten 6 Maschen A.3 (Lochmuster), so A.1 und A.3 stricken Sie aber ohne weitere Zunahme, dh einfach A.2 stricken so lange es möglich ist. Viel Spaß beim Stricken!
12.02.2025 - 13:19
![]() Eva wrote:
Eva wrote:
Hallo, ich bin jetzt angekommen bei dem Teil wo man die still gelegten Ärmel wieder aufnimmt. Wie stricke ich jetzt das Muster weiter, weil wenn ich A1, A2 und A3 immer weiter stricke mache ich automatisch zunahmen. Oder soll ich ab jetzt nur noch A2 stricken da der Teil ohne zunahmen ist? Vielen Dank im Voraus!
07.02.2025 - 13:54DROPS Design answered:
Liebe Eva, Lochmuster - wie bei A.2 - stricken Sie wie zuvor weiter, aber unten die Ärmel passst das Muster nicht mehr, dann sollen Sie diese Maschen glattrechts stricken. Viel Spaß beim Stricken!
07.02.2025 - 15:32
![]() Hanneke wrote:
Hanneke wrote:
Ik heb een vraag over het telpatroon. In de rijen 3,4,7 en 8 zit het patroon met het driehoekje dat over drie steken geteld wordt. A2 bestaat de hele tijd uit 6 steken als ik het patroon lees zie ik staan 1 recht = steek 1 Omslag tussen twee steken = steek 2 en 3 Driehoekje (1afhalen, 2 recht, steek overhalen) = steek 4 Omslag tussen twee steken = steek 5 en 6 1 recht = steek 7 Ik krijg steeds een steek extra ook in A1 en A3. Wat moet ik hier anders doen?
30.01.2025 - 10:33DROPS Design answered:
Dag Hanneke,
De omslag tussen twee steken is steek 5, daarna krijg je nog 1 rechte steek, dus in totaal 6 steken. Met het zwarte driehoekje maak je dus van 3 steken 1 steek (dus 2 steken geminderd) en met de omslagen maak je er weer 2 steken bij.
15.02.2025 - 11:48
![]() Monique Le Brun wrote:
Monique Le Brun wrote:
Sur ce modèle, en M, j'arrive au point fantaisie, j'ai bien tricoté les 14m endroit du demi-dos, fait les augmentations pour le raglan, puis tricoté A1 A2 et A3 fait la maille endroit, mais il me reste encore 6m sur la manche avant d'arriver au marqueur ? est-ce normal et dois je les tricoter en jersey uniquement. merci de votre réponse rapide
23.01.2025 - 15:48DROPS Design answered:
Bonjour Mme Le Brun, vérifiez que vous avez bien la bonne disposition des mailles: 14 m (demi-dos), 1 m (marqueur), 19 m (manche), 1 m (marqueur), 28 m (devant), 1 m (marqueur), 19 m (manche), 1 m (marqueur), 14 m (demi-dos) soit:14+1+19+1+28+1+19+1+14=98 m et les 19 m sont réparties ensuite ainsi:4 m A.1 + 12 m A.2 (2x le diagramme) + 3 m A.3. Bon tricot!
24.01.2025 - 08:21
![]() Rita Bonte wrote:
Rita Bonte wrote:
Beste mensen van Drops, Bij de uitleg van het telpatroon staat bij de bolletjes ( omslagen) dat de ene omslag recht en de andere omslag gedraaid gebreid wordt op de volgende naald, maar met beide omslagen zouden GEEN GAATJES MOGEN ONTSTAAN. Klopt dit? Wat is uiteindelijk in het werk het verschil tussen het open rondje en het zwarte/dichte rondje in het telpatroon? Alvast bedankt Rita Bonte.
21.01.2025 - 19:48DROPS Design answered:
Dag Rita,
Een zwart ovaaltje brei je op de volgende naald gedraaid, om te voorkomen dat er een gaatje ontstaat. Een open ovaaltje brei je op de volgende naald recht (of zoals de steek zich voordoet), dus niet gedraaid, om juist een gaatje te maken.
21.01.2025 - 20:35
![]() Berit wrote:
Berit wrote:
Jeg skjønner ikke økning på ermene. Maskene som ikke går opp i mønsteret i hver side strikkes glattstrikk. Gjelder dette på hver side av A1 og A3?
16.01.2025 - 12:33
![]() Ginny Hollingsworth wrote:
Ginny Hollingsworth wrote:
Where do I find corrected pattern? Numbers don’t work!
16.01.2025 - 00:55DROPS Design answered:
Dear Ginny, since this is an online pattern, the corrections are edited into the pattern. You can see what changes were made if you click on the red sign below the pattern. What numbers do not work for you? Maybe we can help. Happy Crafting!
16.01.2025 - 01:31
|
|||||||||||||||||||
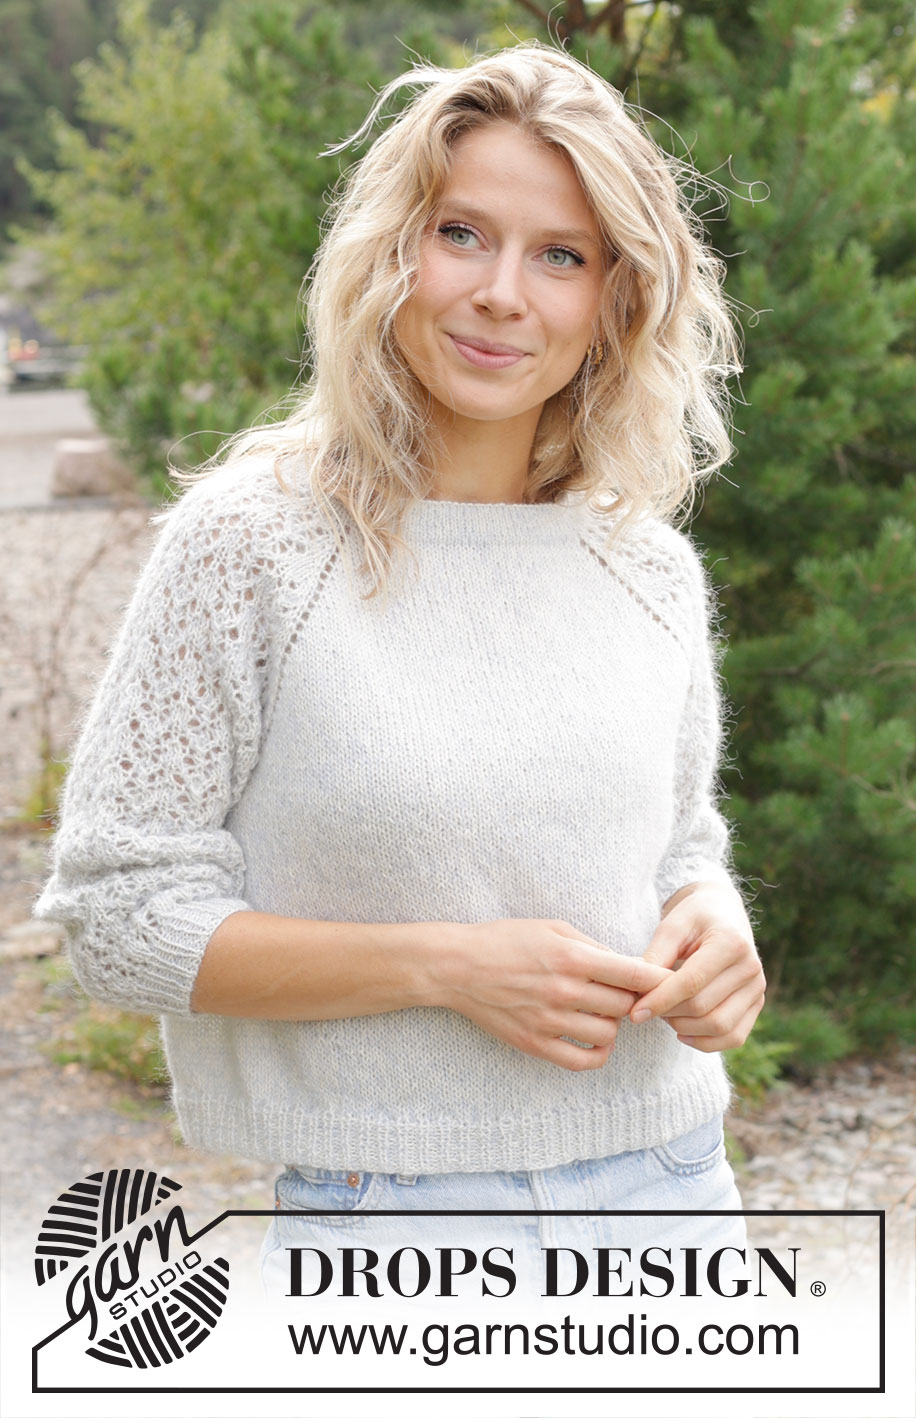
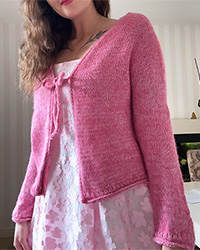
Remembering Spring#rememberingspringsweater |
|||||||||||||||||||
 |
 |
||||||||||||||||||
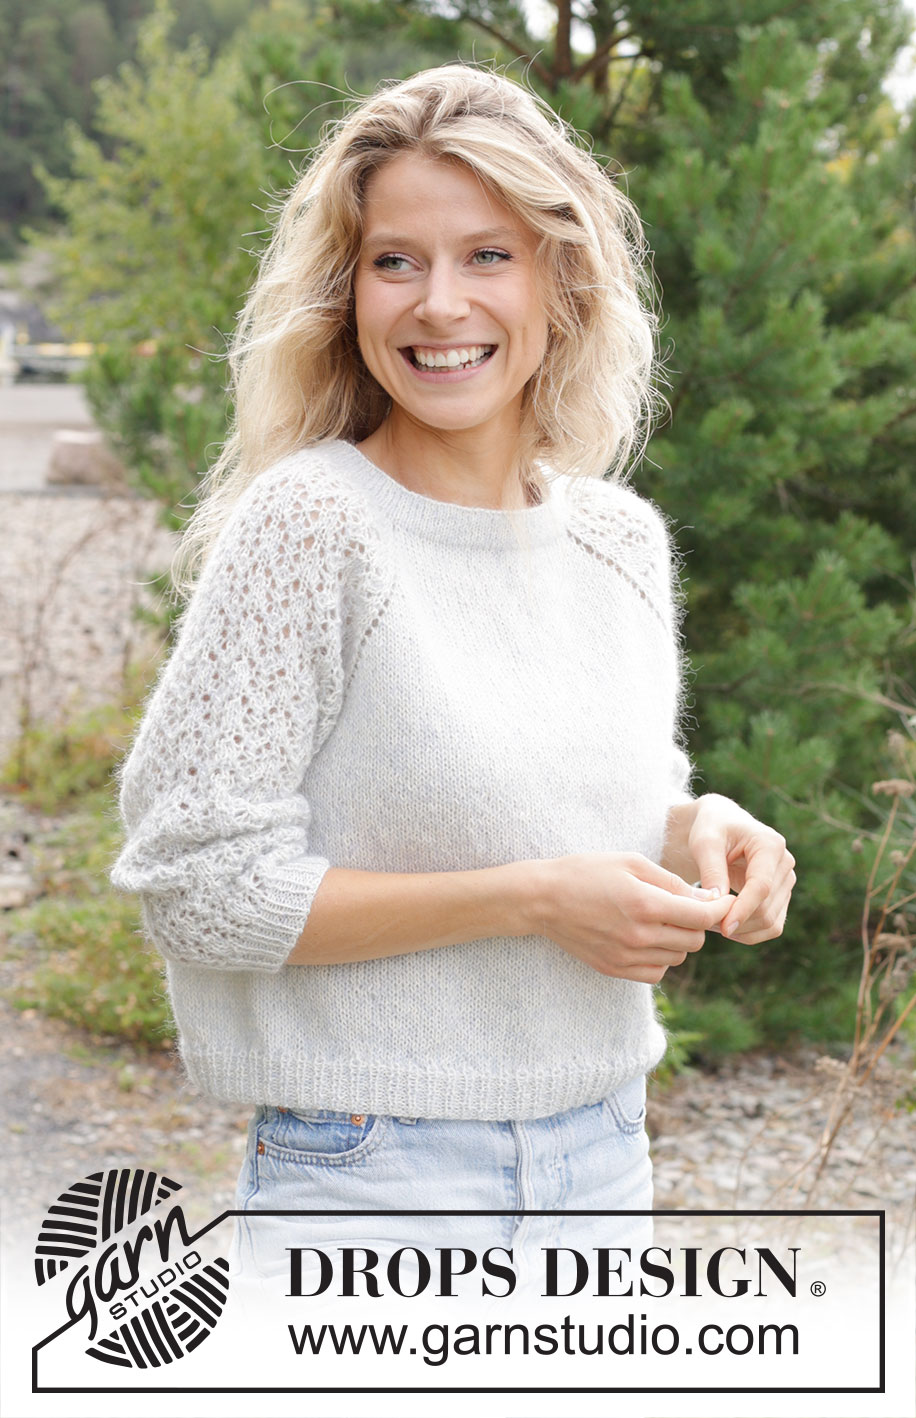
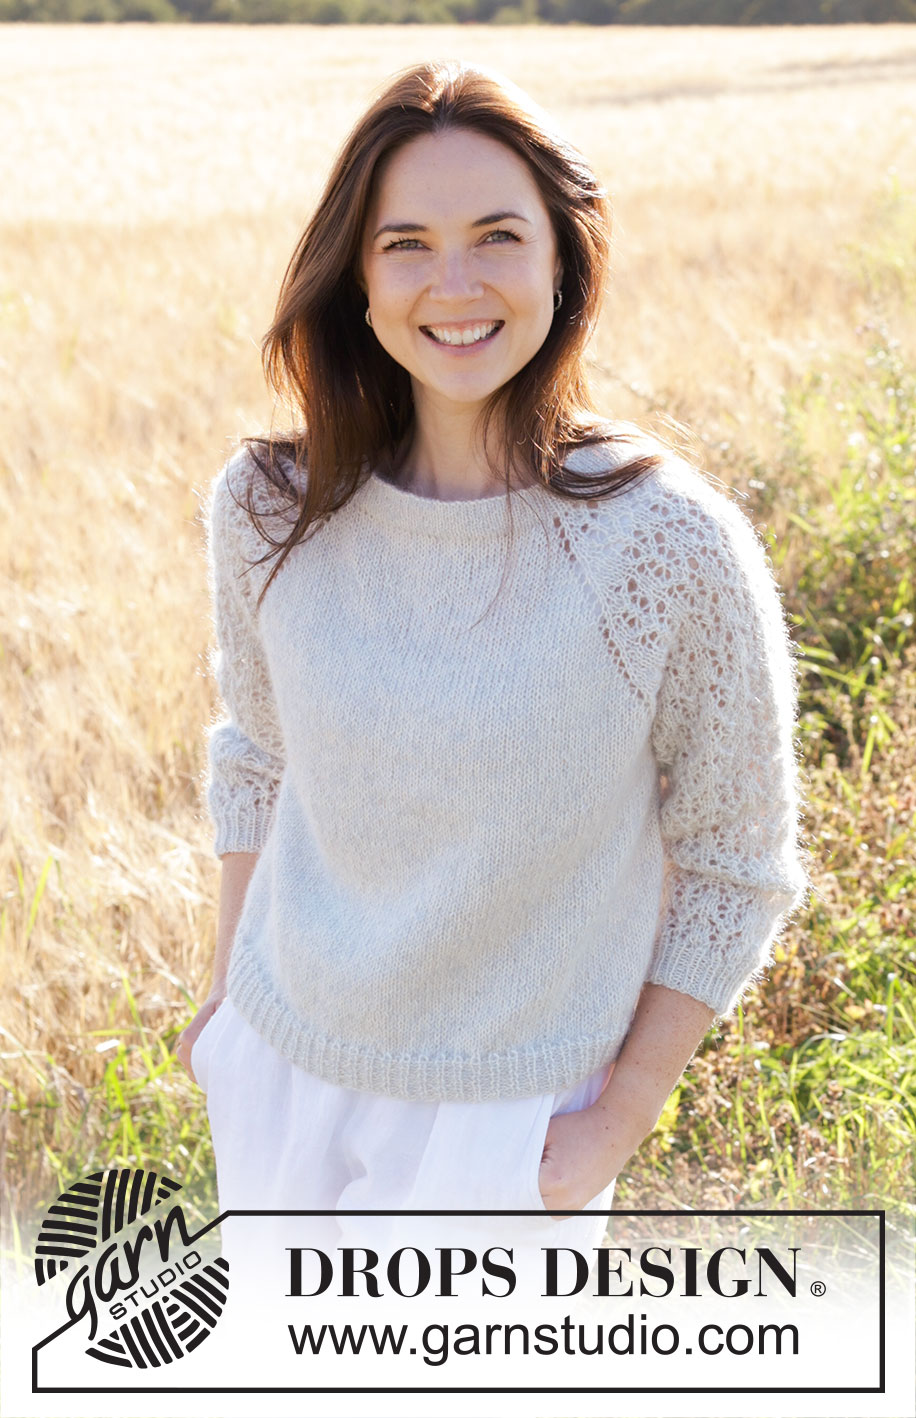
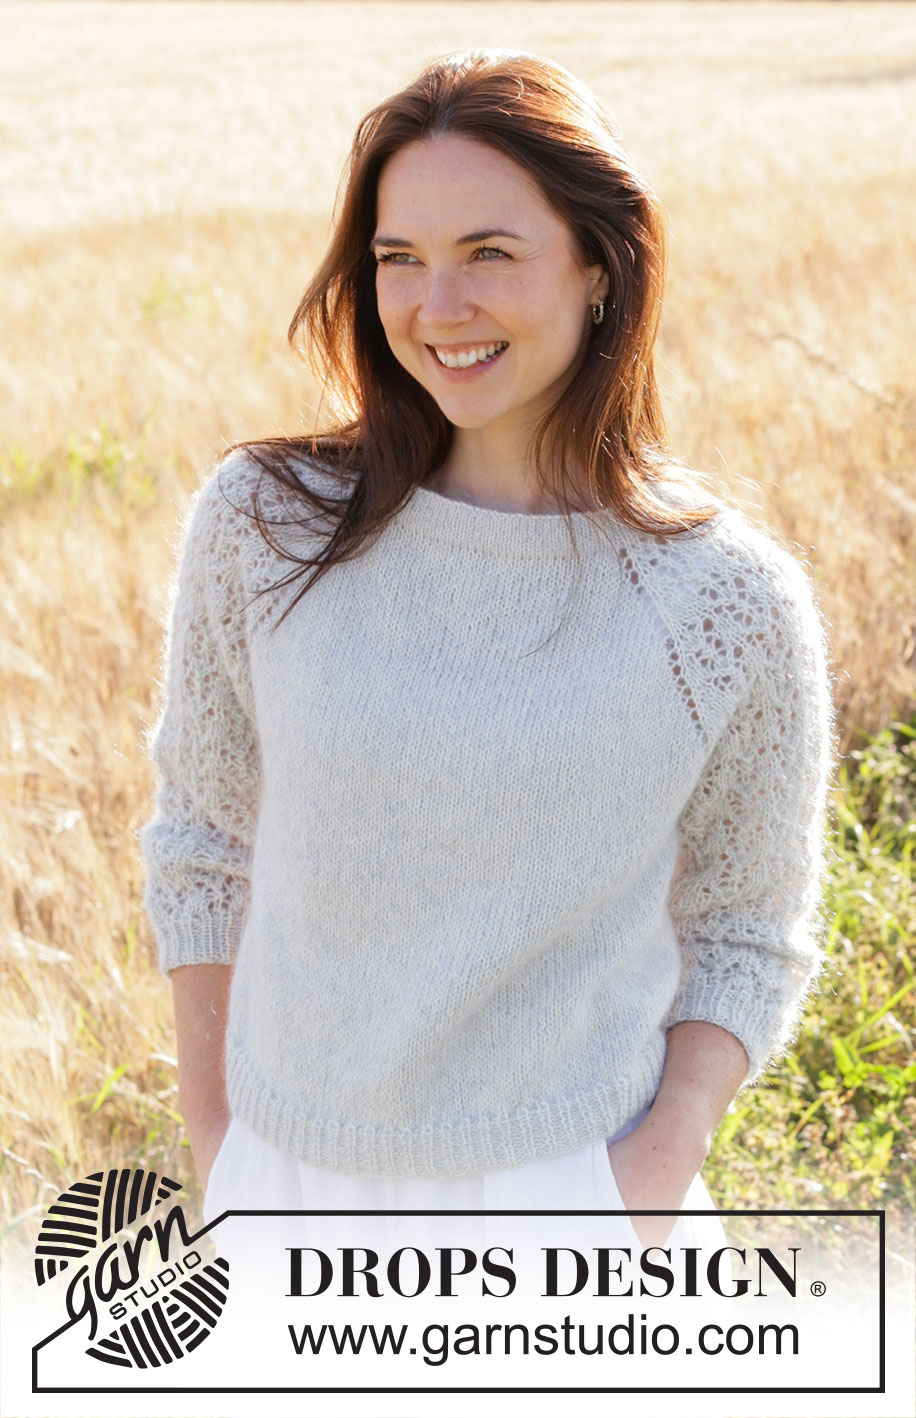
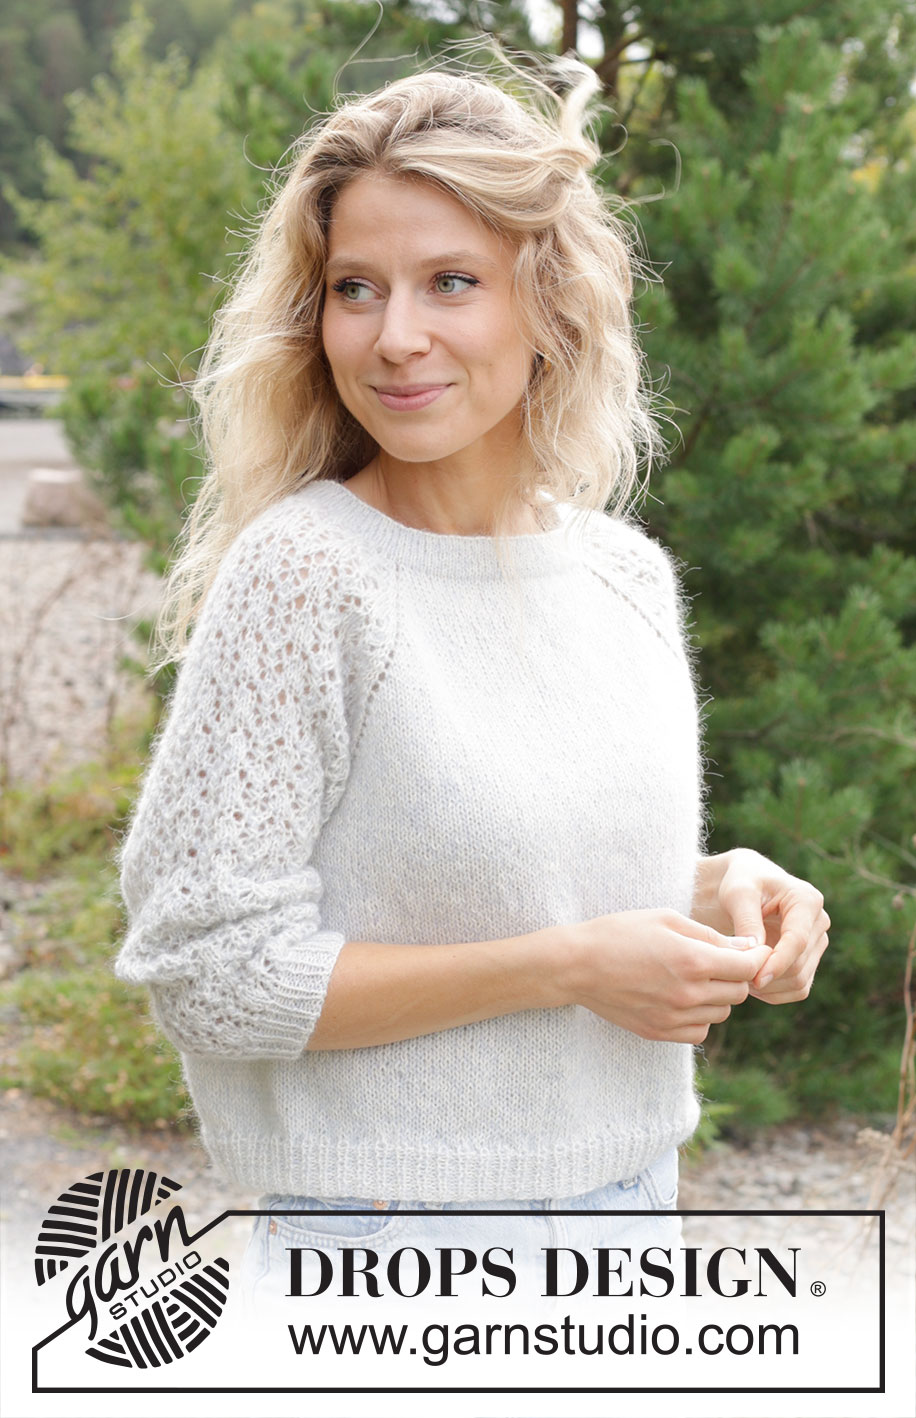
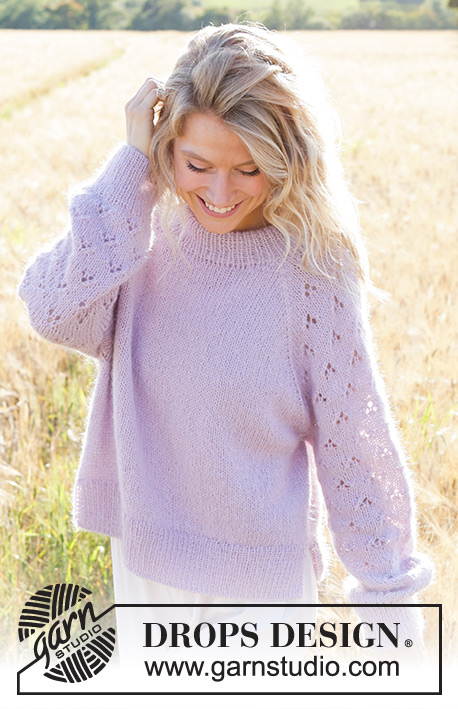
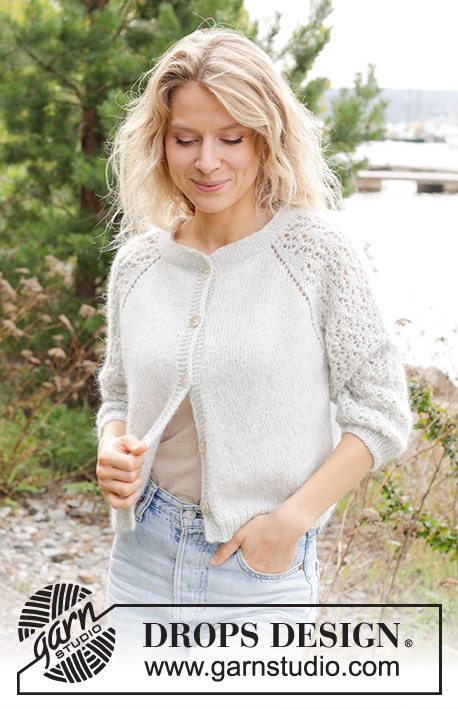
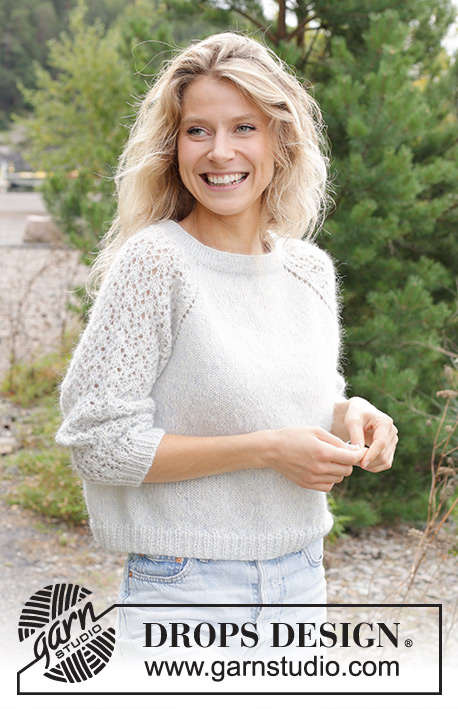
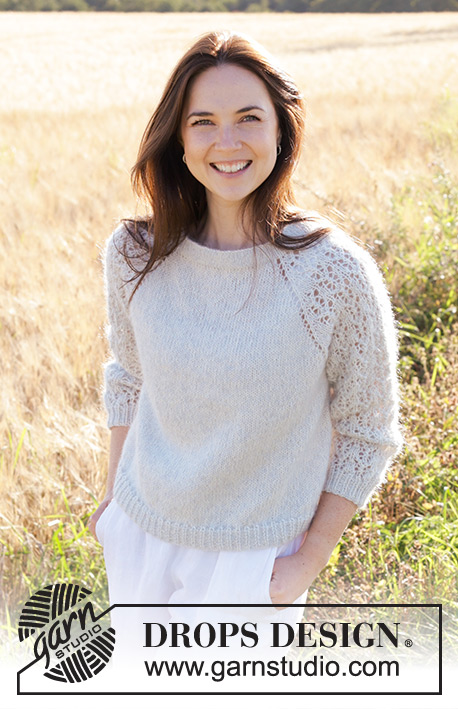
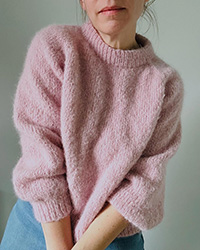
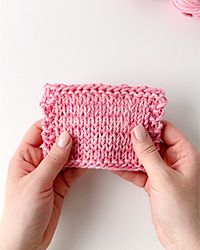
Knitted jumper in DROPS Alpaca and DROPS Kid-Silk. The piece is worked top down with double neck, raglan, lace pattern and ¾-length sleeves. Sizes S - XXXL.
DROPS 250-1 |
|||||||||||||||||||
|
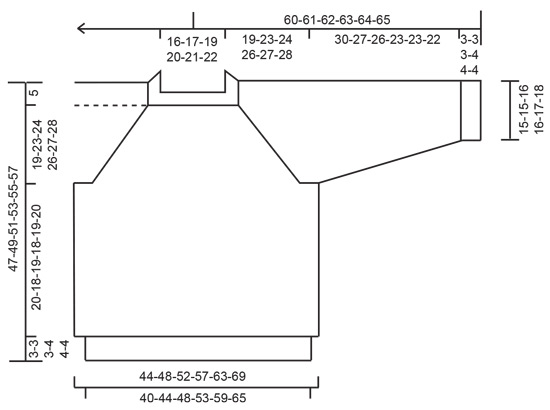
------------------------------------------------------- EXPLANATIONS FOR THE PATTERN: ------------------------------------------------------- PATTERN: See diagrams A.1 to A.3. RAGLAN: Increase 1 stitch by making 1 yarn over before/after each marker-stitch. On the next round knit the yarn overs on the front and back pieces – leaving holes. The yarn overs on the sleeves are knitted twisted – no holes. Work the new stitches in stocking stitch on the front and back pieces and into the pattern on the sleeves. DECREASE TIP (for sleeves): Decrease 1 stitch on each side of the marker-thread as follows: Work until there are 3 stitches left before the marker-thread, knit 2 together, knit 2 (marker-thread sits between these 2 stitches), slip 1 stitch knit-wise, knit 1 and pass the slipped stitch over the knitted stitch (2 stitches decreased). ------------------------------------------------------- START THE PIECE HERE: ------------------------------------------------------- JUMPER – SHORT OVERVIEW OF THE PIECE: The pattern uses both long and short needles; start with the length which fits the number of stitches and change when necessary. The double neck and yoke are worked in the round with circular needle, top down. When the yoke is finished, it is divided for body and sleeves and the body is continued in the round, while the sleeves wait. The sleeves are worked in the round, top down. The neck is folded to the inside and sewn down. If there is a «0» in your chosen size, skip the information and go straight to the next instruction. DOUBLE NECK: Cast on 104-108-114-118-122-126 stitches with circular needle size 4.5 mm, 1 strand DROPS Alpaca and 1 strand DROPS Kid-Silk (= 2 strands). Change to circular needle size 3.5 mm (casting on with a larger needle size gives and elastic cast-on edge). Work stocking stitch in the round for 2½ to 3 cm. Purl 1 round, the neck is later folded along this round. Continue with stocking stitch until the neck measures 6 cm. It will be approx. 3 cm when folded double. Insert 1 marker at the beginning of the round (= mid-back), the yoke is measured from here. YOKE: Change to circular needle size 4.5 mm. Knit 1 round and decrease 10-10-12-12-12-12 stitches evenly spaced = 94-98-102-106-110-114 stitches. Insert 4 markers without working the stitches (these are used when increasing for raglan) as follows: Count 13-14-15-16-17-18 stitches (= half back piece), insert 1 marker in the next stitch, count 19 stitches (= sleeve), insert 1 marker in the next stitch, count 26-28-30-32-34-36 stitches (= front piece), insert 1 marker in the next stitch, count 19 stitches (= sleeve), insert 1 marker in the next stitch, there are 13-14-15-16-17-18 stitches left after the last marker (= half back piece). On the next round, work PATTERN and increase for RAGLAN – read description above, as follows: Knit 13-14-15-16-17-18 (= half back piece), increase 1 stitch for raglan, knit 1 (first marker sits in this stitch), work A.1, A.2 over the next 12 stitches, work A.3, knit 1 (second marker sits in this stitch) (= sleeve), increase 1 stitch for raglan, knit 26-28-30-32-34-36, increase 1 stitch for raglan (= front piece), knit 1 (third marker sits in this stitch), work A.1, A.2 over the next 12 stitches, work A.3, knit 1 (fourth marker sits in this stitch) (= sleeve),increase 1 stitch for raglan, knit 13-14-15-16-17-18 (= half back piece). REMEMBER THE KNITTING TENSION! Continue this pattern but note that the increases are different on the front/back pieces and the sleeves – read INCREASES FOR SLEEVES and INCREASES FOR FRONT/BACK PIECES before continuing! INCREASES FOR SLEEVES: On the sleeves you increase 17-20-21-23-24-25 times on each side (including the first increase described above). The sleeve increases are drawn into diagrams A.1 and A.3. Each time A.1, A.2 and A.3 are finished in height, there is room for 2 more repeats of A.2 between A.1 and A.3. The stitches which do not fit into the pattern on each side of the sleeve are worked in stocking stitch. INCREASES FOR FRONT/BACK PIECES: On the front and back pieces, you increase 22-24-26-29-33-36 times (including the first increase described above), as follows: Increase on each round 0-0-0-0-4-6 times, then every 2nd round 22-24-26-29-29-30 times. AFTER THE LAST INCREASE: When all the increases are finished there are 250-274-290-314-338-358 stitches (70-76-82-90-100-108 stitches on the front/back pieces and 55-61-63-67-69-71 stitches on each sleeve (including the marker-stitches on each side of the sleeves). Continue with pattern and stocking stitch but without further increases. The stitches which do not fit into the pattern on each side of the sleeve are worked in stocking stitch. Work until the yoke measures 19-23-24-26-27-28 cm from the marker. DIVIDE FOR BODY AND SLEEVES: Now divide for the body and sleeves as follows: Knit 35-38-41-45-50-54 (= half back piece), place the next 55-61-63-67-69-71 stitches on a thread for the sleeve, cast on 10-10-12-12-14-16 stitches (in side under sleeve), knit 70-76-82-90-100-108 (= front piece), place the next 55-61-63-67-69-71 stitches on a thread for the sleeve, cast on 10-10-12-12-14-16 stitches (in side under sleeve), knit the last 35-38-41-45-50-54 stitches (= half back piece). The body and sleeves are finished separately. The piece is now measured from here! BODY: = 160-172-188-204-228-248 stitches. Continue with stocking stitch in the round until the body measures 20-18-19-18-19-20 cm from the division. On the next round begin working rib, AT THE SAME TIME on the first round increase 0-4-4-8-8-12 stitches evenly spaced = 160-176-192-212-236-260 stitches, as follows: Change to circular needle size 3.5 mm, work rib (knit 1, purl 1 – remember the increases). When the rib measures 3-3-3-4-4-4 cm, cast off a little loosely with rib. The jumper measures approx. 47-49-51-53-55-57 cm from the shoulder. SLEEVES: Place the 55-61-63-67-69-71 stitches from the thread on the one side of the piece on circular needle size 4.5 mm and knit up 1 stitch in each of the 10-10-12-12-14-16 stitches cast on under the sleeve = 65-71-75-79-83-87 stitches. Insert a marker-thread in the middle of the 10-10-12-12-14-16 stitches under the sleeve. Start at the marker-thread and continue the pattern in the round. The stitches which do not fit into the pattern under the sleeve are worked in stocking stitch. AT THE SAME TIME when the sleeve measures 3-3-3-4-4-4 cm from the division, decrease 2 stitches under the sleeve – read DECREASE TIP. Decrease like this every 4-2½-2-1½-1½-1 cm a total of 6-8-9-10-11-12 times = 53-55-57-59-61-63 stitches. Continue working until the sleeve measures 30-27-26-23-23-22 cm from the division. Change to double pointed needles size 3.5 mm and work rib (knit 1, purl 1). AT THE SAME TIME on the first round increase 1-1-3-3-5-7 stitches evenly spaced = 54-56-60-62-66-70 stitches. When the rib measures 3-3-3-4-4-4 cm, cast off a little loosely with rib. The sleeve measures approx. 33-30-29-27-27-26 cm from the division. ASSEMBLY: Fold the neck double to the inside and sew down. To avoid the neck being tight and rolling outwards, it is important that the seam is elastic. |
|||||||||||||||||||
Diagram explanations |
|||||||||||||||||||
|
|||||||||||||||||||
 |
|||||||||||||||||||
 |
|||||||||||||||||||
Have you finished this pattern?Tag your pictures with #dropspattern #rememberingspringsweater or submit them to the #dropsfan gallery. Do you need help with this pattern?You'll find 29 tutorial videos, a Comments/Questions area and more by visiting the pattern on garnstudio.com. © 1982-2026 DROPS Design A/S. We reserve all rights. This document, including all its sub-sections, has copyrights. Read more about what you can do with our patterns at the bottom of each pattern on our site. |
|||||||||||||||||||


With over 40 years in knitting and crochet design, DROPS Design offers one of the most extensive collections of free patterns on the internet - translated to 17 languages. As of today we count 324 catalogues and 12232 patterns translated into English (UK/cm).
We work hard to bring you the best knitting and crochet have to offer, inspiration and advice as well as great quality yarns at incredible prices! Would you like to use our patterns for other than personal use? You can read what you are allowed to do in the Copyright text at the bottom of all our patterns. Happy crafting!
Post a comment to pattern DROPS 250-1
We would love to hear what you have to say about this pattern!
If you want to leave a question, please make sure you select the correct category in the form below, to speed up the answering process. Required fields are marked *.