
Popular categories
Looking for a yarn?


Comments / Questions (73)
![]() Rachelle wrote:
Rachelle wrote:
Jeg er ved at strikke den her i str.xl. Men jeg kan ikke få maskeantal til at gå op. Jeg ender på 344. 8x14 = 112 4x8 = 32 4x 8 = 32 8x4 = 32 Lagt sammen med de 136 jeg har på pinden bliver det 344. Hvad er det jeg misforstår?
16.02.2025 - 18:46DROPS Design answered:
Hej Rachelle, du har 136 masker, tager 8x14=112m ud + 4x8=32m + 4x14=32 + 4x4=16m = 328 m :)
18.02.2025 - 12:00
![]() Signe wrote:
Signe wrote:
Hej Jeg er ved at strikke denne i størrelse Large. Når man begynder at tage ud til raglan er med så langt at jeg har strikket hver 2. pind raglan 1 7 gange, og omgang 8 også raglan 2, og er nu færdig med omgang 14. Når jeg så skal videre herfra, skal jeg så fortsætte direkte med at tage ud på forstykke/bagstykke på hver 2.omgang og på ærmerne på hver 4.omgang? For synes ikke jeg kan få det til at passe med at jeg ender på 292 masker? hvor manger omgange skal man i alt tage ud?
04.02.2025 - 18:58DROPS Design answered:
Hej Signe, du har 128 masker, tager 8x7=56m ud + 4x6=24 + 4x14=56 + 4x7=28m = 292 m :)
12.02.2025 - 10:47
![]() Hson wrote:
Hson wrote:
Har bara använt ert garn och mönster, men jag undrar varför det inte finns fler tröjor och koftor stickade i Flora? Bör jag inte använda Flora och Kids Silk till det? Och varför det inte finns några V-ringade tröjor stickade uppifrån och ner?
27.01.2025 - 18:15DROPS Design answered:
Hej. Här hittar du våra tröjor med v-hals som är stickade uppifrån och ned. Gällande DROPS Flora så har vi flera koftor och tröjor (använd filter garn: Flora), men kom ihåg att du även kan använda DROPS Flora till mönster gjorda i ett annat garn i garngrupp A också eftersom de har samma stickfasthet. Mvh DROPS Design
28.01.2025 - 07:48
![]() Gaby wrote:
Gaby wrote:
Liebes Drops- Team, diese Anleitung verlangt einem wirklich so einiges ab. Die Raglanzunahmen 1 nach den verkürzten Reihen sind eher fertig als die 6 Raglanzunahmen 2. Werden dann die Raglanzunahmen 1 ausgesetzt bis die Zunahmen 2 alle gestrickt sind?
05.01.2025 - 18:48DROPS Design answered:
Liebe Gaby, man wird zuerst die Raglan-1 in jeder 2. Runde (= 8 M) stricken, aber dann wird man abwechslungsweise 4 und 8 Maschen zunehmen also wie Raglan-1 und gleichzeitig die Raglan-2 weiterstricken. Viel Spaß beim Stricken!
06.01.2025 - 10:47
![]() Angeles wrote:
Angeles wrote:
Hola. Estoy tejiendo el cuello. He tejido la elevación de la espalda. Ahora tengo una diferencia de altura entre el frente y la espalda. He terminado las 6 hileras. Corté el hilo. Tengo que seguir al derecho desde el marcador y empezar el raglan. No sé desde donde empezar a tejer. Gracias!
19.12.2024 - 18:09DROPS Design answered:
Hola Ángeles, te indican en el patrón: Comenzar por el lado derecho, 3 puntos antes del hilo marcador-3. El hilo marcador - 3 estaba en el delantero (ver inicio del canesú). La siguiente fila entonces comienza: 2 derechos, 1 lazada, 2 derechos (el hilo marcador-3 está entre estos 2 puntos), 1 hebra...... Continúa cómo se indica en las instrucciones.
22.12.2024 - 20:43
![]() Angeles wrote:
Angeles wrote:
Hola. Estoy tejiendo el cuello. He tejido la elevación de la espalda. Ahora tengo una diferencia de altura entre el frente y la espalda. He terminado las 6 hileras. Corté el hilo. Tengo que seguir al derecho desde el marcador y empezar el raglan. No sé desde donde empezar a tejer. Gracias!
18.12.2024 - 10:13DROPS Design answered:
Hola Ángeles, te indican en el patrón: Comenzar por el lado derecho, 3 puntos antes del hilo marcador-3. El hilo marcador - 3 estaba en el delantero (ver inicio del canesú). La siguiente fila entonces comienza: 2 derechos, 1 lazada, 2 derechos (el hilo marcador-3 está entre estos 2 puntos), 1 hebra...... Continúa cómo se indica en las instrucciones.
22.12.2024 - 20:44
![]() Anna wrote:
Anna wrote:
Czyli w drugiej części dodawania oczek w reglanie1 co 4 rzędy robimy narzut tylko z jednej strony markerów (od strony tylu i przodu) ? A co 2 rzędy z dwóch stron, jak dotychczas (od strony tyłu i przodu oraz rękawów)?
27.11.2024 - 22:54DROPS Design answered:
Witaj Aniu, dokładnie. I jeszcze dodatkowo wykonujemy te 4 pozostałe powtórzenia reglanu-2. Pozdrawiamy!
28.11.2024 - 08:11
![]() Anna wrote:
Anna wrote:
„ Dalej dodawać oczka na reglan-1 co 2 okrążenia, ale co 2 powtórzenia będziemy dodawać oczka tylko na przód i tył (dodane 4 oczka)” Dodawanie oczek tylko na przód i tył robimy reglanem1 czyli narzutami ? Czy robimy tak , jak w poprzedniej części , używając reglanu2 i podbierania nitek ? Przez 16 rzędów co 2 rzędy reglan 1 , co 4 rzędy reglan1 + reglan2 ?
24.11.2024 - 23:58DROPS Design answered:
Witaj Aniu, reglan-1 jest wykonywany z narzutami. Reglan-2 z podbierania nitki. Pozdrawiamy!
27.11.2024 - 13:39
![]() Anna wrote:
Anna wrote:
Pytanie dotyczy dodawanie oczek po rzędach skrócony. Rozmiar XL - zrobić reglan-1 jeszcze 14 razy co 2 rzędy = 28 rzędów Zrobić reglan-2 8 razy co 6 rzędów = 48. Nie ma możliwości powtórzenia reglanu-2 8 razy. 28 rzędów dodawania reglanu-1 umożliwiają jedynie 4 reglany-2. Proszę o wyjaśnienie.
24.11.2024 - 23:51DROPS Design answered:
Witaj Anno, te 4 pozostałe powtórzenia na reglan-2 kontynuujesz co 6 okrążeń. Czyli jak wykonujesz część: 'Dalej dodawać oczka na reglan-1 co 2 okrążenia, ale co 2 powtórzenia będziemy...' to wtedy kończysz te ostatnie powtórzenia na reglan-2. Pozdrawiamy!
27.11.2024 - 13:33
![]() Marie wrote:
Marie wrote:
Hallo, Die Raglanzunahmen sind extrem verwirrend und kompliziert beschrieben und ich habe bei den Ärmeln versehentlich auch alle 2 Runden zugenommen. Ist es möglich, die Runden der Zunahmen einzeln zu beschreiben, zB. Runde 2: Raglanzunahme Ärmel, Vorderteil/Rückenteil, Runde 4, Runde 6 usw. ? Das wäre sehr hilfreich
20.11.2024 - 14:23DROPS Design answered:
Liebe Marie, da die Zunahmen für jede Größe unterschiedlich sind, können wir nicht das für jede schreiben; aber wählen Sie Ihre Größe oben damit sie markiert wird, so wird es auch einfacher sein. Viel Spaß beim Stricken!
20.11.2024 - 16:31
|
|
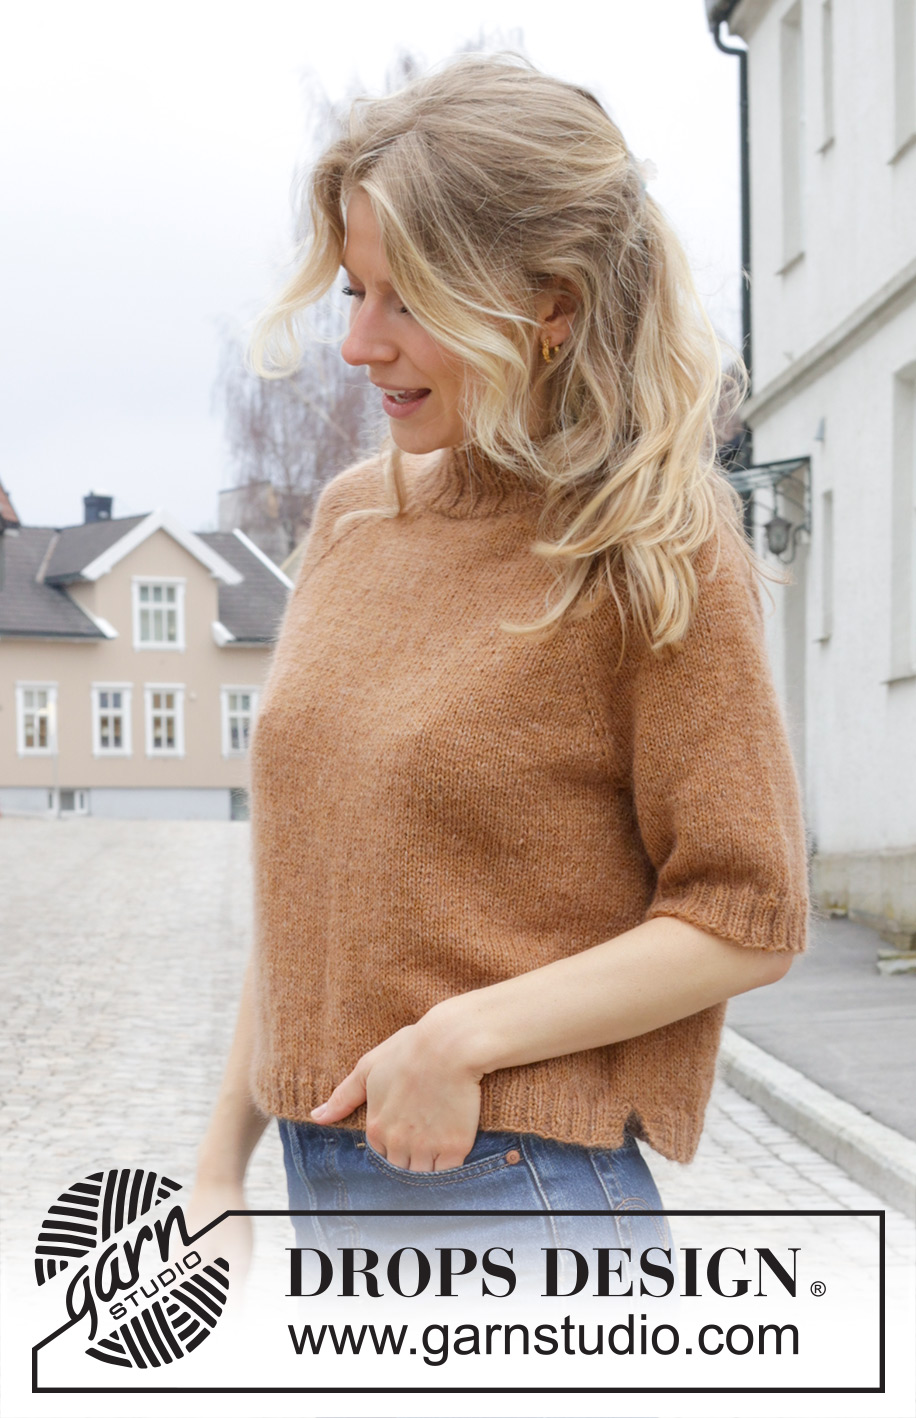
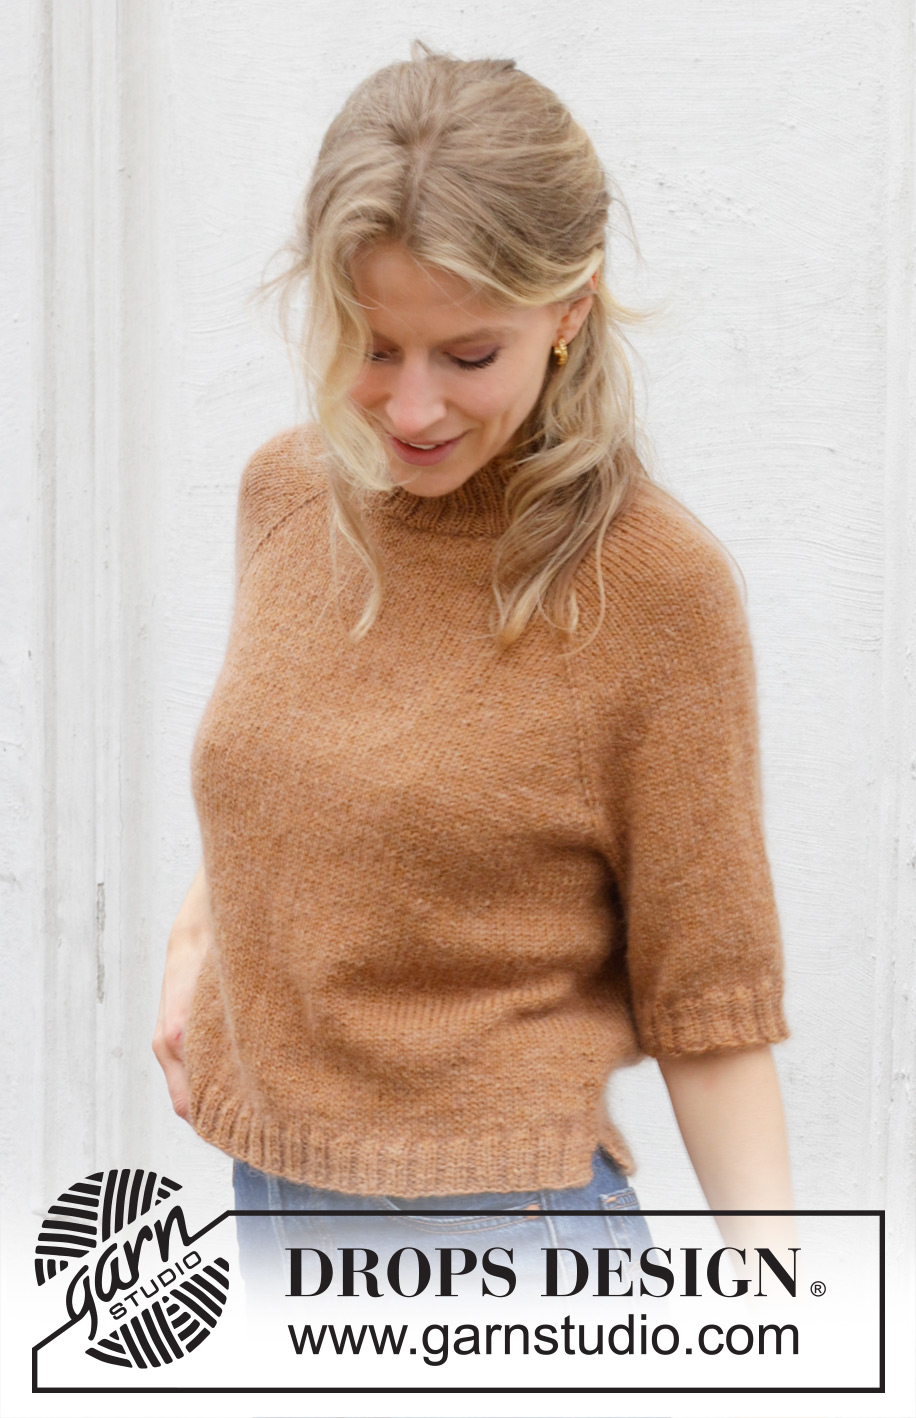
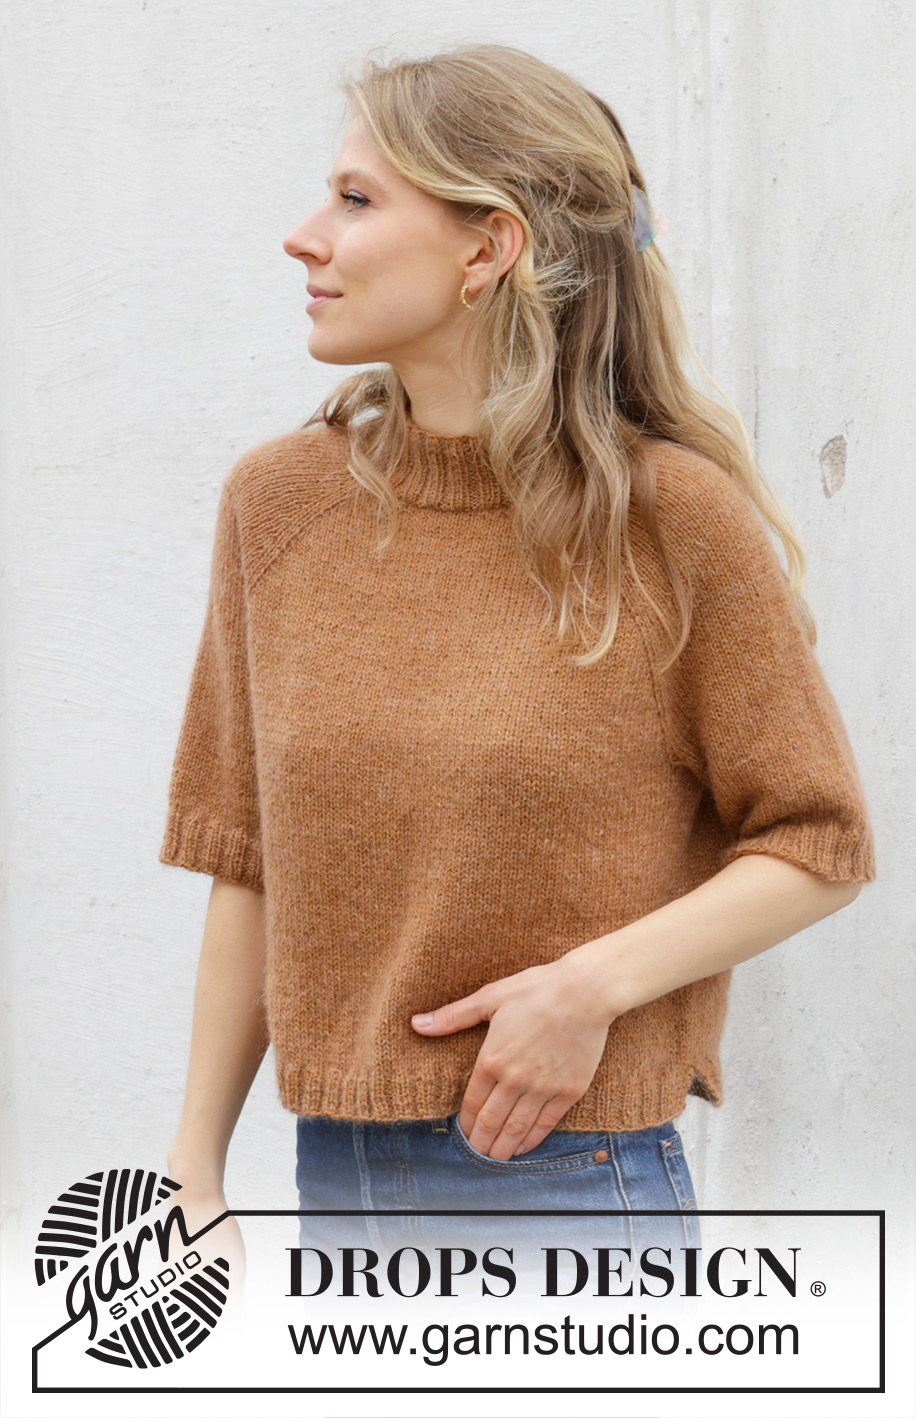
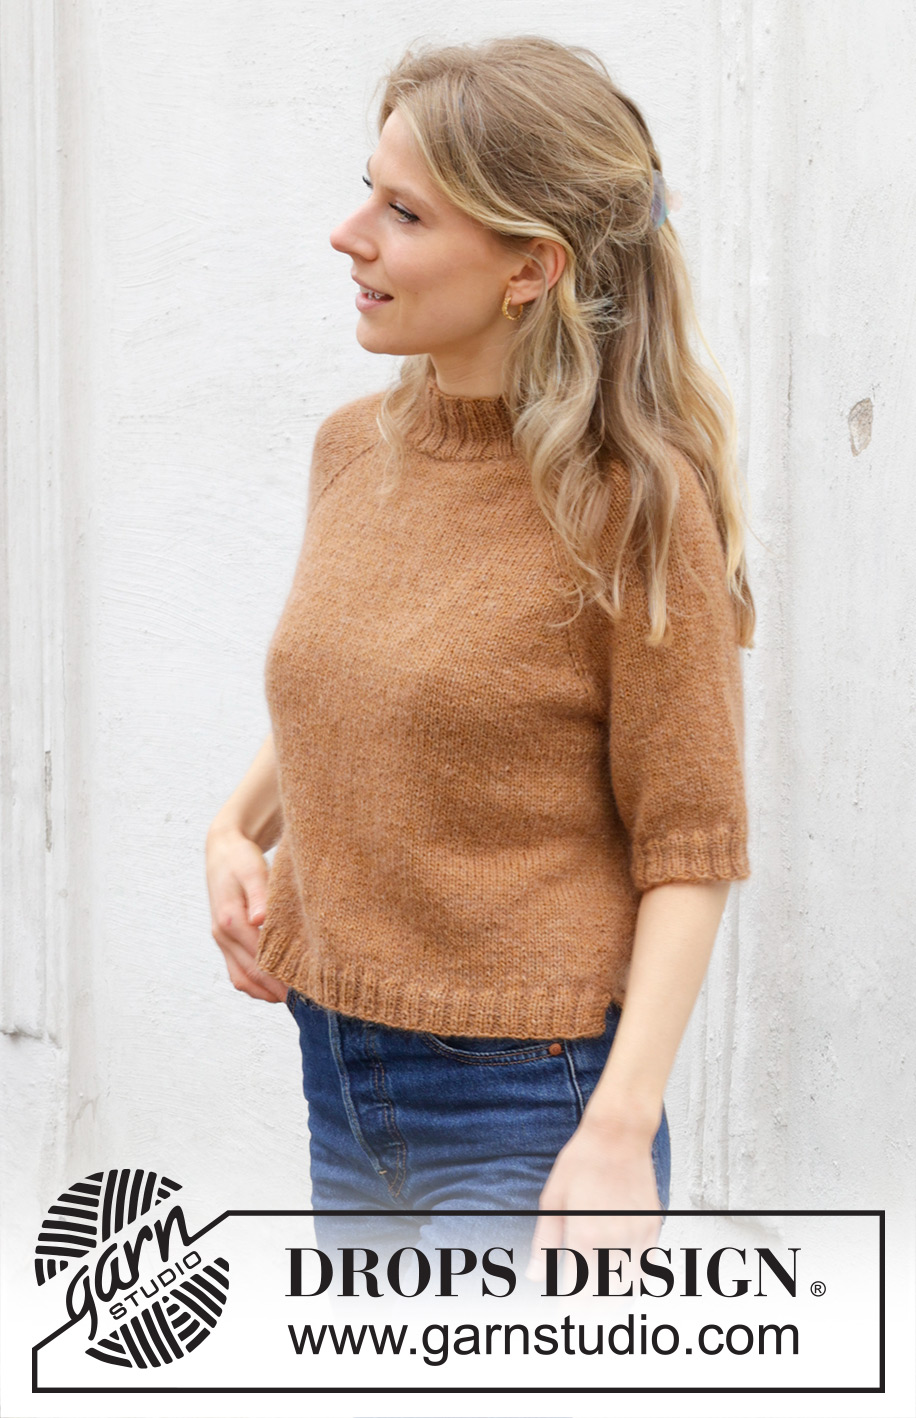
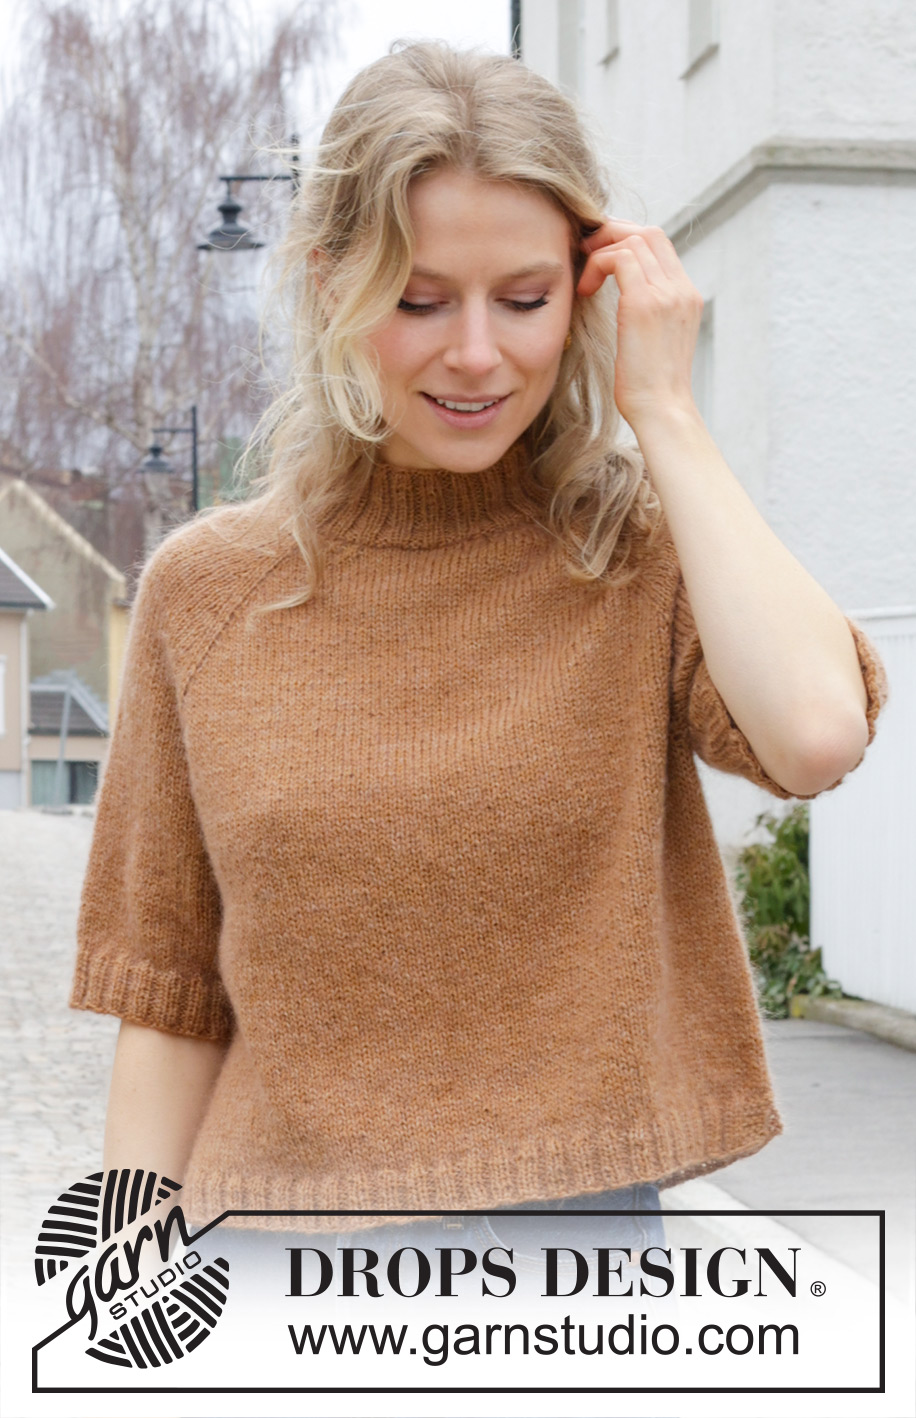
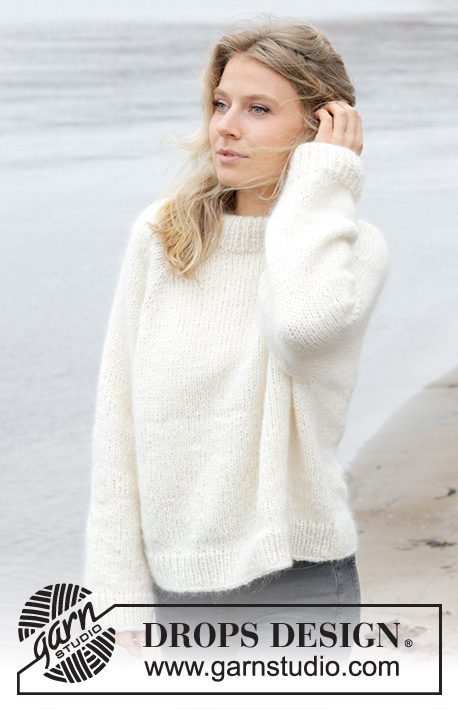
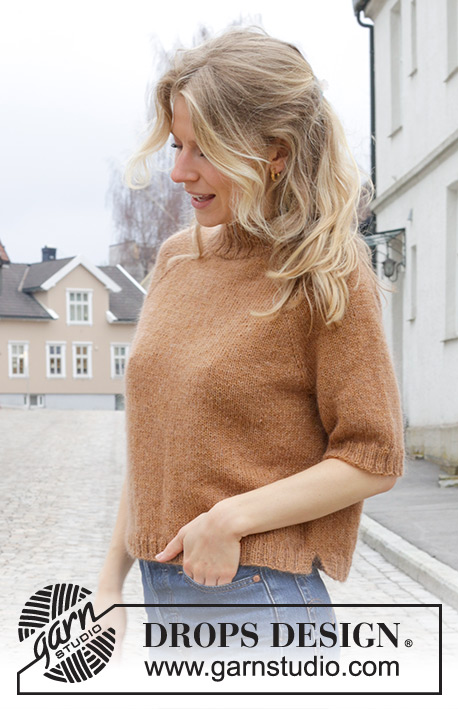
Ginger Tea Top#gingerteatop |
|
 |
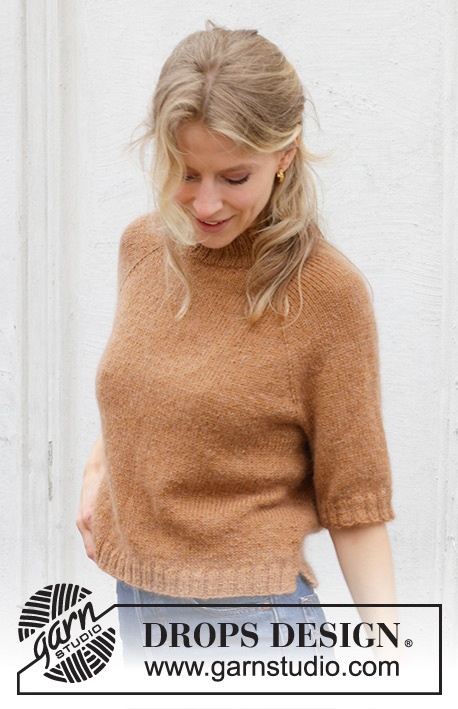 |
Knitted jumper in DROPS Flora and DROPS Kid-Silk. The piece is worked top down in stocking stitch with raglan and short sleeves. Sizes S - XXXL.
DROPS 244-15 |
|
|
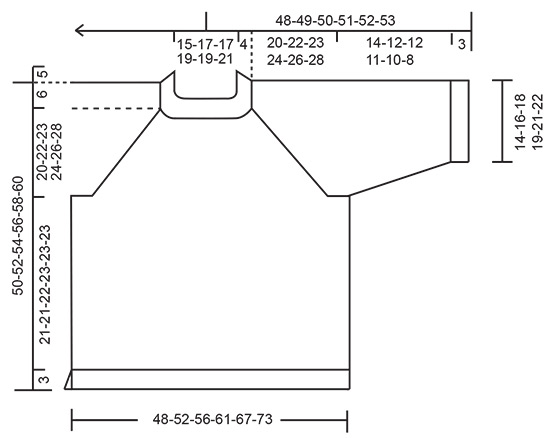
------------------------------------------------------- EXPLANATIONS FOR THE PATTERN: ------------------------------------------------------- RAGLAN-1: Increase 1 stitch before/after 2 stocking stitches in each transition between body and sleeves. The marker-thread sits between these 2 stitches. Increase 1 stitch by making 1 yarn over, which is worked as follows on the next round: BEFORE MARKER-THREAD: Slip the yarn over knit-wise, then place it back onto the left needle the other way around, knit the front loop (stitch twists to the right). No hole. AFTER MARKER-THREAD: Knit the back loop (stitch twists to the left). No hole. The new stitches are worked in stocking stitch. RAGLAN-2: Increase 1 extra stitch before/after the marker-threads on the body (not on the sleeves). Raglan-2 is worked in addition to Raglan-1. BEFORE MARKER-THREAD: Work until there are 3 stitches left before the marker-thread, use the left needle to pick up the strand from behind between the next 2 stitches, knit the front loop. No hole. AFTER MARKER-THREAD: Work to 3 stitches after the marker-thread (any yarn overs from the previous row are not counted in this stitch-count), use the left needle to pick up the strand from the front between the next 2 stitches, knit the back loop. No hole. DECREASE TIP (for sleeves): Decrease 1 stitch on each side of the marker-thread as follows: Work until there are 3 stitches left before the marker-thread, slip 1 stitch knit-wise, knit 1 and pass the slipped stitch over the knitted stitch, knit 2 (marker-thread sits between these 2 stitches), knit 2 together (2 stitches decreased). GARTER STITCH (worked back and forth): Knit all rows. 1 ridge = knit 2 rows. ------------------------------------------------------- START THE PIECE HERE: ------------------------------------------------------- JUMPER – SHORT OVERVIEW OF THE PIECE: The piece is worked from top down. The neck is first worked in the round with circular needle, then an elevation is worked back and forth with circular needle at the back of the neck. The yoke is continued in the round with circular needle, then divided for body and sleeves. The body is continued in the round with circular needle as far as the split, then finished back and forth. The sleeves are worked in the round with circular needle/double pointed needles. NECK: Cast on 96-104-104-112-112-120 stitches with short circular needle size 4.5 mm, 1 strand DROPS Flora and 1 strand DROPS Kid-Silk. Change to short circular needle size 3.5 mm and work rib (knit 2, purl 2) for 5 cm. Insert a marker at the beginning of the round. YOKE: Insert 4 marker-threads without working the stitches, each thread inserted between 2 knitted stitches as follows: Count 13-13-13-17-17-17 stitches, insert marker-thread 1 before the next stitch (approx. half back piece), count 24 stitches, insert marker-thread 2 before the next stitch (sleeve), count 24-28-28-32-32-36 stitches, insert marker-thread 3 before the next stitch (front piece), count 24 stitches, insert marker-thread 4 before the next stitch (sleeve), 11-15-15-15-15-19 stitches left (rest of back piece). You now work an elevation at the back of the neck. Cut the strands. Change to circular needle size 4.5 mm. Start from the right side, 3 stitches before marker-thread 3. Work back and forth as follows: ROW 1 (right side): Knit to 1 stitch before marker-thread 3, make 1 yarn over, knit 2 (marker-thread sits between these 2 stitches), 1 yarn over, knit to 1 stitch before marker-thread 4, make 1 yarn over, knit 2 (marker-thread sits between these 2 stitches), 1 yarn over, knit to 1 stitch before marker-thread 1, make 1 yarn over, knit 2 (marker-thread sits between these 2 stitches), 1 yarn over, knit to 1 stitch before marker-thread 2, make 1 yarn over, knit 2 (marker-thread sits between these 2 stitches), 1 yarn over, knit 2. 8 increased stitches = 104-112-112-120-120-128 stitches. Turn. ROW 2 (wrong side): * Purl to the yarn over (before the marker-thread), purl the back loop, purl 2 (marker-thread sits between these 2 stitches), slip the next yarn over and replace it on the left needle the other way around (insert the left needle from the back when replacing it), purl the front loop. Purl to the next marker-thread *, work from *-* 2 more times. Purl to the yarn over (before marker-thread 3), purl the back loop, purl 2 (marker-thread sits between these 2 stitches), slip the next yarn over and replace it on the left needle the other way around, purl the front loop. Purl to 2 stitches past the beginning of the previous row. Turn. ROW 3 (right side): Knit to 1 stitch before marker-thread 3, make 1 yarn over, knit 2 (marker-thread sits between these 2 stitches), 1 yarn over, knit to 1 stitch before marker-thread 4, make 1 yarn over, knit 2, (marker-thread sits between these 2 stitches), 1 yarn over, knit to 1 stitch before marker-thread 1, make 1 yarn over, knit 2 (marker-thread sits between these 2 stitches), 1 yarn over, knit to 1 stitch before marker-thread 2, make 1 yarn over, knit 2 (marker-thread sits between these 2 stitches), 1 yarn over, knit to 2 stitches past the beginning of the previous row. 8 increased stitches = 112-120-120-128-128-136 stitches. Turn. ROW 4 (wrong side): As row 2. ROW 5 (right side): Knit to 1 stitch before marker-thread 3, make 1 yarn over, knit 2 (marker-thread sits between these 2 stitches), 1 yarn over, knit to 1 stitch before marker-thread 4, make 1 yarn over, knit 2, (marker-thread sits between these 2 stitches), 1 yarn over, knit to 1 stitch before marker-thread 1, make 1 yarn over, knit 2 (marker-thread sits between these 2 stitches), 1 yarn over, knit to 1 stitch before marker-thread 2, make 1 yarn over, knit 2 (marker-thread sits between these 2 stitches), 1 yarn over, knit to 2 stitches past the beginning of the previous row. 8 increased stitches = 120-128-128-136-136-144 stitches. Turn. ROW 6 (wrong side): As row 2. The elevation is finished. Cut the strands. READ THE REST OF THE YOKE SECTION BEFORE CONTINUING. Start by the marker. Continue stocking stitch in the round and increase for raglan as follows: REMEMBER THE KNITTING TENSION! NOTE: Extra stitches are increased on the front and back pieces, therefore raglan-2 is worked at regular intervals in addition to raglan-1. Read RAGLAN-1 and RAGLAN-2 above and begin both increases on the next round. Increase for raglan-1 on each side of all 4 marker-threads every 2nd round 3-4-7-14-14-12 more times (a total of 6-7-10-17-17-15 times including the increases on the elevation). AT THE SAME TIME increase for RAGLAN-2 on the front and back pieces – (raglan-2 is worked in addition to raglan-1) every 6th-8th-8th-6th-4th-4th round 6-5-6-8-10-11 times in total. Continue to increase for raglan-1 every 2nd round but every 2nd increase is only on the front and back pieces (4 increased stitches), i.e., increase on the front and back pieces every 2nd round and on the sleeves every 4th round. Increase like this 14-16-14-8-10-14 times on the front and back pieces (7-8-7-4-5-7 times on the sleeves) – remember raglan-2. After all the increases for raglan-1 and raglan-2 there are 252-276-292-328-348-368 stitches. You have increased a total of 13-15-17-21-22-22 times on the sleeves and 26-28-30-33-37-40 times on the front and back pieces (20-23-24-25-27-29 times for raglan-1 and 6-5-6-8-10-11 times for raglan-2). There are 50-54-58-66-68-68 stitches on the sleeves and 76-84-88-98-106-116 stitches on the front and back pieces). Continue working without further increases until the yoke measures 20-22-23-24-26-28 cm, measured after the rib on the neck mid-back. Now divide for the body and sleeves (from mid-back): Knit to marker-thread 1 (belongs to the back piece) = 39-41-43-50-54-57 stitches, place the next 50-54-58-66-68-68 stitches on a thread for the sleeve, cast on 10-10-12-12-14-16 stitches under the sleeve, knit to marker-thread 3 (front piece = 76-84-88-98-106-116 stitches), place the next 50-54-58-66-68-68 stitches on a thread for the sleeve, cast on 10-10-12-12-14-16 stitches under the sleeve, knit to the end of the round (rest of back piece = 37-43-45-48-52-59 stitches). The body and sleeves are finished separately. BODY: = 172-188-200-220-240-264 stitches. Insert a marker-thread in the middle of the cast-on stitches under each sleeve and allow them to follow your work onwards (used for the split in each side). Start the round at one marker-thread and work stocking stitch in the round. When the body measures 21-21-22-23-23-23 cm from the division, place the last 86-94-100-110-120-132 stitches on a thread and work the first 86-94-100-110-120-132 stitches, creating a split in each side, as follows: Work 4 GARTER STITCHES – read description above, work stocking stitch over the next 78-86-92-102-112-124 stitches and increase 12-12-14-12-18-14 stitches evenly over these stitches (increase with yarn overs which are worked twisted on the next row) and 4 garter stitches = 98-106-114-122-138-146 stitches. Change to circular needle size 3.5 mm and work rib from the wrong side as follows: 4 garter stitches, * purl 2, knit 2 *, work from *-* until there are 6 stitches left, purl 2 and 4 garter stitches. Continue this rib back and forth for 3 cm, with the next row from the right side. Cast off with knit over knit and purl over purl. Place the stitches from the thread on circular needle size 4.5 mm and work in the same way. The jumper measures approx. 50-52-54-56-58-60 cm from the shoulder. SLEEVES: Place the 50-54-58-66-68-68 stitches from the thread on the one side of the piece on short circular needle/double pointed needles size 4.5 mm and knit up 1 stitch in each of the 10-10-12-12-14-16 stitches cast on under the sleeve = 60-64-70-78-82-84 stitches. Insert a marker-thread in the middle of the new stitches under the sleeve and allow it to follow your work onwards (used when decreasing). Work stocking stitch in the round. When the sleeve measures 4 cm, decrease 1 stitch on each side of the marker-thread – read DECREASE TIP. Decrease like this every 2-2-2½-1½-1½-1 cm a total of 4-4-3-4-3-3 times = 52-56-64-70-76-78 stitches. Continue working until the sleeve measures 14-12-12-11-10-8 cm from the division. Knit 1 round and increase 4-4-4-6-8-10 stitches evenly spaced = 56-60-68-76-84-88 stitches. Change to double pointed needles size 3.5 mm and work rib (knit 2, purl 2) for 3 cm. Loosely cast off with knit over knit and purl over purl. The sleeve measures approx. 17-15-15-14-13-11 cm from the division. Work the other sleeve in the same way. ASSEMBLY: Fasten the strands and sew a small stitch at the top of each split so they stay together. |
|
 |
|
Have you finished this pattern?Tag your pictures with #dropspattern #gingerteatop or submit them to the #dropsfan gallery. Do you need help with this pattern?You'll find 34 tutorial videos, a Comments/Questions area and more by visiting the pattern on garnstudio.com. © 1982-2026 DROPS Design A/S. We reserve all rights. This document, including all its sub-sections, has copyrights. Read more about what you can do with our patterns at the bottom of each pattern on our site. |
|


With over 40 years in knitting and crochet design, DROPS Design offers one of the most extensive collections of free patterns on the internet - translated to 17 languages. As of today we count 324 catalogues and 12290 patterns translated into English (UK/cm).
We work hard to bring you the best knitting and crochet have to offer, inspiration and advice as well as great quality yarns at incredible prices! Would you like to use our patterns for other than personal use? You can read what you are allowed to do in the Copyright text at the bottom of all our patterns. Happy crafting!
Post a comment to pattern DROPS 244-15
We would love to hear what you have to say about this pattern!
If you want to leave a question, please make sure you select the correct category in the form below, to speed up the answering process. Required fields are marked *.