
Popular categories
Looking for a yarn?


Comments / Questions (41)
![]() Lou-Ann wrote:
Lou-Ann wrote:
Hi, I just made this top for my daughter out of a cotton linen blend and love the way the front looks. I am just getting back to knitting after having been away from doing it for many years. I am at the point of sewing the pieces together and was wondering what stitch I should use. Slip? back? or mattress. Thanks
03.05.2026 - 21:57DROPS Design answered:
Hi Lou-Ann, We recommend mattress stitch for assembling the vest. Regards, Drops Team.
04.05.2026 - 06:42
![]() Anna wrote:
Anna wrote:
Witam, w 3 rzędzie jest symbol oznaczający :"zdjąć 1 oczko jak do przerobienia na prawo, przerobić 2 oczka prawe i przełożyć oczko zdjęte ponad 2 oczkami prawymi". Czyli z 3 oczek rzędu nr 2 zostaje nam 1 oczko. Jak mam zatem wykonać w tym miejscu 2 oczka wskazane w rzędzie nr 4?
09.04.2026 - 15:59DROPS Design answered:
Witaj Aniu, jak przełożysz zdjęte oczko ponad 2 oczkami, to z 3 oczek zostanie ci 2 oczka, nie 1. Pozdrawiamy!
09.04.2026 - 16:56
![]() Anna wrote:
Anna wrote:
"Gdy długość robótki od rzędu nabierania oczek wynosi 28-29-30-31-32-33 cm, przerobić 2 ściągacze francuskie.." Nie rozumiem tego zdania. Od którego rzędu dodawania oczek? 1ego czy 3ego? Od którego rzędu liczyc te 28cm? Po ilu cm robótki dla rozmiaru S?
05.04.2026 - 16:43DROPS Design answered:
Witaj Aniu, od rzędu nabierania robótki znaczy od początku robótki, czyli w tym przypadku od dołu topu. Pozdrawiamy!
07.04.2026 - 08:15
![]() Jóna wrote:
Jóna wrote:
Hvor finder jeg det nye diagram?
10.08.2025 - 12:09DROPS Design answered:
Hej Jóna. Diagrammet är uppdaterat i opskriften här. Mvh DROPS Design
26.08.2025 - 14:52
![]() Laetitia wrote:
Laetitia wrote:
Bonjour Est ce que ce top peut être tricoté en rond? Quelles seraient les modifications à faire pour cela?
12.05.2025 - 08:25DROPS Design answered:
Bonjour Laetitia, vous pouvez probablement tricoter en rond mais il vous faudra diviser ensuite aux emmanchures pour terminer chaque partie séparément en allers retours. Ajustez le point mousse (qui se tricote en rond alternativement 1 tour à l'end, 1 tour à l'env) et lisez tous les rangs des diagrammes de droite à gauche (sur l'envers, les rangs pairs se lisent de gauche à droite). Bon tricot!
12.05.2025 - 11:11
![]() Abby wrote:
Abby wrote:
For the front side, it says Work until measures 2 cm for ribbing, with the next row from the right side. Then to Work 2 rows of stocking stitch. “ Work the next row as follows from the right side”. And the next row, where the chart starts it, also says to work from the right side. I’m not understanding how both of the 2 rows of the stockinette are both worked from the right side. Since it’s worked back and forth how can 2 rows back to back both be from the right side?
23.04.2025 - 16:07DROPS Design answered:
Dear Abby, end rib with a row from wrong side so that next row (first row stocking stitch) is worked from the right side, then work 1 row from right side increasing evenly + 1 row from wrong side = 2 rows stocking stitch in total. Then on next row = from the right side, start working A.1. Happy knitting!
24.04.2025 - 08:25
![]() SONIA LOUKIL wrote:
SONIA LOUKIL wrote:
Bonjour, le diagramme est à tricoter qu’à l’endroit ou la première ligne est à l’endroit, la seconde à l’envers, etc… Merci d’avance pour votre réponse. Cordialement,
21.04.2025 - 23:42DROPS Design answered:
Bonjour Mme Loukil, le diagramme montre tous les rangs: lisez les rangs sur l'endroit de droite à gauche et les rangs sur l'envers de gauche à droite en suivant bien les indications "sur l'endroit" et "sur l'envers" dans la légende des symboles. Bon tricot!
22.04.2025 - 16:37
![]() Anna wrote:
Anna wrote:
Dzien dobry jak zamknięcie oczek na lewej stronie ma się do tego zdania,które znajdujemy na początku w opisie wzoru? Pozdrawiam serdecznie Oczka są zamykane na prawej stronie robótki!
08.08.2024 - 10:10DROPS Design answered:
Witaj Aniu, chodzi tutaj o zamykanie oczek rozumiane jako redukowanie oczek. To zamknięcie oczek pod pachą to jest raczej zakończenie robótki w tym miejscu. Zamykanie oczek ma w naszych wzorach 2 znaczenia i może być mylące :) W razie jakichkolwiek problemów śmiało pisz. Pozdrawiam!
08.08.2024 - 12:16
![]() Ania wrote:
Ania wrote:
Dzien dobry, Mam pytanie, jestem w momencie przerabiania tyłu robótki po zrobieniu dwóch ściegów francuskich ponad 9 oczkami,teraz instrukcja przewiduje zamknąć 8 oczek na początku 2 kolejnych rzędów na podkroje rękawów. Czy zamknąć mam na prawej stronie z jednej i drugiej 4 oczka, czy od razu 8 z jednej potem przerabiam na lewo i znów 8 z prawej ? ? Dziekuje i pozdrawiam
07.08.2024 - 12:53DROPS Design answered:
Witaj Aniu, zamykasz 8 oczek na początku rzędu na prawej stronie robótki, a w kolejnym rzędzie (na lewej stronie) zamykasz również 8 oczek na początku rzędu. Pozdrawiam!
08.08.2024 - 09:23
![]() Anna wrote:
Anna wrote:
Mam pytanie z początku robótki, po zrobieniu ściągacza mam przerobić 1 rząd na prawo i równomiernie zamykać oczka w moim wypadku 18. Czy mam to zrobić w jednym rzędzie? Czy mam tak zmniejszać przez 6 cm robótki?
27.07.2024 - 11:11DROPS Design answered:
Witaj Anno, zamykasz oczka w jednym rzędzie. Pozdrawiamy!
27.07.2024 - 18:56
|
|||||||||||||||||||||||||||||||
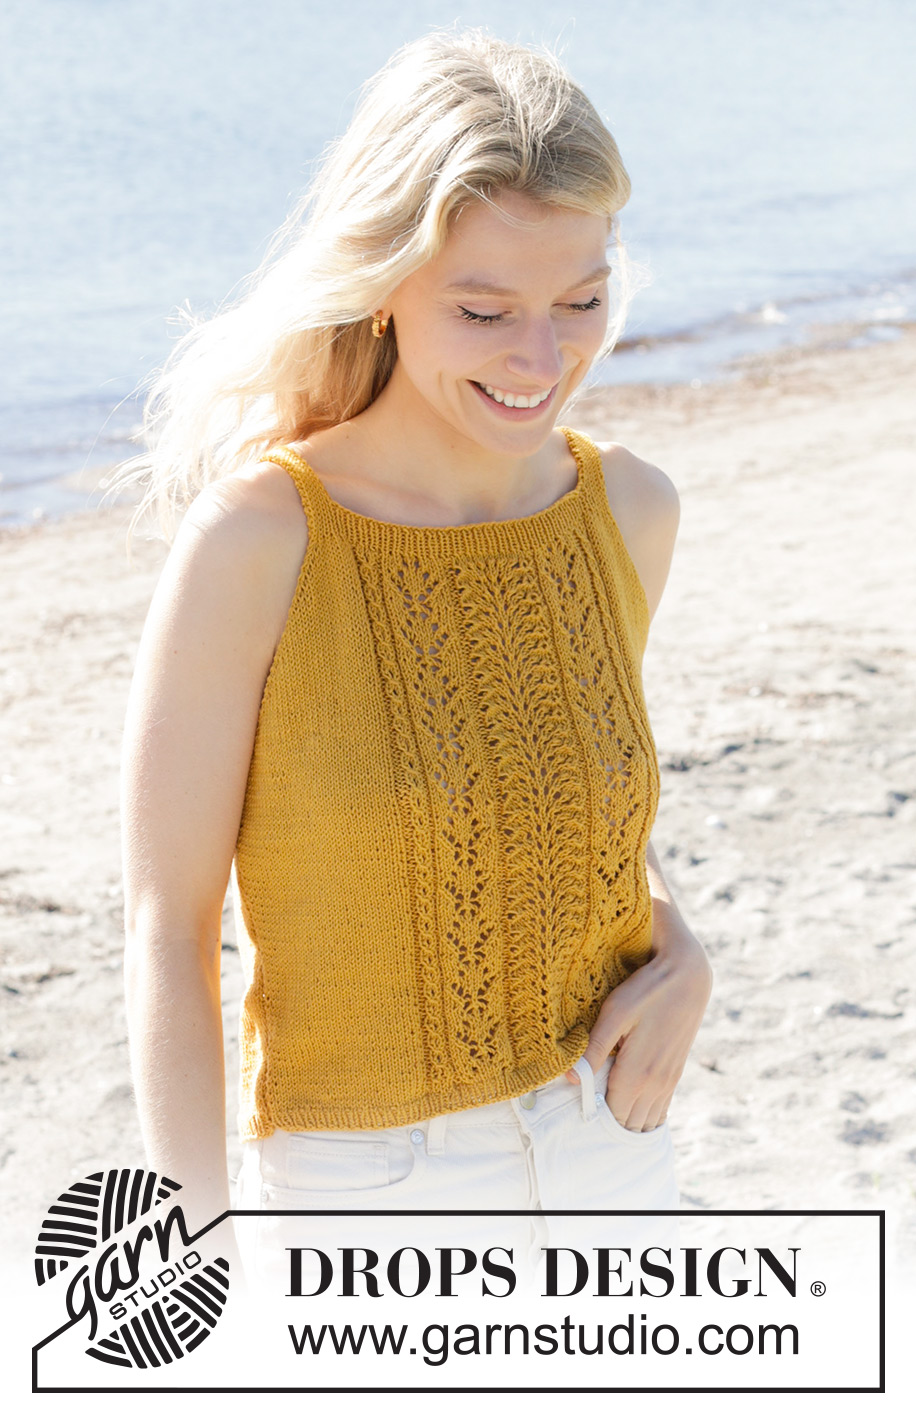
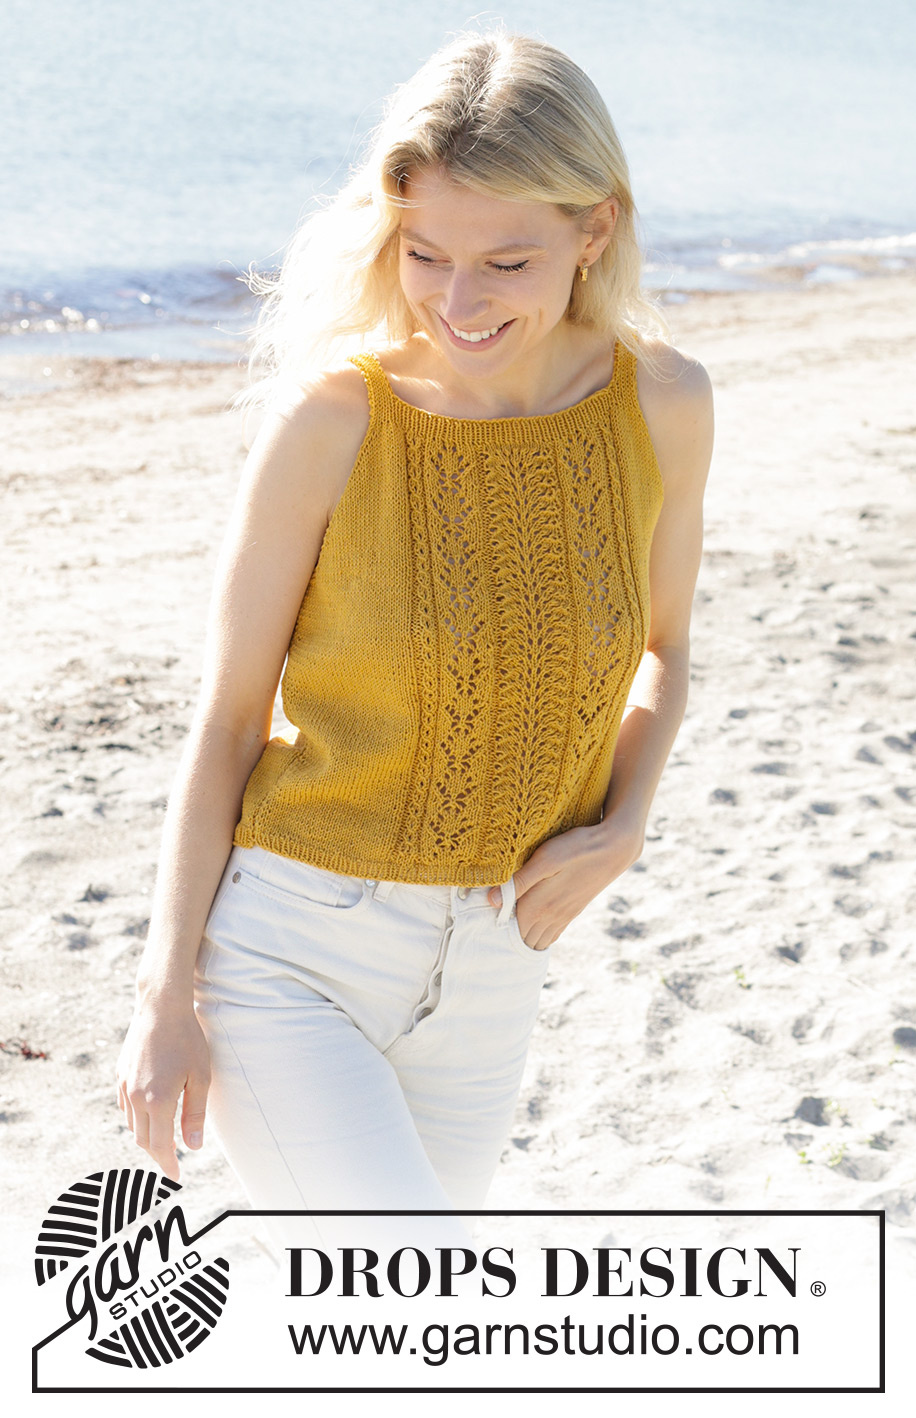
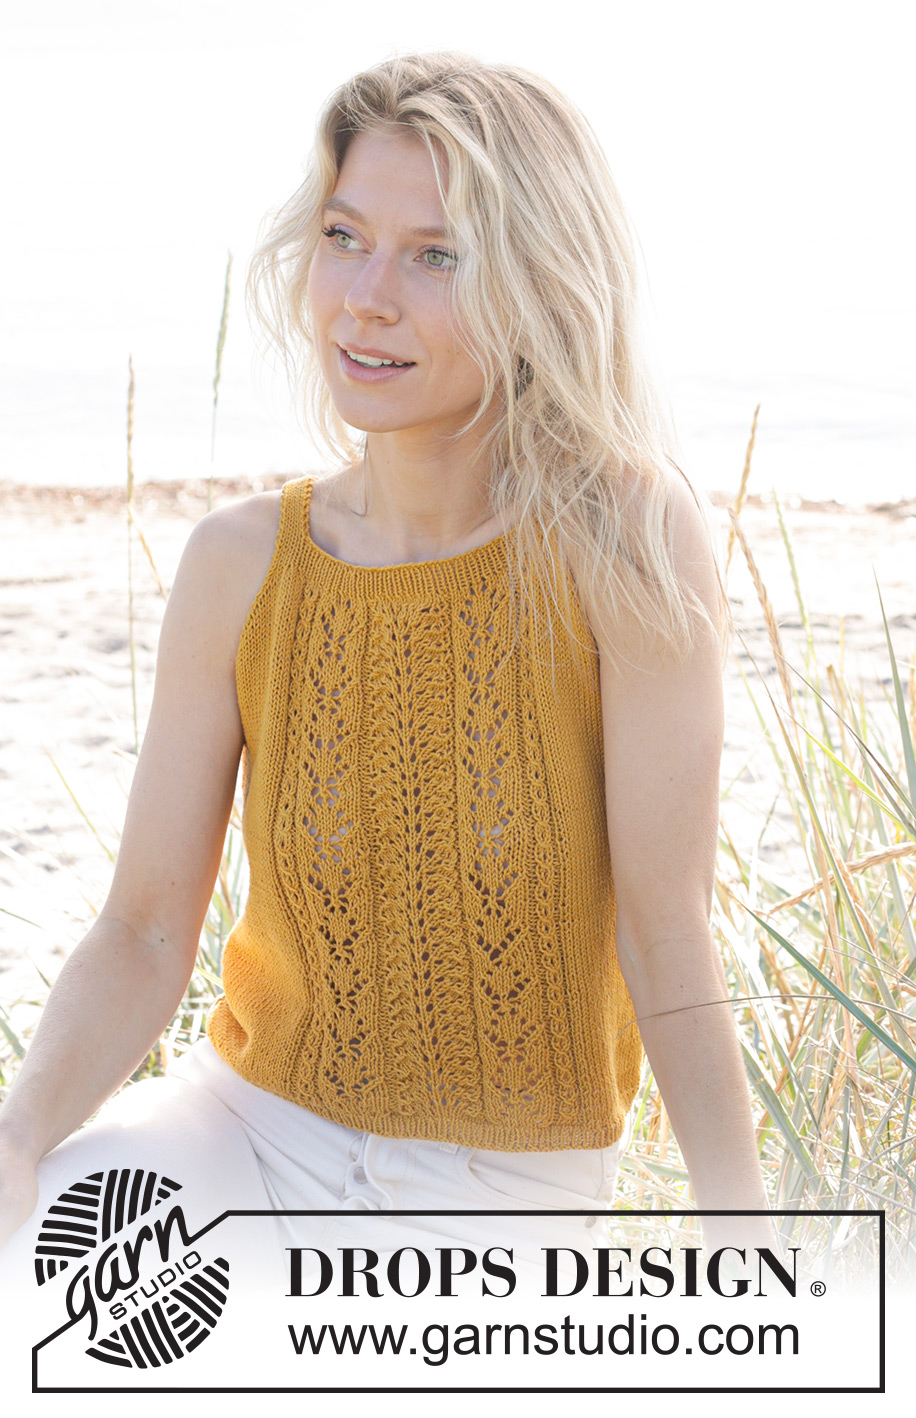
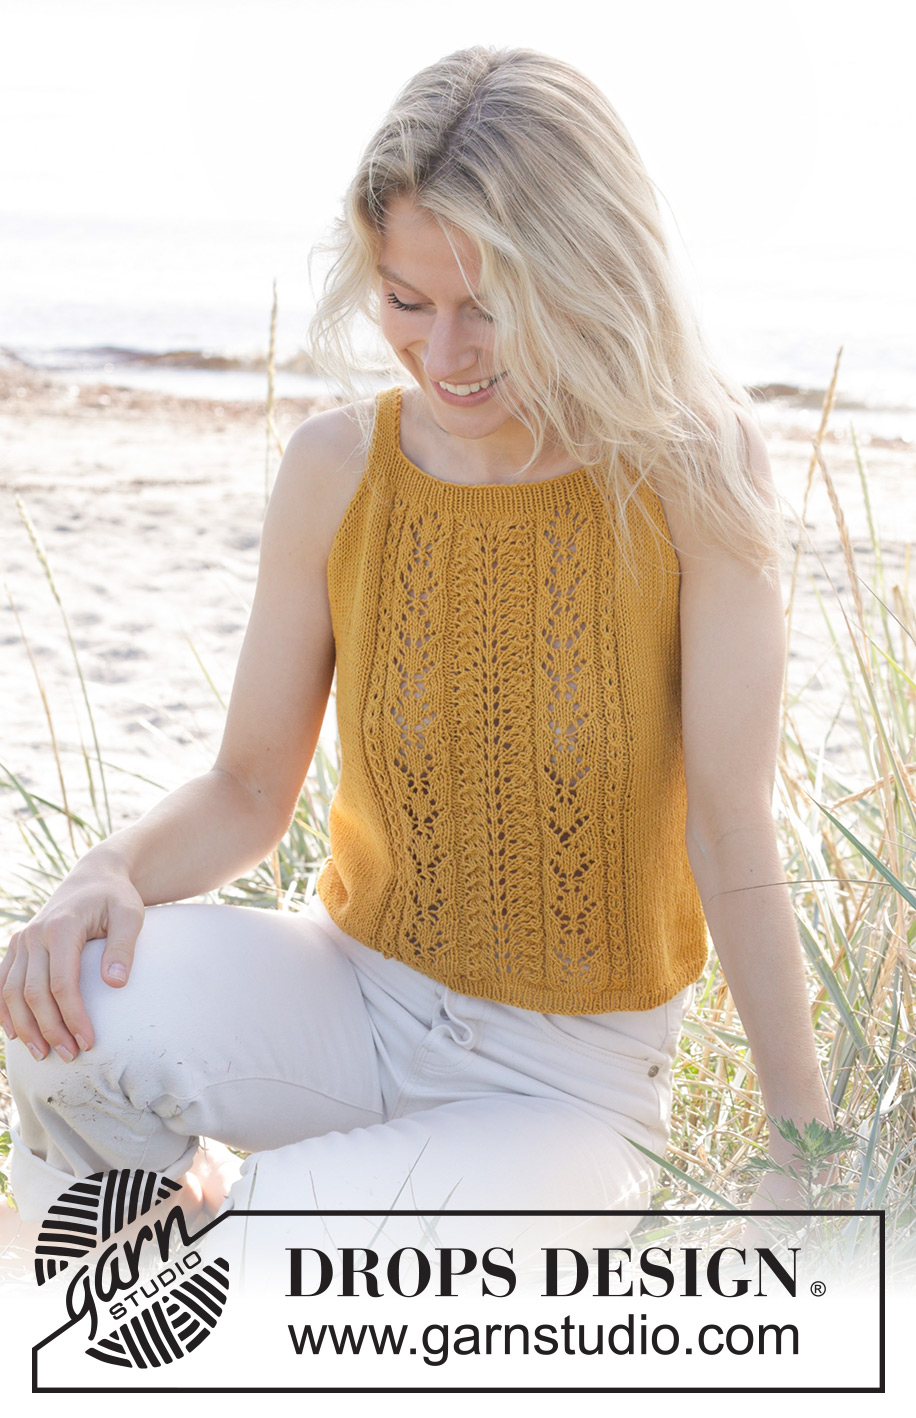
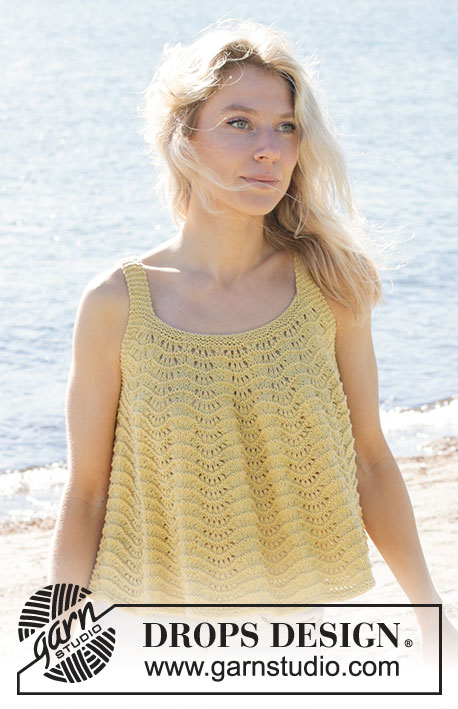
Smiling Honey Top#smilinghoneytop |
|||||||||||||||||||||||||||||||
 |
 |
||||||||||||||||||||||||||||||
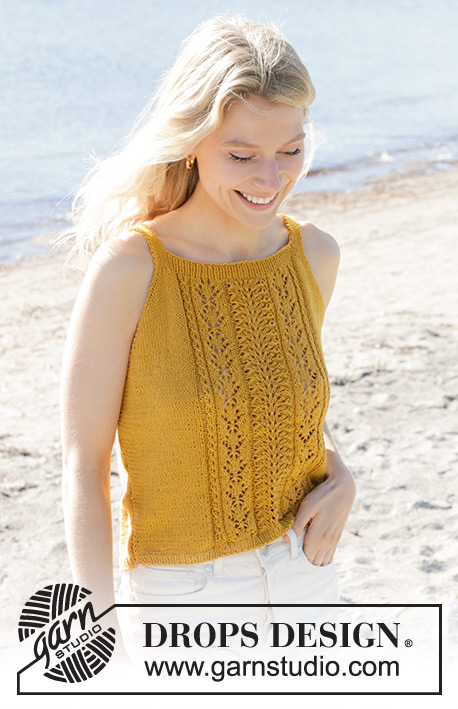
Knitted top in DROPS Safran. The piece is worked bottom up with lace pattern on the front piece. Sizes S - XXXL.
DROPS 240-14 |
|||||||||||||||||||||||||||||||
|
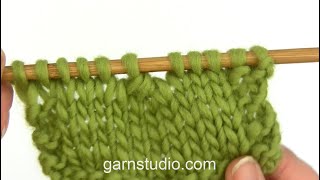
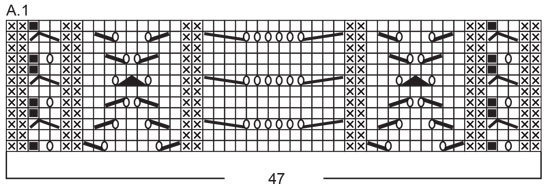
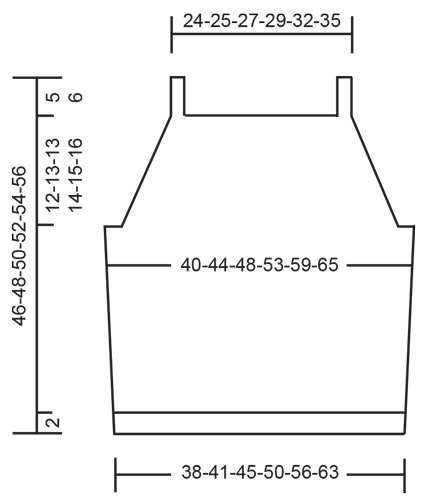
------------------------------------------------------- EXPLANATIONS FOR THE PATTERN: ------------------------------------------------------- RIDGE/GARTER STITCH (worked back and forth): Knit all rows. 1 ridge = knit 2 rows. PATTERN: See diagram A.1. The diagram shows all rows in the pattern from the right side. INCREASE TIP: All increases are worked from the right side! Increase 1 stitch inside the first and last 2 stitches on the row by making 1 yarn over. On the next row purl the yarn overs twisted to avoid holes. Then work the new stitches in stocking stitch. DECREASE TIP: All decreases are worked from the right side! BEGINNING OF ROW: Work 1 stitch in garter stitch, slip 1 stitch as if to knit, knit 1 and pass the slipped stitch over the knitted stitch (1 stitch decreased). END OF ROW: Work until there are 3 stitches left, knit 2 together, 1 stitch in garter stitch (1 stitch decreased). KNITTING TIPS: When working a yarn over in the lace pattern, make sure to tighten the strand is slightly taut. This is done to avoid the holes becoming too large. ------------------------------------------------------- START THE PIECE HERE: ------------------------------------------------------- TOP – SHORT OVERVIEW OF THE PIECE: The back and front pieces are worked separately, back and forth and bottom up. The straps are continued from the front piece and sewn onto the back piece. Then the side-seams are sewn together. BACK PIECE: Cast on 109-117-129-143-159-179 stitches with needles size 2.5 mm and DROPS Safran. Purl 1 row from the wrong side. Then work rib (purl 1, knit 1) with 1 stitch in GARTER STITCH on each side – see explanation above. Work until the piece measures 2 cm, with the next row from the right side. Change to needles size 3.5 mm. Knit 1 row from the right side and decrease 16-16-18-20-22-26 stitches evenly spaced = 93-101-111-123-137-153 stitches. Continue with stocking stitch and 1 stitch in garter stitch on each side. REMEMBER THE KNITTING TENSION! When the piece measures 6-6-6-8-8-8 cm, increase 1 stitch on each side – read INCREASE TIP. Increase like this every 7-7-8-8-8-8 cm, 2 more times in each side = 99-107-117-129-143-159 stitches. When the piece measures 28-29-30-31-32-33 cm from the cast-on edge, work 2 ridges over the outermost 6-8-9-12-14-16 stitches on each side (the other stitches are continued in stocking stitch). Cast off 5-7-8-11-13-15 stitches for the armholes at the beginning of the next 2 rows = 89-93-101-107-117-129 stitches. Continue with stocking stitch and 1 stitch in garter stitch on each side. AT THE SAME TIME on the first row from the right side decrease 1 stitch on each side for the armholes – read DECREASE TIP. Decrease like this every 2nd row (each row from the right side) a total of 16-17-18-19-20-22 times on each side = 57-59-65-69-77-85 stitches. Knit 1 row from the right side and increase 10-10-10-12-12-12 stitches evenly spaced = 67-69-75-81-89-97 stitches. Change to needles size 2.5 mm. Work rib as follows from the wrong side: 1 stitch in garter stitch, * purl 1, knit 1 *, work from *-* until there are 2 stitches left, purl 1 and 1 stitch in garter stitch. Continue this rib for 2 cm. Cast off a little loosely. FRONT PIECE: Cast on 109-117-129-143-159-179 stitches with needles size 2.5 mm and DROPS Safran. Purl 1 row from the wrong side. Then work rib (purl 1, knit 1), with 1 stitch in garter stitch on each side. Work until the piece measures 2 cm, with the next row from the right side. Change to needles size 3.5 mm. Work 2 rows of stocking stitch with 1 stitch in garter stitch on each side – and on the first row decrease 16-16-18-20-22-26 stitches evenly spaced = 93-101-111-123-137-153 stitches. Work the next row as follows from the right side: 1 stitch in garter stitch, 22-26-31-37-44-52 stitches in stocking stitch, A.1 – read KNITTING TIPS, 22-26-31-37-44-52 stitches in stocking stitch, 1 stitch in garter stitch. Continue this pattern. When the piece measures 6-6-6-8-8-8 cm, increase 1 stitch on each side – remember INCREASE TIP. Increase like this every 7-7-8-8-8-8 cm, 2 more times in each side = 99-107-117-129-143-159 stitches. When the piece measures 28-29-30-31-32-33 cm from the cast-on edge, work 2 ridges over the outermost 6-8-9-12-14-16 stitches on each side (the other stitches are continued as before). Then cast off 5-7-8-11-13-15 stitches for the armholes at the beginning of the next 2 rows = 89-93-101-107-117-129 stitches. Continue the pattern, with 1 stitch in garter stitch on each side. AT THE SAME TIME on the first row from the right side, decrease 1 stitch on each side for the armholes – remember DECREASE TIP. Decrease like this every 2nd row (each row from the right side) a total of 16-17-18-19-20-22 times on each side = 57-59-65-69-77-85 stitches. Knit 1 row from the right side and increase 10-10-10-12-12-12 stitches evenly spaced = 67-69-75-81-89-97 stitches. Change to needles size 2.5 mm. Work rib as follows from the wrong side: 1 stitch in garter stitch, * purl 1, knit 1 *, work from *-* until there are 2 stitches left, purl 1 and 1 stitch in garter stitch. Continue this rib for 2 cm. Do not cut the strand. The front piece measures approx. 41-43-44-46-48-50 cm from the cast-on edge. STRAPS AND NECK: Work the first row from the right side as follows: 1 stitch in garter stitch, * knit 1, purl 1 *, work from *-* a total of 3-3-4-5-6-7 times, knit 1, 1 stitch in garter stitch, then place these 9-9-11-13-15-17 stitches on a thread for the strap, cast off the next 49-51-53-55-59-63 stitches and work the last 9-9-11-13-15-17 stitches as follows: 1 stitch in garter stitch, * knit 1, purl 1 *, work from *-* a total of 3-3-4-5-6-7 times, knit 1, 1 stitch in garter stitch. Continue this rib back and forth over these 9-9-11-13-15-17 stitches until the strap measures approx. 10-10-12-12-12-12 cm (the strap should reach over the shoulder to the back piece; try the top on and work to desired length). Cast off. Place the 9-9-11-13-15-17 stitches from the thread back on needles size 2.5 mm and continue the rib until the strap measures approx. 10-10-12-12-12-12 cm (adjust the length to the first strap). Cast off. ASSEMBLY: Sew the straps to the cast-off edge on the back piece – outermost on each side. Sew the side seams, inside the 1 edge stitch. |
|||||||||||||||||||||||||||||||
Diagram explanations |
|||||||||||||||||||||||||||||||
|
|||||||||||||||||||||||||||||||
 |
|||||||||||||||||||||||||||||||
 |
|||||||||||||||||||||||||||||||
Have you finished this pattern?Tag your pictures with #dropspattern #smilinghoneytop or submit them to the #dropsfan gallery. Do you need help with this pattern?You'll find 25 tutorial videos, a Comments/Questions area and more by visiting the pattern on garnstudio.com. © 1982-2026 DROPS Design A/S. We reserve all rights. This document, including all its sub-sections, has copyrights. Read more about what you can do with our patterns at the bottom of each pattern on our site. |
|||||||||||||||||||||||||||||||


With over 40 years in knitting and crochet design, DROPS Design offers one of the most extensive collections of free patterns on the internet - translated to 17 languages. As of today we count 325 catalogues and 12298 patterns translated into English (UK/cm).
We work hard to bring you the best knitting and crochet have to offer, inspiration and advice as well as great quality yarns at incredible prices! Would you like to use our patterns for other than personal use? You can read what you are allowed to do in the Copyright text at the bottom of all our patterns. Happy crafting!
Post a comment to pattern DROPS 240-14
We would love to hear what you have to say about this pattern!
If you want to leave a question, please make sure you select the correct category in the form below, to speed up the answering process. Required fields are marked *.