DROPS Safran
DROPS Safran
100% Cotton
from 1.30 £ /50g
Get the yarn to make this pattern from 3.90£.

The yarn cost is calculated from the pattern’s smallest size and the yarn’s cheapest product type. Looking for an even better price? You might find it on the DROPS Deals!

DROPS SS24

Coconut Adventure Top

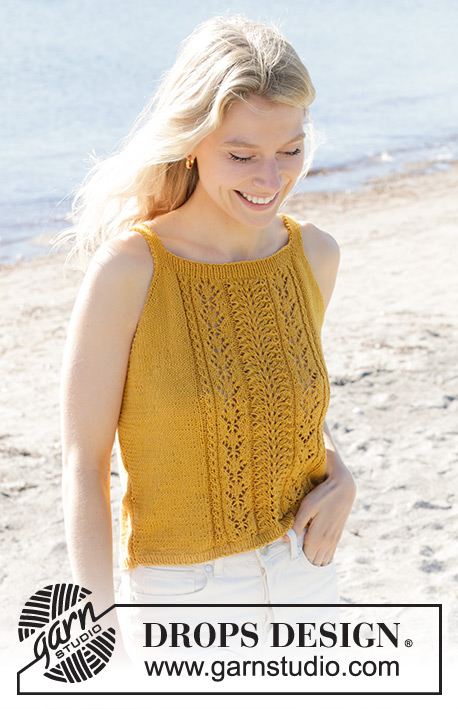
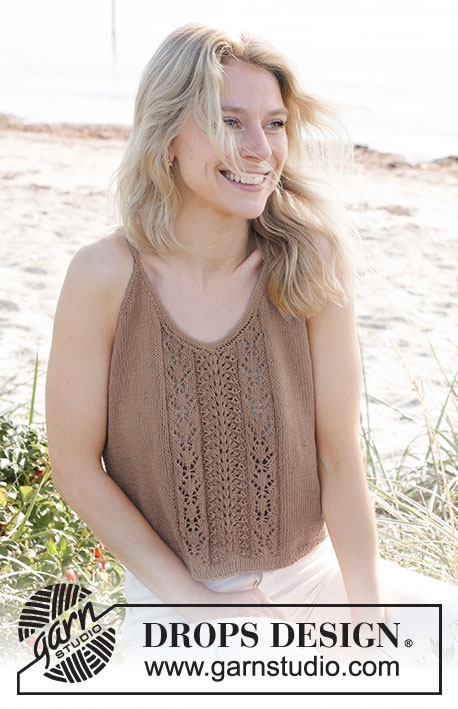
Knitted top in DROPS Safran. The piece is worked bottom up, with lace pattern and I-cord edging. Sizes S - XXXL.

DROPS 239-33
DROPS Design: Pattern e-356
Yarn group A
-------------------------------------------------------

SIZES:
S - M - L - XL - XXL - XXXL

YARN:
DROPS SAFRAN from Garnstudio (belongs to yarn group A)
150-200-200-200-250-250 g colour 22, light brown

NEEDLES:
DROPS CIRCULAR NEEDLE SIZE 3.5 MM: Length 60 cm.
DROPS CIRCULAR NEEDLE SIZE 2.5 MM: Length 60 cm.
DROPS DOUBLE POINTED NEEDLES SIZE 2.5 MM.

KNITTING TENSION:
24 stitches in width and 32 rows in height with stocking stitch = 10 x 10 cm.
NOTE: Needle size is only a guide. If you get too many stitches on 10 cm, change to a larger needle size. If you get too few stitches on 10 cm, change to a smaller needle size.

-------------------------------------------------------

Alternative Yarn – See how to change yarns here
Yarn Groups A to F – Use the same pattern and change the yarn here
Yarn usage using an alternative yarn – Use our yarn converter here

-------------------------------------------------------

DROPS Safran
DROPS Safran
100% Cotton
from 1.30 £ /50g
Get the yarn to make this pattern from 3.90£.

The yarn cost is calculated from the pattern’s smallest size and the yarn’s cheapest product type. Looking for an even better price? You might find it on the DROPS Deals!

Pattern instructions

NOTE: This pattern is written in British English. All measurements in charts are in cm. For conversion from cm to inches - click here. There are different terms for crocheting in British and American English. If this pattern includes crochet, click for "crochet terms" here. For this pattern in American English, please click here.
-------------------------------------------------------

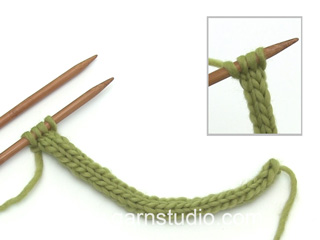
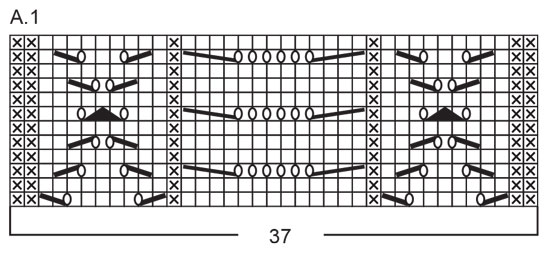
EXPLANATIONS FOR THE PATTERN:
-------------------------------------------------------

RIDGE/GARTER STITCH (worked back and forth):
Knit all rows.
1 ridge = knit 2 rows.

PATTERN:
See diagram A.1. The diagram shows all rows in the pattern from the right side.

INCREASE TIP:
All increases are worked from the right side!
Increase 1 stitch inside the 2 outermost stitches on each side by making 1 yarn over. The yarn over is purled twisted on the next row to avoid a hole. The new stitches are worked in stocking stitch.

DECREASE TIP:
All decreases are worked from the right side!
2 STITCHES DECREASED AT BEGINNING OF ROW:
Work 1 stitch in garter stitch, slip 1 stitch as if to knit, knit 2 together and pass the slipped stitch over the knitted-together stitches (2 stitches decreased).
1 STITCH DECREASED AT BEGINNING OF ROW:
Work 1 stitch in garter stitch, slip 1 stitch as if to knit, knit 1 and pass the slipped stitch over the knitted stitch (1 stitch decreased).
2 STITCHES DECREASED AT END OF ROW:
Work until there are 4 stitches left, knit 3 together, 1 stitch in garter stitch (2 stitches decreased).
1 STITCH DECREASED AT END OF ROW:
Work until there are 3 stitches left, knit 2 together, 1 stitch in garter stitch (1 stitch decreased).

KNITTING TIPS:
When working a yarn over in the lace pattern, make sure to tighten the strand is slightly taut. This is done to avoid the holes becoming too large.

-------------------------------------------------------

START THE PIECE HERE:

-------------------------------------------------------

TOP – SHORT OVERVIEW OF THE PIECE:
The front and back pieces are worked separately, back and forth and bottom up. The straps are tube-knitted and you cast off with I-cord around the neck. The straps are sewn to the back piece.

BACK PIECE:
Cast on 109-117-129-143-159-179 stitches with circular needle size 2.5 mm and DROPS Safran. Purl 1 row from the wrong side. Then work rib (purl 1, knit 1) with 1 stitch in garter stitch on each side for 2 cm (and the next row is from the right side).
Change to circular needle size 3.5 mm, knit 1 row from the right side and decrease 16-16-18-20-22-26 stitches evenly spaced = 93-101-111-123-137-153 stitches. Continue with stocking stitch and 1 edge stitch in garter stitch on each side.
When the piece measures 6-6-6-8-8-8 cm, increase 1 stitch on each side – read INCREASE TIP. Increase like this every 7-7-8-8-8-8 cm a total of 3 times on each side = 99-107-117-129-143-159 stitches.
When the piece measures 28-29-30-31-32-33 cm, work 2 ridges over the outermost 6-8-9-12-14-16 stitches on each side (continue the other stitches in stocking stitch).
After the ridges, cast off 5-7-8-11-13-15 stitches for the armholes at the beginning of the next 2 rows = 89-93-101-107-117-129 stitches.
Continue back and forth with stocking stitch and 1 edge stitch in garter stitch on each side. AT THE SAME TIME, on the first row from the right side, decrease 1 stitch on each side for the armhole – read DECREASE TIP. Decrease like this every 2nd row (each row from the right side) a total of 17-19-21-21-22-24 times on each side = 55-55-59-65-73-81 stitches. Cast off with I-cord as described below.

I-CORD EDGING:
Cast on 5 stitches with 1 double pointed needle size 2.5 mm (work with the second needle). Purl these stitches from the wrong side. Turn, * knit 4, knit twisted together the last stitch with the first stitch from the back piece (from the right side), place the worked stitches back on the left needle *, work from *-* until all the stitches from the back piece are cast off and there are 5 stitches left. Cast these stitches off with purl from the wrong side.

FRONT PIECE:
Cast on 109-117-129-143-159-179 stitches with circular needle size 2.5 mm and DROPS Safran. Purl 1 row from the wrong side. Then work rib (knit 1, purl 1) with 1 stitch in garter stitch on each side for 2 cm (next row is from the right side).
Change to circular needle size 3.5 mm
Work 2 rows stocking stitch with 1 stitch in garter stitch on each side – at the same time, on the first row, decrease 16-16-18-20-22-26 stitches evenly spaced = 93-101-111-123-137-153 stitches.
Work the next row from the right side as follows: 1 stitch in garter stitch, 27-31-36-42-49-57 stitches in stocking stitch, work A.1 – read KNITTING TIPS, 27-31-36-42-49-57 stitches in stocking stitch, 1 stitch in garter stitch. Continue this pattern. REMEMBER THE KNITTING TENSION!

When the piece measures 6-6-6-8-8-8 cm, increase 1 stitch on each side – remember INCREASE TIP. Increase like this every 7-7-8-8-8-8 cm a total of 3 times on each side = 99-107-117-129-143-159 stitches.
When the piece measures 28-29-30-31-32-33 cm, work 2 ridges over the outermost 6-8-9-12-14-16 stitches on each side (the other stitches are worked as before).
After the ridges, work as follows from the right side: Cast off the first 5-7-8-11-13-15 stitches for the armhole, work the next 42-44-48-51-56-62 stitches as before, place 2 stitches on an extra needle in front of the piece, knit 3 together, then place these 43-45-49-52-57-63 stitches on a thread = SECTION-1.

SECTION-2:
Knit twisted together the 2 stitches from extra needle, work the next 41-43-47-50-55-61 stitches as before and knit the last 6-8-9-12-14-16 stitches. Turn.
Cast off 5-7-8-11-13-15 stitches for the armhole, work pattern until there are 2 stitches left, purl 1 and 1 stitch in garter stitch = 43-45-49-52-57-63 stitches.

OVERVIEW OF NEXT SECTION:
Continue the pattern with 1 stitch in garter stitch on each side.
AT THE SAME TIME on the first row from the right side to decrease for the neck and armhole. Decrease inside 1 stitch in garter stitch on each side – read DECREASE TIP, differently for the neck and armhole. Read V-NECK and ARMHOLE before continuing.

V-NECK:
Decrease 2 stitches for the V-neck every 2nd row (each row from the right side) 4-2-2-3-6-8 times, then decrease 1 stitch for the V-neck every 2nd row 13-17-19-18-16-16 times. NOTE: The next-outermost stitch by the neck (the stitch inside the garter stitch) is always worked in stocking stitch.

ARMHOLE:
Decrease 1 stitch for the armhole every 2nd row (every row from the right side) 17-19-21-21-22-24 times.

After all the decreases for the neck and armhole there are 5-5-5-7-7-7 stitches left. Knit the stitches together 2 and 2 until there is 1 stitch left, knit 1. Cast off.

SECTION-1:
Place the 43-45-49-52-57-63 stitches from SECTION-1 back on needles size 3.5 mm. Continue the pattern back and forth with 1 stitch in garter stitch on each side.
AT THE SAME TIME, on the first row from the right side, start to decrease for the armhole and V-neck. Decrease in the same way as SECTION-2 = 5-5-5-7-7-7 stitches. Knit the stitches together 2 and 2 until there is 1 stitch left, knit 1. Cast off.

STRAPS AND I-CORD EDGING:
Start by knitting up stitches from the right side along the neck on the front piece, using circular needle size 2.5 mm and knitting up 75 to 105 stitches inside the 1 stitch in garter stitch around the neck (approx. 1 stitch in each stitch/row). Cut the strand.

Cast on 5 stitches using one double pointed needle size 2.5 mm (work with the second one). Work tube knit as follows: * Push the stitches back to the beginning of the needle, tighten the strand and knit the 5 stitches from the right side again *, work from *-* until the strap measures 12-12-12-14-14-14 cm (the strap goes over the shoulder to the back piece, try the garment on and work to desired length). Do not cut the strand.
Now cast off with I-cord along the V-neck as follows:
Start from the right side, * knit the first 4 stitches from the strap, knit twisted together the last stitch and the first stitch from the front piece. Move the worked stitches back onto the left needle *, work from *-* until all the stitches around the neck are cast off and there are 5 stitches left on the right needle. Move these 5 stitches back onto the left needle, work tube knit until the strap is the same length as the first strap. Cut the strand, pull it through the remaining stitches, tighten and fasten well.

ASSEMBLY:
Sew the shoulder straps to the cast-off edge on the back piece – outermost on each side.
Sew the side seams inside the 1 stitch in garter stitch.

Diagram

symbols = knit from right side, purl from wrong side
symbols = purl from right side, knit from wrong side
symbols = between 2 stitches make 1 yarn over
symbols = knit 2 together
symbols = slip 1 as if to knit, knit 1 and pass the slipped stitch over the knitted stitch
symbols = slip 1 as if to knit, knit 2 together and pass the slipped stitch over the knitted-together stitches
symbols = knit 4 together as follows: Knit 4, move them back onto the left needle, pass the next-outermost stitch over the outermost stitch, repeat until all 3 stitches are passed over (= 3 stitches decreased). Move the last stitch back onto the right needle.
symbols = knit 4 twisted together as follows: Knit 4, pass the next-outermost stitch over the outermost stitch, repeat until all 3 stitches have been are passed over (= 3 stitches decreased)
diagram
diagram

Each of our patterns has specific tutorial videos to help you.

Do you have a question? See a list of frequently asked questions (FAQ)

Knitting tension is what determines the final measurements of your work, and is usually measured per 10 x 10 cm. It is provided like so: number of stitches in width x number of rows in height - eg: 19 stitches x 26 rows = 10 x 10 cm.

The knitting tension is very individual; some people knit/crochet loosely while others work tightly. You adjust the knitting tension with the needle size, which is why the suggested needle size is only meant as a guide! You need to adjust this (up or down) to ensure that YOUR knitting tension matches the knitting tension provided in the pattern. If you work with a different knitting tension than provided you will have a different yarn consumption, and your work will have different measurements than what the pattern suggests.

The knitting tension also determines which yarns can replace each other. As long as you achieve the same knitting tension you can replace one yarn with another.

See DROPS lesson: How to measure your tension/gauge

See DROPS video: How to make a gauge tension swatch

The required amount of yarn is provided in grams, eg: 450 g. To calculate how many balls you’ll need you first need to know how many grams are in 1 ball (25g, 50g or 100g). This information is available if you click on the individual yarn quality on our pages. Divide the amount required with the amount of each ball. For example, if each ball is 50g (the most common amount), the calculation will be as follows: 450 / 50 = 9 balls.

The important thing when changing from one yarn to another is that the knitting/crochet tension remains the same. This is so that the measurements of the finished piece will be the same as on the sketch provided. It is easier to achieve the same knitting tension using yarns from the same yarn group. It is also possible to work with multiple strands of a thinner yarn to achieve the knitting tension of a thicker one. Please try our yarn converter. We recommend you to always work a test swatch.

Please NOTE: when changing yarn the garment might have a different look and feel to the garment in the photo, due to individual properties and qualities of each yarn.

See DROPS lesson: Can I use a different yarn than the one mentioned in the pattern?

All our yarns are categorised into yarn groups (from A to F) according to thickness and knitting tension – group A contains the thinnest yarns and group F the thickest. This makes it easier for you to find alternative yarns to our patterns, should you wish to switch yarn. All yarns within the same group have a similar knitting tension and can easily replace each other. However, different yarn qualities have different structures and properties which will give the finished work a unique look and feel.

Click here for an overview of the yarns in each yarn group

At the top of all our patterns you’ll find a link to our yarn calculator, which is a helpful tool should you wish to use a different yarn than suggested. By filling in the yarn quality you wish to replace, the amount (in your size) and number of strands, the calculator will present good alternative yarns with the same knitting tension. Additionally it will tell you how much you’ll require in the new qualities and whether you’ll need to work with multiple strands. Most skeins are 50g (some are 25g or 100g).

If the pattern is worked with multiple colours, every colour will have to be calculated separately. Similarly, if the pattern is worked with several strands of different yarns (for example 1 strand Alpaca and 1 strand Kid-Silk) you will have to find alternatives for each, individually.

Click here to see our yarn calculator

Since different yarns have different qualities and textures we have chosen to keep the original yarn in our patterns. However, you can easily find options among our available qualities by using our yarn calculator, or simply pick a yarn from the same yarn group.

It is possible that some retailers still have discontinued yarns in stock, or that someone has a few skeins at home that they would like to find patterns for.

The yarn calculator will provide both alternative yarn as well as required amount in the new quality.

If you think it's hard to decide what size to make, it can be a good idea to measure a garment you own already and like the size of. Then you can pick the size by comparing those measures with the ones available in the pattern's size chart.

You'll find the size chart at the bottom of the pattern.

See DROPS lesson: How to read size chart

The needle size provided in the pattern serves only as a guide, the important thing is to follow the knitting tension. And since knitting tension is very individual, you will have to adjust the needle size to ensure that YOUR tension is the same as in the pattern – maybe you’ll have to adjust 1, or even 2 needle sizes, up or down to achieve the correct tension. For this, we recommend that you work test swatches.

Should you work with a different knitting tension than the one provided, the measurements of the finished garment might deviate from the measurement sketch.

See DROPS lesson: How to measure your tension/gauge

See DROPS video: How to make a tension/gauge swatch

Working a garment top-down provides more flexibility and room for personal adjustment. For example it is easier to try the garment on while working, as well as making adjustments to length of yoke and shoulder caps.

The instructions are carefully explaining every step, in the correct order. Diagrams are adjusted to the knitting direction and are worked as usual.

The diagram depicts all rows/rounds, and every stitch seen from the right side. It is read from bottom to top, from right to left. 1 square = 1 stitch.

When working back and forth, every other row is worked from the right side and every other row is worked from the wrong side. When working from the wrong side, the diagram will have to be worked reversed: from left to right, knit stitches are purled, purl stitches are knit etc.

When working in the round every round is worked from the right side and the diagram are worked from right to left on all rounds.

See DROPS lesson: How to read knitting diagrams

The diagram depicts all rows/rounds, and every stitch seen from the right side. It is worked from bottom to top, from right to left.

When working back and forth every other row is worked from the right side: from right to left and every other row is worked from the wrong side: from left to right.

When working in the round, every row in the diagram are worked from the right side, from right to left.

When working a circular diagram you start in the middle and work your way outwards, counter clockwise, row by row.

The rows usually start with a given number of chain stitches (equivalent to the height of the following stitch), this will either be depicted in the diagram or explained in the pattern.

See DROPS lesson: How to read crochet diagrams

Instructions for working several diagrams after each other on the same row/round, will often be written like so: “work A.1, A.2, A.3 a total of 0-0-2-3-4 times". This means you work A.1 once, then A.2 is worked once, and A.3 is repeated (in width) the number of times provided for your size – in this case like so: S = 0 times, M = 0 times, L=2 times, XL= 3 times and XXL = 4 times.

The diagrams are worked as usual: begin with the first row in A.1, then work the first row in A.2 etc.

See DROPS lesson: How to read knitting diagrams

See DROPS lesson: How to read crochet diagrams

The total width of the garment (from wrist-to-wrist) will be larger in the larger sizes, despite the actual sleeves being shorter. The larger sizes have longer sleeve caps and wider shoulders, so there will be a good fit in all sizes.

The measurement sketch/schematic drawing provides information regarding the full length of the garment. If it’s a jumper or a jacket the length is measured from the highest point on the shoulder closest to the neckline, and straight down to the bottom of the garment. It is NOT measured from the tip of shoulder. Similarly, the length of yoke is measured from the highest point on the shoulder and down to where yoke is split into body and sleeves.

On a jacket measures are never taken along bands, unless specifically stated. Always measure inside band stitches when measuring the length.

See DROPS lesson: How to read a schematic drawing

Diagrams are often repeated on the round or in height. 1 repeat is the diagram the way it appears in the pattern. If it says to work 5 repeats of A.1 in the round, then you work A.1 a total of 5 times after/next to each other in the round. If it says to work 2 repeats of A.1 vertically/in height you work the entire diagram once, then begin again at the start and work the entire diagram one more time.

Chain stitches are slightly narrower than other stitches and to avoid working the cast-on edge too tight, we simply chain more stitches to begin with. The stitch count will be adjusted on the following row to fit the pattern and measurement sketch.

The rib edge is more elastic and will contract slightly compared to, for example, stocking stitch. By increasing before the rib edge, you avoid a visible difference in width between the rib edge and the rest of the body.

It’s very easy to cast off too tightly, and by making yarn overs while casting off (and simultaneously casting these off) you avoid a too tight cast off edge.

See DROPS video: How to bind off with yarn overs (yo)

To achieve an even increase (or decrease) you can increase on, for example: every 3rd and 4th row alternately, like so: work 2 rows and increase on the 3rd row, work 3 rows and increase on the 4th. Repeat this until the increase is complete.

See DROPS lesson: Increase or decrease 1 st on every 3rd and 4th row alternately

Should you prefer to work in the round instead of back and forth, you may of course adjust the pattern. You’ll need to add steeks mid-front (usually 5 stitches), and follow the instructions. When you would normally turn and work from the wrong side, simply work across the steek and continue in the round. At the end you’ll cut the piece open, pick up stitches to work bands, and cover the cut edges.

See DROPS video: How to knit steeks and cut open

Should you prefer to work back and forth instead of in the round, you may of course adjust the pattern so you work the pieces separately and then assemble them at the end. Divide the stitches for the body in 2, add 1 edge stitch in each side (for sewing) and work the front and back pieces separately.

See DROPS lesson: Can I adapt a pattern for circular needles into straight needles?

Pattern repeats can vary slightly in the different sizes, in order to get the correct proportions. If you’re not working the exact same size as the garment in the photo, yours might deviate slightly. This has been carefully developed and adjusted so that the complete impression of the garment is the same in all sizes.

Make sure to follow instructions and diagrams for your size!

If you have found a pattern you like which is available in women’s size it’s not very difficult to convert it to men’s size. The biggest difference will be the length of sleeves and body. Start working on the women size that you think would fit across the chest. The additional length will be worked right before you cast off for the armhole/sleeve cap. If the pattern is worked top-down you can add the length right after the armhole or before the first decrease on sleeve.

Regarding additional yarn amount, this will depend on how much length you add, but it is better with a skein too many than too few.

All yarns will have excess fibres (from production) that might come off as lint or shedding. Brushed yarns (ie hairier yarns) have more of these loose, excess fibres, causing more shedding.

Shedding also depends on what is worn under or over the garment, and whether this pulls at the yarn fibres. It’s therefore not possible to guarantee that there will be no shedding

Below are some tips on how to get the best result when working with hairier yarns:

1. When the garment is finished (before you wash it) shake it vigorously so the looser hairs come off. NOTE: do NOT use a lint roller, brush or any method that pulls at the yarn.

2. Place the garment in a plastic bag and put it in your freezer - the temperature will cause the fibres to become less attached to each other, and excess fibres will come off easier.

3. Leave in the freezer for a few hours before taking it out and shaking it again.

4. Wash the garment according to the instructions on the yarn label.

Pilling is a natural process that happens to even the most exclusive of fibers. It's a natural sign of wear and tear that is hard to avoid, and that is most visible in high friction areas of your garment like a sweater's arms and cuffs.

You can make your garment look as new by removing the pilling, using a fabric comb or a pill/lint remover.

Still can't find the answer you need? Then scroll down and leave your question so one of our experts can try to help you. This will be done normally within 5 to 10 working days.
In the meantime, you can read the questions and answers that others have left to this pattern or join the DROPS Workshop on Facebook to get help from fellow knitters/crocheters!

You might also like...

Post a comment to pattern DROPS 239-33

We would love to hear what you have to say about this pattern!

If you want to leave a question, please make sure you select the correct category in the form below, to speed up the answering process. Required fields are marked *.

Comments / Questions (12)

country flag Corina wrote:

Hello! I would like to know if this pattern can be worked with 80 cm needles instead of 60cm. I only have them in this length. Thank you!

18.04.2024 - 11:39

DROPS Design answered:

Hi Corina, you can use 80 cm needles instead of 60cm. Happy knitting!

18.04.2024 - 11:50

country flag Agata wrote:

Dzień dobry, mam pytanie do: „Zamykać w odl. 1 oczka ściegiem francuskim od brzegu z każdej strony” przy robieniu dekoltu. Rozumiem, ze przekładam pierwsze oczko (brzegowe) potem jedno oczko prawe, drugie oczko prawe i przekładam jedno nad drugim w celu zamknięcia?

06.10.2023 - 14:54

DROPS Design answered:

Witaj Agato, oczka brzegowe są zawsze przerabiane na prawo. Zamykasz oczko/a za lub przed oczkiem brzegowym. Jak to zrobić patrz ZAMYKANIE OCZEK na górze wzoru. Poniżej znajdziesz również instrukcje video, gdzie możesz obejrzeć jak zamykamy 1 czy 2 oczka w taki sposób jak wymaga tego ten wzór (patrz Zamykanie 2 oczek' oraz 'Zamykanie oczek–zdjąć 1 o., 1 o.p., przełożyć o. zdjęte nad przerobionym oczkiem'). W razie dodatkowych pytań pisz. Pozdrawiamy!

09.10.2023 - 08:43

country flag Giulia wrote:

Buongiorno, Non capisco bene cosa fare quando si dice "Quando il lavoro misura 28-29-30-31-32-33 cm, lavorare 2 coste sulle 6-8-9-12-14-16 maglie più esterne a ogni lato (continuare le altre maglie a maglia rasata)." Avrei bisogno di maggiori spiegazioni

12.09.2023 - 12:49

DROPS Design answered:

Buonasera Giulia, in questo punto deve lavorare solo sul numero di maglie indicato e non su tutte le maglie, e deve lavorare 2 coste, cioè 4 ferri diritto. Buon lavoro!

12.09.2023 - 19:37

country flag Anja wrote:

Hallo, ich verstehe nicht, was mit dem V-Ausschnitt passieren soll. Ich nehme die Maschen auf und schneide den Faden ab. Und dann? Es ist ja nichts weiter beschrieben, wie ich den Rand stricke. Und für den Schulterträger nehme ich 5 Maschen auf und stricke eine Hinreihe rechts und wiederhole dies? Also kraus rechts über 5 Maschen? Das verstehe ich nicht, aber mehr ist nicht beschrieben.

29.07.2023 - 14:46

DROPS Design answered:

Liebe Anja, wenn beide Vorderteile fertig sind, stricken Sie SCHULTERTRÄGER und I-CORD-RAND:, dh zuerst die Maschen auffassen und Faden abschneiden; dann 5 Maschen anschlagen und eine I-Cord für den 1. Träger stricken dann stricken Sie diese 5 Maschen mit den aufgefassenen Maschen zusammen wie in diesem Video gezeigt. Viel Spaß beim stricken!

31.07.2023 - 10:11

country flag Riikka wrote:

Hei, en ymmärrä ohjeesta miten olkaimet tehdään? Tarvitsen yhden 2,5 puikon, mutta miten olkain kiinnittyy topin etuosaan tässä vaiheessa? En löytänyt opastusvideoita tähän vaiheeseen.

01.07.2023 - 22:07

DROPS Design answered:

Hei, olkain neulotaan aluksi erikseen. Kun olkaimen pituus on 12-12-12-14-14-14 cm, se kiinnitetään etukappaleeseen seuraavasti: *Neulo olkaimen ensimmäiset 4 silmukkaa oikein, neulo viimeinen silmukka ja etukappaleen ensimmäinen silmukka kiertäen oikein yhteen. Ota neulotut silmukat takaisin vasemman käden puikolle*, toista *-* kunnes olet päättänyt kaikki etukappaleen V-aukon kohdalla olevat silmukat ja oikean käden puikolla on jäljellä 5 silmukkaa. Ota nämä 5 silmukkaa vasemman käden puikolle ja neulo näillä silmukoilla toinen olkain.

04.07.2023 - 16:57

country flag Audrey wrote:

Can someone please help me understand the I-cord bind off for the back piece? I do not understand how I’m supposed to purl from the wrong side and then get back to the front to start the bind off. I always wind up with the yarn in the wrong place. The video leaves out this first part so I am just royally confused. Been staring at it for hours.

27.05.2023 - 18:22

DROPS Design answered:

Dear Audrey, cast on 5 stitches in an extra needle, then purl these stitches on the wrong side. Now, turn and work these stitches alongside the stitches in the back. Knit the first 4 stitches and knit the 5th stitches with the first stitch on the back, pass all stitches onto the same needle and continue working as before: knit the 4 stitches and work the 5th stitch with the next stitch in the back. Happy knitting!

28.05.2023 - 18:48

country flag Ingrid Mcmillan-ernst wrote:

Hello. Can you please tell me, if possible, what size the model in the picture is wearing? Thank you!

27.04.2023 - 17:53

DROPS Design answered:

Dear Mrs Mcmillan-ernst, most of the time, our models are wearing either a size S or a size M, but since every body is different, measure a similar garment you have and like the shape and compare to the measurements in the chart (taken flat from side to side - in cm, convert into inches here). read more here. Happy knitting!

28.04.2023 - 09:38

country flag Nayfher wrote:

Esta parte no la entiendo *trabajar 2 pliegues sobre los 6-8-9-12-14-16 puntos más externos a cada lado* . A qué se refieren con pliegues

19.04.2023 - 12:04

DROPS Design answered:

Hola Nayfher, los pliegues están explicados en EXPLICACIONES PARA REALIZAR LA LABOR; 1 pliegue = 2 filas de derecho.

23.04.2023 - 18:10

country flag Agnès wrote:

Dune

21.01.2023 - 17:46

country flag Marta wrote:

Fawn Top

18.01.2023 - 16:15