
Popular categories
Looking for a yarn?


Comments / Questions (27)
![]() Elise wrote:
Elise wrote:
Hi! How are the increased sleeve stiches knitted? Am I supposed to just knit them in a garter stich? In that way the pattern won't continue naturally. Thanks!
12.02.2024 - 20:41DROPS Design answered:
Hi Elise, The increased stitches are purled twisted (through the back loop) on the first round after each increase, then worked in stocking stitch. Happy knitting!
13.02.2024 - 06:43
![]() Connie Bach wrote:
Connie Bach wrote:
Hvorfor svarer I ikke retur ? Træls at sidde med dyrt garn man ikke kan bruge, da opskriften er fuldstændig uforståelig. Og ja, jeg er nybegynder og mangler simpelthen lidt lettere forklaringer, også på de pinde der ikke står i mønsteret, men er underforstået for en dygtig strikker.
24.06.2023 - 21:47DROPS Design answered:
Hei Connie. Under hver oppskrift står det: Du får vanligvis svar innen 5-10 arbeidsdager (du etterlyser svar etter 2 arbeidsdager!). I mellomtiden kan du lese tidligere spørsmål og svar som andre har lagt igjen på denne oppskriften eller bli med i DROPS Workshop på Facebook for å få hjelp av andre strikkere/heklere! Trenger du hjelp i løpet av en helg, er sosiale medier et flott sted å få hjelp. mvh DROPS Design
26.06.2023 - 11:33
![]() Sonja De Keersmaecker wrote:
Sonja De Keersmaecker wrote:
Goedemorgen, kan deze trui ook met gewone breinaalden worden gemaakt Alvast bedankt voor een antwoord Sonja
26.02.2023 - 07:47
![]() Geneviève Martin wrote:
Geneviève Martin wrote:
Bonjour, est-ce que toutes les mailles augmentées pour la manche sont tricotées en jersey ? On se retrouve alors avec une partie qui n'est plus en point fantaisie... Ou bien faut-il reconstituer le point fantaisie au fur et à mesure des augmentations ? Merci de me'aider .
29.12.2022 - 09:21DROPS Design answered:
Bonjour Mme Martin, les augmentations des manches se tricotent en jersey (cf AUGMENTATIONS). Bon tricot!
02.01.2023 - 11:40
![]() Marlies Van Dijk wrote:
Marlies Van Dijk wrote:
Zou u nog antwoord op mijn vraag kunnen geven? Blijf je die 3 steken van de mouw recht en averecht breien? Want er wordt gemeerderd, moet ik dan niet op een gegeven moment die steken in patroon gaan breien?Alvast bedankt.
23.10.2022 - 20:41
![]() Marlies Van Dijk wrote:
Marlies Van Dijk wrote:
Bedankt voor uw antwoord. Maar ik heb nog een vraag. Blijf je die 3 steken van de mouw recht en averecht breien? Want er wordt gemeerderd, moet ik dan niet op een gegeven moment die steken in patroon gaan breien?Alvast bedankt.
12.10.2022 - 21:08DROPS Design answered:
Dag Marlies,
Nee, je volgt het patroon zoals aangegeven en de 3 steken midden onder de mouw aan beide kanten blijf je in tricotsteek breien. De gemeerderde steken brei je ook in tricotsteek.
24.10.2022 - 20:45
![]() Marlies Van Dijk wrote:
Marlies Van Dijk wrote:
Mijn vraag betreft de mouw, direct bij de eerste pennen. Er staat voor de maat die ik brei, 1 kantsteek in ribbelsteek, 3 recht, dan patroon volen, eindigen met 3 recht en 1 kantsteek in ribbelsteek. De 3 steken recht, worden die in de teruggaande naalden ook recht gebreid, of averecht? Alvast bedankt voor het antwoord. I
10.10.2022 - 19:48DROPS Design answered:
Dag Marlies,
Nee de 3 recht brei je op de teruggaande naald averecht. Dee kantsteek brei je wel op iedere naald recht.
12.10.2022 - 20:18
![]() Françoise Benoit wrote:
Françoise Benoit wrote:
Je suis rendu à toute tailles pour le dos du chandail 230-23 et je ne. On prend pas ce que vous voulez dire ( Tricoter Jersey/point mousse comme indiquer dans A2 mais je ne voie rien d’inscrit à ce sujet. Pouvez-vous me donner des explications pour terminer mon chandail. Merci
26.06.2022 - 00:05DROPS Design answered:
Bonjour Mme Benoit, lorsque vous tricotez le point fantaisie, certaines mailles sont tricotées à l'endroit sur l'endroit et sur l'envers (= point mousse); lorsque vous terminez chaque épaule séparément, le point fantaisie ne tombe pas juste côté encolure, vous tricotez alors les mailles comme elles le doivent (à l'endroit sur l'endroit et soit à l'envers sur l'envers (= jersey) soit à l'endroit sur l'envers (point mousse) mais sans les jetés/diminutions si vous ne pouvez pas faire les 2. Bon tricot!
27.06.2022 - 08:29
![]() Tihana wrote:
Tihana wrote:
Bonjour, je n’arrive pas à comprendre ce que ça veut dire: 1 maille endroit sur l'endroit, envers sur l'envers. Merci pour votre aide
18.04.2022 - 20:02DROPS Design answered:
Bonjour Tihana, lorsque vous tricotez un rang sur l'endroit, vous tricotez cette maille à l'endroit, quand vous serez sur l'envers de l'ouvrage, vous tricoterez cette maille à l'envers (= jersey endroit). Mais parfois, cette maille tricotée à l'endroit sur l'endroit sera tricotée à l'endroit sur l'envers (= point mousse) Bon tricot!
19.04.2022 - 11:47
![]() Karen Orbie wrote:
Karen Orbie wrote:
Beste, klopt het dat - een rechte steek op de verkeerde kant is?
09.04.2022 - 13:06DROPS Design answered:
Dag Karen,
Ja dat klopt. Het tweede symbool is recht op de verkeerde kant. Je krijgt dan een ribbel op de goede kant. Op de laatste foto kun je dit ook zien.
14.04.2022 - 11:19
|
||||||||||||||||||||||||||||
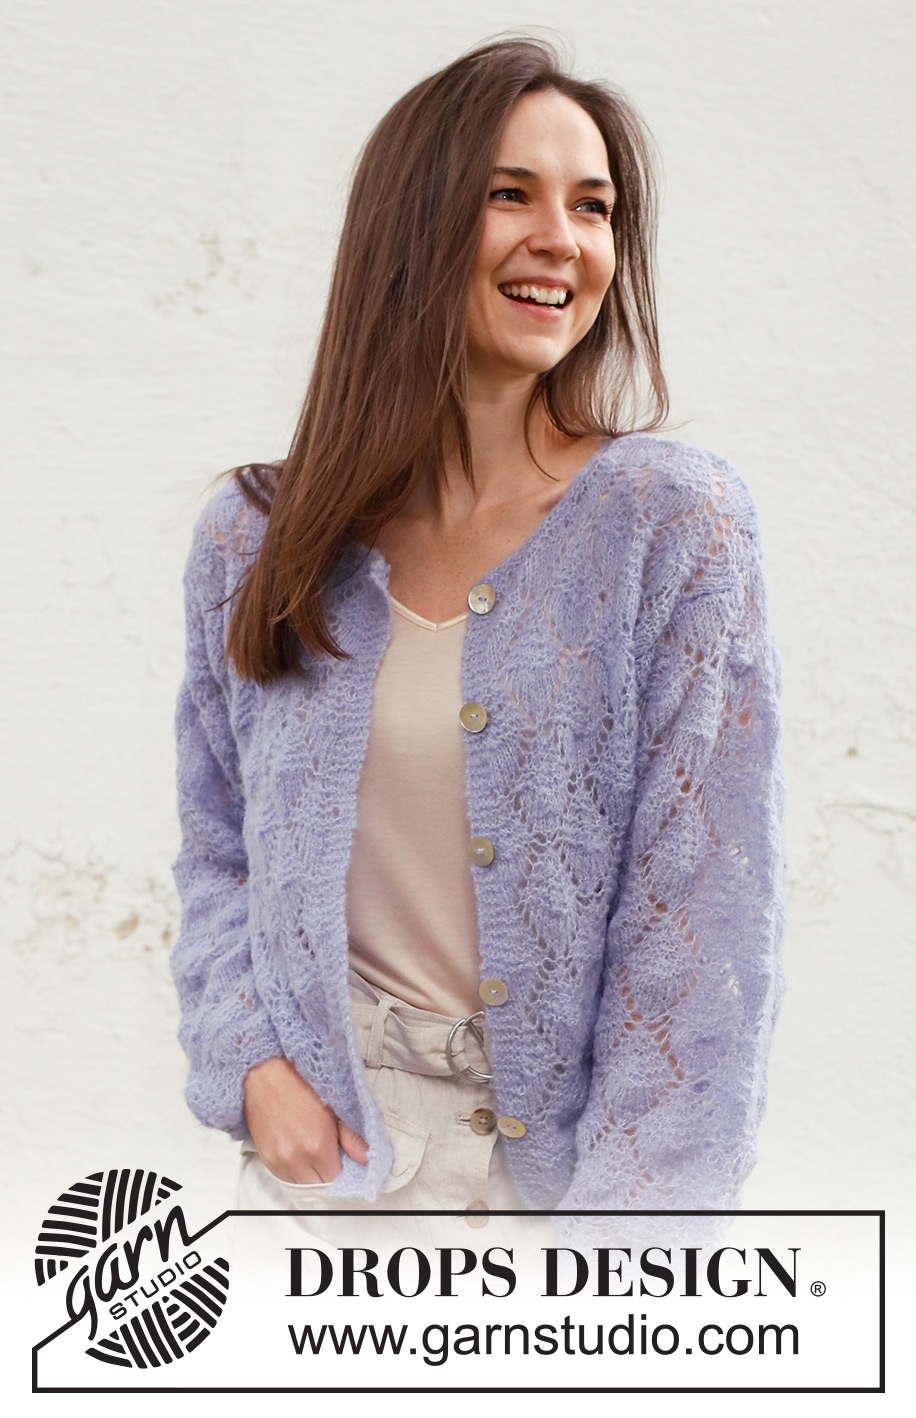
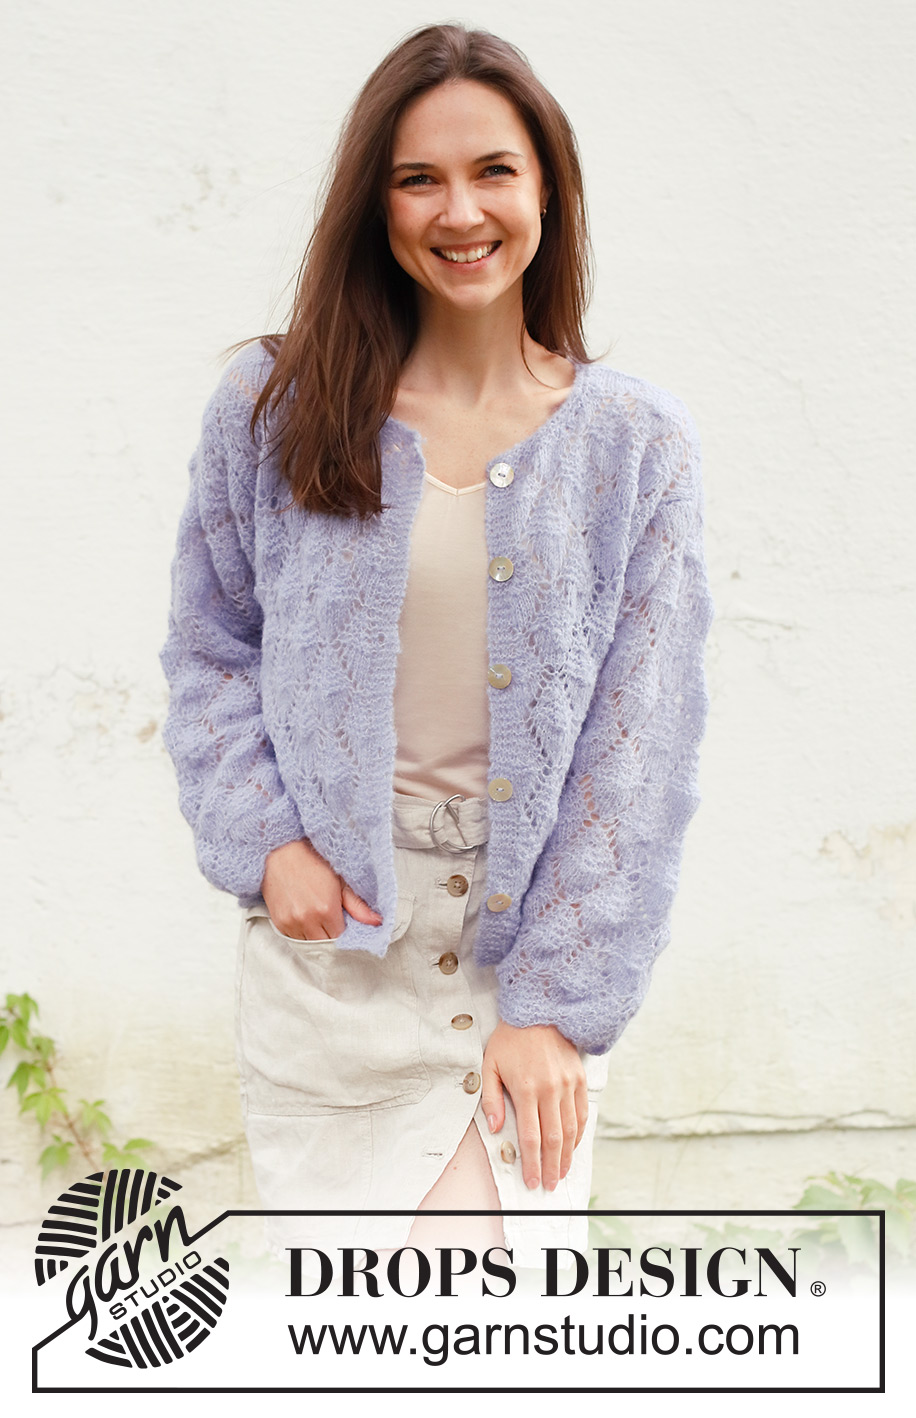
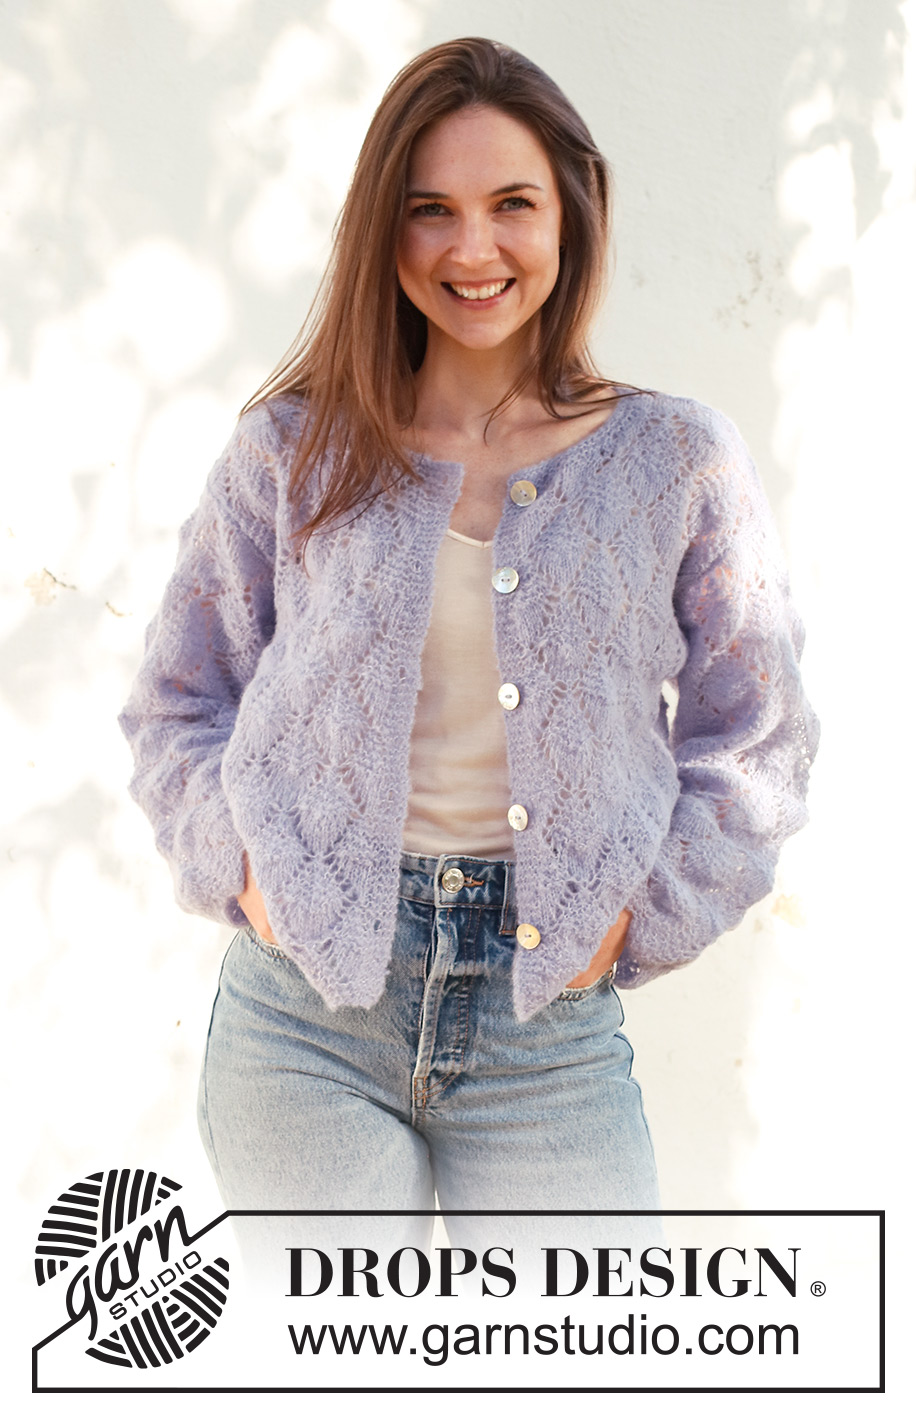
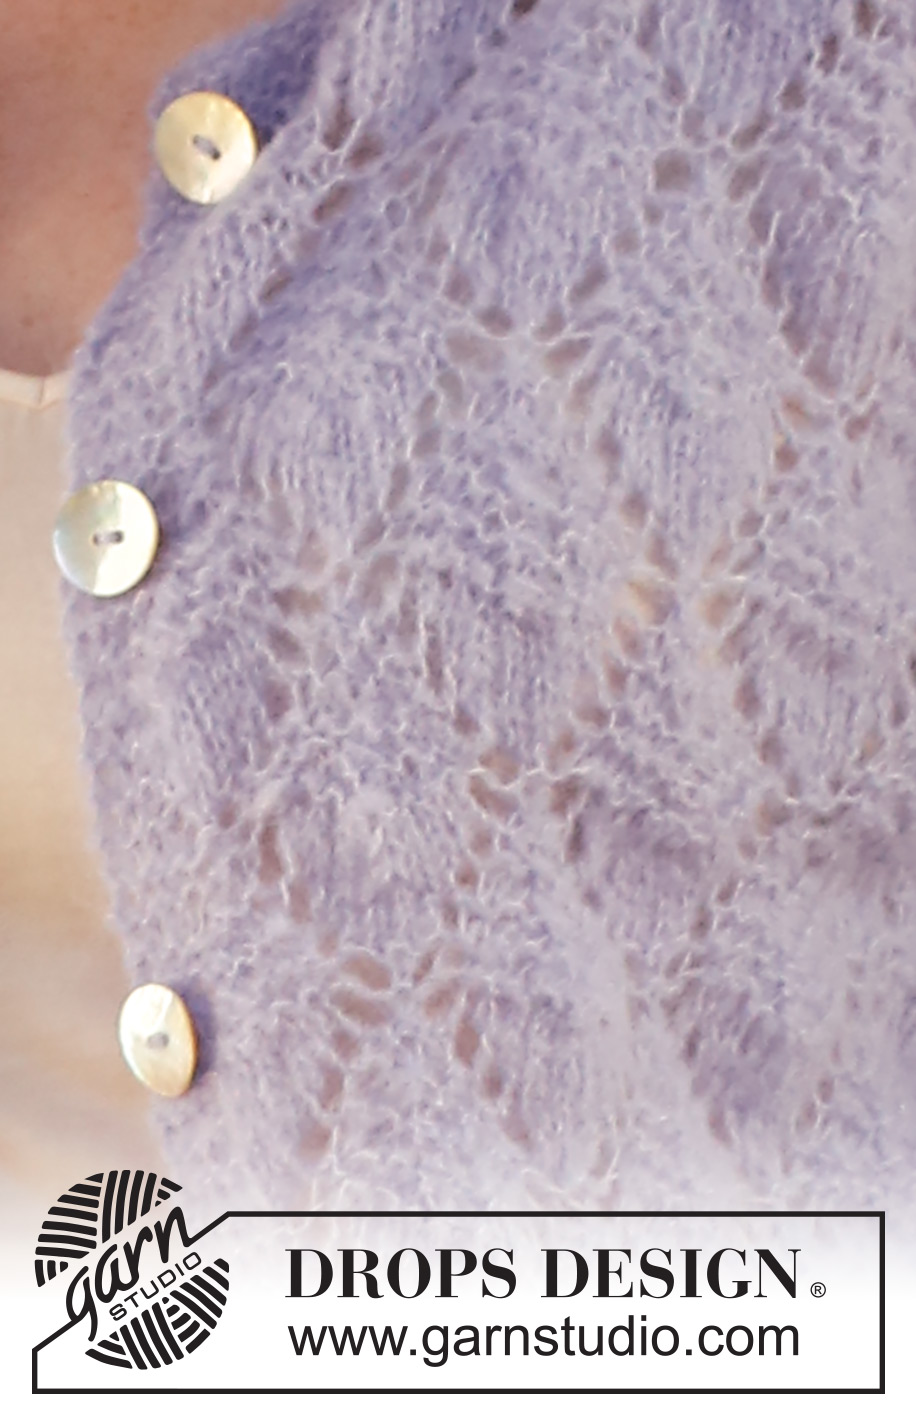
Lila Mist Cardigan#lilamistcardigan |
||||||||||||||||||||||||||||
 |
 |
|||||||||||||||||||||||||||
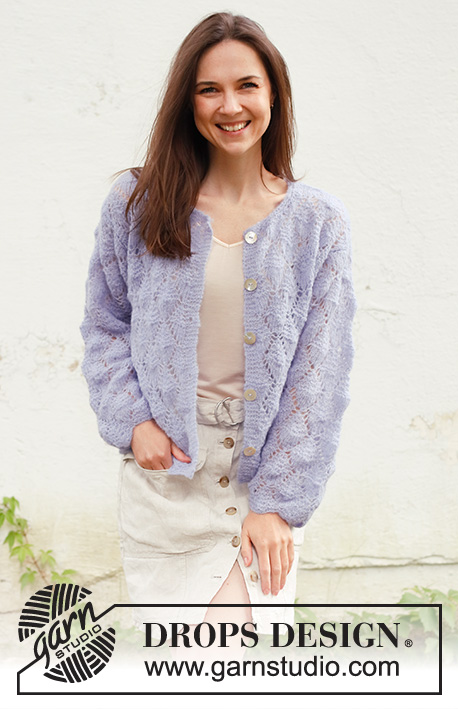
Knitted jacket in DROPS Brushed Alpaca Silk. The piece is worked bottom up with lace pattern. Sizes S - XXXL.
DROPS 230-23 |
||||||||||||||||||||||||||||
|
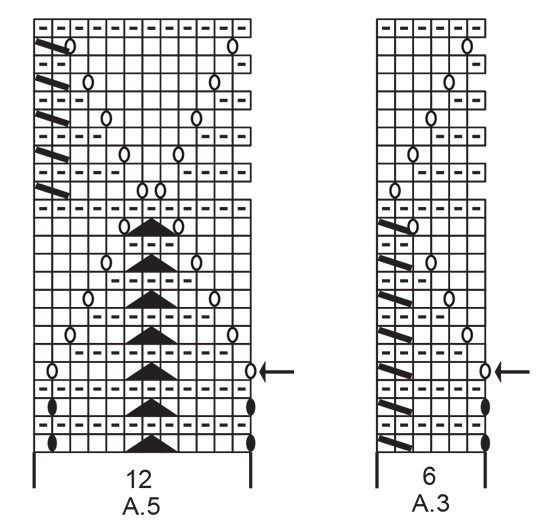
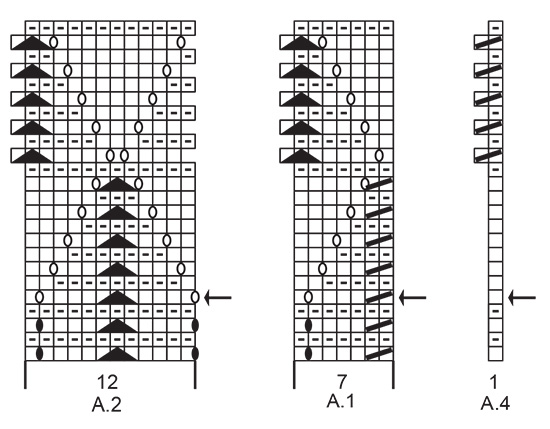
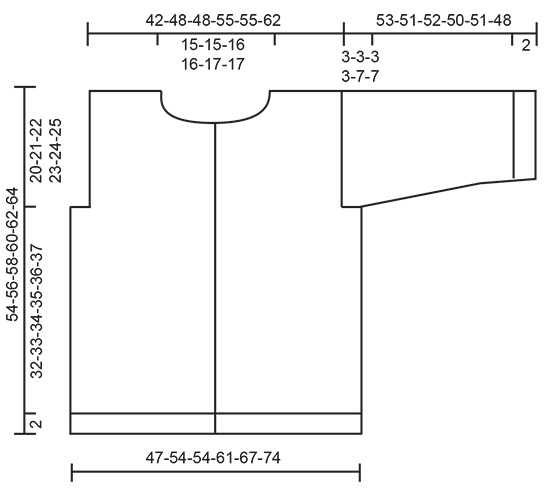
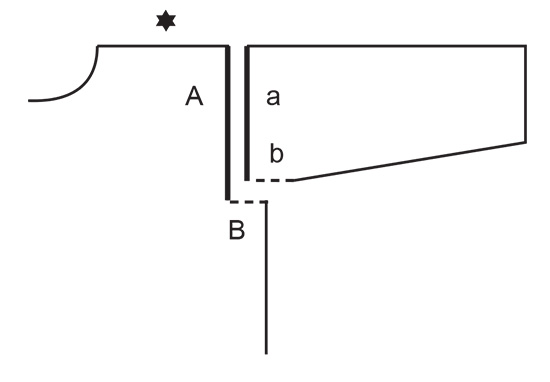
------------------------------------------------------- EXPLANATIONS FOR THE PATTERN: ------------------------------------------------------- RIDGE/GARTER STITCH (worked back and forth): Knit all rows. 1 ridge = knit 2 rows. PATTERN: See diagrams A.1 to A.5. The diagrams show all rows in the pattern from the right side. INCREASE TIP (for sleeves): All increases are worked from the right side! Increase 1 stitch inside the 1 edge stitch on both sides by making 1 yarn over (= 2 stitches increased on the row). On the next row (wrong side) purl the yarn overs twisted to avoid holes. Then work the new stitches in stocking stitch. BUTTONHOLES: Work the buttonholes on the right band. 1 BUTTONHOLE = knit together the 3rd and 4th stitch from the edge and make 1 yarn over. On the next row knit the yarn over to leave a hole. Work the buttonholes when the piece measures: S: 9, 18, 27, 36 and 45 cm M: 9, 18, 28, 37 and 47 cm L: 8, 18, 28, 38 and 48 cm XL: 7, 16, 24, 33, 41 and 50 cm XXL: 8, 17, 25, 34, 42 and 51 cm XXXL: 8, 17, 26, 35, 44 and 53 cm CASTING-OFF TIP: To avoid the cast-off edge being tight you can cast off with a larger size needle. If the edge is still tight, make 1 yarn over after approx. each 4th stitch at the same time as casting off; the yarn overs are cast off as normal stitches. ------------------------------------------------------- START THE PIECE HERE: ------------------------------------------------------- JACKET – SHORT OVERVIEW OF THE PIECE: The front and back pieces and the sleeves are worked separately, bottom up and back and forth. The sections are sewn together and the neck worked back and forth to finish. BACK PIECE: Cast on 87-99-99-111-123-135 stitches (including 1 edge stitch on each side) with circular needle size 4.5 mm and DROPS Brushed Alpaca Silk. Work pattern back and forth as follows: 1 edge stitch in GARTER STITCH – read description above, A.1 over the next 7 stitches, A.2 over the next 72-84-84-96-108-120 stitches (= 6-7-7-8-9-10 repeats of 12 stitches), A.3 over the next 6 stitches, 1 edge stitch in garter stitch. Continue back and forth for the first 4 rows in A.1 to A.3. Change to circular needle size 5 mm. Continue the pattern from the row with an arrow. REMEMBER THE KNITTING TENSION! When the diagrams have been completed in height, repeat from the row with the arrow until the piece measures 34-35-36-37-38-39 cm (measured from where the pattern arches down – this applies throughout the pattern). Now cast off 6-6-6-6-12-12 stitches for the armholes at the beginning of the next 2 rows = 75-87-87-99-99-111 stitches. Continue as follows in the different sizes – continue the pattern as before: Sizes S, M, L and XL: 1 edge stitch in garter stitch, A.4 over the next stitch, A.2 over the next 60-72-72-84 stitches (= 5-6-6-7 repeats of 12 stitches), A.5 over the next 12 stitches, 1 edge stitch in garter stitch. Continue this pattern until the piece measures 52-54-56-58 cm. Go to All sizes below. Sizes XXL and XXXL: 1 edge stitch in garter stitch, A.1 over the next 7 stitches, A.2 over the next 84-96 stitches (= 7-8 repeats of 12 stitches), A.3 over the next 6 stitches, 1 edge stitch in garter stitch. Continue this pattern until the piece measures 60-62 cm. Go to All sizes below. All sizes: Cast off the middle 25-25-27-27-29-29 stitches for the neck and finish each shoulder separately. Then cast off 1 stitch from the next row from the neck = 24-30-29-35-34-40 stitches on the shoulder. Continue the pattern as before until the piece measures 54-56-58-60-62-64 cm, but over the stitches by the neck which do not fit into a complete repeat of A.2, work stocking/garter stitch as shown in A.2, without yarn overs or decreases. Cast off – read CASTING-OFF TIP. Work the other shoulder in the same way. RIGHT FRONT PIECE: Cast on 49-55-55-61-67-73 stitches with circular needle size 4.5 mm and DROPS Brushed Alpaca Silk. Work pattern as follows in the different sizes: Sizes S, XL and XXXL: 5 band stitches in garter stitch, A.4 over the next stitch, A.2 over the next 36-48-60 stitches (= 3-4-5 repeats of 12 stitches), A.3 over the next 6 stitches, 1 edge stitch in garter stitch. Work the first 4 rows in the diagrams back and forth. Change to circular needle size 5 mm. Continue from the row with an arrow. When the diagrams have been completed in height, repeat from the row with the arrow. Remember the BUTTONHOLES on the band – read description above. When the piece measures 34-37-39 cm, go to All sizes below. Sizes M, L and XXL: 5 band stitches in garter stitch, A.1 over the next 7 stitches, A.2 over the next 36-36-48 stitches (= 3-3-4 repeats of 12 stitches), A.3 over the next 6 stitches, 1 edge stitch in garter stitch. Work the first 4 rows in the diagrams back and forth. Change to circular needle size 5 mm. Continue from the row with an arrow. When the diagrams have been completed in height, repeat from the row with the arrow. Remember the BUTTONHOLES on the band – read description above. When the piece measures 35-36-38 cm, go to All sizes below. All sizes: Cast off 6-6-6-6-12-12 stitches at the beginning of the next row from the wrong side, then work as before to the end of the row = 43-49-49-55-55-61 stitches. Continue with pattern as follows in the different sizes: Sizes S, M, L and XL: Work the first 30-36-36-42 stitches as before, A.5 over the next 12 stitches – make sure you start on the correct row in the diagram so you continue the pattern, 1 edge stitch in garter stitch. Sizes XXL and XXXL: Work the first 48-54 stitches as before, A.3 over the next 6 stitches – make sure you start on the correct row in the diagram so you continue the pattern, 1 edge stitch in garter stitch. All sizes: Continue this pattern back and forth until the piece measures 46-48-49-51-52-54 cm, there is approx. 8-8-9-9-10-10 cm left to finished length. Work the first 12 stitches from the right side, then place them on a thread for the neck. OVERVIEW OF THE NEXT SECTION: You will now work pattern and cast off at the same time. Read PATTERN and CASTING OFF before continuing. PATTERN: Continue the pattern – over the stitches by the neck which do not fit into a complete repeat of A.2, work stocking/garter stitch as shown in A.2, without yarn overs or decreases. CASTING OFF: Cast off as follows at the beginning of each row from the neck: 2 stitches 2 times and 1 stitch 3-3-4-4-5-5 times = 24-30-29-35-34-40 stitches on the shoulder. Continue working until the piece measures 54-56-58-60-62-64 cm. Cast off – remember CASTING-OFF TIP. LEFT FRONT PIECE: Cast on 49-55-55-61-67-73 stitches with circular needle size 4.5 mm and DROPS Brushed Alpaca Silk. Work pattern as follows in the different sizes: Sizes S, XL and XXXL: 1 edge stitch in garter stitch, A.1 over the next 7 stitches, A.2 over the next 24-36-48 stitches (= 2-3-4 repeats of 12 stitches), A.5 over the next 12 stitches, 5 band stitches in garter stitch. Continue back and forth for the first 4 rows in the diagrams. Change to circular needle size 5 mm. Continue the pattern from the row with an arrow. . When the diagrams have been completed in height, repeat from the row with the arrow until the piece measures 34-37-39 cm. Go to all sizes below. Sizes M, L and XXL: 1 edge stitch in garter stitch, A.1 over the next 7 stitches, A.2 over the next 36-36-48 stitches (= 3-3-4 repeats of 12 stitches), A.3 over the next 6 stitches, 5 band stitches in garter stitch. Work the first 4 rows in the diagrams back and forth. Change to circular needle size 5 mm. Continue from the row with an arrow. When the diagrams have been completed in height, repeat from the row with the arrow until the piece measures 35-36-38 cm. Go to All sizes below. All sizes: Cast off 6-6-6-6-12-12 stitches at the beginning of the next row from the right side, then work as before to the end of the row = 43-49-49-55-55-61 stitches. Continue with pattern as follows in the different sizes: Sizes S, M, L and XL: 1 edge stitch in garter stitch, A.4 over the next stitch – make sure you start on the correct row in the diagrams so you continue the pattern, work as before to the end of the row. Sizes XXL and XXXL: 1 edge stitch in garter stitch, A.1 over the next 7 stitches – make sure you start on the correct row in the diagrams so you continue the pattern, work as before to the end of the row. All sizes: Continue working until the piece measures 46-48-49-51-52-54 cm, there is approx. 8-8-9-9-10-10 cm left. Now work the first 12 stitches from the wrong side before placing them on a thread for the neck. Read PATTERN and CASTING OFF before continuing. PATTERN: Continue the pattern – over the stitches by the neck which do not fit into a complete repeat of A.2, work stocking/garter stitch as shown in A.2, without yarn overs or decreases. CASTING OFF: Cast off as follows at the beginning of each row from the neck: 2 stitches 2 times and 1 stitch 3-3-4-4-5-5 times = 24-30-29-35-34-40 stitches on the shoulder. Continue working until the piece measures 54-56-58-60-62-64 cm. Cast off – remember CASTING-OFF TIP. SLEEVES: Cast on 53-55-57-57-59-61 stitches (including 1 edge stitch on each side) with circular needle size 4.5 mm and DROPS Brushed Alpaca Silk. Work pattern back and forth as follows: 1 edge stitch in garter stitch, knit 1-2-3-3-4-5, A.4 over the next stitch, A.2 over the next 36 stitches (= 3 repeats of 12 stitches), A.5 over the next 12 stitches, knit 1-2-3-3-4-5, 1 edge stitch in garter stitch. Continue back and forth for the first 4 rows in the diagrams. Change to circular needle size 5 mm. Continue the pattern from the row with an arrow. When the diagrams have been completed in height, repeat from the row with the arrow until the piece measures 10-10-10-8-7-4 cm. Now increase 1 stitch on each side of the sleeve – read INCREASE TIP. Increase like this every 4-3½-3½-3-2½-2½ cm a total of 10-11-11-13-14-15 times = 73-77-79-83-87-91 stitches. Continue working until the sleeve measures 50-48-49-47-44-41 cm. Insert 1 marker in each side – they mark the bottom of the armhole. Continue the pattern until the sleeve measures 53-51-52-50-51-48 cm. Cast off – remember CASTING-OFF TIP. Work the other sleeve in the same way. ASSEMBLY: Sew the shoulder seams, inside the cast-off edge. Sew the sleeve cap to the body, then the split at the top of the sleeve to the bottom of the armhole – see sketch. Sew the sleeve and side seams in one go, inside the 1 edge stitch. Sew the buttons onto the left band. NECK: Start from the right side with circular needle size 4.5 mm and DROPS Brushed Alpaca Silk. Knit up 78 to 90 stitches (including the stitches from the threads) inside the 1 edge stitch around the neck. Work 2 ridges back and forth. Cast off – remember CASTING-OFF TIP. |
||||||||||||||||||||||||||||
Diagram explanations |
||||||||||||||||||||||||||||
|
||||||||||||||||||||||||||||
 |
||||||||||||||||||||||||||||
 |
||||||||||||||||||||||||||||
 |
||||||||||||||||||||||||||||
 |
||||||||||||||||||||||||||||
Have you finished this pattern?Tag your pictures with #dropspattern #lilamistcardigan or submit them to the #dropsfan gallery. Do you need help with this pattern?You'll find 27 tutorial videos, a Comments/Questions area and more by visiting the pattern on garnstudio.com. © 1982-2026 DROPS Design A/S. We reserve all rights. This document, including all its sub-sections, has copyrights. Read more about what you can do with our patterns at the bottom of each pattern on our site. |
||||||||||||||||||||||||||||


With over 40 years in knitting and crochet design, DROPS Design offers one of the most extensive collections of free patterns on the internet - translated to 17 languages. As of today we count 324 catalogues and 12245 patterns translated into English (UK/cm).
We work hard to bring you the best knitting and crochet have to offer, inspiration and advice as well as great quality yarns at incredible prices! Would you like to use our patterns for other than personal use? You can read what you are allowed to do in the Copyright text at the bottom of all our patterns. Happy crafting!
Post a comment to pattern DROPS 230-23
We would love to hear what you have to say about this pattern!
If you want to leave a question, please make sure you select the correct category in the form below, to speed up the answering process. Required fields are marked *.