
Popular categories
Looking for a yarn?


Comments / Questions (28)
![]() Thérèse wrote:
Thérèse wrote:
Bonjour, pensez-vous qu'il est possible de tricoter ce modèle en Paris avec un résultat esthétique ? Merci beaucoup de votre réponse
20.04.2026 - 07:22DROPS Design answered:
Bonjour Thérèse, Paris appartient au même groupe de fils que Brushed Alpaca Silk donc oui c'est possible, l'effet sera juste différent car les deux laines ont des caractéristiques différentes, n'hésitez pas à essayer sur un échantillon pour mieux vous rendre compte. Bon tricot!
20.04.2026 - 11:20
![]() Marjolaine wrote:
Marjolaine wrote:
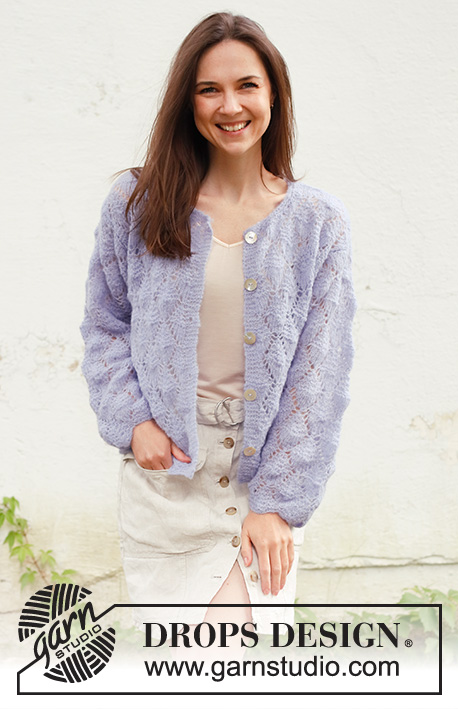
Devant Droit:es le rabattu les 6 ml, il reste 49 ml. Vous écrivez tricoter les 36 ml, comme avant et A5 pour les 12 ml suivantes. Mais c une erreur je devrait lire 24 ml comme avant (A2), A5 pour les 12 suivantes? Svp me confirmez car j'ai juste 3 motifs de 12 apres avoir rabattu?Merci
18.03.2026 - 12:11DROPS Design answered:
Bonjour Marjolaine, vous tricotez comme avant les =36 premières mailles, autrement dit: 5 m point mousse, les 7 m de A.1, 2 x les 12 m de A.2 (= 5+7+24=36) puis vous tricotez les 12 m de A.5 et vous terminez par 1 m lis au point mousse soit: 36+12+1=49 m. Bon tricot!
18.03.2026 - 16:26
![]() Geanina wrote:
Geanina wrote:
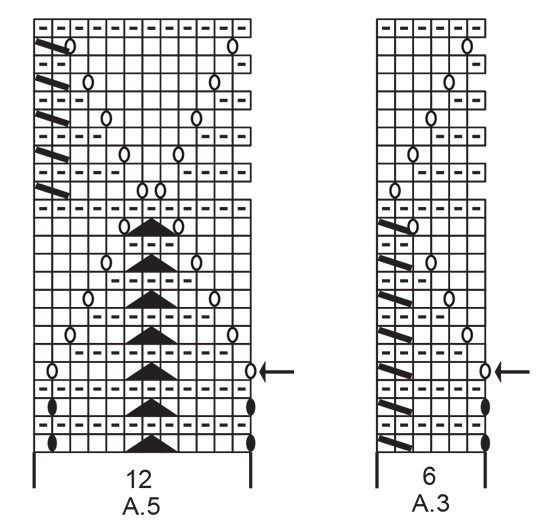
Hallo! Ich bin Anfängerin. Ich habe gerade am Rücken die jeweils 6 Maschen für die Ärmel abgekettet. Ich habe richtige Probleme das Muster für die Fortsetzung anzupassen. Irgendwelche Tipps? Ich bin in der ersten Reihe wo die Umschläge in der Mitte sind. Also 2 Hälfte des Musters.
12.02.2026 - 21:16DROPS Design answered:
Liebe Geanina, durch das Abketten entfallen ja an beiden Seiten je 6 M. Damit haben Sie noch 2 M von A.1 übrig (denn 1 Rand-M + 7 M A.1 = 8 M, minus 6 M abgekettet = 2 M). An der anderen Seite bleibt nur noch 1 M von A.3 übrig (denn 1 Rand-M + 6 M A.3 = 7 M, minus 6 M abgekettet = 1 M). Dort, wo Sie A.1 gestrickt haben, stricken Sie nun 1 Rand-M + A.4 (A.4 = 1 M), an der anderen Seite 1 Rand-M. Dazwischen stricken Sie A.2 & A.5 wie beschrieben - kennzeichnen Sie sich am besten jeden einzelnen Rapport mit Markierungsfäden, damit Sie besser erkennen, wo Sie sich gerade befinden. Ab und zu "ragt" ein Rapport in den anderen hinein, wenn Maschen zusammengestrickt werden.
18.02.2026 - 22:23
![]() Marjolaine wrote:
Marjolaine wrote:
Merci de la réponse. 1-Au 14e rang, je suis sur l'envers, au 15e rang je fais mon motif comme d'habitude. Au 16e rang je suis sur l'envers. Donc quand je retourne mon travail, je débute parA3 et non A1 n'est-ce-pas? je devrais lire tricotez la dern. ml de A3 avec la 1ere de A2 n'est-ce pas? Si je fais cela mon tricot sera décalé non? J'ai besoin de plus de détail, j'aime bcp ce motif mais désolé difficile à saisir. Merci beaucoup Marjolaine
09.02.2026 - 19:13DROPS Design answered:
Bonjour Marjolaine, le 14ème rang se fait effectivement sur l'envers, mais là, vous n'avez pas de décalage des diagrammes sur l'envers, ils se fera au rang suivant sur l'endroit. Sur l'envers, tricotez le diagramme comme indiqué. Bon tricot!
10.02.2026 - 17:29
![]() Marjolaine wrote:
Marjolaine wrote:
Bonjour, diagramme A2-A3 au 14e rang il manque un carré dans le diagramme comment on tricote cela? Les 4 premiers rangs, sur l'envers - Au rang suivant, tricoter le jeté torse à l'endroit pour éviter un trou. Est-ce que vous auriez un vidéo svp merci à l'avance, Marjolaine
07.02.2026 - 15:22DROPS Design answered:
Bonjour Marjolaine, au 16ème rang de A.1/A.4, tricotez la (les) dernière(s) maille de A.1/A.4 avec la 1ère maille de A.2 (d'où le trou dans A.2 car cette maille a déjà été tricotée), puis à la fin de chaque A.2, tricotez les 2 dernières mailles de A.2 avec la 1ère maille du A.2 suivant/de A.3, ainsi vous aurez à chaque fois le bon nombre de mailles. Les jetés au milieu des diagrammes se tricotent au point mousse, torse = en piquant dans le brin arrière. Bon tricot!
09.02.2026 - 08:33
![]() Marjolaine wrote:
Marjolaine wrote:
Pourriez me partager un vidéo pour saisir tricoté le jeté à l’endroit à l’envers merci
20.12.2025 - 19:28DROPS Design answered:
Bonjour Marjolaine, découvrez dans cette vidéo comment tricoter un jeté à l'envers et dans cette autre vidéo comment en tricote un à l'endroit - ce sont des points différents mais la façon de tricoter le jeté soit à l'endroit soit à l'envers sera la même. Bon tricot!
23.12.2025 - 17:55
![]() Marjolaine wrote:
Marjolaine wrote:
Quand vous écrivez tricoté un jeté à l’endroit/a l’envers ça veux dire tricoté le jeté torse? merci
20.12.2025 - 19:05DROPS Design answered:
Bonjour Marjolaine, non cela veut dire que le jeté va être tricoté soit comme une maille endroit soit comme une maille envers, mais normalement, dans le brin avant s'il doit former un trou (3ème symbole). Bon tricot!
23.12.2025 - 17:53
![]() Hanne Jespersen wrote:
Hanne Jespersen wrote:
Hej Tak for en dejlig opskrift. Men jeg er gået i stå i række 15 i mønstret. Der er jo pludselig flere masker i mønstret. Skal de tages ud - eller hvordan skal det forstås.
02.12.2024 - 01:10DROPS Design answered:
Hei Hanne. Nei, om du ser på f.eks diagram A.2 og rad 15, så er det 1 maske mindre i begynnelsen av diagrammet og 1 maske mer i slutten av diagrammet. Maskeantallet er det samme. mvh DROPS Design
02.12.2024 - 13:12
![]() Elise wrote:
Elise wrote:
Sew the shoulder seams, inside the cast-off edge. Could you please explain what is meant by "inside the cast-off edge"? Thanks!
08.07.2024 - 23:06DROPS Design answered:
Dear Elise, it means just what it says. You chould put the stitches next to the edge stitch (toward the rest of the piece, "inside" of the edge stitch). Happy Stitching!
09.07.2024 - 02:14
![]() Anne wrote:
Anne wrote:
Kan ik dit ook met katoen breien en zonder rondbreinaalden?
07.04.2024 - 11:22DROPS Design answered:
Dag Anne,
Katoen is zwaarder en heeft daardoor een ander effect, maar het zou zeker kunnen. Maak eventueel eerst even een proeflapje om te beoordelen wat je ervan vindt.
Om een patroon aan te passen om op rechte naalden te breien hebben we een instructie gemaakt. Deze vind je hier.
07.04.2024 - 18:46
|
||||||||||||||||||||||||||||
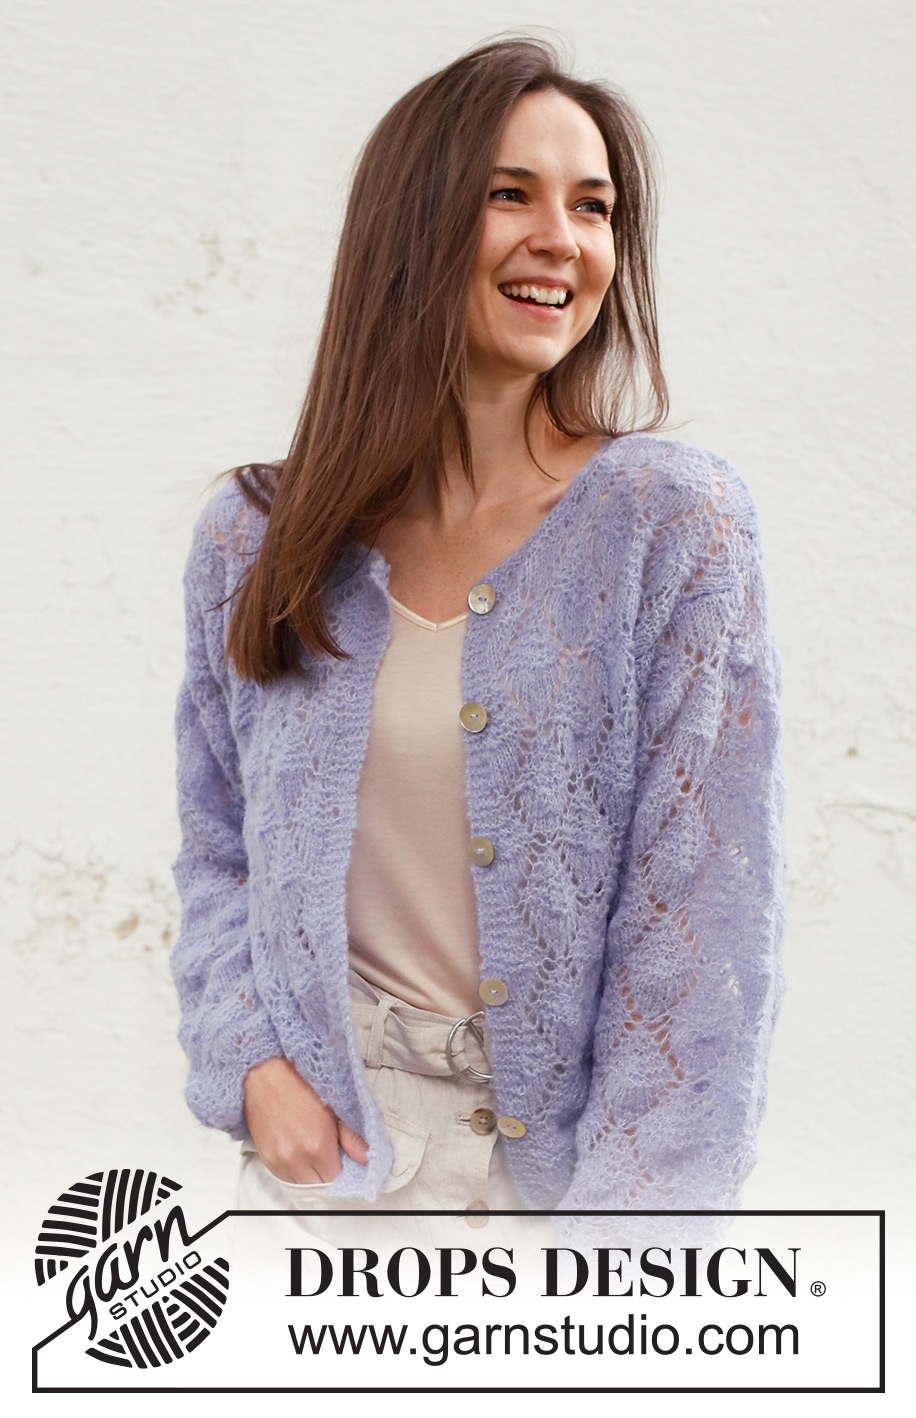
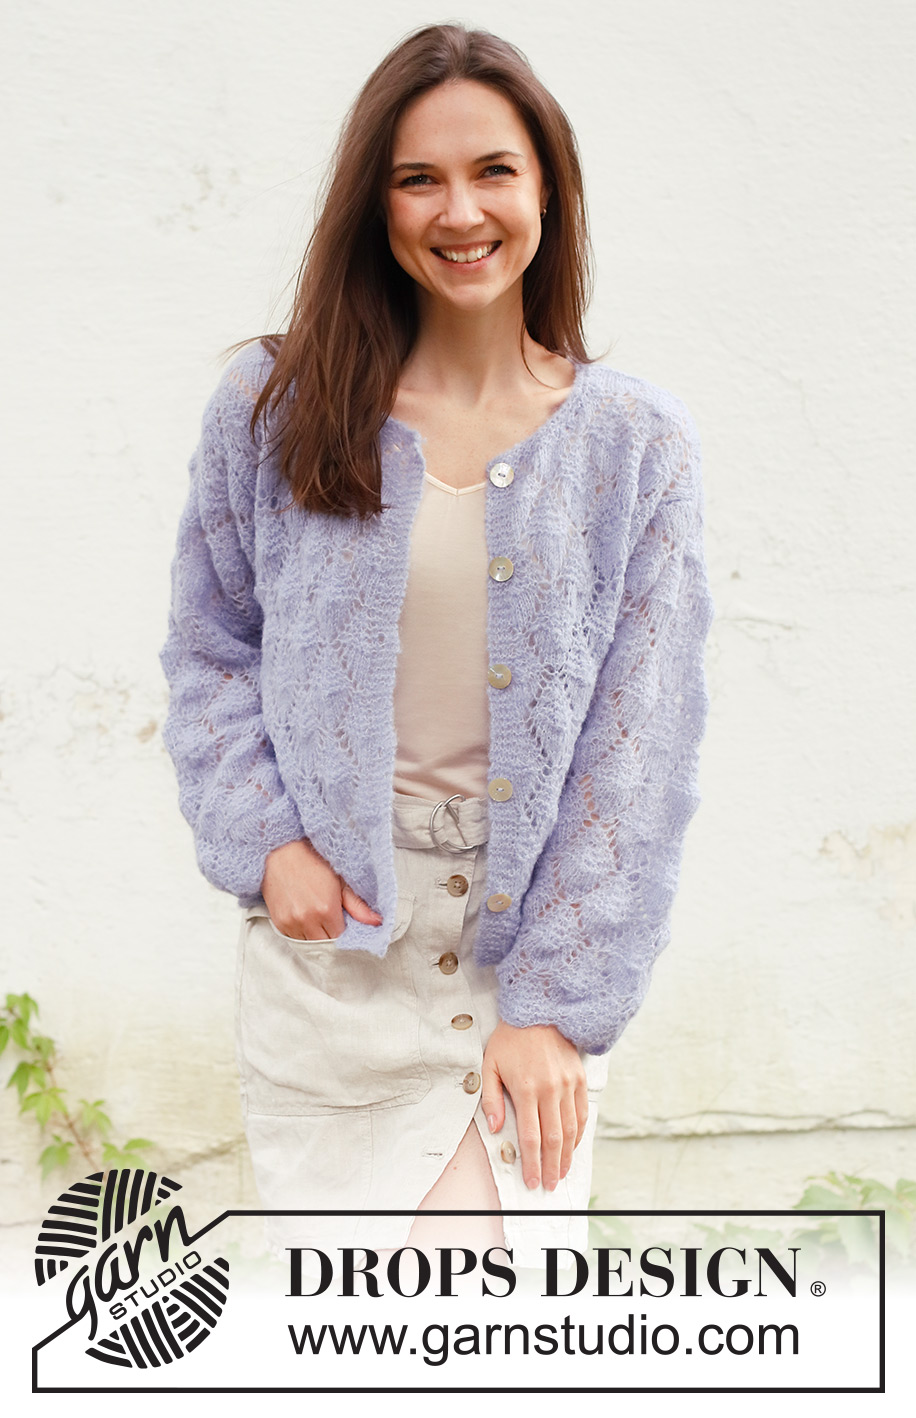
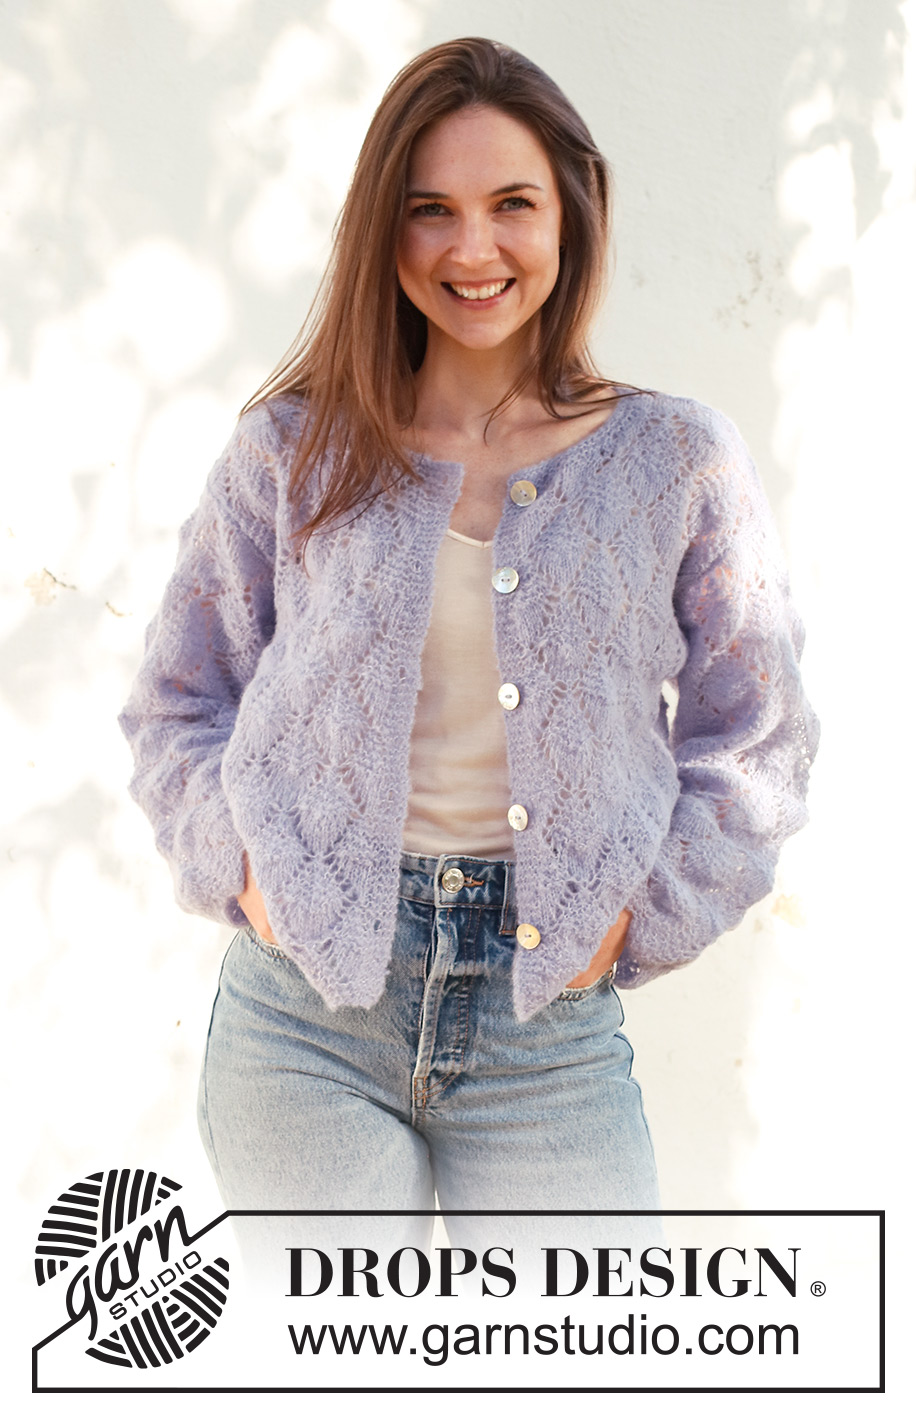
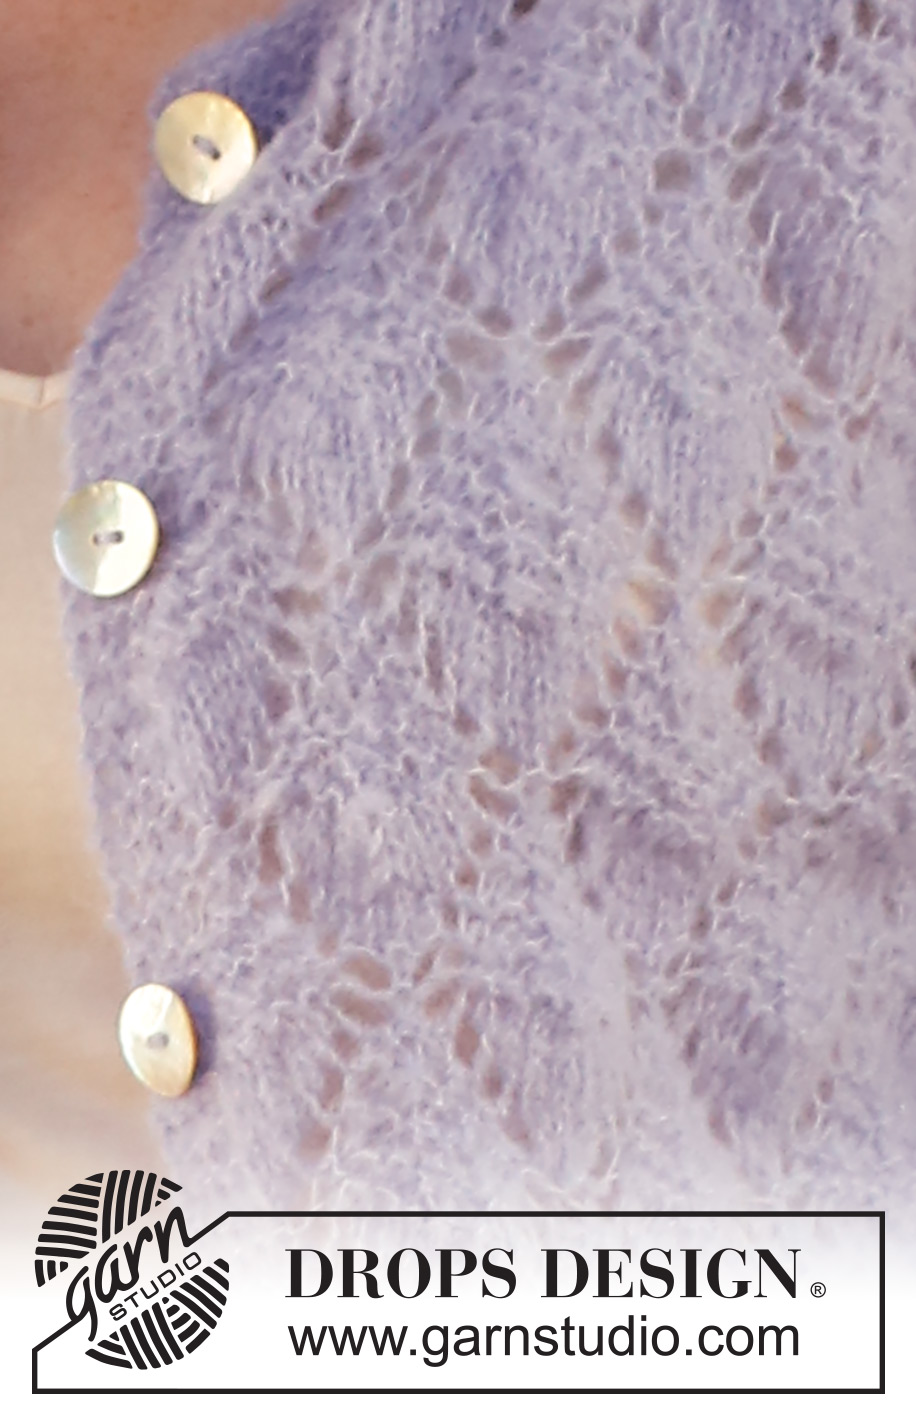
Lila Mist Cardigan#lilamistcardigan |
||||||||||||||||||||||||||||
 |
 |
|||||||||||||||||||||||||||
Knitted jacket in DROPS Brushed Alpaca Silk. The piece is worked bottom up with lace pattern. Sizes S - XXXL.
DROPS 230-23 |
||||||||||||||||||||||||||||
|
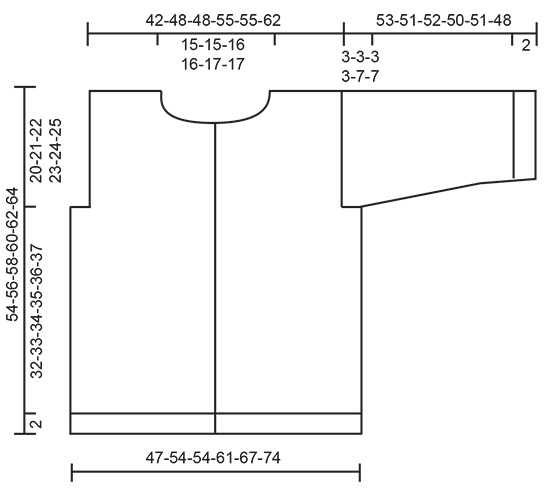
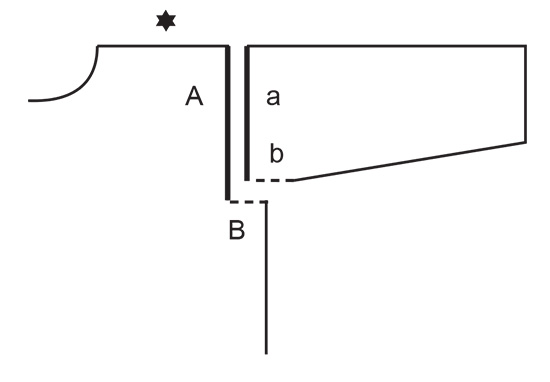
------------------------------------------------------- EXPLANATIONS FOR THE PATTERN: ------------------------------------------------------- RIDGE/GARTER STITCH (worked back and forth): Knit all rows. 1 ridge = knit 2 rows. PATTERN: See diagrams A.1 to A.5. The diagrams show all rows in the pattern from the right side. INCREASE TIP (for sleeves): All increases are worked from the right side! Increase 1 stitch inside the 1 edge stitch on both sides by making 1 yarn over (= 2 stitches increased on the row). On the next row (wrong side) purl the yarn overs twisted to avoid holes. Then work the new stitches in stocking stitch. BUTTONHOLES: Work the buttonholes on the right band. 1 BUTTONHOLE = knit together the 3rd and 4th stitch from the edge and make 1 yarn over. On the next row knit the yarn over to leave a hole. Work the buttonholes when the piece measures: S: 9, 18, 27, 36 and 45 cm M: 9, 18, 28, 37 and 47 cm L: 8, 18, 28, 38 and 48 cm XL: 7, 16, 24, 33, 41 and 50 cm XXL: 8, 17, 25, 34, 42 and 51 cm XXXL: 8, 17, 26, 35, 44 and 53 cm CASTING-OFF TIP: To avoid the cast-off edge being tight you can cast off with a larger size needle. If the edge is still tight, make 1 yarn over after approx. each 4th stitch at the same time as casting off; the yarn overs are cast off as normal stitches. ------------------------------------------------------- START THE PIECE HERE: ------------------------------------------------------- JACKET – SHORT OVERVIEW OF THE PIECE: The front and back pieces and the sleeves are worked separately, bottom up and back and forth. The sections are sewn together and the neck worked back and forth to finish. BACK PIECE: Cast on 87-99-99-111-123-135 stitches (including 1 edge stitch on each side) with circular needle size 4.5 mm and DROPS Brushed Alpaca Silk. Work pattern back and forth as follows: 1 edge stitch in GARTER STITCH – read description above, A.1 over the next 7 stitches, A.2 over the next 72-84-84-96-108-120 stitches (= 6-7-7-8-9-10 repeats of 12 stitches), A.3 over the next 6 stitches, 1 edge stitch in garter stitch. Continue back and forth for the first 4 rows in A.1 to A.3. Change to circular needle size 5 mm. Continue the pattern from the row with an arrow. REMEMBER THE KNITTING TENSION! When the diagrams have been completed in height, repeat from the row with the arrow until the piece measures 34-35-36-37-38-39 cm (measured from where the pattern arches down – this applies throughout the pattern). Now cast off 6-6-6-6-12-12 stitches for the armholes at the beginning of the next 2 rows = 75-87-87-99-99-111 stitches. Continue as follows in the different sizes – continue the pattern as before: Sizes S, M, L and XL: 1 edge stitch in garter stitch, A.4 over the next stitch, A.2 over the next 60-72-72-84 stitches (= 5-6-6-7 repeats of 12 stitches), A.5 over the next 12 stitches, 1 edge stitch in garter stitch. Continue this pattern until the piece measures 52-54-56-58 cm. Go to All sizes below. Sizes XXL and XXXL: 1 edge stitch in garter stitch, A.1 over the next 7 stitches, A.2 over the next 84-96 stitches (= 7-8 repeats of 12 stitches), A.3 over the next 6 stitches, 1 edge stitch in garter stitch. Continue this pattern until the piece measures 60-62 cm. Go to All sizes below. All sizes: Cast off the middle 25-25-27-27-29-29 stitches for the neck and finish each shoulder separately. Then cast off 1 stitch from the next row from the neck = 24-30-29-35-34-40 stitches on the shoulder. Continue the pattern as before until the piece measures 54-56-58-60-62-64 cm, but over the stitches by the neck which do not fit into a complete repeat of A.2, work stocking/garter stitch as shown in A.2, without yarn overs or decreases. Cast off – read CASTING-OFF TIP. Work the other shoulder in the same way. RIGHT FRONT PIECE: Cast on 49-55-55-61-67-73 stitches with circular needle size 4.5 mm and DROPS Brushed Alpaca Silk. Work pattern as follows in the different sizes: Sizes S, XL and XXXL: 5 band stitches in garter stitch, A.4 over the next stitch, A.2 over the next 36-48-60 stitches (= 3-4-5 repeats of 12 stitches), A.3 over the next 6 stitches, 1 edge stitch in garter stitch. Work the first 4 rows in the diagrams back and forth. Change to circular needle size 5 mm. Continue from the row with an arrow. When the diagrams have been completed in height, repeat from the row with the arrow. Remember the BUTTONHOLES on the band – read description above. When the piece measures 34-37-39 cm, go to All sizes below. Sizes M, L and XXL: 5 band stitches in garter stitch, A.1 over the next 7 stitches, A.2 over the next 36-36-48 stitches (= 3-3-4 repeats of 12 stitches), A.3 over the next 6 stitches, 1 edge stitch in garter stitch. Work the first 4 rows in the diagrams back and forth. Change to circular needle size 5 mm. Continue from the row with an arrow. When the diagrams have been completed in height, repeat from the row with the arrow. Remember the BUTTONHOLES on the band – read description above. When the piece measures 35-36-38 cm, go to All sizes below. All sizes: Cast off 6-6-6-6-12-12 stitches at the beginning of the next row from the wrong side, then work as before to the end of the row = 43-49-49-55-55-61 stitches. Continue with pattern as follows in the different sizes: Sizes S, M, L and XL: Work the first 30-36-36-42 stitches as before, A.5 over the next 12 stitches – make sure you start on the correct row in the diagram so you continue the pattern, 1 edge stitch in garter stitch. Sizes XXL and XXXL: Work the first 48-54 stitches as before, A.3 over the next 6 stitches – make sure you start on the correct row in the diagram so you continue the pattern, 1 edge stitch in garter stitch. All sizes: Continue this pattern back and forth until the piece measures 46-48-49-51-52-54 cm, there is approx. 8-8-9-9-10-10 cm left to finished length. Work the first 12 stitches from the right side, then place them on a thread for the neck. OVERVIEW OF THE NEXT SECTION: You will now work pattern and cast off at the same time. Read PATTERN and CASTING OFF before continuing. PATTERN: Continue the pattern – over the stitches by the neck which do not fit into a complete repeat of A.2, work stocking/garter stitch as shown in A.2, without yarn overs or decreases. CASTING OFF: Cast off as follows at the beginning of each row from the neck: 2 stitches 2 times and 1 stitch 3-3-4-4-5-5 times = 24-30-29-35-34-40 stitches on the shoulder. Continue working until the piece measures 54-56-58-60-62-64 cm. Cast off – remember CASTING-OFF TIP. LEFT FRONT PIECE: Cast on 49-55-55-61-67-73 stitches with circular needle size 4.5 mm and DROPS Brushed Alpaca Silk. Work pattern as follows in the different sizes: Sizes S, XL and XXXL: 1 edge stitch in garter stitch, A.1 over the next 7 stitches, A.2 over the next 24-36-48 stitches (= 2-3-4 repeats of 12 stitches), A.5 over the next 12 stitches, 5 band stitches in garter stitch. Continue back and forth for the first 4 rows in the diagrams. Change to circular needle size 5 mm. Continue the pattern from the row with an arrow. . When the diagrams have been completed in height, repeat from the row with the arrow until the piece measures 34-37-39 cm. Go to all sizes below. Sizes M, L and XXL: 1 edge stitch in garter stitch, A.1 over the next 7 stitches, A.2 over the next 36-36-48 stitches (= 3-3-4 repeats of 12 stitches), A.3 over the next 6 stitches, 5 band stitches in garter stitch. Work the first 4 rows in the diagrams back and forth. Change to circular needle size 5 mm. Continue from the row with an arrow. When the diagrams have been completed in height, repeat from the row with the arrow until the piece measures 35-36-38 cm. Go to All sizes below. All sizes: Cast off 6-6-6-6-12-12 stitches at the beginning of the next row from the right side, then work as before to the end of the row = 43-49-49-55-55-61 stitches. Continue with pattern as follows in the different sizes: Sizes S, M, L and XL: 1 edge stitch in garter stitch, A.4 over the next stitch – make sure you start on the correct row in the diagrams so you continue the pattern, work as before to the end of the row. Sizes XXL and XXXL: 1 edge stitch in garter stitch, A.1 over the next 7 stitches – make sure you start on the correct row in the diagrams so you continue the pattern, work as before to the end of the row. All sizes: Continue working until the piece measures 46-48-49-51-52-54 cm, there is approx. 8-8-9-9-10-10 cm left. Now work the first 12 stitches from the wrong side before placing them on a thread for the neck. Read PATTERN and CASTING OFF before continuing. PATTERN: Continue the pattern – over the stitches by the neck which do not fit into a complete repeat of A.2, work stocking/garter stitch as shown in A.2, without yarn overs or decreases. CASTING OFF: Cast off as follows at the beginning of each row from the neck: 2 stitches 2 times and 1 stitch 3-3-4-4-5-5 times = 24-30-29-35-34-40 stitches on the shoulder. Continue working until the piece measures 54-56-58-60-62-64 cm. Cast off – remember CASTING-OFF TIP. SLEEVES: Cast on 53-55-57-57-59-61 stitches (including 1 edge stitch on each side) with circular needle size 4.5 mm and DROPS Brushed Alpaca Silk. Work pattern back and forth as follows: 1 edge stitch in garter stitch, knit 1-2-3-3-4-5, A.4 over the next stitch, A.2 over the next 36 stitches (= 3 repeats of 12 stitches), A.5 over the next 12 stitches, knit 1-2-3-3-4-5, 1 edge stitch in garter stitch. Continue back and forth for the first 4 rows in the diagrams. Change to circular needle size 5 mm. Continue the pattern from the row with an arrow. When the diagrams have been completed in height, repeat from the row with the arrow until the piece measures 10-10-10-8-7-4 cm. Now increase 1 stitch on each side of the sleeve – read INCREASE TIP. Increase like this every 4-3½-3½-3-2½-2½ cm a total of 10-11-11-13-14-15 times = 73-77-79-83-87-91 stitches. Continue working until the sleeve measures 50-48-49-47-44-41 cm. Insert 1 marker in each side – they mark the bottom of the armhole. Continue the pattern until the sleeve measures 53-51-52-50-51-48 cm. Cast off – remember CASTING-OFF TIP. Work the other sleeve in the same way. ASSEMBLY: Sew the shoulder seams, inside the cast-off edge. Sew the sleeve cap to the body, then the split at the top of the sleeve to the bottom of the armhole – see sketch. Sew the sleeve and side seams in one go, inside the 1 edge stitch. Sew the buttons onto the left band. NECK: Start from the right side with circular needle size 4.5 mm and DROPS Brushed Alpaca Silk. Knit up 78 to 90 stitches (including the stitches from the threads) inside the 1 edge stitch around the neck. Work 2 ridges back and forth. Cast off – remember CASTING-OFF TIP. |
||||||||||||||||||||||||||||
Diagram explanations |
||||||||||||||||||||||||||||
|
||||||||||||||||||||||||||||
 |
||||||||||||||||||||||||||||
 |
||||||||||||||||||||||||||||
 |
||||||||||||||||||||||||||||
 |
||||||||||||||||||||||||||||
Have you finished this pattern?Tag your pictures with #dropspattern #lilamistcardigan or submit them to the #dropsfan gallery. Do you need help with this pattern?You'll find 27 tutorial videos, a Comments/Questions area and more by visiting the pattern on garnstudio.com. © 1982-2026 DROPS Design A/S. We reserve all rights. This document, including all its sub-sections, has copyrights. Read more about what you can do with our patterns at the bottom of each pattern on our site. |
||||||||||||||||||||||||||||


With over 40 years in knitting and crochet design, DROPS Design offers one of the most extensive collections of free patterns on the internet - translated to 17 languages. As of today we count 324 catalogues and 12290 patterns translated into English (UK/cm).
We work hard to bring you the best knitting and crochet have to offer, inspiration and advice as well as great quality yarns at incredible prices! Would you like to use our patterns for other than personal use? You can read what you are allowed to do in the Copyright text at the bottom of all our patterns. Happy crafting!
Post a comment to pattern DROPS 230-23
We would love to hear what you have to say about this pattern!
If you want to leave a question, please make sure you select the correct category in the form below, to speed up the answering process. Required fields are marked *.