
Popular categories
Looking for a yarn?


Comments / Questions (82)
![]() Tricotin75 wrote:
Tricotin75 wrote:
Bonjour, En taille 12-18mois, après séparation des manches, il reste 140m pour les devant / dos et non pas 152m comme indiqué sur les explications, non?
20.05.2026 - 09:40DROPS Design answered:
Bonjour Tricotin 75, vous devez bien avoir 152 m après la division: 6 m de bordure devant + 32 m devant + 6 m sous la manche + 64 m dos + 6 m sous la manche + 32 m devant + 6 m bordure devant = 152. Bon tricot!
21.05.2026 - 08:33
![]() Carol Coleman wrote:
Carol Coleman wrote:
At the yolk section for 3rd size it says to increase 7 sts to 92 sts, then place markers, but at number is only 88 not 92.what is the correct position of markers to total 92, or us increase amount incorrect please?
16.04.2026 - 11:41DROPS Design answered:
Dear Mrs Coleman, note that the markers should be inserted in a stitch and not between stitches, so that you will have: 6+13+1+12+1+26+1+12+1+13+6=92 stitches. Happy knitting!
16.04.2026 - 16:37
![]() Mimmi wrote:
Mimmi wrote:
Saknar hur långt jag ska sticka efter jag delat arbetet under ärmarna. Det borde stå antal cm ner till resår avmaskningen. FRAM- OCH BAKSTYCKE: Byt till rundsticka 2,5. Sedan stickas det resår med början från avigsidan så här: Sticka 6 framkantsmaskor i rätstickning, * 1 avigmask
13.04.2026 - 18:56DROPS Design answered:
Hej Mimmi. Det kommer i meningen efter: "När arbetet mäter 10-13-14-16 (18-21) cm från delningen, ökas det 13-13-15-15 (17-19) maskor jämnt fördelat på nästa varv från rätsidan (det ökas inte över framkantsmaskorna) = 129-145-155-167 (177-191) maskor. Byt till rundsticka 2,5. Sedan stickas det resår med början från avigsidan så här:..." Mvh DROPS Design
16.04.2026 - 10:00
![]() Cinzia wrote:
Cinzia wrote:
Salve, nella spiegazione del raglan non capisco come fanno a formarsi 8 aumenti con 1 gettato solo per ogni segnapunti. Non devono essere 2 i gettati ai lati del segna punti?
28.03.2026 - 23:01DROPS Design answered:
Buonasera Cinzia, grazie per la segnalazione, abbiamo corretto il testo. Buon lavoro!
29.03.2026 - 23:15
![]() Drapier wrote:
Drapier wrote:
Bonjour. Je ne comprends pas l'empiècement : en taille 1/3 mois, je dois placer les marqueurs de la façon suivante : 6 mailles bordure + 13 mailles (devant) - marqueur - 12 mailles (manche) - marqueur - 26 mailles (dos) - marqueur - 12 mailles (manche) - marqueur - 13 mailles 6 mailles bordure Ce qui fait 88 mailles. Mais cela ne correspond pas aux 92 mailles que je devrais avoir sur mon aiguille. Où y a-t-il une erreur ? Merci d'avance
25.03.2026 - 08:35DROPS Design answered:
Bonjour Mme Drapier, notez que les marqueurs doivent être insérés chacun dans une maille, pas entre les mailles, autrement dit, vous aurez: 6+13+1+12+1+26+1+12+1+13+6=92 mailles. Bon tricot!
25.03.2026 - 15:44
![]() Isabelle wrote:
Isabelle wrote:
Bonjour. J'ai repris les mailles en attente pour les manches. Je ne comprends pas quelles sont les mailles montées sous la manches ? Est ce la suite des mailles en attente sur un des côtés ? Merci par avance pour vos explications et votre patience pour une débutante. Cordialement.
15.03.2026 - 15:37DROPS Design answered:
Bonjour Isabelle, lors de la division, vous avez monté 6 mailles pour remplacer les mailles des manches mises en attente, vous relevez maintenant 1 maille dans chacune de ces 6 mailles et tricotez celles de la manche en attente. Retrouvez cette étape avec la photo 18B dans cette leçon et/ou à partir du time code 9:38 dans cette vidéo (on remet d'abord les mailles en attente sur l'aiguille puis on relève les mailles sous la manche). Bon tricot!
16.03.2026 - 10:21
![]() Heike Rath wrote:
Heike Rath wrote:
Hallo, ich habe leider noch einmal eine Frage. Beim Rumpfteil werden die Ärmelmaschen glattrechts gestrickt bevor sie stillgelegt werden ?
19.02.2026 - 14:59DROPS Design answered:
Liebe Heike, wenn Sie die Maschen am Ende der Passe stilllegen, stricken Sie die Ärmelmaschen nicht, sondern legen Sie direkt still. Mit dem Arbeitsfaden, der dann noch vor den stillgelegten Maschen hängt, schlagen Sie die Maschen für den Armausschnitt an, damit "überbrücken" Sie die stillgelegten Maschen. Viel Spaß beim Stricken!
23.02.2026 - 09:37
![]() Heike Rath wrote:
Heike Rath wrote:
Hallo Ich stricke die Jacke in der Größe 80/86. ich bin nun beim Aufteilen in das Rumpfteil angekommen. Wenn ihr die Länge von 12 cm ab dem Makierer , wo ja auch die Zunahmen erfolgten, abmesse, habe ich die Länge . Wenn ich sie an der Reihe des Makierers am graden Stück also dem Rücken abmesse, fehlen mir ca 2 cm . Was zählt nun?
18.02.2026 - 13:49DROPS Design answered:
Liebe Heike, die Passe wird gerade nach unten an der Innenseite der einen Blende am Vorderteil gemessen. Dort sitzt ja auch der Markierer - gemessen wird nach den ersten 2 cm der Halsblende. Die Passe wird nicht an den Raglanzunahmen gemessen, sondern senkrecht nach unten. Viel Spaß beim Weiterstricken!
18.02.2026 - 14:02
![]() Paula Hordijk wrote:
Paula Hordijk wrote:
Bij PAS staat in tweede regel: meerder 9-11-7-13 (13-17). Moet dat niet zijn: 7-9-11-13 (13-17)?\\r\\nBij MOUWEN staat in regel 7: minder zo iedere 2,5-2,5-1,5-1,5 2 (2-3) cm. Lijkt me ook verkeerd. Moeten toch aflopende of oplopende cijfers zijn?\\r\\nGraag snelle reactie! groetjes, Paula
05.02.2026 - 15:24DROPS Design answered:
Dag Paula,
Bij de pas kom je na het meerderen uiteindelijk op oplopende getallen uit (dus meer steken in de grotere maten); het meerderen klopt op die plek. Bij de mouwen klopt het ook. Daar is in bepaalde maten het aantal cm's dat ertussen zit minder, maar je mindert dan wel weer vaker.
08.02.2026 - 18:54
![]() Susanne wrote:
Susanne wrote:
Danke für die kostenlose Anleitung. Ich stricke Little Bee Cardigan in Größe 80/86. Bei der Beschreibung für die Passe habe ich entsprechend zugenommen auf 104 Maschen. Wenn dann die Einteilung mit den Maschenmarkierern kommt, bleiben 4 Maschen übrig (6+16+12+32+12+16+6=100). Kann es sein, dass die Anleitung einen Fehler hat? Wo muss ich die 4 Maschen zugeben? Beim Mittelteil?
02.02.2026 - 22:01DROPS Design answered:
Liebe Susanne, Sie haben die markierten Maschen nicht mitgerechnet - Sie bringen die Markierer ja in einer Masche an. Das sind die fehlenden 4 Maschen. Viel Spaß beim Weiterstricken!
03.02.2026 - 00:28
|
|||||||
Little Bee Cardigan#littebeecardigan |
|||||||
 |
 |
||||||
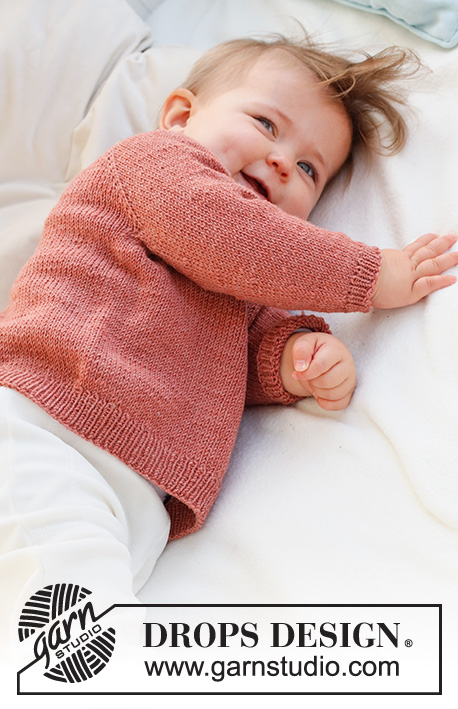
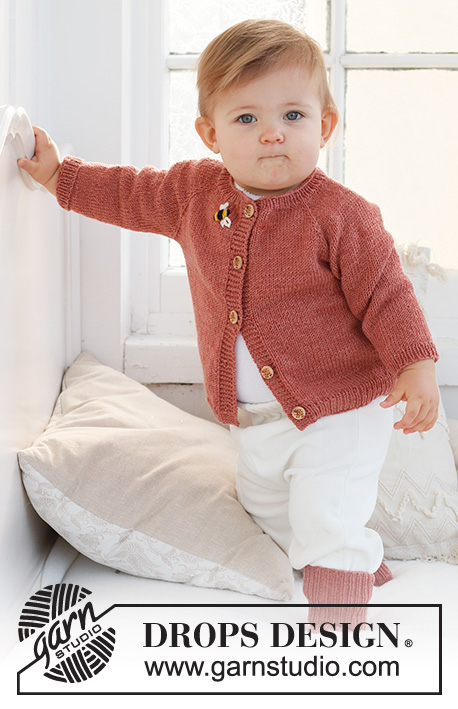
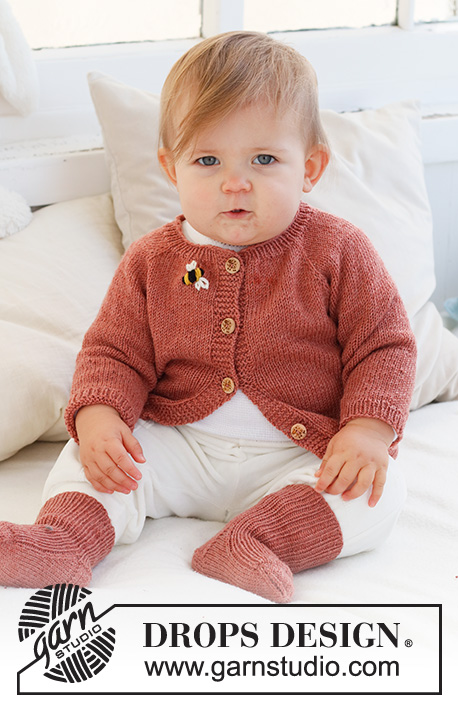
Knitted jacket for babies and children in DROPS BabyMerino. The piece is worked top down, with raglan and embroidered bee. Sizes 0 - 4 years.
DROPS Baby 42-4 |
|||||||
|
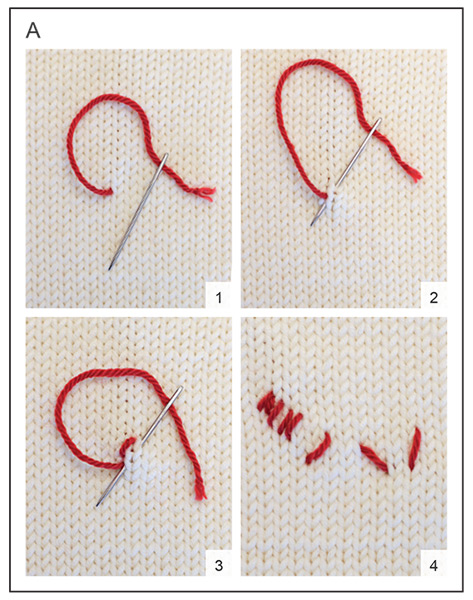
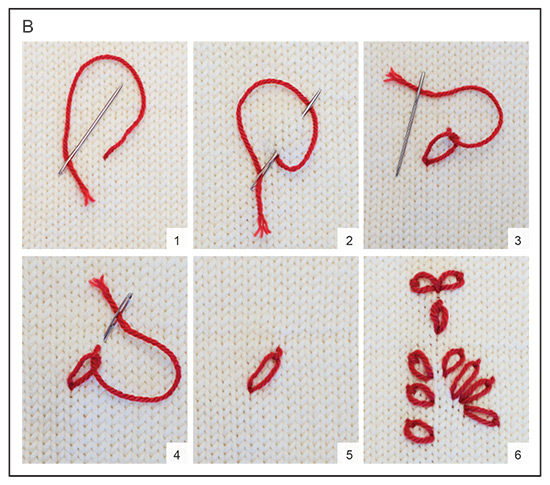
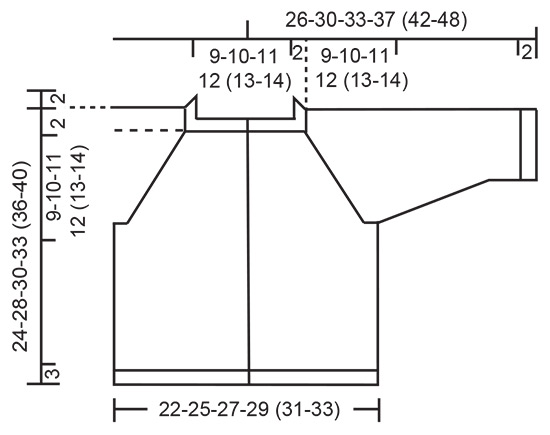
------------------------------------------------------- EXPLANATIONS FOR THE PATTERN: ------------------------------------------------------- RIDGE/GARTER STITCH (worked back and forth): Knit all rows. 1 ridge = knit 2 rows. RAGLAN: All increases are worked from the right side! Work to the marker-stitch, 1 yarn over, knit the marker-stitch, 1 yarn over. Increase like this at each marker-stitch (8 stitches increased). On the next row purl the yarn overs twisted to avoid holes. Then work the new stitches in stocking stitch. DECREASE TIP (sleeves): Decrease 1 stitch on either side of the marker as follows: Work until there are 3 stitches left before the marker, knit 2 together, knit 2 (marker sits between these 2 stitches), slip 1 stitch as if to knit, knit 1 and pass the slipped stitch over the knitted stitch. BUTTONHOLES: Work buttonholes on the right band (when the garment is worn). Work from the right side when there are 3 stitches left on the row as follows: Make 1 yarn over, knit 2 together and knit 1. On the next row, knit the yarn over to leave a hole. The first buttonhole is worked when the neck measures 2 cm. Then work the other 4-4-4-4 (5-5) buttonholes with after 5-6-6½-7 (6½-7) cm between each one. ------------------------------------------------------- START THE PIECE HERE: ------------------------------------------------------- JACKET – SHORT OVERVIEW OF THE PIECE: The yoke is worked back and forth with circular needle. It is divided for the body and sleeves and the body continued back and forth. The sleeves are worked in the round with double pointed needles. NECK: Cast on 75-81-85-91 (95-99) stitches with circular needle size 2.5 mm and DROPS Baby Merino. Purl 1 row from the wrong side with 6 band stitches in GARTER STITCH on each side – read description above. Then work rib as follows: 6 band stitches in garter stitch, * knit 1, purl 1 *, work from *-* until there are 7 stitches left, knit 1 and 6 band stitches in garter stitch. When the rib measures 2 cm, change to circular needle size 3 mm. Insert 1 marker after the band at the beginning of the row, the yoke is measured from this marker! YOKE: Work the next row from the right side: 6 band stitches in garter stitch, knit 63-69-73-79 (83-87) and increase 9-11-7-13 (13-17) stitches evenly spread and 6 band stitches in garter stitch = 84-92-92-104 (108-116) stitches. Work the first BUTTONHOLE – read description above. On the next row insert 4 markers as follows: Work 6 band stitches in garter stitch, purl 11-13-13-16 (17-19), insert 1 marker in the next stitch, purl 12, insert 1 marker in the next stitch, purl 22-26-26-32 (34-38), insert 1 marker in the next stitch, purl 12, insert 1 marker in the next stitch, purl 11-13-13-16 (17-19) and 6 band stitches in garter stitch. Continue with stocking stitch and 6 band stitches in garter stitch on each side, increasing as follows: On the next row from the right side increase 1 stitch on each side of all the markers – read RAGLAN! Increase like this every row from the right side 12-14-16-17 (18-19) times = 180-204-220-240 (252-268) stitches. REMEMBER THE KNITTING TENSION! When the piece measures 9-10-11-12 (13-14) cm from the marker, divide for the body and sleeves as follows: Work 6 band stitches in garter stitch, 23-27-29-32 (34-37) stitches in stocking stitch, place the next 38-42-46-50 (52-54) stitches on a thread for the sleeve, cast on 6 stitches, work 46-54-58-64 (68-74) stitches in stocking stitch, place the next 38-42-46-50 (52-54) stitches on a thread for the sleeve, cast on 6 stitches, work 23-27-29-32 (34-37) stitches in stocking stitch and 6 band stitches in garter stitch. BODY: = 116-132-140-152 (160-172) stitches. Continue back and forth with stocking stitch and 6 band stitches in garter stitch on each side. When the piece measures 10-13-14-16 (18-21) cm from the division, increase 13-13-15-15 (17-19) stitches evenly spaced on the next row from the right side (do not increase over the bands) = 129-145-155-167 (177-191) stitches. Change to circular needle size 2.5 mm and work rib, starting from the wrong side as follows: 6 band stitches in garter stitch, * purl 1, knit 1 *, work from *-* until there are 7 stitches left, purl 1 and 6 band stitches in garter stitch. Continue this rib for 3 cm. Cast off. SLEEVES: Place the 38-42-46-50 (52-54) stitches from the thread on the one side of the piece on double pointed needles size 3 mm and knit up 1 stitch in each of the 6 stitches cast on under the sleeve = 44-48-52-56 (58-60) stitches. Insert a marker in the middle of the new stitches under the sleeve. Start at the marker and work stocking stitch in the round. When the sleeve measures 1 cm from the division, decrease 1 stitch on each side of the marker - read DECREASE TIP! Decrease like this every 2½-2½-1½-2 (2-3) cm a total of 3-4-6-7 (7-7) times = 38-40-40-42 (44-46) stitches. When the sleeve measures 8-11-12-15 (18-23) cm, increase 4-4-4-4 (6-6) stitches evenly spaced = 42-44-44-46 (50-52) stitches. Change to double pointed needles size 2.5 mm and work rib (knit 1, purl 1) for 2 cm. Cast off. Work the other sleeve in the same way. BEE: Embroider a bee on the right front piece – see photo. The bee is worked with a single strand and flat stitch, the wings are worked with chain stitch. BEE – BLACK STRIPES: See diagram A and diagram explanations. Using black, start 3 cm below the neck and 4 cm from the band. Embroider 2 flat stitches, diagonally up to the right (towards the band), close together and 0.5 cm in length. Skip 0.5 cm diagonally up to the left and embroider 4 flat stitches close together and parallel to the first 2 stitches, 1 cm in length (= middle of body), skip 0.5 cm, work 2 flat stitches close together and parallel to the 4 stitches, 0.5 cm in length. BEE – MUSTARD STRIPES: Change to mustard. Embroider flat stitches between the black stripes - 4 stitches of the same length as the black stitches they are close to (2 mustard stripes). BEE - WINGS: Use colour off white; the wings consist of 2 chain stitches, both starting from the same hole. Work as follows: STITCH 1: Work 1 chain stitch, 1-1.5 cm in length from the middle of the bee - see diagram B and diagram explanations. STITCH 2: Work 1 chain stitch, 1-1.5 cm in length, starting from the same place. Embroider a set of wings on the other side of the bee. ASSEMBLY: Sew the buttons onto the left band. |
|||||||
Diagram explanations |
|||||||
|
|||||||
 |
|||||||
 |
|||||||
 |
|||||||
Have you finished this pattern?Tag your pictures with #dropspattern #littebeecardigan or submit them to the #dropsfan gallery. Do you need help with this pattern?You'll find 31 tutorial videos, a Comments/Questions area and more by visiting the pattern on garnstudio.com. © 1982-2026 DROPS Design A/S. We reserve all rights. This document, including all its sub-sections, has copyrights. Read more about what you can do with our patterns at the bottom of each pattern on our site. |
|||||||


With over 40 years in knitting and crochet design, DROPS Design offers one of the most extensive collections of free patterns on the internet - translated to 17 languages. As of today we count 325 catalogues and 12298 patterns translated into English (UK/cm).
We work hard to bring you the best knitting and crochet have to offer, inspiration and advice as well as great quality yarns at incredible prices! Would you like to use our patterns for other than personal use? You can read what you are allowed to do in the Copyright text at the bottom of all our patterns. Happy crafting!
Post a comment to pattern DROPS Baby 42-4
We would love to hear what you have to say about this pattern!
If you want to leave a question, please make sure you select the correct category in the form below, to speed up the answering process. Required fields are marked *.