
Popular categories
Looking for a yarn?


Comments / Questions (21)
![]() Michaela Lindahl wrote:
Michaela Lindahl wrote:
Hello again, I want to turn this particular pattern into an open vest where I cant tie the sides. Do you have any requests for how to do it?
21.01.2026 - 14:21DROPS Design answered:
Dear Michaela, we don't make custom patterns. You can check here our open vests, choose the type of open vest that you prefer and adapt it for this stitch-pattern. Happy knitting!
25.01.2026 - 18:26
![]() Michaela Lindahl wrote:
Michaela Lindahl wrote:
Hej! Har ni något tips om man skulle vilja göra västen öppen på sidorna med knytning tex?
21.01.2026 - 04:54DROPS Design answered:
Hi Michaela, please go through patterns HERE. Happy knitting!
21.01.2026 - 08:46
![]() Karin Nyberg wrote:
Karin Nyberg wrote:
Hur kommer jag åt diagrammet? Får inte fram det i mönstret.
05.01.2026 - 16:33DROPS Design answered:
Hej Karin. Jag kan se diagrammen längst ner på mönstret, kanske du kan prova en annan webläsare om du inte kan se dem? Mvh DROPS Design
07.01.2026 - 13:40
![]() Carlijn wrote:
Carlijn wrote:
Met welke naalden wordt de stekenverhouding gebreid? 7 of 8? Dank
01.01.2026 - 13:38DROPS Design answered:
Hi Carlijn, the ribs are knitted on needles no 7, for the the body use needles no 8. NOTE: Needle size is only a guide. If you get too many stitches on 10 cm, change to a larger needle size. If you get too few stitches on 10 cm, change to a smaller needle size. Happy knitting!
02.01.2026 - 13:14
![]() Sharon wrote:
Sharon wrote:
Bind off for arm hole - I don't understand the instructions do you decrease all 11 stitches for size M in one row?
31.12.2025 - 21:18DROPS Design answered:
Dear Sharon, 3 stitches at the beginning of the next 2 rows (once on each side), 2 stitches at the beginning of the next 6 rows (3 times on each side) and 1 stitch at the beginning of the next 4 rows (2 times on each side). So you decrease 11 sts on each side, 22 sts total, but spread out over several rows. Happy knitting!
05.01.2026 - 00:44
![]() Claudia wrote:
Claudia wrote:
Ich möchte das Modell Sage Strings (DROPS 227-47) nacharbeiten und suche ohne Erfolg die Garnqualität DROPS Wish, weil ich ungern zweifädig mit DROPS Air stricken möchte. Durch welches Garn kann ich DROPS Wish ersetzen?
23.06.2025 - 12:38DROPS Design answered:
Liebe Claudia, dann dürfen Sie gerne eine andere Wolle der Garngruppe E stricken: entweder Andes oder Snow. Benutzen Sie den Garnumrechner um die neue Garnmenge kalkulieren zu lassen. Viel Spaß beim Stricken!
23.06.2025 - 16:28
![]() Christina wrote:
Christina wrote:
Skall mönstret stickas på baksidan också ? eller kan man sticka enkel slätstickning där? Tacksam för svar Christina
19.01.2025 - 12:26DROPS Design answered:
Hei Christina. Ja, det strikkes mønster på bakstykket også. mvh DROPS Design
20.01.2025 - 13:12
![]() Marika wrote:
Marika wrote:
Millaisilla pistoilla yhdistän olkasaumat niin, etteivät ne tunnu ikäviltä (siis liian "paksuilta") nurjalla puolella ja näyttävät kauniilta työn oikealla puolella?
05.01.2024 - 07:36
![]() Emma wrote:
Emma wrote:
Wish there was a pdf version of this pattern it would make it a lot easier to print and follow.
25.12.2023 - 03:06
![]() Magdalena wrote:
Magdalena wrote:
Dzień dobry, Nie potrafię zrozumieć zamykania oczek na dekolt. Napisane jest aby umieścić 12oczek na nitkę.. robie tak i kompletnie mi nie wychodzi. Prosze o pomoc.
05.11.2022 - 14:48DROPS Design answered:
Witaj Magdo, przerabiasz na prawej stronie robótki: zaznacz środek warkocza na środku (umieszczając marker między 2 o. środk.). Przerabiasz zgodnie ze schematem, zamykasz 2 oczka razem na prawo przed markerem, (marker), teraz zamykasz 2 oczka razem na prawo za markerem i przerabiasz jeszcze 5 oczek. Zdejmij 12 ostatnio przerobionych o. na nitkę lub agrafkę (marker jest na środku tych oczek) i zacznij wykonywać lewe ramię. Odtąd będziesz przerabiać tylko oczka do nitki/agrafki. Dalej przerabiaj od: „Zamykać na początku każdego rzędu od strony dekoltu: 1 raz 2 oczka i 2 razy 1 oczko = 11-12-12-12-13-13 oczek… Pozdrawiamy!
07.11.2022 - 12:03
|
||||||||||
Sage Strings#sagestringsvest |
||||||||||
 |
 |
|||||||||
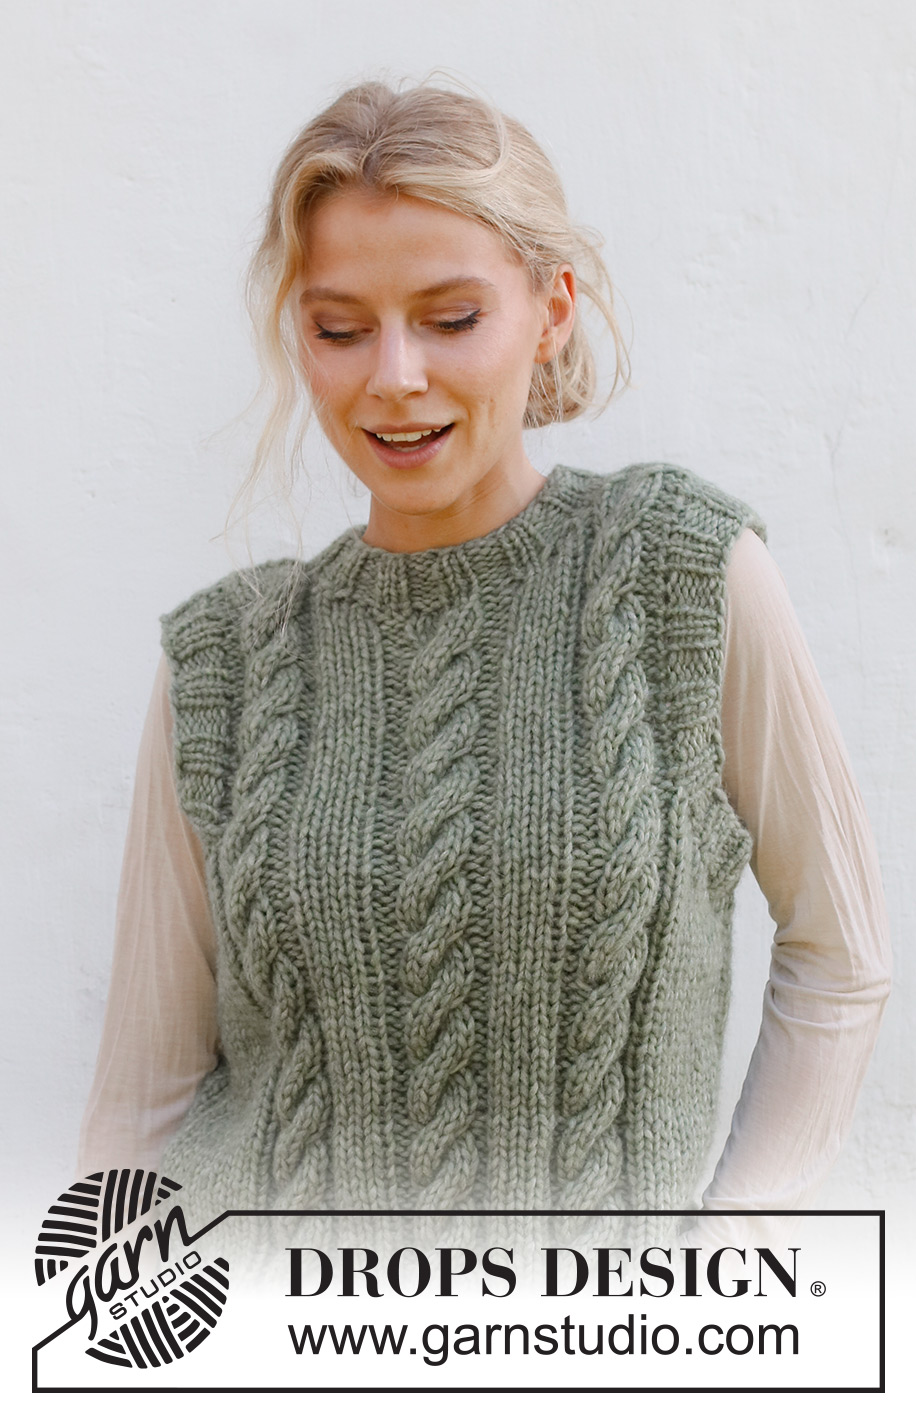
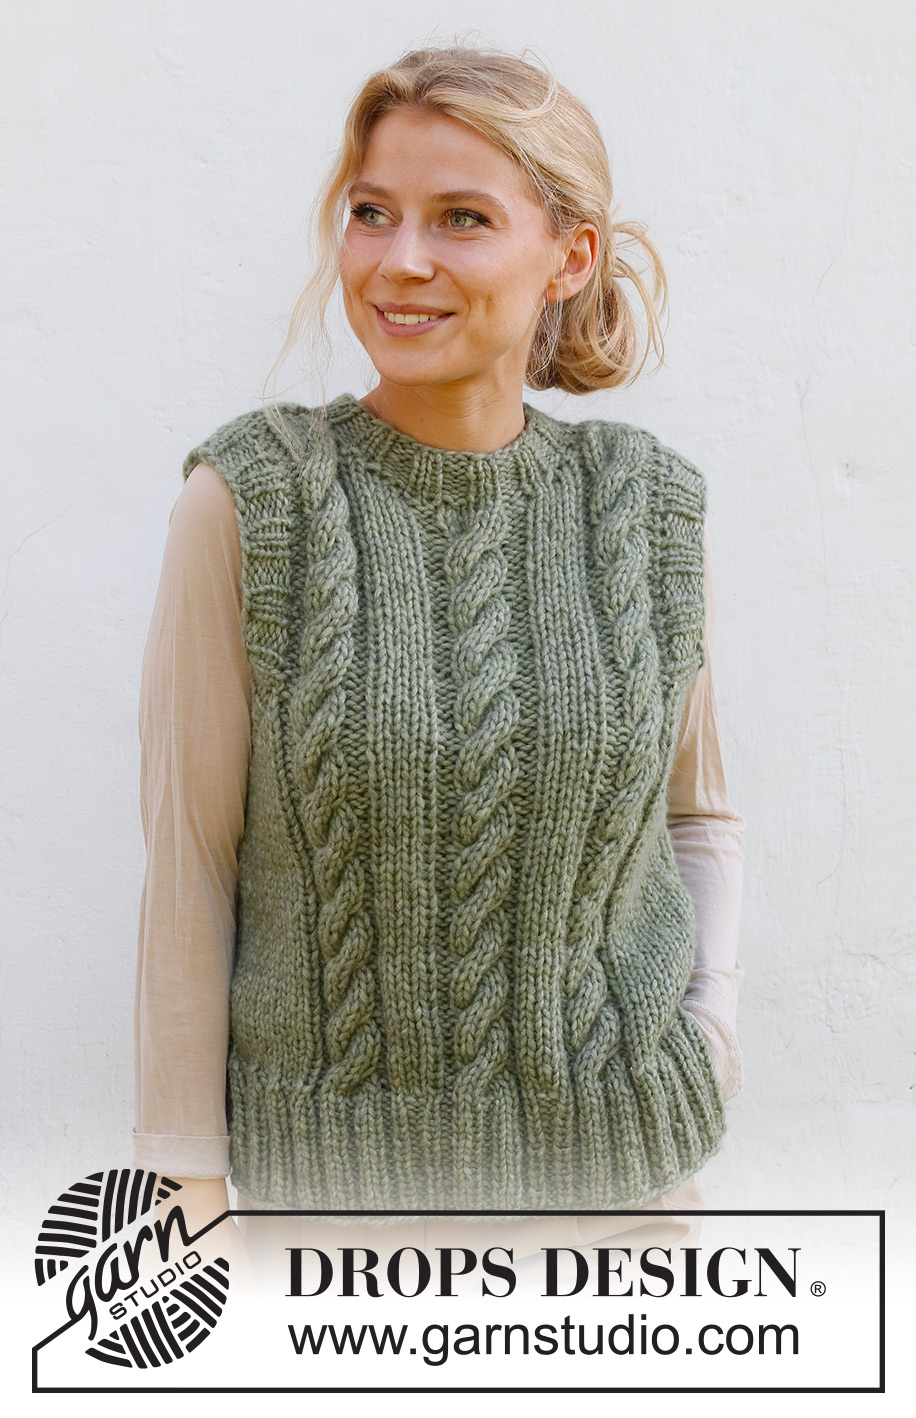
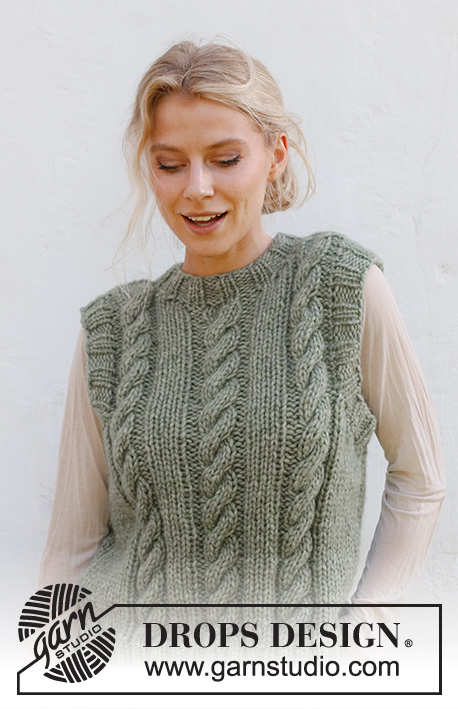
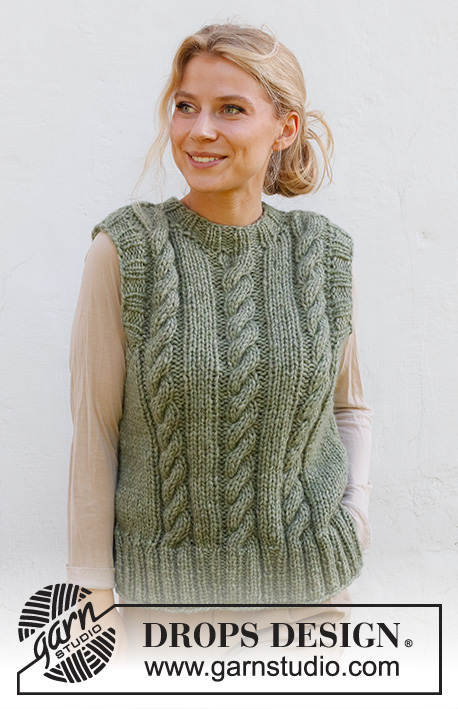
Knitted vest / slipover in 1 strand DROPS Wish or 2 strands DROPS Air. The piece is worked bottom up, with cables and ribbed edging. Sizes S - XXXL.
DROPS 227-47 |
||||||||||
|
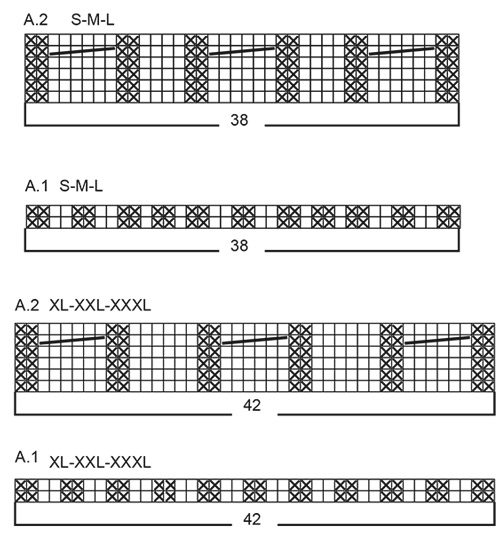
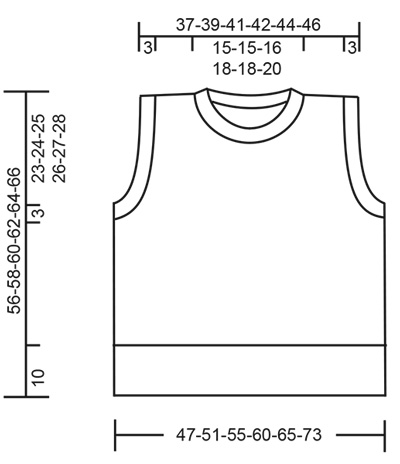
------------------------------------------------------- EXPLANATIONS FOR THE PATTERN: ------------------------------------------------------- RIDGE/GARTER STITCH (worked back and forth): Knit all rows. 1 ridge = knit 2 rows. PATTERN: See diagrams A.1 and A.2. The diagrams show all rows in the pattern from the right side. Choose diagram for your size. CASTING-OFF TIP: To avoid the cast-off edge being tight you can cast off with a larger size needle. If the edge is still tight, make 1 yarn over after approx. each 4th stitch at the same time as casting off; the yarn overs are cast off as normal stitches. ------------------------------------------------------- START THE PIECE HERE: ------------------------------------------------------- VEST – SHORT OVERVIEW OF THE PIECE The vest is worked back and forth in 2 sections, then sewn together. Ribbed edges are worked around the armholes and neck to finish. FRONT PIECE: Cast on 60-68-68-80-80-88 stitches with circular needle size 7 mm and 1 strand DROPS Wish or 2 strands DROPS Air. Purl 1 row from the wrong side, then work from the right side as follows: 1 edge stitch in GARTER STITCH – read description above, * knit 2, purl 2 *, work from *-* over the next 10-14-14-18-18-22 stitches, work A.1 (= 38-38-38-42-42-42 stitches), * knit 2, purl 2 *, work from *-* over the next 10-14-14-18-18-22 stitches and 1 edge stitch in garter stitch. Continue this rib for 10 cm. Change to circular needle size 8 mm and work as follows from the right side: 1 edge stitch in garter stitch, work the next 10-14-14-18-18-22 stitches in stocking stitch and decrease 0-2-0-3-0-0 stitches evenly over these stitches, work A.2 (= 38-38-38-42-42-42 stitches), work the next 10-14-14-18-18-22 stitches in stocking stitch and decrease 0-2-0-3-0-0 stitches evenly over these stitches and 1 edge stitch in garter stitch = 60-64-68-74-80-88 stitches. Continue this pattern. REMEMBER THE KNITTING TENSION! When the piece measures 30-31-32-33-34-35 cm, cast off for the armholes at the beginning of each row as follows: 3 stitches 1 time, 2 stitches 3-3-3-4-5-6 times and 1 stitch 1-2-3-3-3-4 times on each side = 40-42-44-46-48-50 stitches. Continue working until the piece measures 49-51-53-55-57-59 cm. Now decrease 2 stitches over the middle cable in A.2, then place the middle 8-8-10-12-12-14 stitches on 1 thread for the neck; finish each shoulder separately. Cast off at the beginning of each row from the neck as follows: 2 stitches 1 time and 1 stitch 2 times = 11-12-12-12-13-13 stitches. Continue working until the piece measures 55-57-59-61-63-65 cm, then decrease 2 stitches over the cable in A.2 = 9-10-10-10-11-11 stitches. When the piece measures 56-58-60-62-64-66 cm, cast off. Work the other shoulder in the same way. BACK PIECE: Cast on 60-68-68-80-80-88 stitches with circular needle size 7 mm and 1 strand DROPS Wish or 2 strands DROPS Air. Purl 1 row from the wrong side, then work from the right side as follows: 1 edge stitch in garter stitch, * knit 2, purl 2 *, work from *-* over the next 10-14-14-18-18-22 stitches, work A.1 (= 38-38-38-42-42-42 stitches), * knit 2, purl 2 *, work from *-* over the next 10-14-14-18-18-22 stitches and 1 edge stitch in garter stitch. Continue this rib for 10 cm. Change to circular needle size 8 mm and work as follows from the right side: 1 edge stitch in garter stitch, work the next 10-14-14-18-18-22 stitches in stocking stitch and decrease 0-2-0-3-0-0 stitches evenly over these stitches, work A.2 (= 38-38-38-42-42-42 stitches), work the next 10-14-14-18-18-22 stitches in stocking stitch and decrease 0-2-0-3-0-0 stitches evenly over these stitches and 1 edge stitch in garter stitch = 60-64-68-74-80-88 stitches. Continue this pattern, When the piece measures 30-31-32-33-34-35 cm, cast off for the armholes at the beginning of each row as follows: 3 stitches 1 time, 2 stitches 3-3-3-4-5-6 times and 1 stitch 1-2-3-3-3-4 times on each side = 40-42-44-46-48-50 stitches. Continue working until the piece measures 53-55-57-59-61-63 cm. Now decrease 2 stitches over the middle cable in A.2, then place the middle 14-14-16-18-18-20 stitches on 1 thread for the neck; finish each shoulder separately. Cast off 1 stitch at the beginning of the next row from the neck = 11-12-12-12-13-13 stitches. Continue working until the piece measures 55-57-59-61-63-65 cm, then decrease 2 stitches over the cable in A.2 = 9-10-10-10-11-11 stitches. When the piece measures 56-58-60-62-64-66 cm, cast off. Work the other shoulder in the same way. ASSEMBLY: Sew the shoulder seams. Sew the side seams inside the 1 edge stitch, leaving a 10 cm split at the bottom. NECK: Start from the right side by one shoulder seam. Use short circular needle size 7mm and knit up (inside 1 stitch) 44 to 56 stitches around the neck (including the stitches from the threads; stitch-number should be divisible by 4). Work rib (knit 2, purl 2) in the round for 3 cm. Cast off with knit over knit and purl over purl. SLEEVE-EDGES: Start from the right side by one side seam. Use short circular needle size 7mm and knit up 60 to 72 stitches around the armhole (stitch-number should be divisible by 4). Work rib (knit 2, purl 2) in the round for 3 cm. Cast off with knit over knit and purl over purl – remember CASTING-OFF TIP. Work the other sleeve-edge in the same way |
||||||||||
Diagram explanations |
||||||||||
|
||||||||||
 |
||||||||||
 |
||||||||||
Have you finished this pattern?Tag your pictures with #dropspattern #sagestringsvest or submit them to the #dropsfan gallery. Do you need help with this pattern?You'll find 24 tutorial videos, a Comments/Questions area and more by visiting the pattern on garnstudio.com. © 1982-2026 DROPS Design A/S. We reserve all rights. This document, including all its sub-sections, has copyrights. Read more about what you can do with our patterns at the bottom of each pattern on our site. |
||||||||||


With over 40 years in knitting and crochet design, DROPS Design offers one of the most extensive collections of free patterns on the internet - translated to 17 languages. As of today we count 324 catalogues and 12290 patterns translated into English (UK/cm).
We work hard to bring you the best knitting and crochet have to offer, inspiration and advice as well as great quality yarns at incredible prices! Would you like to use our patterns for other than personal use? You can read what you are allowed to do in the Copyright text at the bottom of all our patterns. Happy crafting!
Post a comment to pattern DROPS 227-47
We would love to hear what you have to say about this pattern!
If you want to leave a question, please make sure you select the correct category in the form below, to speed up the answering process. Required fields are marked *.