DROPS Sky
DROPS Sky
74% Alpaca, 18% Polyamide, 8% Wool
from 5.10 £ /50g
DROPS Kid-Silk
DROPS Kid-Silk
75% Mohair, 25% Silk
from 4.60 £ /25g
Get the yarn to make this pattern from 29.10£.

The yarn cost is calculated from the pattern’s smallest size and the yarn’s cheapest product type. Looking for an even better price? You might find it on the DROPS Deals!

DROPS SS24

Ash Mint Slipover

Knitted vest / slipover in DROPS Sky and DROPS Kid-Silk. Piece is knitted with V-neck pattern, vents in the sides, textured pattern and displacements. Size XS – XXL.

DROPS 227-31
DROPS design: Pattern sk-150
Yarn group B and A
----------------------------------------------------------

SIZE:
XS - S - M - L - XL - XXL

MATERIALS:
DROPS SKY from Garnstudio (belongs to yarn group B)
150-200-200-200-250-250 g colour 07, light sea green
And use:
DROPS KID-SILK from Garnstudio (belongs to yarn group A)
75-75-75-75-100-100 g colour 34, sage green

NEEDLES:
DROPS CIRCULAR NEEDLE SIZE 5.5 mm: Length 60-60-60-60-80-80 cm.
DROPS CIRCULAR NEEDLE SIZE 4.5 mm: Length 40 cm and 60-60-60-60-80-80 cm.
The technique MAGIC LOOP can be used on the neck edge – you then only need circular needle size 4.5 mm.

KNITTING TENSION:
15 stitches in width and 20 rows vertically with texture pattern and 1 strand of each quality = 10 x 10 cm.
NOTE! Remember that needle size is only a suggestion. If you have too many stitches on 10 cm switch to larger needles. If you have too few stitches on 10 cm switch to smaller needles.

-------------------------------------------------------

Alternative Yarn – See how to change yarns here
Yarn Groups A to F – Use the same pattern and change the yarn here
Yarn usage using an alternative yarn – Use our yarn converter here

-------------------------------------------------------

DROPS Sky
DROPS Sky
74% Alpaca, 18% Polyamide, 8% Wool
from 5.10 £ /50g
DROPS Kid-Silk
DROPS Kid-Silk
75% Mohair, 25% Silk
from 4.60 £ /25g
Get the yarn to make this pattern from 29.10£.

The yarn cost is calculated from the pattern’s smallest size and the yarn’s cheapest product type. Looking for an even better price? You might find it on the DROPS Deals!

Pattern instructions

NOTE: This pattern is written in British English. All measurements in charts are in cm. For conversion from cm to inches - click here. There are different terms for crocheting in British and American English. If this pattern includes crochet, click for "crochet terms" here. For this pattern in American English, please click here.
----------------------------------------------------------

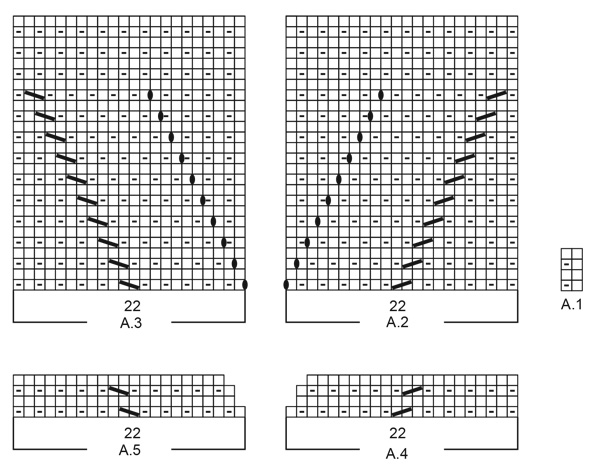
EXPLANATION FOR THE PATTERN:

----------------------------------------------------------

GARTER STITCH (back and forth):
Knit all rows.
1 ridge vertically = knit 2 rows.

PATTERN:
See diagrams A.1 to A.5. Diagrams show all rows in pattern seen from the right side.

DECREASE TIP:
All decreases are done from the right side!
Work 6 stitches in garter stitch, slip 1 stitch knitwise, knit 1, pass slipped stitch over stitch worked(= 1 stitch decreased), work until 8 stitches remain, knit 2 together(= 1 stitch decreased), work 6 stitches in garter stitch.

----------------------------------------------------------

START THE PIECE HERE:

----------------------------------------------------------

VEST – SHORT OVERVIEW OF THE PIECE:
Work back piece and front piece back and forth on circular needle. Then assemble the vest by sewing it together on the shoulders and down the side seams. Finish with a neck edge in round on a circular needle.

BACK PIECE:
Cast on 73-77-85-89-97-105 stitches on circular needle size 4.5 mm with 1 strand of each colour (= 2 strands). Purl 1 row from wrong side. Then work rib as follows: 6 stitches in GARTER STITCH - read explanation above - * knit 1/purl 1 *, repeat from *-* until 7 stitches remain, knit 1 and 6 stitches in garter stitch. Continue rib back and forth like this for 4 cm.
Switch to circular needle size 5.5 mm.
Now work pattern as follows: 6 stitches in garter stitch, work A.1 (= 2 stitches) until 7 stitches remain, work first stitch in A.1, 6 stitches in garter stitch.
REMEMBER THE KNITTING TENSION!
Continue back and forth like this until piece measures 29-30-31-32-33-34 cm. Now work in garter stitch over the outermost 8-8-10-10-10-10 stitches in each side. When 2 ridges have been worked over these stitches, cast off 2-2-4-4-4-4 stitches for armholes at the beginning of the next 2 rows = 69-73-77-81-89-97 stitches.
In sizes XS, S, M and L skip next section and continue to work from ALL SIZES – read explanation below. In sizes XL and XXL work as explained below.

SIZE XL AND XXL:
Now decrease 1 stitch inside 6 stitches in garter stitch in each side- read DECREASE TIP. Decrease like this on every row from right side 4-6 times in total = 81-85 stitches.

ALL SIZES:
Continue back and forth with A.1 and 6 stitches in garter stitch in each side. When piece measures 56-58-60-62-64-66 cm, cast off the middle 19-19-19-23-23-23 stitches for neck and finish each shoulder separately. Then cast off 1 stitch on next row from the neck = 24-26-28-28-28-30 stitches remain for shoulder.
When piece measures 58-60-62-64-66-68 cm, cast off with knit over knit and garter stitch over garter stitch. Work the other shoulder the same way.

FRONT PIECE:
Cast on 73-77-85-89-97-105 stitches on circular needle size 4.5 mm with 1 strand of each colour (= 2 strands). Purl 1 row from wrong side. Then work rib as follows: 6 stitches in garter stitch, * knit 1, purl 1 *, work from *-* until 7 stitches remain, knit 1, 6 stitches in garter stitch. Continue back and forth like this for 4 cm.
Switch to circular needle size 5.5 mm.
Now work pattern as follows: 6 stitches in garter stitch, work A.1 (= 2 stitches) until 7 stitches remain, work first stitch in A.1, 6 stitches in garter stitch. Continue back and forth like this.
When piece measures 9-9-10-10-11-11 cm, work pattern as follows:
Work 6 stitches in garter stitch, A.1 as before over the next 5-7-11-13-17-21 stitches, A.2 over the next 22 stitches, A.1 as before over the next 7 stitches (the middle of these 7 stitches is middle stitch on front piece = a knit stitch), A.3 over the next 22 stitches, A.1 as before over the next 5-7-11-13-17-21 stitches, 6 stitches in garter stitch.
Continue back and forth like this until piece measures 29-30-31-32-33-34 cm. Now work in garter stitch over the outermost 8-8-10-10-10-10 stitches in each side. When 2 ridges have been worked over these stitches, cast off 2-2-4-4-4-4 stitches for armholes at the beginning of the next 2 rows = 69-73-77-81-89-97 stitches.

OVERVIEW OF NEXT SECTION:
Then work as explained below in the next sections - choose section for your size.

SIZE XS, S, M and L:
Divide the piece for right and left front piece, at the same time work pattern and decrease for V-neck as explained below.

PATTERN AND DECREASE FOR V-NECK:
Continue to work with 6 stitches in garter stitch towards the side and pattern as before over the remaining stitches. When A.2 and A.3 have been worked vertically 2 times in total, work A.4 over A.2 and A.5 over A.3 (continue the remaining stitches as before). Decrease in A.4 and A.5 is decrease for V-neck. When A.4 and A.5 have been worked vertically, continue decrease the same way until 10-10-10-12 stitches have been decreased in total (on each front piece).
DIVISION FOR RIGHT AND LEFT FRONT PIECE:
When piece measures 37-38-39-40 cm, divide the piece for right and left front piece by slipping middle stitch and the stitches for the other side of front piece on a thread (middle stitch = 1 knit stitch). Then work each shoulder separately with pattern and decrease as explained above (divide the piece before all decreases in pattern are done).
When all decreases for V-neck are done, 24-26-28-28 stitches remain for shoulder. Continue to work until piece measures 58-60-62-64 cm. Cast off with knit over knit and purl over purl. Work the other shoulder the same way.

SIZE XL AND XXL:
Decrease stitches for armhole, at the same time divide the piece for right and left front piece, and work pattern and decrease for V-neck as explained below.

DECREASE FOR ARMHOLES:
Now decrease 1 stitch inside 6 stitches in garter stitch in each side the same way as on back piece - remember DECREASE TIP. Decrease like this on every row from right side 4-6 times in total = 81-85 stitches.
PATTERN AND DECREASE FOR V-NECK:
After last decrease for armhole continue to work with 6 stitches in garter stitch towards the side and pattern as before over the remaining stitches. When A.2 and A.3 have been worked vertically 2 times in total, work A.4 over A.2 and A.5 over A.3 (continue the remaining stitches as before). Decrease in A.4 and A.5 is decrease for V-neck. When A.4 and A.5 have been worked vertically, continue decrease the same way until 12-12 stitches have been decreased in total (on each front piece).
DIVISION FOR RIGHT AND LEFT FRONT PIECE:
When piece measures 41-42 cm, divide the piece for right and left front piece by slipping middle stitch and the stitches for the other side of front piece on a thread (middle stitch = 1 knit stitch). Then work each shoulder separately with pattern and decrease as explained above (divide the piece before all decreases are done).
When all decreases for V-neck are done, 28-30 stitches remain for shoulder. Work until piece measures 66-68 cm. Cast off with knit over knit and purl over purl. Work the other shoulder the same way.

ASSEMBLY:
Sew shoulder seams inside cast-off edges. Sew side seam in outermost loop of edge stitches from armhole and down until approx. 17 cm remain (= vent). Repeat in the other side.

NECK EDGE:
Begin at one shoulder seam and pick up from right side approx. 106 to 130 stitches inside 1 edge stitch in garter stitch around the neck on a short circular needle size 4.5 mm with 1 strand in each quality (= 2 strands). Work rib in the round (= knit 1/purl 1) - but adjust so that middle stitch at the front is knitted and that rib fits the entire round. Insert 1 marker in middle stitch at the front. AT THE SAME TIME on every round decrease 2 stitches mid front as follows: Work until 1 stitch remains before stitch with marker, slip the next 2 stitches knitwise, knit 1, pass the 2 slipped stitches over stitch worked (= 2 stitches decreased).
When decreasing like this the knit stitch in the middle of V-neck will follow as a straight line mid front.
Decrease like this every round until neck edge measures approx. 3 cm in knitting direction. Cast off stitches with knit over knit and purl over purl.

Diagram

symbols = knit from the right side, purl from the wrong side
symbols = purl from right side
symbols = between 2 stitches make 1 yarn over, on next row purl yarn over to make a hole
symbols = knit 2 together
symbols = slip 1 stitch knitwise, knit 1, pass slipped stitch over stitch worked
diagram
diagram

Each of our patterns has specific tutorial videos to help you.

Do you have a question? See a list of frequently asked questions (FAQ)

Knitting tension is what determines the final measurements of your work, and is usually measured per 10 x 10 cm. It is provided like so: number of stitches in width x number of rows in height - eg: 19 stitches x 26 rows = 10 x 10 cm.

The knitting tension is very individual; some people knit/crochet loosely while others work tightly. You adjust the knitting tension with the needle size, which is why the suggested needle size is only meant as a guide! You need to adjust this (up or down) to ensure that YOUR knitting tension matches the knitting tension provided in the pattern. If you work with a different knitting tension than provided you will have a different yarn consumption, and your work will have different measurements than what the pattern suggests.

The knitting tension also determines which yarns can replace each other. As long as you achieve the same knitting tension you can replace one yarn with another.

See DROPS lesson: How to measure your tension/gauge

See DROPS video: How to make a gauge tension swatch

The required amount of yarn is provided in grams, eg: 450 g. To calculate how many balls you’ll need you first need to know how many grams are in 1 ball (25g, 50g or 100g). This information is available if you click on the individual yarn quality on our pages. Divide the amount required with the amount of each ball. For example, if each ball is 50g (the most common amount), the calculation will be as follows: 450 / 50 = 9 balls.

The important thing when changing from one yarn to another is that the knitting/crochet tension remains the same. This is so that the measurements of the finished piece will be the same as on the sketch provided. It is easier to achieve the same knitting tension using yarns from the same yarn group. It is also possible to work with multiple strands of a thinner yarn to achieve the knitting tension of a thicker one. Please try our yarn converter. We recommend you to always work a test swatch.

Please NOTE: when changing yarn the garment might have a different look and feel to the garment in the photo, due to individual properties and qualities of each yarn.

See DROPS lesson: Can I use a different yarn than the one mentioned in the pattern?

All our yarns are categorised into yarn groups (from A to F) according to thickness and knitting tension – group A contains the thinnest yarns and group F the thickest. This makes it easier for you to find alternative yarns to our patterns, should you wish to switch yarn. All yarns within the same group have a similar knitting tension and can easily replace each other. However, different yarn qualities have different structures and properties which will give the finished work a unique look and feel.

Click here for an overview of the yarns in each yarn group

At the top of all our patterns you’ll find a link to our yarn calculator, which is a helpful tool should you wish to use a different yarn than suggested. By filling in the yarn quality you wish to replace, the amount (in your size) and number of strands, the calculator will present good alternative yarns with the same knitting tension. Additionally it will tell you how much you’ll require in the new qualities and whether you’ll need to work with multiple strands. Most skeins are 50g (some are 25g or 100g).

If the pattern is worked with multiple colours, every colour will have to be calculated separately. Similarly, if the pattern is worked with several strands of different yarns (for example 1 strand Alpaca and 1 strand Kid-Silk) you will have to find alternatives for each, individually.

Click here to see our yarn calculator

Since different yarns have different qualities and textures we have chosen to keep the original yarn in our patterns. However, you can easily find options among our available qualities by using our yarn calculator, or simply pick a yarn from the same yarn group.

It is possible that some retailers still have discontinued yarns in stock, or that someone has a few skeins at home that they would like to find patterns for.

The yarn calculator will provide both alternative yarn as well as required amount in the new quality.

If you think it's hard to decide what size to make, it can be a good idea to measure a garment you own already and like the size of. Then you can pick the size by comparing those measures with the ones available in the pattern's size chart.

You'll find the size chart at the bottom of the pattern.

See DROPS lesson: How to read size chart

The needle size provided in the pattern serves only as a guide, the important thing is to follow the knitting tension. And since knitting tension is very individual, you will have to adjust the needle size to ensure that YOUR tension is the same as in the pattern – maybe you’ll have to adjust 1, or even 2 needle sizes, up or down to achieve the correct tension. For this, we recommend that you work test swatches.

Should you work with a different knitting tension than the one provided, the measurements of the finished garment might deviate from the measurement sketch.

See DROPS lesson: How to measure your tension/gauge

See DROPS video: How to make a tension/gauge swatch

Working a garment top-down provides more flexibility and room for personal adjustment. For example it is easier to try the garment on while working, as well as making adjustments to length of yoke and shoulder caps.

The instructions are carefully explaining every step, in the correct order. Diagrams are adjusted to the knitting direction and are worked as usual.

The diagram depicts all rows/rounds, and every stitch seen from the right side. It is read from bottom to top, from right to left. 1 square = 1 stitch.

When working back and forth, every other row is worked from the right side and every other row is worked from the wrong side. When working from the wrong side, the diagram will have to be worked reversed: from left to right, knit stitches are purled, purl stitches are knit etc.

When working in the round every round is worked from the right side and the diagram are worked from right to left on all rounds.

See DROPS lesson: How to read knitting diagrams

The diagram depicts all rows/rounds, and every stitch seen from the right side. It is worked from bottom to top, from right to left.

When working back and forth every other row is worked from the right side: from right to left and every other row is worked from the wrong side: from left to right.

When working in the round, every row in the diagram are worked from the right side, from right to left.

When working a circular diagram you start in the middle and work your way outwards, counter clockwise, row by row.

The rows usually start with a given number of chain stitches (equivalent to the height of the following stitch), this will either be depicted in the diagram or explained in the pattern.

See DROPS lesson: How to read crochet diagrams

Instructions for working several diagrams after each other on the same row/round, will often be written like so: “work A.1, A.2, A.3 a total of 0-0-2-3-4 times". This means you work A.1 once, then A.2 is worked once, and A.3 is repeated (in width) the number of times provided for your size – in this case like so: S = 0 times, M = 0 times, L=2 times, XL= 3 times and XXL = 4 times.

The diagrams are worked as usual: begin with the first row in A.1, then work the first row in A.2 etc.

See DROPS lesson: How to read knitting diagrams

See DROPS lesson: How to read crochet diagrams

The total width of the garment (from wrist-to-wrist) will be larger in the larger sizes, despite the actual sleeves being shorter. The larger sizes have longer sleeve caps and wider shoulders, so there will be a good fit in all sizes.

The measurement sketch/schematic drawing provides information regarding the full length of the garment. If it’s a jumper or a jacket the length is measured from the highest point on the shoulder closest to the neckline, and straight down to the bottom of the garment. It is NOT measured from the tip of shoulder. Similarly, the length of yoke is measured from the highest point on the shoulder and down to where yoke is split into body and sleeves.

On a jacket measures are never taken along bands, unless specifically stated. Always measure inside band stitches when measuring the length.

See DROPS lesson: How to read a schematic drawing

Diagrams are often repeated on the round or in height. 1 repeat is the diagram the way it appears in the pattern. If it says to work 5 repeats of A.1 in the round, then you work A.1 a total of 5 times after/next to each other in the round. If it says to work 2 repeats of A.1 vertically/in height you work the entire diagram once, then begin again at the start and work the entire diagram one more time.

Chain stitches are slightly narrower than other stitches and to avoid working the cast-on edge too tight, we simply chain more stitches to begin with. The stitch count will be adjusted on the following row to fit the pattern and measurement sketch.

The rib edge is more elastic and will contract slightly compared to, for example, stocking stitch. By increasing before the rib edge, you avoid a visible difference in width between the rib edge and the rest of the body.

It’s very easy to cast off too tightly, and by making yarn overs while casting off (and simultaneously casting these off) you avoid a too tight cast off edge.

See DROPS video: How to bind off with yarn overs (yo)

To achieve an even increase (or decrease) you can increase on, for example: every 3rd and 4th row alternately, like so: work 2 rows and increase on the 3rd row, work 3 rows and increase on the 4th. Repeat this until the increase is complete.

See DROPS lesson: Increase or decrease 1 st on every 3rd and 4th row alternately

Should you prefer to work in the round instead of back and forth, you may of course adjust the pattern. You’ll need to add steeks mid-front (usually 5 stitches), and follow the instructions. When you would normally turn and work from the wrong side, simply work across the steek and continue in the round. At the end you’ll cut the piece open, pick up stitches to work bands, and cover the cut edges.

See DROPS video: How to knit steeks and cut open

Should you prefer to work back and forth instead of in the round, you may of course adjust the pattern so you work the pieces separately and then assemble them at the end. Divide the stitches for the body in 2, add 1 edge stitch in each side (for sewing) and work the front and back pieces separately.

See DROPS lesson: Can I adapt a pattern for circular needles into straight needles?

Pattern repeats can vary slightly in the different sizes, in order to get the correct proportions. If you’re not working the exact same size as the garment in the photo, yours might deviate slightly. This has been carefully developed and adjusted so that the complete impression of the garment is the same in all sizes.

Make sure to follow instructions and diagrams for your size!

If you have found a pattern you like which is available in women’s size it’s not very difficult to convert it to men’s size. The biggest difference will be the length of sleeves and body. Start working on the women size that you think would fit across the chest. The additional length will be worked right before you cast off for the armhole/sleeve cap. If the pattern is worked top-down you can add the length right after the armhole or before the first decrease on sleeve.

Regarding additional yarn amount, this will depend on how much length you add, but it is better with a skein too many than too few.

All yarns will have excess fibres (from production) that might come off as lint or shedding. Brushed yarns (ie hairier yarns) have more of these loose, excess fibres, causing more shedding.

Shedding also depends on what is worn under or over the garment, and whether this pulls at the yarn fibres. It’s therefore not possible to guarantee that there will be no shedding

Below are some tips on how to get the best result when working with hairier yarns:

1. When the garment is finished (before you wash it) shake it vigorously so the looser hairs come off. NOTE: do NOT use a lint roller, brush or any method that pulls at the yarn.

2. Place the garment in a plastic bag and put it in your freezer - the temperature will cause the fibres to become less attached to each other, and excess fibres will come off easier.

3. Leave in the freezer for a few hours before taking it out and shaking it again.

4. Wash the garment according to the instructions on the yarn label.

Pilling is a natural process that happens to even the most exclusive of fibers. It's a natural sign of wear and tear that is hard to avoid, and that is most visible in high friction areas of your garment like a sweater's arms and cuffs.

You can make your garment look as new by removing the pilling, using a fabric comb or a pill/lint remover.

Still can't find the answer you need? Then scroll down and leave your question so one of our experts can try to help you. This will be done normally within 5 to 10 working days.
In the meantime, you can read the questions and answers that others have left to this pattern or join the DROPS Workshop on Facebook to get help from fellow knitters/crocheters!

You might also like...

Post a comment to pattern DROPS 227-31

We would love to hear what you have to say about this pattern!

If you want to leave a question, please make sure you select the correct category in the form below, to speed up the answering process. Required fields are marked *.

Comments / Questions (31)

country flag Ulla wrote:

Hei Jeg går ut fra at de rette maskene i mønster A1 skal strikkes på retten, dvs man starter på A1 fra vrangen? (Ellers skulle jeg også ønske at spørsmålene som var stilt på andre språk kunne enkelt oversettes.)

29.01.2024 - 20:01

DROPS Design answered:

Hei Ulla, Om du begynner mønster A.1 fra retten eller vrangen begynner du med 1 rett, deretter 1 vrang. Det spiller ingen rolle. Men hvis du helst vil begynne fra retten avslutter du vrangbord etter en pinne fra vrangen. God fornøyelse!

30.01.2024 - 06:43

country flag Sibylle wrote:

Hallo Zusammen, leider komme ich beim Vorderteil nicht mit den Maschen zurecht. Laut Anleitung wird die Arbeit erst später geteilt. Nach dem stricken von A.2 und A.3 geht es mit A.4 und A.5 weiter. Wenn ich 6 Maschen kraus rechts, 13 Maschen A 1 und dann A.4 + A.5 stricke komme ich auf 82 Maschen -statt 18 Maschen. Was mache ich falsch?

07.01.2024 - 21:42

DROPS Design answered:

Liebe Sibylle, meinen Sie 81 anstatt 18? In XL stricken Sie: 6 M kraus rechts, 13 M A.1, 22 M A.2, 7 M A.1, 22 M A.3, 13 M A.1, 6 M krausrechts = 6+13+22+7+22+13+6=89 Maschen, dann werden 4 Maschen am Anfang der 2 nächsten Reihen abgekettet = 89-8=81 M. Wie zuvor, mit 6 Maschen kraus rechts beidseitig weiterstricken. Die Maschenanzahl wird dann später abnehmen, wenn man A.4 und A.5 strickt. Viel Spaß beim stricken!

08.01.2024 - 10:44

country flag Nicole Carrier wrote:

Bonjour! Pour m'assurer que je comprend bien le patron, pour le devant: quand on a tricoté 2 fois A2 et A4, on fait A3 et A5 qui correspondent aux diminutions donc à la pointe de l'encolure en V, n'est-ce pas? Ce qui devrait arriver à environ 39 cm du bas?

26.11.2023 - 22:16

DROPS Design answered:

Bonjour Mme Carrier, en taille M, après les emmanchures et après avoir tricoté 2 x A.2 et A.3 en hauteur, on va tricoter A.4 et A.5, et, répéter ces diminutions 10 fois au total (5 fois les diagrammes A.4/A.5 en hauteur), en même temps, à 39 cm, divisez l'ouvrage au milieu pour terminer chaque devant séparément. Il doit vous rester 28 mailles pour l'épaule quand les diminutions sont terminées. Bon tricot!

27.11.2023 - 10:12

country flag Dorte Jensen wrote:

Er i gang med forstykket. Efter 2xstrik af A2og A3 kan jeg ikke komme videre. Skal jeg fortsætte med A5&A6 1 gang og hvad med de midterste 7 masker? Skal jeg samtidigt strikke 10 retmasker i hver side inden indtagning til ærmegab? Skal der tages ind til hals samtidigt med indtagning til ærmegab? Mvh

03.11.2023 - 08:29

DROPS Design answered:

Hej Dorte, A.4 og A.5 er indtagningerne til V-hals og du tager ind på hver.2pind til du har taget 10 masker ind på hvert forstykke. Se også måleskitsen nederst i opskriften, her kan du også se hvornår du skal lukke af til ærmegab :)

09.11.2023 - 14:54

country flag Nata Osipowa wrote:

Melody?

08.08.2023 - 00:17

country flag Catherine Martin wrote:

Bonjour, je ne comprends pas le principe du diagramme A1. Je fini par 1 rang endroit et un rang envers. Merci de m apporter plus d explications, En vous remerciant Cordialement Catherine Martin

18.01.2023 - 18:00

DROPS Design answered:

Bonjour Mme Martin, le diagramme A.1 se tricote ainsi, en commençant sur l'endroit: rang 1 (et- tous les rangs impairs): 1 m end, 1 m env; rang 2 (et tous les rangs pairs: 2 m env. Vous alternez ainsi 1 m jersey (1ère maille de A.1) et 1 m point mousse (2ème m de A.1, que l'on tricote à l'envers tous les rangs). Bon tricot!

19.01.2023 - 10:09

country flag ALEXANDRA wrote:

Bonjour! Je voudrai savoir comment faire pour tricoter avec des aiguilles droites et combien de mailles faut-il mettre pour le devant et pour le dos dans la taille xl. Merci

28.12.2022 - 10:06

DROPS Design answered:

Bonjour Alexandra, seul le col se tricote ici en rond, autrement dit, on utilise une aiguille circulaire pour tricoter le devant et le dos (séparément) pour avoir suffisamment de place pour loger toutes les mailles, vous pouvez ainsi utiliser des aiguilles droites pour le devant /le dos, mais le col devra être tricoté en rond. Bon tricot!

02.01.2023 - 11:06

country flag Estelle wrote:

Bonjour Je souhaite réaliser ce modèle, pouvez-vous m’indiquer le nombre de pelote qu’il faut acheter pour une taille L ? Merci

05.10.2022 - 22:49

DROPS Design answered:

Bonjour Estelle, vous trouverez les fournitures nécessaires dans l'en-tête et la quantité de laine, au poids pour chaque taille, en même temps que les aiguilles et l'échantillon, ainsi, en taille L, il va vous falloir 200 g DROPS Sky/50 g la pelote = 4 pelotes + 75 g DROPS Kid-Silk/25 g la pelote = 3 pelotes. Bon tricot!

06.10.2022 - 08:25

country flag Alena wrote:

Good day, I can't understand how to continue A4 and A5 after 4 sts have been cast off for the armholes (size S). Now I have 73 sts instead of 77. There will not be enough sts for the pattern if I continue the remaining sts as before (6 sts in garter st, 7 sts A1, 22 sts A4, 7 sts A1, 22 sts A5 etc..). Thank you for the help.

02.10.2022 - 20:22

DROPS Design answered:

Dear Alena, after casting off 4 stitches, you work 1 less repeat of A.1 on each side. Happy knitting!

03.10.2022 - 00:33

country flag Adelina wrote:

Buonasera, posso utilizzare solo il filato Sky omettendo il Kid silk?

30.08.2022 - 18:48

DROPS Design answered:

Buonasera Adelina, può lavorare il modello con il solo filato Sky, tenendo conto che il risultato e il campione risulteranno diversi rispetto a quelli indicati nel modello. Buon lavoro!

31.08.2022 - 09:44