
Popular categories
Looking for a yarn?


Comments / Questions (24)
![]() Michela wrote:
Michela wrote:
Buongiorno nel modello si parla di bottoni e asole, ma nelle istruzioni di lavorazione non ne trovo traccia. Dove e come vanno fatte?
14.01.2022 - 09:17DROPS Design answered:
Buonasera Michela, abbiamo corretto il testo, grazie per la segnalazione: non ci sono bottoni e asole in questo modello. Buon lavoro!
14.01.2022 - 21:02
![]() Kerstin Wittelmeyer wrote:
Kerstin Wittelmeyer wrote:
Um den Pullover nach der Anleitung First Rain Mit Big Delight und brushed alpaca silk (2fädig) in Größe M zu stricken brauche ich wieviel g von jeweils Big Delight und Brushed Alpaca? Ich stricke mit Nadelstärke 9. Ich habe bereits 300g Big Delight und 150g Brushed Alpaca bestellt , fürchte aber es ist zu wenig. Danke für Ihre Antwort. Kerstin Wittelmeyer
13.01.2022 - 13:31DROPS Design answered:
Liebe Frau Wittelmeyer, diese Lektion erklärt, wie man die neue Garnmenge kalkuliert, dh siehe 1 Faden durch 2 oder mehr Fäden ersetzen:. Viel Spaß beim stricken!
13.01.2022 - 16:21
![]() Christine wrote:
Christine wrote:
Wie sol ich den Halsausschnitt stricken wen bei der Maschenprobe zu klein st .danke schön.
17.11.2021 - 18:35
![]() Renate wrote:
Renate wrote:
Ik ben bij het punt dat ik het werk moet verdelen in lijf en mouwen. Ik heb 24 steken gebreid (helft van het achterland) en heb de volgende 33 steken op een hulpnaald gezet. De 6 steken die ik nu op moet zetten, moet ik die met het lijf meebreien? Of moet ik die 6 steken opzetten en met de mouwen meebreien. Er staat nl 107 st voor het lijf (dat is incl die 12 st die ik moet opzetten) maar bij de mouw moet ik ook iets doen met de 6 steken. Graag uw reactie😀
10.11.2021 - 16:23DROPS Design answered:
Dag Renate,
De 6 steken die je nu opzet brei je mee met het lijf en komen tussen het achterpand en het voorpand, dus in de oksel. Als je kaar bent met het lijf, dan brei je de mouw en zet je bij de mouw ook 6 steken op onder de oksel. Als de mouw klaar is naai je de oksel dicht.
11.11.2021 - 07:33
![]() Connie wrote:
Connie wrote:
I have started this sweater and I don't know what the A1 pattern is; I see the diagram, is this a double increase? the diagram has the two ovals on each side of the 3rd K stitch, so is it a double increase or is the diagram meaning to do the make on yo on stitch 3?
07.11.2021 - 03:45DROPS Design answered:
Hi Connie, the first row of A.1 is knitted as follows: knit 2, 1 yarn over, knit 1 (third stitch), 1 yarn over, knit 2. On the next round knit the yarn over twisted to avoid holes. Happy knitting!
07.11.2021 - 10:45
![]() Connie wrote:
Connie wrote:
Thank you for the reply. Another question: going up a needle size to get gauge makes the knit loose, lacy like, I don't like that. If I use the needle down a size because the knitting is a tiny bit tighter but more appealing to me, I need a medium, if I make a large, with the needle that makes the knit a tighter to my taste, will the sweater fit in theory??
01.11.2021 - 00:37
![]() Connie wrote:
Connie wrote:
I purchased the wish yarn to make this sweater, I have done multiple gauge Swatch and with multiple needle sizes and cannot get the correct gauge, each one is about a half a cm off, will this make a huge difference in the pattern? I get 10cm long by 9 1/2cm width, when I go up a needle it is over by 1/2. what should I do?
10.10.2021 - 02:35DROPS Design answered:
Dear Connie, the pattern should have 11 sts. As long as it's only 1/2 cm more (not less, since, when removing 1/2 cm in each pattern worked, you'd need to work the next size) it should be fine; it will be a bit more loose than the original, but it's better than making it too small. Happy knitting!
10.10.2021 - 23:31
![]() Jane O wrote:
Jane O wrote:
I fully agree with Michele Crawford. Not keen on the wide cuffs either. Whish the patterns would be more exciting and modern but probably the same designers repeat their old designs, only changing the colors. They all look the same. Just imagine if they eg had put trumpet sleeves instead with a beautiful lace border. I would directly run to the closest yarn shop and by the yarn. Wish that the patterns would be more inspiring, creative & beautiful. I visit "Drops" less frequently nowadays.
03.10.2021 - 23:51
![]() Eva wrote:
Eva wrote:
Comfy Cloud
24.08.2021 - 23:31
![]() Inke Jörgensen wrote:
Inke Jörgensen wrote:
Very beautiful! Thank you!
24.08.2021 - 21:12
|
|||||||
First Rain#firstrainsweater |
|||||||
 |
 |
||||||
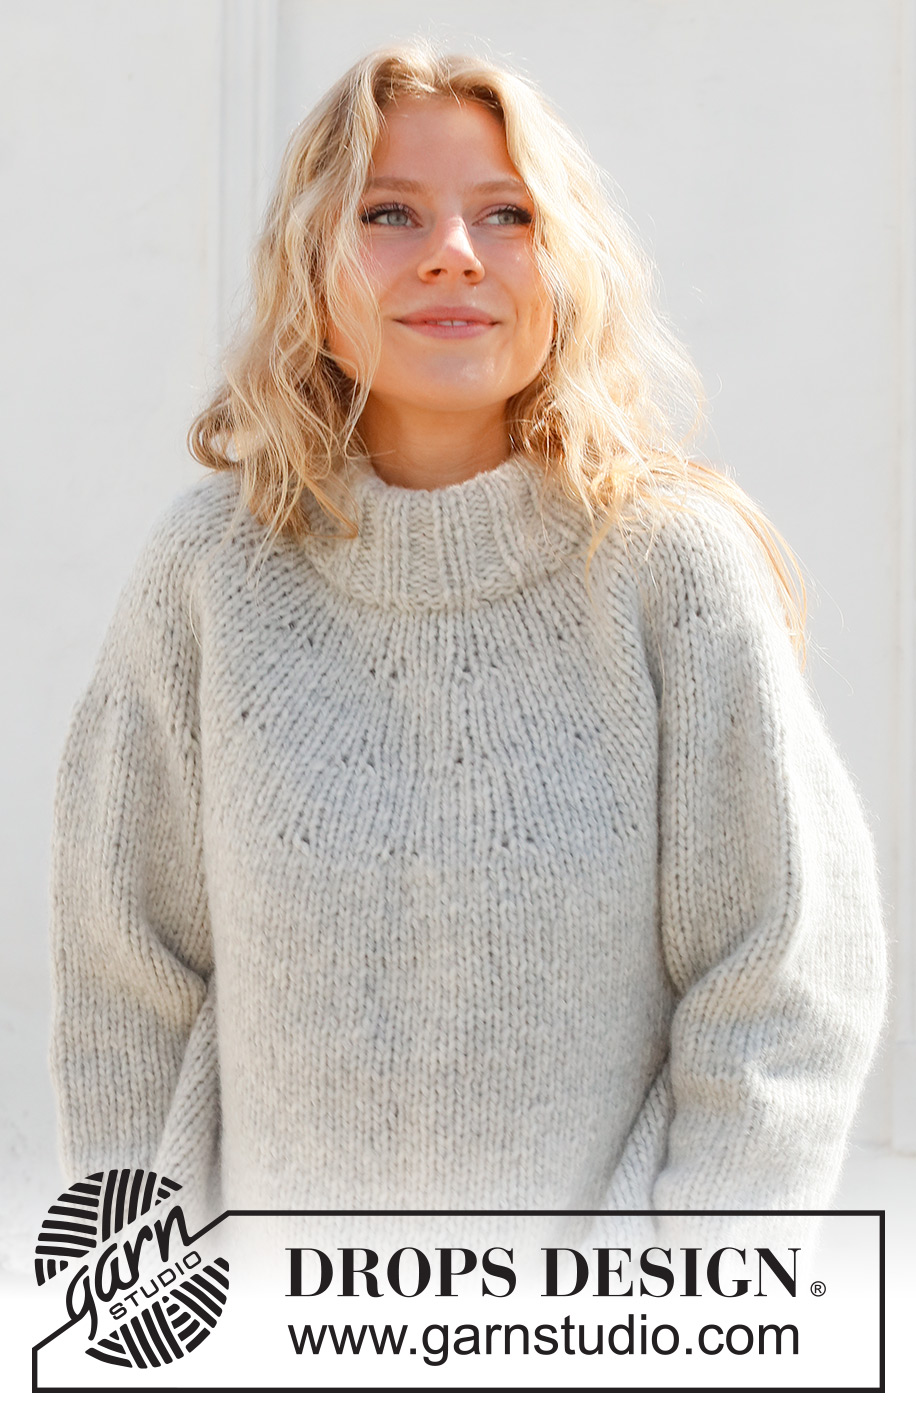
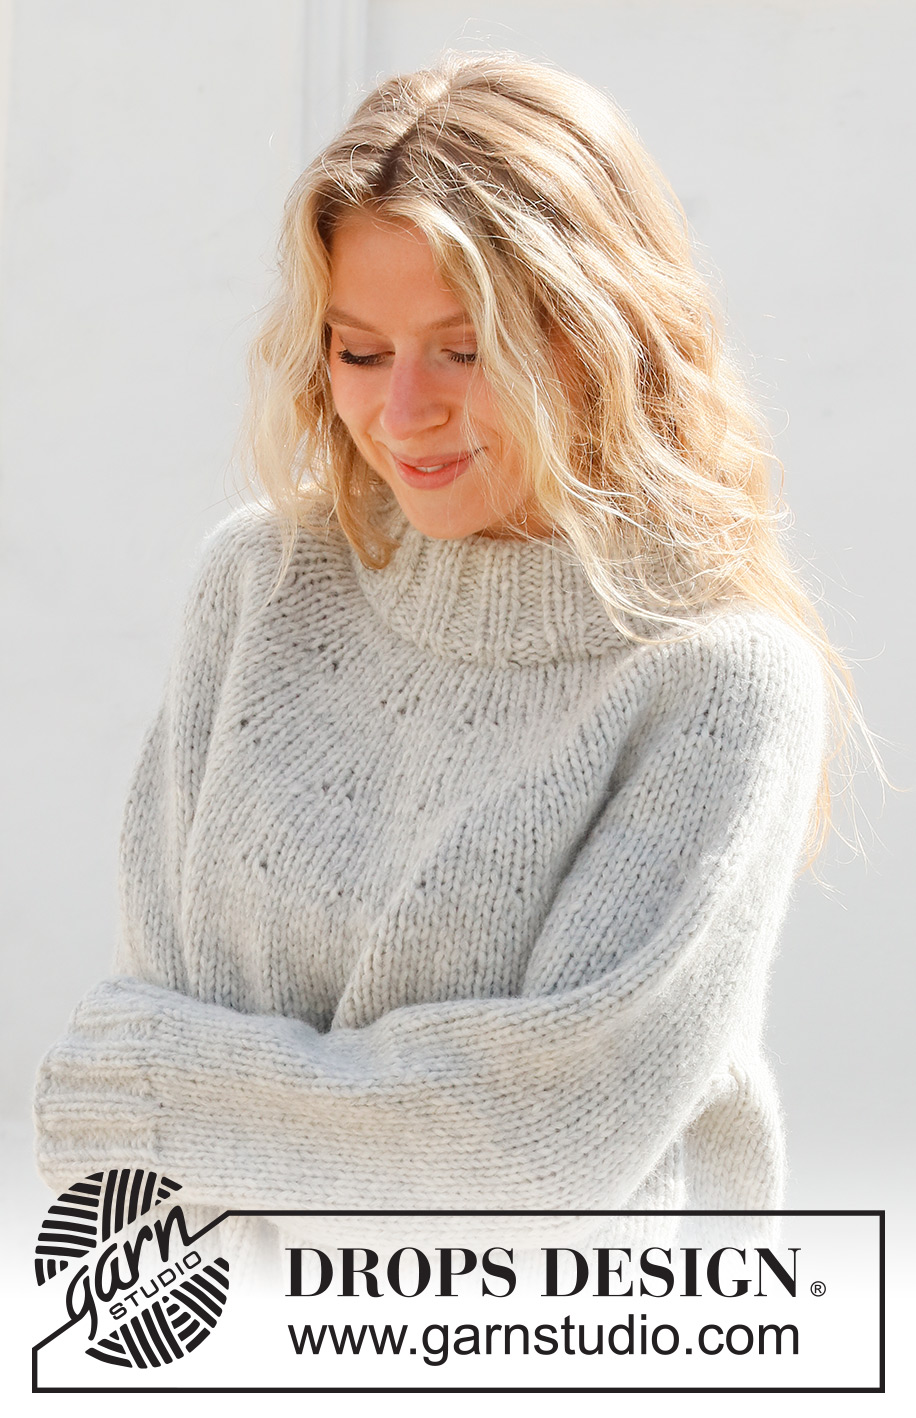
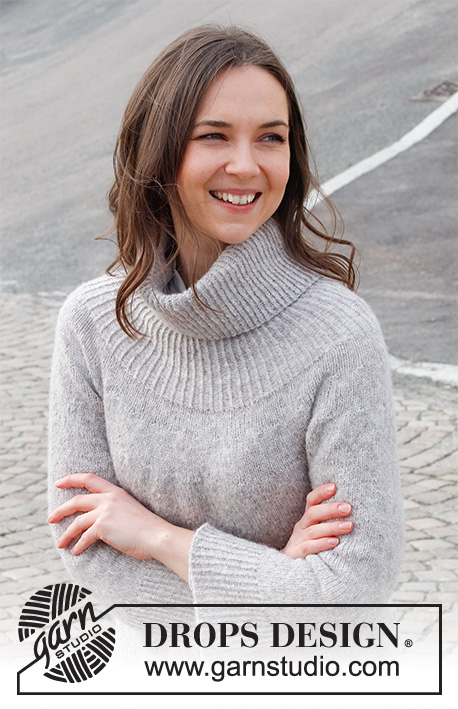
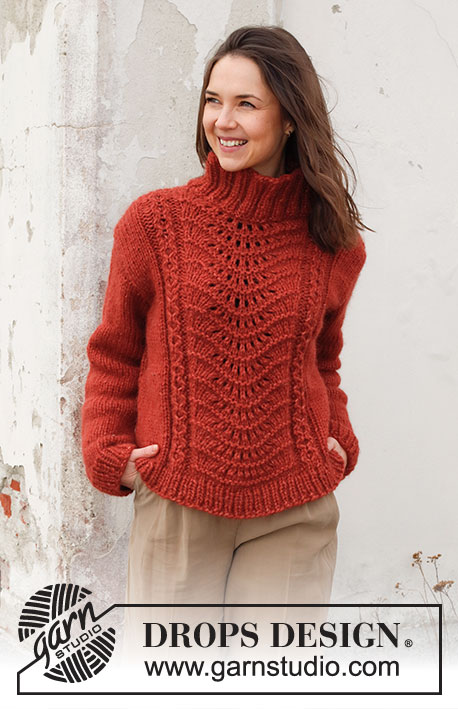
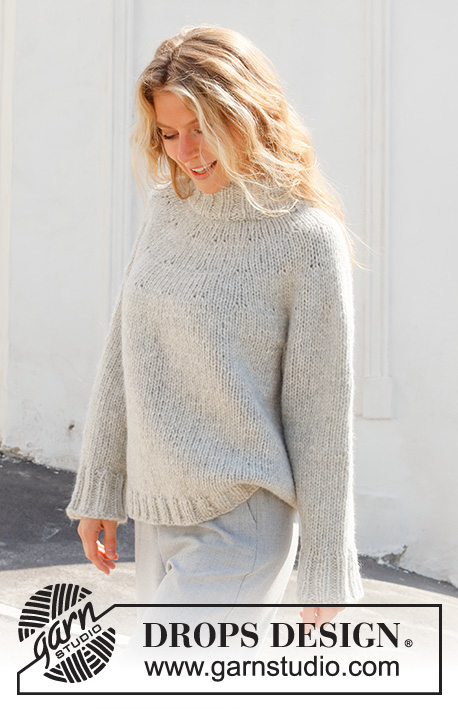
Knitted jumper in DROPS Wish or DROPS Andes. The piece is worked top down, with round yoke and double neck. Sizes S - XXXL.
DROPS 228-7 |
|||||||
|
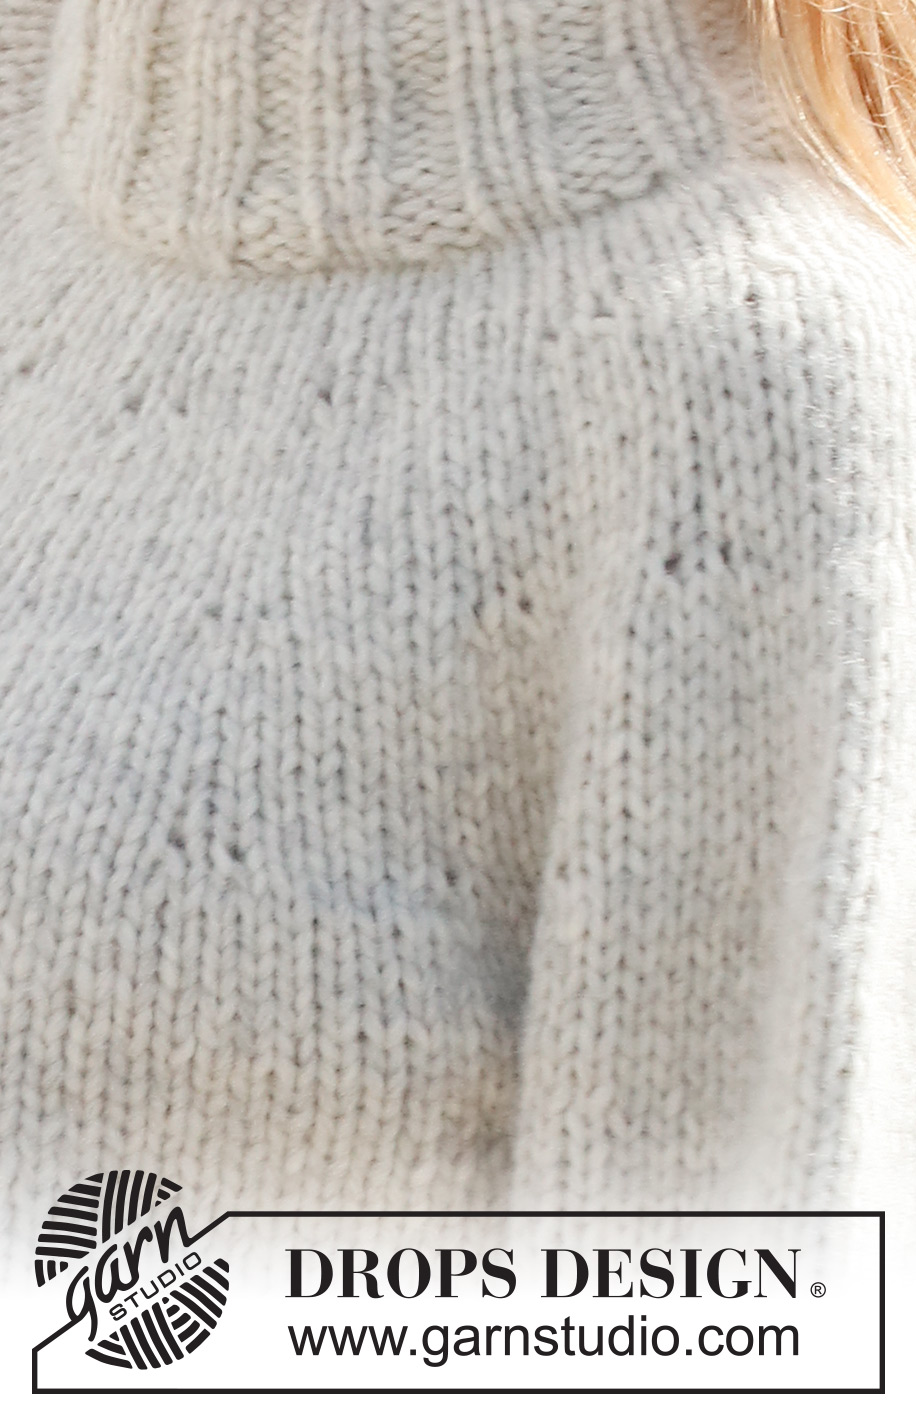
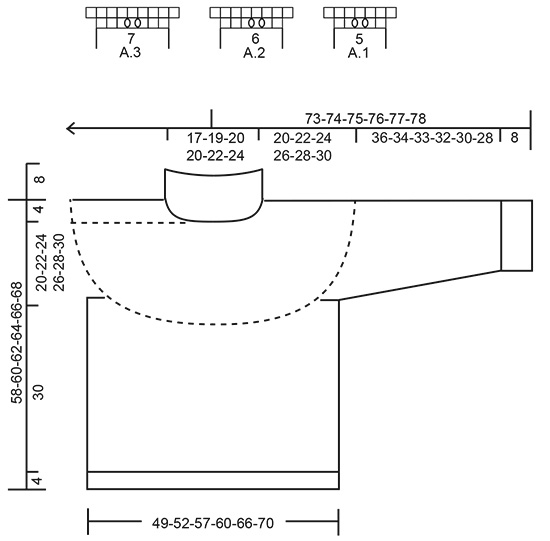
------------------------------------------------------- EXPLANATIONS FOR THE PATTERN: ------------------------------------------------------- PATTERN: See diagrams A.1 to A.3. INCREASE TIP (evenly spaced): To work out how to increase evenly, count the total number of stitches on the needle (e.g. 60 stitches) and divide by the number of increases to be made (e.g. 5) = 12. In this example, increase by making 1 yarn over after each 12th stitch. On the next round knit the yarn overs twisted to avoid holes. DECREASE TIP (for sleeves): Decrease 1 stitch on either side of the marker thread as follows: Work until there are 3 stitches left before the marker thread, knit 2 together, knit 2 (marker thread sits between these 2 stitches), slip 1 stitch as if to knit, knit 1 and pass the slipped stitch over the knitted stitch (2 stitches decreased). CASTING-OFF TIP: To avoid the cast-off edge being tight you can cast off with a larger size needle. If the edge is still tight, make 1 yarn over after approx. each 6th stitch at the same time as casting off; the yarn overs are cast off as normal stitches. ------------------------------------------------------- START THE PIECE HERE: ------------------------------------------------------- JUMPER – SHORT OVERVIEW OF THE PIECE: The neck and yoke are worked in the round with circular needle, from mid back and top down. The yoke is divided for body and sleeves and the body is continued in the round with circular needle. The sleeves are worked with double pointed needles, top down. DOUBLE NECK: Cast on 75-80-85-85-90-95 stitches with short circular needle size 6 mm and DROPS Wish or DROPS Andes. Knit 1 round, then work rib in the round (knit 2, purl 3) for 4 cm. Now decrease all purl-3 to purl-2 = 60-64-68-68-72-76 stitches. Continue the new rib until the neck measures 16 cm. Knit 1 round where you increase 5-6-7-12-13-14 stitches evenly spaced – read INCREASE TIP = 65-70-75-80-85-90 stitches. Knit 1 round. Insert a marker at the beginning of the round; the yoke is measured from this marker! YOKE: Change to circular needle size 8 mm and work stocking stitch. REMEMBER THE KNITTING TENSION! When the piece measures 4 cm from the marker increase as follows: INCREASE 1: Work A.1 for the whole round (= 13-14-15-16-17-18 repeats of 5 stitches). When A.1 has been completed there are 91-98-105-112-119-126 stitches. Continue with stocking stitch until the piece measures 9-10-10-11-12-13 cm from the marker. INCREASE 2: Work A.3 over the first 0-7-7-14-14-0 stitches (= 0-1-1-2-2-0 repeats of 7 stitches), A.2 over the next 42-42-42-42-42-60 stitches (= 7-7-7-7-7-10 repeats of 6 stitches), A.3 over the next 7-0-7-0-7-0 stitches, A.2 over the next 42-42-42-42-42-66 stitches (= 7-7-7-7-7-11 repeats of 6 stitches), A.3 over the last 0-7-7-14-14-0 stitches. When the diagrams have been completed there are 121-130-139-148-157-168 stitches. Continue with stocking stitch until the piece measures 14-16-17-19-20-22 cm from the marker. INCREASE 3: Work A.3 over the first 0-7-0-7-0-0 stitches, A.2 over the next 54-48-66-60-78-84 stitches (= 9-8-11-10-13-14 repeats of 6 stitches), A.3 over the next 7-14-7-14-7-0 stitches (= 1-2-1-2-1-0 repeats of 7 stitches), A.2 over the next 60-54-66-60-72-84 stitches (= 10-9-11-10-12-14 repeats of 6 stitches), A.3 over the last 0-7-0-7-0-0 stitches. When the diagrams have been completed there are 161-172-185-196-209-224 stitches. Continue with stocking stitch until the piece measures 20-22-24-26-28-30 cm from the marker Now divide for the body and sleeves as follows: Work the first 24-25-27-29-32-34 stitches (= half back piece), place the next 33-35-38-40-40-43 stitches on 1 thread for the sleeve, cast on 6-6-8-8-8-8 stitches (= in side under sleeve), work 47-51-55-58-65-69 stitches (= front piece), place the next 33-35-38-40-40-43 stitches on 1 thread for the sleeve, cast on 6-6-8-8-8-8 stitches (= in side under sleeve), work the remaining 24-26-27-29-32-35 stitches (= half back piece). The body and sleeves are finished separately. THE PIECE IS NOW MEASURED FROM HERE! BODY: = 107-114-125-132-145-154 stitches. Continue with stocking stitch in the round for 30 cm. Try the jumper on and work to desired length – there is approx. 4 cm left to finished length. Knit 1 round and increase 21-22-23-24-27-34 stitches evenly spaced = 128-136-148-156-172-188 stitches. Change to circular needle size 6 mm and work rib (knit 2, purl 2) for 4 cm. Cast off with knit over knit and purl over purl – read CASTING-OFF TIP. The jumper measures approx. 58-60-62-64-66-68 cm from the shoulder down. SLEEVES: Place the 33-35-38-40-40-43 stitches from the thread on the one side of the piece on double pointed needles/short circular needle size 8 mm and knit up 1 stitch in each of the 6-6-8-8-8-8 stitches cast on under the sleeve = 39-41-46-48-48-51 stitches. Insert a marker thread in the middle of the new stitches under the sleeve. Allow the thread to follow your work onwards; it will be used when decreasing. Start at the marker thread and work stocking stitch in the round for 4 cm. Now decrease 2 stitches under the sleeve – read DECREASE TIP. Decrease like this every 6-5-3½-3-3-2 cm a total of 6-6-8-9-9-10 times = 27-29-30-30-30-31 stitches. Continue working until the sleeve measures 36-34-33-32-30-28 cm (shorter measurements in larger sizes due to wider neck and longer yoke). Try the jumper on and work to desired length – approx. 8 cm to finished length. Knit 1 round and increase 5-7-6-10-10-9 stitches evenly spread = 32-36-36-40-40-40 stitches. Change to double pointed needles size 6 mm and work rib (knit 2, purl 2) for 8 cm. Cast off with knit over knit and purl over purl – remember CASTING-OFF TIP. The sleeve measures approx. 44-42-41-40-38-36 cm from the division. Work the other sleeve in the same way. ASSEMBLY: Fold the neck double to the inside and sew down. To avoid the neck being tight and rolling outwards, it is important that the seam is elastic. |
|||||||
Diagram explanations |
|||||||
|
|||||||
 |
|||||||
Have you finished this pattern?Tag your pictures with #dropspattern #firstrainsweater or submit them to the #dropsfan gallery. Do you need help with this pattern?You'll find 30 tutorial videos, a Comments/Questions area and more by visiting the pattern on garnstudio.com. © 1982-2026 DROPS Design A/S. We reserve all rights. This document, including all its sub-sections, has copyrights. Read more about what you can do with our patterns at the bottom of each pattern on our site. |
|||||||


With over 40 years in knitting and crochet design, DROPS Design offers one of the most extensive collections of free patterns on the internet - translated to 17 languages. As of today we count 324 catalogues and 12290 patterns translated into English (UK/cm).
We work hard to bring you the best knitting and crochet have to offer, inspiration and advice as well as great quality yarns at incredible prices! Would you like to use our patterns for other than personal use? You can read what you are allowed to do in the Copyright text at the bottom of all our patterns. Happy crafting!
Post a comment to pattern DROPS 228-7
We would love to hear what you have to say about this pattern!
If you want to leave a question, please make sure you select the correct category in the form below, to speed up the answering process. Required fields are marked *.