
Popular categories
Looking for a yarn?


Comments / Questions (129)
![]() Jocelyne wrote:
Jocelyne wrote:
Bonjour, Après les côtes de l'encolure, est-ce que je peux terminer l'ouvrage avec un rabattage classique ou je dois faire un rabattage spécial à la suite de côtes? Merci beaucoup à l'avance.
12.04.2026 - 16:22DROPS Design answered:
Bonjour Jocelyne, on rabat ici les mailles du col avec des jetés pour que le col reste souple, on va utiliser cette technique, en faisant 1 jeté après environ chaque 4ème maille. Bon tricot!
13.04.2026 - 10:29
![]() Jocelyne wrote:
Jocelyne wrote:
Au col dois-je tourner l'ouvrage du côté envers après le premier rang tricoté en A1? Merci.
08.04.2026 - 22:54DROPS Design answered:
Bonjour Jocelyne, le col se tricote ici en rond, vous restez donc sur l'endroit et tricotez A.1 en rond (1 m torse à l'endroit, 1 m envers). Bon tricot!
09.04.2026 - 10:58
![]() Quijoux wrote:
Quijoux wrote:
Bonjour, Est-il possible de réaliser ce modèle avec des aiguilles droites ? Merci d'avance pour votre retour. Bien à vous. C.Q
05.04.2026 - 11:57DROPS Design answered:
Bonjour Mme Quijoux, dans la mesure où l'on tricote ici le dos et le devant séparément en allers et retours sur aiguille circulaire, tout à fait. Faites ensuite la couture d'une seule épaule, tricotez le col et terminez par couture du col et de la 2ème épaule. Découvrez plus d'infos ici. Bon tricot!
08.04.2026 - 10:30
![]() Daisy Vander Linden wrote:
Daisy Vander Linden wrote:
Als ik vanaf de armsgaten brei heb ik maar 4 steken opzij aan elke kant meer over om verder te breien. Op de foto zie ik echter een bredere band. Hoe los ik dat op?
31.03.2026 - 15:55DROPS Design answered:
Dag Daisy,
Als het goed is heb je vanaf een bepaalde hoogte (vlak onder de armsgaten) A.1 gebreid op de zijkanten. Als je afkant voor het armsgat, blijven er nog steeds een aantal steken over in het telpatroon. Dit is die band die langs het armsgat loopt.
04.04.2026 - 21:23
![]() Birte wrote:
Birte wrote:
Hej Er det rigtigt, at der skal tages masker IND efter ribkanten forneden? Kan jeg bruge garn med strikkefasthed 22/10 på pinde 3 1/2? Og stadig bruge rundpinde 3,5 og 4,5? På forhånd tak.
20.03.2026 - 09:25DROPS Design answered:
Hej Birte, for at få målene i opskriften, skal du have samme strikkefasthed som der står i opskriften. Ja, det stemmer at du skal tage ind efter ribkanten :)
08.04.2026 - 13:54
![]() Anke Pfannschmidt wrote:
Anke Pfannschmidt wrote:
Hallo, ich würde gerne Drops 227-9 Visit Vienna stricken. In der Anleitung steht man soll das Diagramm A.1. benutzen. Leider finde ich das Diagramm in der Anleitung nicht. Was kann ich tun? Es wäre toll, wenn sie mir das Diagramm mailen könnten. Vielen Dank.
08.03.2026 - 10:34DROPS Design answered:
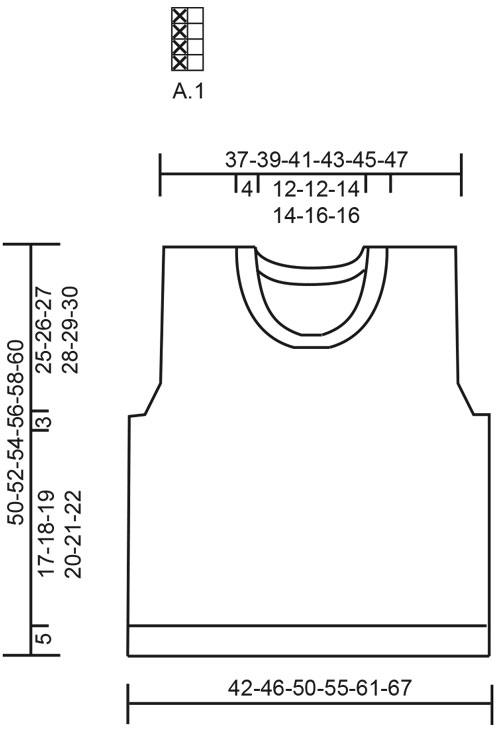
Liebe Frau Pfannschmidt, das Diagram A.1 finden Sie unter der Seite, zwischen Diagramm und Maßskizze, es wird über 2 Maschen und 4 Reihen gezeichnet. Viel Spaß beim Stricken!
09.03.2026 - 09:27
![]() Valerie wrote:
Valerie wrote:
How do I download this pattern?
26.02.2026 - 06:08
![]() Johanna wrote:
Johanna wrote:
I am on the section 'decrease for armholes - see decrease tip 2' This states 'work the first 11 stitches as before.....' Does this mean that you follow the pattern from the previous two lines? i.e. 1 x edge stitch in garter, A.1 pattern over the next 8 stitches, then 2 x garter = 11 stitches. Is this patterned continued all the way to the shoulders? It is not 100% clear and the pattern is not shown on the diagram. Thank you
19.02.2026 - 10:40
![]() Renate wrote:
Renate wrote:
Warum soll man in der ersten Reihe glatt rechts Maschen abnehmen?
19.02.2026 - 07:40DROPS Design answered:
Liebe Renate, das Bündchen soll locker und fließend fallen und den Pullunder unten nicht zusammenziehen, daher werden nach dem Bündchen Maschen abgenommen. Viel Spaß beim Stricken!
23.02.2026 - 09:10
![]() Elisabeth wrote:
Elisabeth wrote:
Vad betyder 1 över 12 i mönsterberskrivningen ?
18.02.2026 - 18:03DROPS Design answered:
Hej Elisabeth. Se svar under. Mvh DROPS Design
19.02.2026 - 14:35
|
|||||||
Visit Vienna#visitviennaslipover |
|||||||
 |
 |
||||||
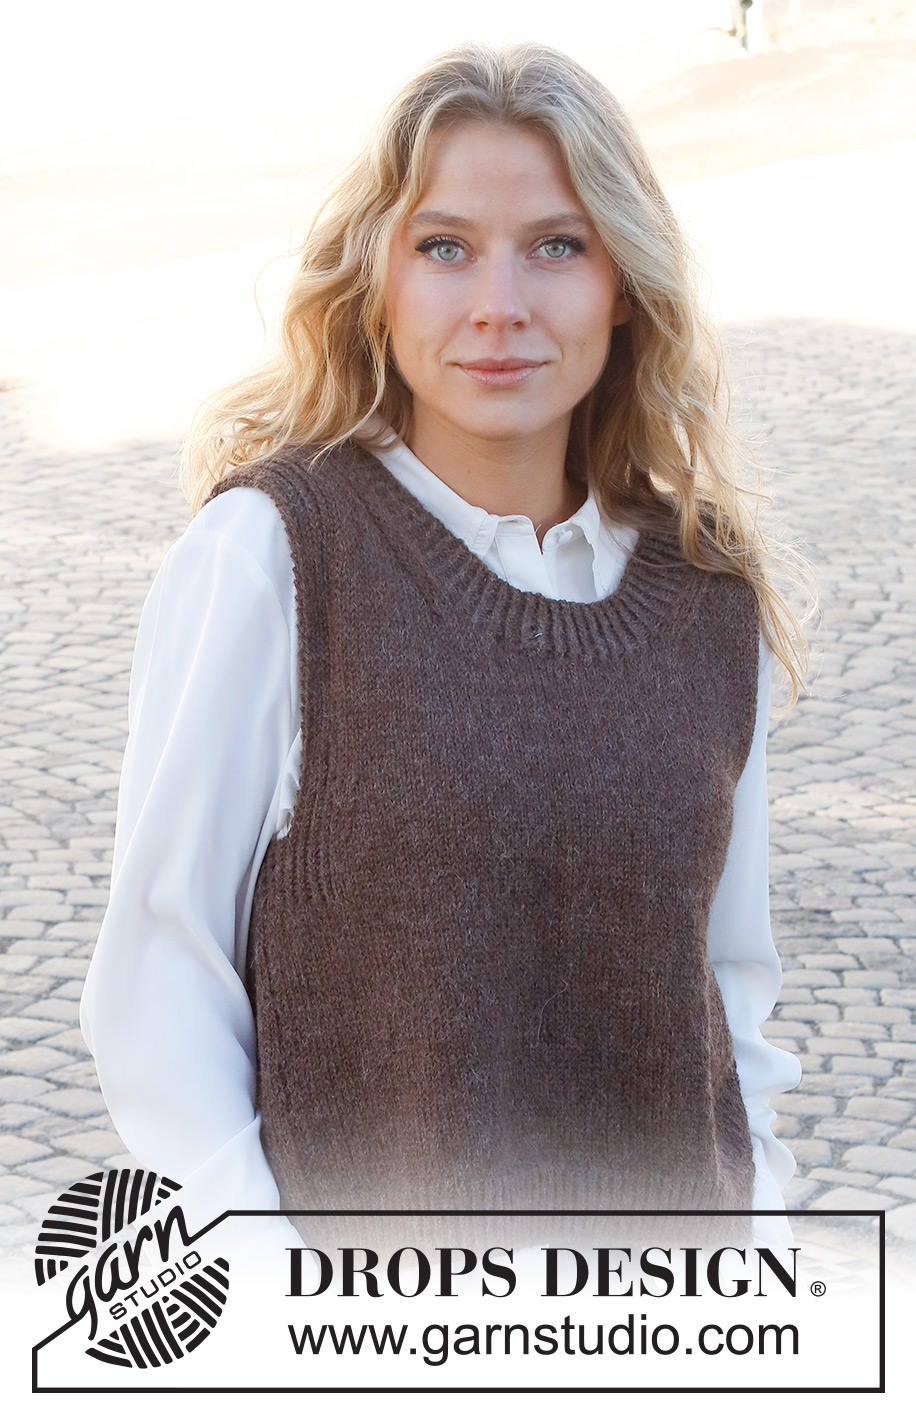
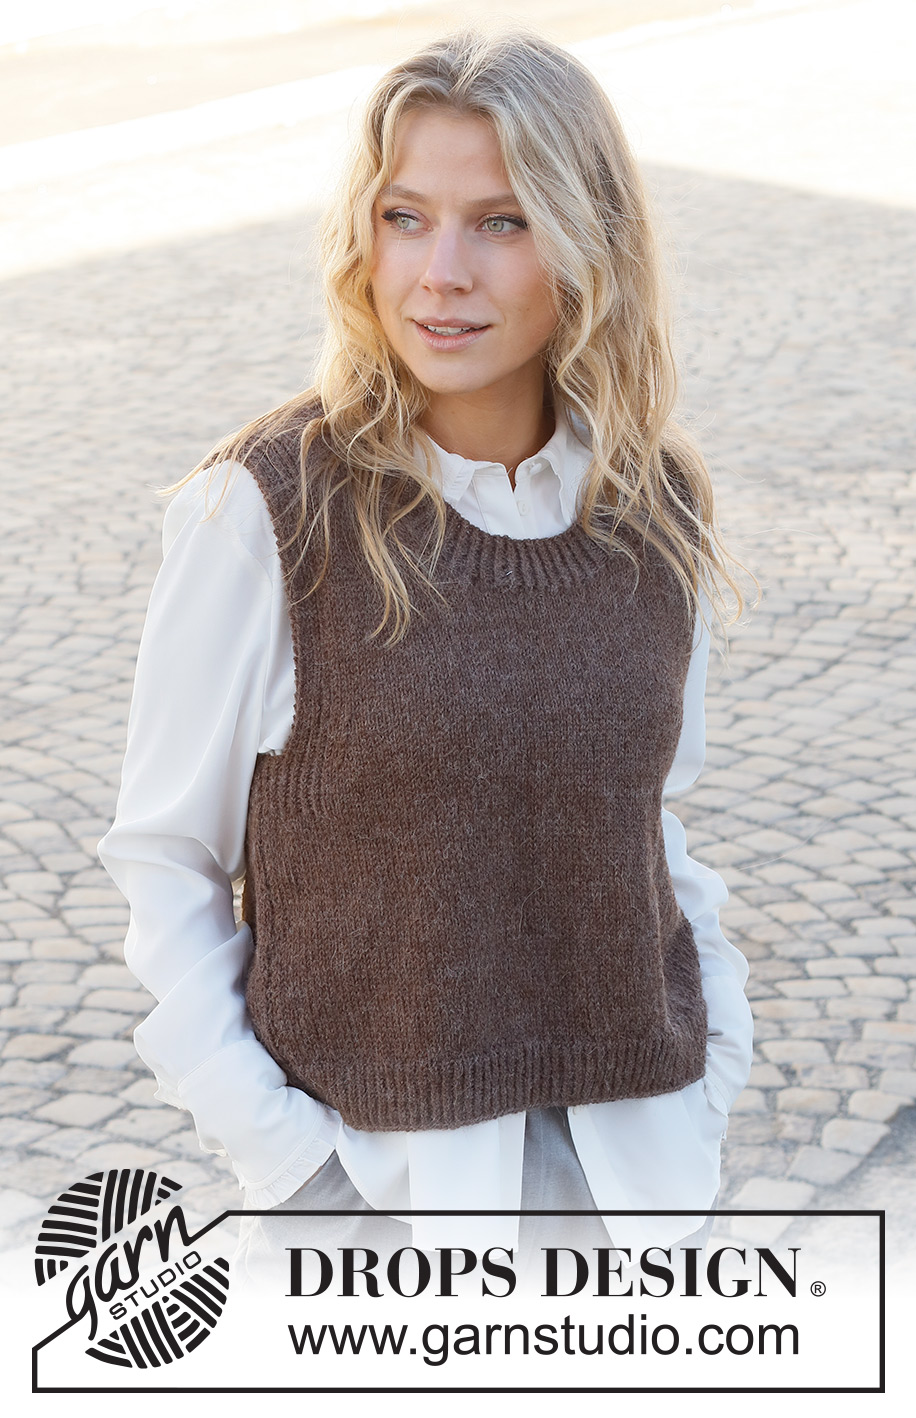
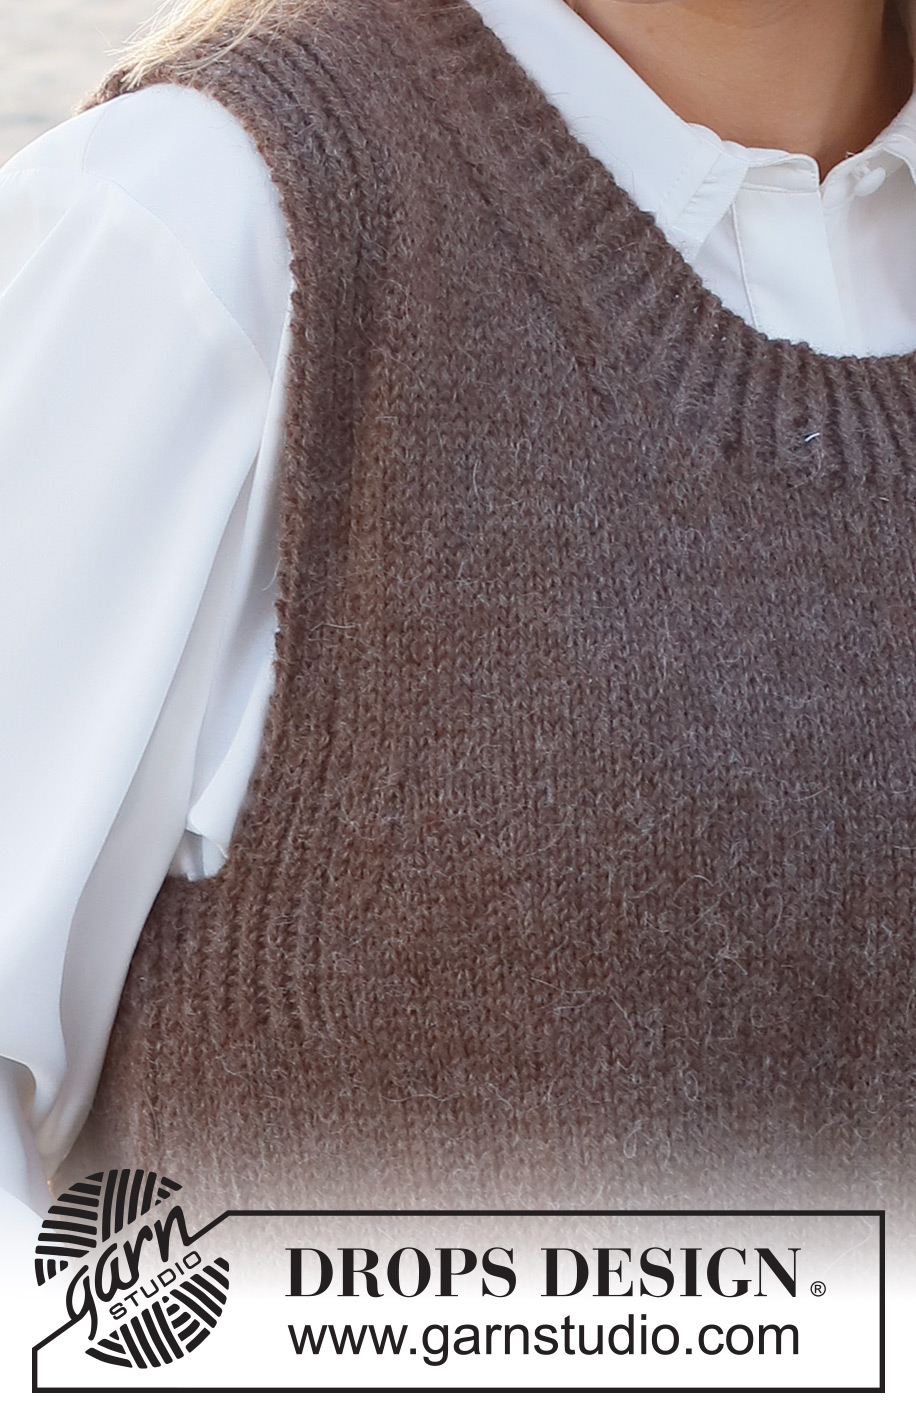
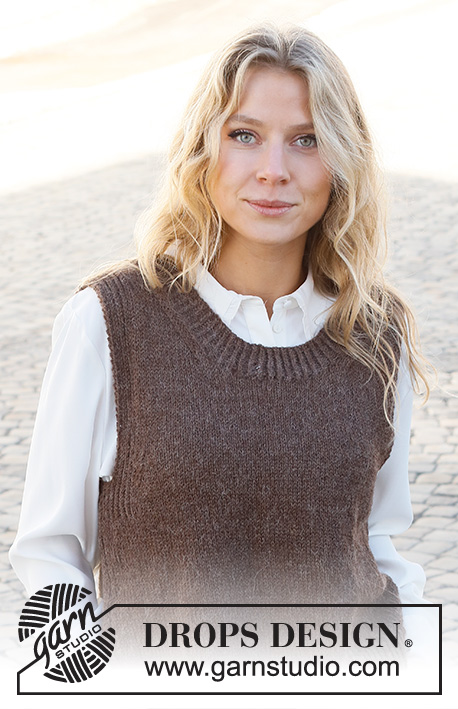
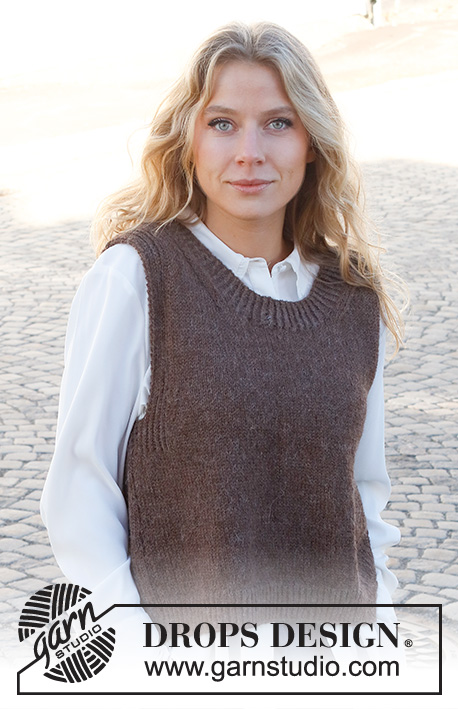
Knitted vest / slipover in DROPS Puna. The piece is worked with ribbed edges. Sizes S - XXXL.
DROPS 227-9 |
|||||||
|
------------------------------------------------------- EXPLANATIONS FOR THE PATTERN: ------------------------------------------------------- RIDGE/GARTER STITCH (worked back and forth): Knit all rows. 1 ridge = knit 2 rows PATTERN: See diagram A.1. The diagram shows all rows in the pattern from the right side. DECREASE TIP-1 (evenly spaced): To work out how to decrease evenly, count the total number of stitches on needle (e.g. 103 stitches) minus the edge stitches (e.g. 2 stitches) and divide the remaining stitches by the number of decreases to be made (e.g. 17) = 5.9. In this example decrease by knitting together approx. each 5th and 6th stitch. Do not decrease the edge stitches. DECREASE TIP-2 (armholes): All decreases are worked from the right side! Decrease at the beginning of row: Work the first 11 stitches as before, slip 1 stitch as if to knit, knit 1 and pass the slipped stitch over the knitted stitch (= 1 stitch decreased). Decrease at the end of row: Work until there are 13 stitches left, knit 2 together and work to end of row (= 1 stitch decreased). DECREASE TIP-3 (neck): All decreases are worked from the right side! After the neck: Work 1 edge stitch in garter stitch, 2 stitches in stocking stitch, slip 1 stitch as if to knit, knit 1 and pass the slipped stitch over the knitted stitch (= 1 stitch decreased). Before the neck: Work until there are 5 stitches left, knit 2 together and work to end of row (= 1 stitch decreased). CASTING-OFF TIP: To avoid the cast-off edge being tight you can cast off with a larger size needle. If the edge is still tight, make 1 yarn over after approx. each 4th stitch at the same time as casting off; the yarn overs are cast off as normal stitches. ------------------------------------------------------- START THE PIECE HERE: ------------------------------------------------------- VEST – SHORT OVERVIEW OF THE PIECE: The piece is worked in sections, back and forth on the needle and then sewn together. The neck is worked to finish. BACK PIECE: Cast on 103-113-121-133-149-163 stitches (including 1 edge stitch on each side) with circular needle size 3.5 mm and DROPS Puna. Purl 1 row from the wrong side, then work rib from the right side as follows: 1 edge stitch in GARTER STITCH – read description above, work A.1 until there are 2 stitches left, work the first stitch in A.1 (so the pattern is symmetrical) and 1 edge stitch in garter stitch. Continue this rib back and forth for 5 cm – adjust so the next row is from the right side. Knit 1 row where you decrease 17-19-19-21-25-27 stitches evenly spaced – read DECREASE TIP-1 = 86-94-102-112-124-136 stitches. Change to circular needle size 4.5 mm. Purl 1 row from the wrong side. Continue with stocking stitch and 1 edge stitch in garter stitch on each side. REMEMBER THE KNITTING TENSION! When the piece measures 22-23-24-25-26-27 cm, work pattern as follows from the right side: 1 edge stitch in garter stitch, A.1 over the next 12-12-12-14-16-18 stitches, stocking stitch until there are 13-13-13-15-17-19 stitches left, purl 1, A.1 over the next 11-11-11-13-15-17 stitches and 1 edge stitch in garter stitch. Continue this pattern. When the piece measures 25-26-27-28-29-30 cm (the rib on each side measures 3 cm – adjust to work next row from the right side), work as follows: Cast off the first 4-4-4-6-8-10 stitches for the armholes at the beginning of the next 2 rows (cast off with knit) = 78-86-94-100-108-116 stitches. The next row from the right side is worked as follows: 1 edge stitch in garter stitch, pattern as before over the next 8 stitches, work stocking stitch until there are 9 stitches left, pattern over the next 8 stitches and 1 edge stitch in garter stitch. Continue this pattern. On the next row from the right side, decrease 1 stitch on each side for the armholes – read DECREASE TIP-2! Decrease like this each row from the right side a total of 1-3-5-6-8-10 times = 76-80-84-88-92-96 stitches. When the piece measures 46-48-50-52-54-56 cm, cast off the middle 36-36-40-40-44-44 stitches for the neck and each shoulder (= 20-22-22-24-24-26 stitches) is finished separately. On the next row from the right side, decrease 1 stitch for the neck – read DECREASE TIP-3! Decrease like this each row from the right side a total of 2 times = 18-20-20-22-22-24 stitches. Continue with pattern and stocking stitch until the piece measures 50-52-54-56-58-60 cm. Cast off with knit over knit and purl over purl. Work the other shoulder in the same way. FRONT PIECE: Cast on and work as for the back piece. When the piece measures 35-37-37-39-39-41 cm (there are 76-80-84-88-92-96 stitches on the needle), place the middle 18-18-20-20-24-24 stitches on a thread for the neck and each shoulder (= 29-31-32-34-34-36 stitches) is finished separately On the next row from the right side, decrease 1 stitch for the neck – remember DECREASE TIP-3! Decrease like this each row from the right side a total of 11-11-12-12-12-12 times = 18-20-20-22-22-24 stitches. Continue with pattern and stocking stitch until the piece measures 50-52-54-56-58-60 cm. Cast off with knit over knit and purl over purl. Work the other shoulder in the same way. ASSEMBLY: Sew the shoulder seams inside the cast-off edge. Sew the side seams inside the 1 edge stitch. NECK: Start from the right side at one shoulder seam and knit up 120 to 148 stitches (including the stitches from the thread) inside the 1 edge stitch, with short circular needle size 3.5 mm and DROPS Puna. The number of stitches must be divisible by 2; make sure the neck is neither too loose nor too tight. Work A.1 in the round over all stitches for 4½ cm. Cast off with knit-twisted over knit-twisted and purl over purl – read CASTING-OFF TIP. |
|||||||
Diagram explanations |
|||||||
|
|||||||
 |
|||||||
Have you finished this pattern?Tag your pictures with #dropspattern #visitviennaslipover or submit them to the #dropsfan gallery. Do you need help with this pattern?You'll find 28 tutorial videos, a Comments/Questions area and more by visiting the pattern on garnstudio.com. © 1982-2026 DROPS Design A/S. We reserve all rights. This document, including all its sub-sections, has copyrights. Read more about what you can do with our patterns at the bottom of each pattern on our site. |
|||||||


With over 40 years in knitting and crochet design, DROPS Design offers one of the most extensive collections of free patterns on the internet - translated to 17 languages. As of today we count 325 catalogues and 12298 patterns translated into English (UK/cm).
We work hard to bring you the best knitting and crochet have to offer, inspiration and advice as well as great quality yarns at incredible prices! Would you like to use our patterns for other than personal use? You can read what you are allowed to do in the Copyright text at the bottom of all our patterns. Happy crafting!
Post a comment to pattern DROPS 227-9
We would love to hear what you have to say about this pattern!
If you want to leave a question, please make sure you select the correct category in the form below, to speed up the answering process. Required fields are marked *.