Comments / Questions (13)
![]() Ruth wrote:
Ruth wrote:
Sorry i meant to write that i messed up my sleeve increases, not decreases.
18.03.2024 - 00:07
![]() Ruth wrote:
Ruth wrote:
Hi, i messed ip my sleeve decreases, and instead of decreasing on both sides of a first stitch of a row, i decreased on both sides of the last stitch of a row, i think this shifted my sleeve centre to the left, and now i have to do cast off’s, i really don’t want to frog my sleeve and start all over again. I try to figure out if i should cast off middle 7 stitches of A.5? Will this disturb the structure of my sleeve too much that it will be visible in your opinion?
18.03.2024 - 00:05DROPS Design answered:
Dear Ruth, if you displaced the decreases then the center of the sleeve could be displaced one stitch. However this was displaced one stitch at most, so it shouldn't be too visible. Now, when you cast off for joining with the body you need to cast off in the center of the sleeve according to the pattern and not with your displaced center. It may look slightly twisted in your case but since that part is hardly visible then it shouldn't affect the rest of the pattern. Happy knitting!
18.03.2024 - 01:03
![]() Ruth wrote:
Ruth wrote:
Hi, i have a question about the decreases of the front piece when working on a shoulder. I knit size M. I counted everything right, i have 29stch on each shoulder and 22stch in the middle.Later pattern says i have to decrease stitches in A2 and A3/A4, but fact of the matter i don’t have A2 anymore because i had to cast off 4 stch in total, which “ate” my A2. Nevertheless just by doing A3/A4 decrease i will be left with 21 stitch, so i wonder is this a mistake in pattern.
12.03.2024 - 23:41DROPS Design answered:
Dear Ruth, in size. M just decrease the 4 sts in A.3/A.4 as there are no A.2 anymore, there are then 21 sts left: 29 sts for shoulder. - 2 sts - 2x1 st for neck - 4 sts in A.3/A.4 = 21. Happy knitting!
13.03.2024 - 08:38
![]() Michael Harish wrote:
Michael Harish wrote:
Hi, I want to knit this pattern on 2 straight needles but having a problem working out how to divide stiches as back and front are different amounts. Seems not to be diveded equally as you have suggested in tutorial for adapting fro circular to straight needles.
08.01.2023 - 10:41DROPS Design answered:
Dear Mrs Harish, you will have to check the pattern on the front piece regarding the dividing on the piece for your size then check the number of sts worked in each pattern/diagram for front and back piece. Happy knitting!
09.01.2023 - 10:01
![]() Frederike wrote:
Frederike wrote:
Dit mooie truitje zou ik graag breien. Nu mag ik dus wol gaan kiezen. Dat vind ik soms zo lastig vanaf een scherm. Kan ik ook voor 2 draden kid silk gaan zodat de draden goed samen kleuren, of mist het dan wel echt wat ‘body’ voor de kabels enz? Of is dat gewoon ook weer net zo persoonlijk als een kleur kiezen? Soms als ik 2 kleuren combineer vanaf mijn scherm, en bestel is het heel mooi en kloppend, en soms echt niet.. vandaar mijn vraag. Vriendelijke groet, frederike
19.07.2022 - 12:28DROPS Design answered:
Dag Frederike,
Je kan zeker voor 2 draden Kid-Silk kiezen. Het breiwerk wordt dan wat lichter omdat Kid-Silk lichter is. We hebben ook patronen voor damestruien met 2 draden Kid-Silk. Om de kabels mooi uit te laten komen is het mooi om lichte kleuren te kiezen die dicht bij elkaar liggen.
19.07.2022 - 19:05
![]() Sara Mereu wrote:
Sara Mereu wrote:
Salve ho un dubbio riguardo le diminuzioni nelle trecce. Si dovrebbero fare 2 diminuzioni in ogni A2, e 4 diminuzioni in ogni A3/A4, quindi: - A2 si lavora 3 volte= 2 diminuzioni x 3 -A3/A4 si lavorano 4 volte = 4 diminuzioni x 4 = 22 diminuzioni totali nelle trecce Nel modello però c'è scritto che le diminuzioni totali nelle trecce sono 10. E' corretto o ho capito male io? Grazie
06.11.2021 - 11:02DROPS Design answered:
Buonasera Sara, le diminuzioni sulle trecce si lavorano sul davanti solo sulle 36 maglie indicate, che contengono 1 diagramma A.4, 1 diagramma A.2 e 1 diagramma A.3, per un totale di 10 diminuzioni. Buon lavoro!
10.11.2021 - 23:21
![]() Claire wrote:
Claire wrote:
Bonjour. Merci pour vos retours qui m’aident à continuer mon tricot. Dans les instructions pour les manches il écrit à la fin « jusqu’à ce que l’ouvrage mesure 52 cm dans toutes les tailles, rabattre ensuite 1 fois 3 mailles » dois-je rabattre que d’un seul côté ou des 2 cotés ? Si d’un seul côté, cela veut il donc dire que je dois rabattre le côté opposé pour l’autre manche ? Merci !
30.04.2021 - 21:38DROPS Design answered:
Bonjour Claire, quand la manche mesure 52 cm, vous rabattez 3 mailles au début des 2 rangs suivants, autrement dit 3 mailles de chaque côté (= sur l'endroit et sur l'envers). Bon tricot!
03.05.2021 - 07:28
![]() Claire wrote:
Claire wrote:
Bonjour - merci de votre premier retour qui m’ont permis de finir le devant / dos. Je m’attaque maintenant aux manches. J’ai du mal à comprendre ce passage « A.5 au-dessus des 13-13-15-15-17-17 premières mailles ». En effet A5 est sur 2 mailles (nombre pair) et la j’ai un nombre impair de mailles (dans mon cas 13). Je fais 6 fois A5 (12 mailles) - comment je tricote la treizième maille ? Merci d’avance !
17.04.2021 - 14:07DROPS Design answered:
Bonjour Claire, tricotez la 13ème maille comme la 1ère de A.5, ainsi le motif est symétrique: il commence et se termine par la 1ère m du motif/diagramme. Bon tricot!
19.04.2021 - 08:00
![]() Claire wrote:
Claire wrote:
Dans les instructions relatifs au devant il n’est pas précisé comment sont fait les diminutions ni ou elles doivent être placés dans chaque A2, A3/A4. Quand il est indiqué diminuer en même temps 4 mailles dan chaque A3/A4, faut il comprendre qu’il faut tricoter 4 mailles en même temps ? Et si oui doit on le faire est-ce au milieu ? Sur les mailles 3,4,5 et 6 de A3/A4 ? Merci d’avance (ça serait dommage de se tromper après tout ce travail !)
12.04.2021 - 21:16DROPS Design answered:
Bonjour Claire, on doit diminuer le nombre de mailles de chaque diagramme pour que les mailles rabattues ne soient pas plus larges que les torsades: A.2=4 m, on doit diminuer 2 m= on tricote 2x 2m ens à l'end (=il reste 2 m). A.3 et A.4 =8 m; on doit diminuer 4m= on tricote 4x 2 m ens à l'end (= il reste 4m). Bon tricot!
13.04.2021 - 07:29
![]() Laila wrote:
Laila wrote:
Erilainen palmikko - kiva
19.01.2021 - 23:36
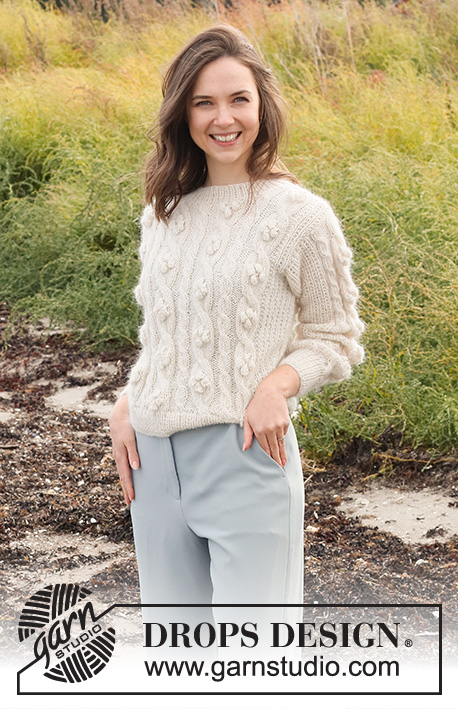
Buttercream Swirls Sweater#buttercreamswirlssweater |
||||||||||||||||
 |
 |
|||||||||||||||
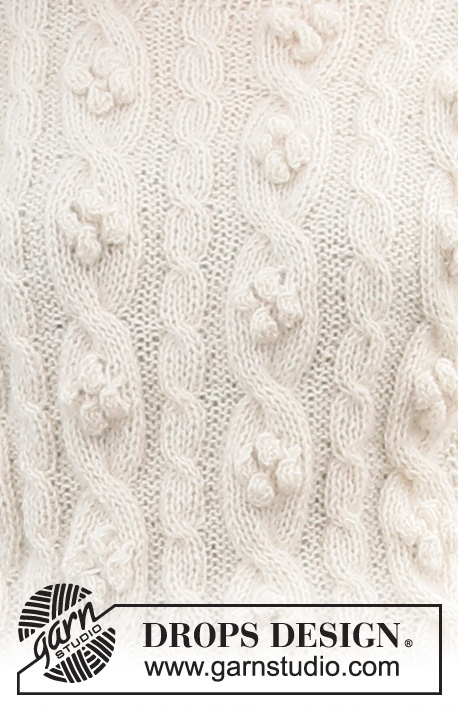
Knitted jumper with DROPS Alpaca and DROPS Kid-Silk. The piece is worked with cables and bobbles. Sizes S - XXXL.
DROPS 221-16 |
||||||||||||||||
|
------------------------------------------------------- EXPLANATIONS FOR THE PATTERN: ------------------------------------------------------- PATTERN: See diagrams A.1 to A.5. The diagrams show all rows in the pattern seen from the right side. INCREASE TIP-1 (evenly spaced): To work out how to increase evenly, count the total number of stitches on the needle (e.g. 166 stitches) and divide by the number of increases to be made (e.g. 21) = 7.9. In this example, increase by making 1 yarn over after alternately each 7th and 8th stitch (approx.). On the next round work the yarn overs twisted to avoid holes. INCREASE TIP-2 (for sleeves): Start 1 stitch before the marker-stitch, make 1 yarn over, knit the marker-stitch and make 1 yarn over. On the next round work the yarn overs twisted to avoid holes. Then work the new stitches into A.5. ------------------------------------------------------- START THE PIECE HERE: ------------------------------------------------------- JUMPER – SHORT OVERVIEW OF THE PIECE: The piece is worked in the round with circular needle as far as the armholes, then divided and the front and back pieces finished separately back and forth on the needle. The sleeves are worked in the round with double pointed needles/short circular needle. The jumper is worked with 1 strand Alpaca and 1 strand Kid-Silk (= 2 strands). BODY: Cast on 166-182-190-208-230-254 stitches with short circular needle size 4 mm and 1 strand Alpaca and 1 strand Kid-Silk. Knit 1 round, then work rib (knit 1, purl 1) for 6 cm. Change to circular needle size 5 mm and knit 1 round where you increase 21-21-21-25-25-25 stitches evenly spaced – read INCREASE TIP-1 = 187-203-211-233-255-279 stitches. Continue as follows: Sizes S-M-L: Work A.1 over the first 16-20-22 stitches, purl 2, A.3 (= 8 stitches), purl 4, A.2 (4 stitches), purl 4, A.4 (= 8 stitches), purl 4, A.2, purl 4, A.3, purl 4, A.2, purl 4, A.4, purl 2, A.5 over the last 99-111-117 stitches. Sizes XL-XXL-XXXL: Work A.1 over the first 20-26-32 stitches, purl 2, A.2 (= 4 stitches), purl 4, A.3 (= 8 stitches), purl 4, A.2, purl 4, A.4 (= 8 stitches), purl 4, A.2, purl 4, A.3, purl 4, A.2, purl 4, A.4, purl 4, A.2, purl 2, A.5 over the last 125-141-159 stitches. Continue this pattern. REMEMBER THE KNITTING TENSION! When the piece measures 32-33-34-35-36-37 cm cast off for the armholes – adjust so this is an odd round in A.2/A.3/A.4 (important to avoid cabling from the wrong side when the front and back pieces are continued back and forth): Cast off the first 3 stitches on the round, work pattern as before over the next 98-106-110-122-134-146 stitches ( = front piece), cast off the next 6 stitches for the armhole, work the next 77-85-89-99-109-121 stitches (= back piece) and cast off the last 3 stitches. Each part is finished separately, back and forth. Place the first 77-85-89-99-109-121 stitches on a thread and continue working the last 98-106-110-122-134-146 stitches on the front piece. FRONT PIECE: = 98-106-110-122-134-146 stitches. Continue the pattern and cast off for the armholes at the beginning of each row on both sides as follows: 2 stitches 1-2-2-3-4-5 times and 1 stitch 2-2-3-4-5-7 times = 90-94-96-102-108-112 stitches. When the piece measures 49-51-53-55-57-59 cm, work the next row as follows – from the right side: Work as before over the first 27-25-25-27-29-30 stitches, work the next 36-44-46-48-50-52 stitches, AT THE SAME TIME as you decrease 2 stitches in each A.2 and 4 stitches in each A.3/A.4, work the last 27-25-25-27-29-30 stitches (a total of 10-14-14-14-14-14 stitches decreased over the cables). On the next row place the middle 18-22-24-26-28-30 stitches on a thread = 31-29-29-31-33-34 stitches on each shoulder; the shoulders are finished separately. Continue the pattern, AT THE SAME TIME cast off for the neck on every 2nd row as follows: 2 stitches 1 time and 1 stitch 2 times = 27-25-25-27-29-30 stitches. Continue working until the piece measures 51-53-55-57-59-61 cm, decrease 2 stitches in A.2 and 4 stitches in A.3/A.4 = 21-21-21-21-23-24 stitches left on the shoulder. Cast off the when the piece measures 52-54-56-58-60-62 cm. Work the other shoulder in the same way. BACK PIECE: = 77-85-89-99-109-121 stitches. Continue the pattern and cast off for the armholes at the beginning of the row on both sides as follows: 2 stitches 1-2-2-3-4-5 times and 1 stitch 2-2-3-4-5-7 times = 69-73-75-79-83-87 stitches. When the piece measures 50-52-54-56-58-60 cm cast off the middle 25-29-31-35-35-37 stitches for the neck and each shoulder is finished separately. On the next row cast off 1 stitch from the neck = 21-21-21-21-23-24 stitches. Cast off the when the piece measures 52-54-56-58-60-62 cm. Work the other shoulder in the same way. SLEEVE: The sleeve is worked bottom up, with double pointed needles/short circular needle. The piece is then divided for the sleeve cap and finished back and forth. Cast on 40-42-44-46-48-50 stitches with double pointed needles size 4 mm and 1 strand Alpaca and 1 strand Kid-Silk (= 2 strands). Knit 1 round then work rib (knit 1, purl 1) for 8 cm. Change to double pointed needles size 5 mm and knit 1 round where you increase 13 stitches evenly spaced = 53-55-57-59-61-63 stitches. Then continue as follows: A.5 over the first 13-13-15-15-17-17 stitches, purl 2, A.2 (= 4 stitches), purl 4, A.4 (= 8 stitches), purl 4, A.2 (= 4 stitches), purl 2, A.5 over the last 12-14-14-16-16-18 stitches. Insert 1 marker thread in the first stitch on the round (mid under sleeve). Continue the pattern, AT THE SAME TIME when the piece measures 10 cm, increase 1 stitch on each side of the marker-stitch – read INCREASE TIP-2. Increase like this every 3½-3-3-2½-2-1½ cm a total of 10-11-12-13-15-16 times = 73-77-81-85-91-95 stitches. When the piece measures 45-44-44-43-42-40 cm, cast off 3 stitches each side of the stitch with the marker thread and the stitch with marker thread (= 7 stitches cast off under sleeve) and finish the sleeve back and forth. Cast off for the sleeve cap at the beginning of each row on both sides as follows: 2 stitches 3 times, 1 stitch 1-2-2-3-4-6 times. Then cast off 2 stitches on each side until the piece measures 52 cm in all sizes, cast off 3 stitches 1 time, AT THE SAME TIME as you are casting off the last time, decrease 4 stitches in A.4 and 2 stitches in each A.2. On next row cast off the remaining stitches. The sleeve measures approx. 53 cm in all sizes. Work the other sleeve in the same way. ASSEMBLY: Sew the shoulder seams and sew in the sleeves. NECK: Start at one of the shoulder seams and, using short circular needle size 4 mm, knit up 80 to 90 stitches around the neck (including the stitches from the thread); the number of stitches must be divisible by 2. Work rib (knit 1, purl 1) for 4 cm. Cast off with knit over knit and purl over purl. |
||||||||||||||||
Diagram explanations |
||||||||||||||||
|
||||||||||||||||
 |
||||||||||||||||
 |
||||||||||||||||
Have you finished this pattern?Tag your pictures with #dropspattern #buttercreamswirlssweater or submit them to the #dropsfan gallery. Do you need help with this pattern?You'll find 26 tutorial videos, a Comments/Questions area and more by visiting the pattern on garnstudio.com. © 1982-2026 DROPS Design A/S. We reserve all rights. This document, including all its sub-sections, has copyrights. Read more about what you can do with our patterns at the bottom of each pattern on our site. |
||||||||||||||||


Post a comment to pattern DROPS 221-16
We would love to hear what you have to say about this pattern!
If you want to leave a question, please make sure you select the correct category in the form below, to speed up the answering process. Required fields are marked *.